Essential Git Commands and Workflow
Quick Review: GitHub vs Git
Remember from our previous lesson:
- Git = The tool that tracks changes (like a smart notebook)
- GitHub = The online service that stores your Git projects (like a cloud storage)
New Analogy for Today: Think of your computer as your home office and GitHub as your shared office building:
- You work on documents at home (local Git)
- You save backup copies to the shared office (push to GitHub)
- You get updates from colleagues' work (pull from GitHub)
Setting Up Git on Your Computer
Installing Git
For Windows:
- Download Git from https://git-scm.com
- Run the installer with default settings
- Open "Git Bash" or "Command Prompt"
For Mac:
- Open Terminal
- Type:
git --version - If not installed, it will prompt you to install
For Linux:
sudo apt install git  # Ubuntu/Debian
sudo yum install git   # CentOS/RHEL
First-Time Setup (Required!)
Before using Git, you must tell it who you are:
git config --global user.name "Your Full Name"
git config --global user.email "your.email@example.com"
Real Example:
git config --global user.name "Sarah Johnson"
git config --global user.email "sarah.johnson@university.edu"
Why is this important? Every change you make will be tagged with this information. It's like signing your name on every page of your notebook.
Live Demo: Setting Up Git
- Instructor demonstrates installation verification
- Students set up their Git identity
- Verify setup with:
git config --list
Essential Git Commands
Understanding the Git Workspace
Before learning commands, imagine your project has three areas:
Daily Life Analogy - Organizing Your Desk:
- Working Directory = Your messy desk where you're actively working
- Staging Area = A clean tray where you organize things before filing
- Repository = Your organized file cabinet with a complete history
Your Messy Desk  →  Clean Tray  →  File Cabinet
(Working Dir)       (Staging)      (Repository)
git init - Starting a New Project
What it does: Creates a new Git project in your current folder Analogy: Like getting a new notebook and writing your name on the cover
Basic Usage:
git init
Step-by-Step Example:
# Create a new folder for your project
mkdir my-recipe-collection
cd my-recipe-collection

# Initialize Git in this folder
git init
What happens: Git creates a hidden .git folder that stores all the tracking information.
Real-World Scenario:
You decide to organize all your favorite recipes digitally. You create a folder called "my-recipe-collection" and use git init to start tracking changes to your recipes.
2. git add - Preparing Changes
What it does: Moves files from your working directory to the staging area Analogy: Like organizing papers on your clean tray before filing them
Basic Usage:
git add filename.txt        # Add one specific file
git add .                   # Add all changed files
git add *.txt              # Add all text files
Step-by-Step Example:
# Create a new recipe file
echo "Chocolate Chip Cookies" > cookies.txt
echo "Ingredients: flour, sugar, eggs" >> cookies.txt

# Check what files are ready to be tracked
git status

# Add the file to staging area
git add cookies.txt

# Check status again
git status
Understanding git status:
- Red text = Changes not staged (still on your messy desk)
- Green text = Changes staged and ready to commit (organized on your tray)
Live Demo: Creating and Adding Files
- Create a simple text file with students
- Demonstrate
git statusbefore and aftergit add - Show the difference between adding specific files vs. adding all files
3. git commit - Saving a Snapshot
What it does: Permanently saves your staged changes with a message Analogy: Like filing your organized papers with a sticky note explaining what's inside
Basic Usage:
git commit -m "Your descriptive message here"
Step-by-Step Example:
# Commit the staged changes
git commit -m "Add chocolate chip cookie recipe"

# Check the history
git log --oneline
Good Commit Message Examples:
- ✅
"Add chocolate chip cookie recipe" - ✅
"Fix baking temperature in brownie recipe" - ✅
"Update ingredients list for pasta recipe"
Poor Commit Message Examples:
- ❌
"updated stuff" - ❌
"fixed it" - ❌
"changes"
The Complete Add-Commit Workflow:
# Make changes to files
echo "Preheat oven to 350°F" >> cookies.txt

# Check what changed
git status

# Add changes to staging
git add cookies.txt

# Commit with message
git commit -m "Add baking temperature to cookie recipe"
git log - Viewing History
What it does: Shows the history of all commits Analogy: Like flipping through your filed papers to see what you've done
Basic Usage:
git log                    # Full detailed history
git log --oneline         # Simplified one-line format
git log --graph           # Shows branching visually
Example Output:
commit a1b2c3d (HEAD -> main)
Author: Sarah Johnson <sarah@university.edu>
Date: Mon Jun 14 10:30:00 2025

    Add baking temperature to cookie recipe

commit e4f5g6h
Author: Sarah Johnson <sarah@university.edu>
Date: Mon Jun 14 10:15:00 2025

    Add chocolate chip cookie recipe
git branch - Working with Branches
What it does: Creates and manages different versions of your project Analogy: Like writing multiple drafts of the same essay - you keep your original safe while experimenting with different versions
Why Use Branches? Real Scenarios:
- Trying new ideas without breaking what works
- Working on different features of the same project
- Experimenting with changes you might not keep
Basic Usage:
git branch                      # List all branches
git branch new-branch-name      # Create new branch
git branch -d branch-name       # Delete branch
Step-by-Step Example - Recipe Book Project:
# You have a working recipe book in main branch
# Now you want to experiment with a new format

# See current branches
git branch

# Create a branch to try a new recipe format
git branch experiment-new-format

# See all branches now
git branch
Understanding Branches:
- main = Your stable, working recipe book
- experiment-new-format = A copy where you try new ideas
- If the experiment works → merge it back to main
- If it doesn't work → delete the branch, main is still safe
6. git checkout - Switching Between Branches
What it does: Switches you to a different branch Analogy: Like switching between your "main draft" and your "experimental draft" of the same document
Basic Usage:
git checkout branch-name        # Switch to existing branch
git checkout -b new-branch     # Create and switch to new branch
Step-by-Step Example - Continuing Recipe Book:
# Switch to your experimental branch
git checkout experiment-new-format

# Verify you're on the right branch
git branch

# Make changes to try the new format
echo "=== NEW FORMAT RECIPE ===" > chocolate-cake.txt
echo "DIFFICULTY: Easy" >> chocolate-cake.txt
echo "TIME: 45 minutes" >> chocolate-cake.txt
echo "INGREDIENTS:" >> chocolate-cake.txt

# Add and commit the experimental changes
git add chocolate-cake.txt
git commit -m "Try new recipe format with difficulty and time"

# Switch back to main to see the difference
git checkout main
# Notice: chocolate-cake.txt is not here! It's safely in the experimental branch

# Create and switch to a new branch in one command
git checkout -b add-nutrition-info
What Happens When You Switch:
- Your files change to match the branch version
- You can safely experiment without affecting your main version
- Each branch keeps its own history of changes
Example of Branching Scenarios:
Scenario 1: Trying a New Resume Format
mainbranch = Your current working resumemodern-designbranch = Experimenting with a new visual style- If you like it → merge to main
- If you don't → delete branch, keep original
Scenario 2: Adding New Features to a Report
mainbranch = Your complete reportadd-graphsbranch = Adding charts and visualizationsimprove-conclusionbranch = Rewriting the ending- Work on each separately, then merge the ones that work
Live Demo : Branching Workflow
Example: Creating a School Project
Practice:
- Create a "school-project" repository
- Make branches for different sections:
introduction,research-methods,conclusions - Work on each section independently
School Project Git Workflow
Create a New Repository
git init school-project
cd school-project
Create a Main Branch and Make Initial Commit
echo "# School Project" > README.md
git add README.md
git commit -m "Initial commit with README"
git branch -M main
Create Branches for Each Section
introduction Branch
git checkout -b introduction
echo "This is the introduction section." > introduction.md
git add introduction.md
git commit -m "Add introduction section"
git checkout main
research-methods Branch
git checkout -b research-methods
echo "This is the research methods section." > research-methods.md
git add research-methods.md
git commit -m "Add research methods section"
git checkout main
conclusions Branch
git checkout -b conclusions
echo "This is the conclusions section." > conclusions.md
git add conclusions.md
git commit -m "Add conclusions section"
git checkout main
git merge - Combining Branches
What it does: Combines changes from one branch into another Analogy: Like taking the best parts from your experimental draft and adding them to your final document
Basic Usage:
# Switch to the branch you want to merge INTO
git checkout main

# Merge another branch into current branch
git merge branch-name
Step-by-Step Example - Recipe Book Continued:
# Let's say you're happy with your new recipe format experiment
# First, switch to main branch
git checkout main

# Merge the experimental format into main
git merge experiment-new-format

# Check that the new format recipe is now in main
ls
cat chocolate-cake.txt
Another Realistic Example - Study Guide Project:
# You're working on a study guide and want to add practice questions
git checkout -b add-practice-questions

# Add some practice questions
echo "Practice Question 1: What is Git?" > practice-questions.txt
echo "Practice Question 2: How do branches work?" >> practice-questions.txt
git add practice-questions.txt
git commit -m "Add practice questions to study guide"

# You're happy with the questions, so merge them to main
git checkout main
git merge add-practice-questions

# Clean up - delete the branch since it's now merged
git branch -d add-practice-questions
Types of Merges:
- Fast-forward merge = Your branch just adds new stuff (like adding a new chapter to a book)
- Three-way merge = Both branches have different changes (like combining two people's edits to the same essay)
When to Use Branches?
- Want to try something new but keep original safe? → Create branch
- Experimenting with different approaches? → Create branch
- Working on a specific feature or section? → Create branch
- Happy with your changes? → Merge to main
- Don't like your changes? → Delete branch, main is unchanged
8. git remote - Connecting to GitHub
What it does: Links your local Git project to a GitHub repository Analogy: Like getting the address of your shared office building
Basic Usage:
git remote add origin https://github.com/username/repository-name.git
git remote -v                  # View remote connections
Step-by-Step Example:
# Add GitHub repository as remote
git remote add origin https://github.com/sarah-johnson/my-recipe-collection.git

# Verify the connection
git remote -v
Understanding "origin":
- origin = The default name for your main remote repository
- Like having a nickname for your shared office building
- You can have multiple remotes, but origin is the primary one
git push - Uploading to GitHub
What it does: Sends your local commits to GitHub Analogy: Like taking your notebook to the shared office and making copies for everyone
Basic Usage:
git push origin main           # Push main branch to GitHub
git push origin branch-name    # Push specific branch
git push -u origin main        # Push and set upstream (first time)
Step-by-Step Example:
# First time push (sets up tracking)
git push -u origin main

# Future pushes (after making new commits)
git push
What Happens:
- Your commits are copied to GitHub
- Others can see your work
- Your local and GitHub versions are synchronized
git pull - Downloading from GitHub
What it does: Gets the latest changes from GitHub Analogy: Like getting the latest updates from your colleagues' work in the shared office
Basic Usage:
git pull origin main           # Pull from specific branch
git pull                       # Pull from tracked branch
Step-by-Step Example:
# Get latest changes from GitHub
git pull origin main

# Check what changed
git log --oneline
When to Use Pull:
- Before starting work each day
- When you know others have made changes
- Before pushing your own changes
Live Demo: GitHub Integration
- Connect local repository to GitHub
- Demonstrate push and pull
- Show how changes appear on GitHub
- Students practice the complete workflow (lab for the day)
Git Workflow in Practice
The Standard Daily Workflow
Morning Routine (Getting Ready to Work):
# 1. Get latest changes
git pull

# 2. Create a new branch for today's work
git checkout -b add-breakfast-recipes

# 3. Start working on your files
During Work (Making Changes):
# 4. Make changes to files
echo "Easy Pancake Recipe" > pancakes.txt
echo "Ingredients: 2 eggs, 1 cup flour, 1 cup milk" >> pancakes.txt

# 5. Check what you've changed
git status

# 6. Add changes to staging
git add pancakes.txt

# 7. Commit with clear message
git commit -m "Add basic pancake recipe with ingredients"
End of Day (Sharing Your Work):
# 8. Switch back to main branch
git checkout main

# 9. Merge your work (if you're happy with it)
git merge add-breakfast-recipes

# 10. Push to GitHub
git push

# 11. Clean up (delete the feature branch)
git branch -d add-breakfast-recipes
Alternative End of Day (If You're Not Ready to Merge):
# 8. Just push your branch to GitHub for backup
git push origin add-breakfast-recipes

# 9. Continue working on it tomorrow
# The main branch stays clean and stable
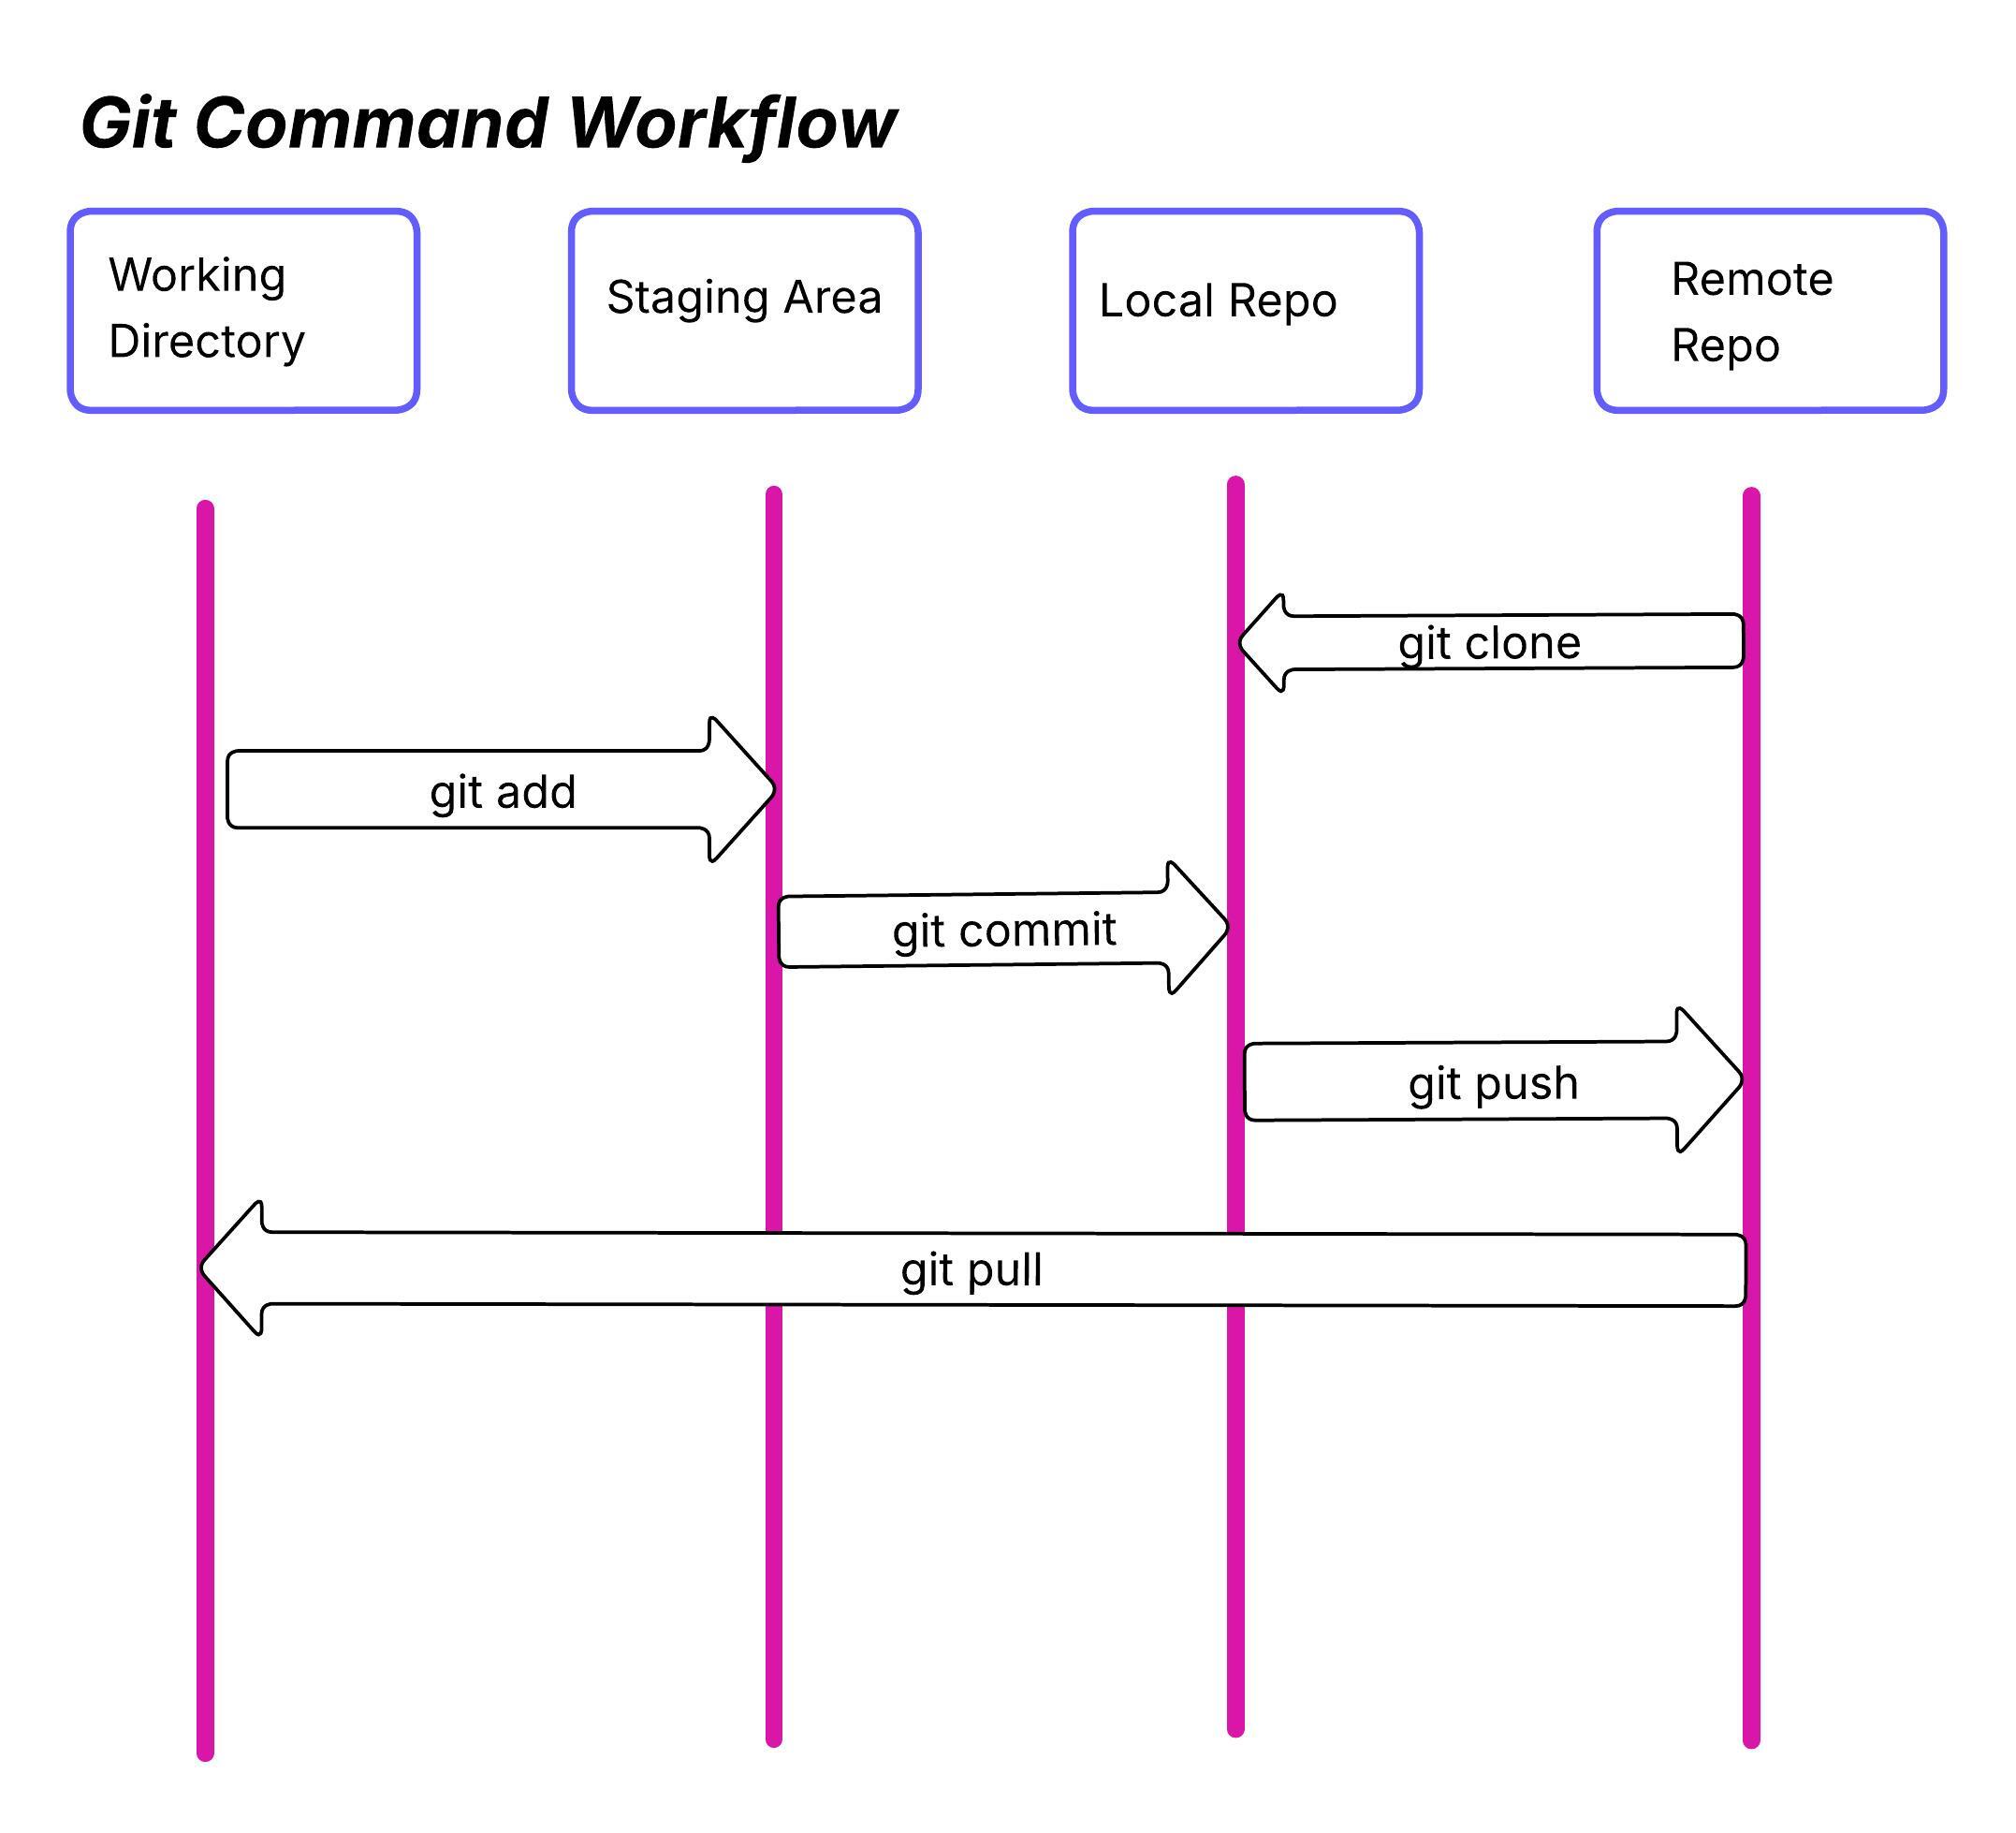
Visual Workflow Diagram
Step 1: git pull
    GitHub → Local Computer

Step 2-7: Local Work
    Working Directory → Staging → Repository

Step 8-10: Share Work
    Local Repository → GitHub
Connecting Local Git to GitHub
Method 1: Start Local, Connect to GitHub
Scenario: You already have a local project and want to put it on GitHub
# 1. Create repository on GitHub (without README)
# 2. In your local project folder:
git remote add origin https://github.com/username/repository-name.git
git push -u origin main
Method 2: Start on GitHub, Clone Locally
Scenario: You created a repository on GitHub and want to work locally
# 1. Clone the repository
git clone https://github.com/username/repository-name.git

# 2. Enter the folder
cd repository-name

# 3. Start working
Live Demo: Two-Way Sync
- Show both methods of connecting
- Demonstrate how changes sync in both directions
- Students choose one method to practice
Remember: Git might seem complex at first, but with practice, these commands will become second nature. Think of learning Git like learning to drive - it feels overwhelming initially, but soon you'll do it without thinking!