Azure Lab 4: Setting Up a Multi-VM Application Server Environment
Lab Preparation
Purpose / Objectives of Lab 4
In this lab, you will set up a basic Apache web server (including some light HTML coding) and supporting iptables firewall rules. You will also set up an IIS-based web server on your Windows Server VM, and learn how to set up port forwarding through your Linux Server VM to allow access to the IIS web server on the Internet.
If you encounter technical issues, please contact your professor via e-mail or in your section's Microsoft Teams group.
Minimum Requirements
Before beginning, you must have:
- Successfully completed Lab 3.
- Attended the Week 5 lectures.
- Read through the Week 5 slides, and have them handy as a reference for concepts.
- Your Azure-based Linux VM.
Investigation 1: Setting Up A Web Server on Ubuntu Linux
In this investigation, you'll install the Apache web server package from a Linux repository and set up the service.
Part 1: Setting Up and Managing the Apache Service
From within your Linux server, install the
apache2package. (Remember your package management tools. Refer back to Lab 2 if needed.)Now that the package is installed, the web server should have automatically started. Using systemd commands, confirm the
apache2service has started without any errors.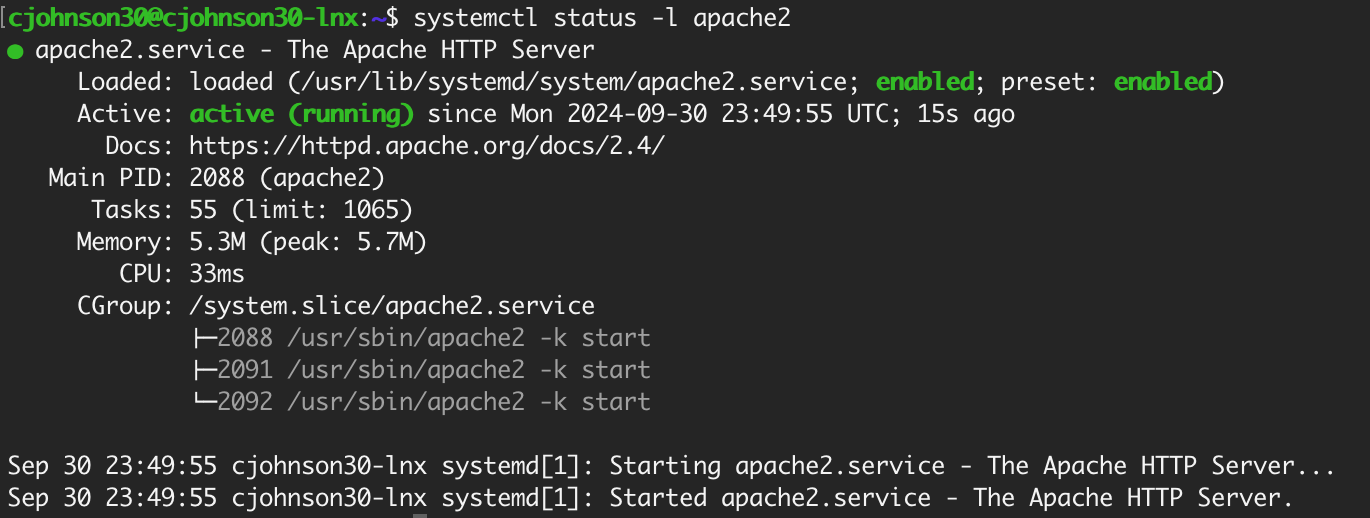
Finally, check the web server is serving web pages by loading a page locally on Ubuntu (inside your VM):
curl localhostIf you get a bunch of HTML code, you've succeeded! (Curl doesn't render HTML code, so you see it as plain text. This is how we check the web server works without dealing with networking.)
Remember from our lecture: there's a difference between start and enable. Ensure the web server starts up with the system every time.
Copy and paste the FQDN address for your Linux VM in a browser on your local computer. It doesn't load, does it? We're not done. Move to Part 2 to deal with the firewall and allow web traffic through.
Part 2: Allowing Web Traffic
In this section, you will follow security best practices to allow web server traffic into your VM. We'll open a firewall exception to allow requests to our web server through, so we can access our new web server from the Internet.
Before making changes, it's a good idea to review our current rules:
iptables -L -vn --line-numbersAdd your rule exception. Web traffic is typically served on TCP port 80, and that's what we'll use:
iptables -A INPUT -p tcp --dport 80 -j ACCEPTConfirm your new rule has been applied:
iptables -L -vn --line-numbers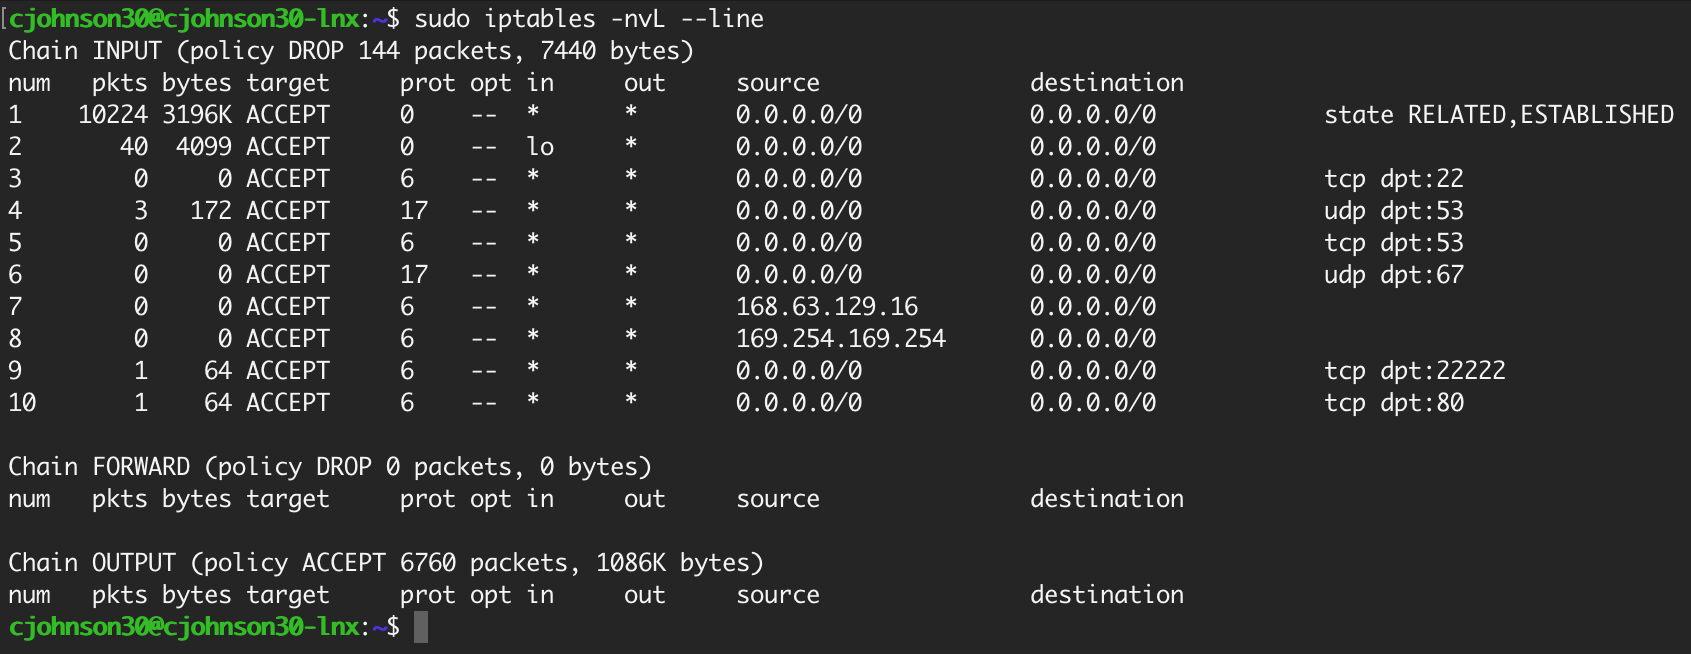
Go back to your local browser, and reload the page. Does it work now?
If it does, congratulations! You're almost done.
Back in you SSH session, save your new rules! Remember, changes you make will be erased when you shut down unless you save them.
Part 3: Editing Your Apache Website
Finally, let's modify the main page. Currently, it's displaying the default Apache splash page. Let's change that.
Navigate to:
/var/www/htmlList all files in this directory. There should be one:
index.htmlElevate to root and go back into this location:
/var/www/html/Rename the current
index.htmlto keep it as a backup:mv index.html apache_default.backupNow, create a new index.html by opening a new vim session to it:
vim index.htmlThis file should be empty. If not, revisit Step 4.
Using HTML, give it a title of: OPS705 Linux Server - Winter 2025.
Using HTML, add to the body: Name: yourname
Using HTML, add to the body as a new line: Student Username: yourstudentusername
Here's how that basic HTML code looks like:
<html>
  <head>
    <title>
      OPS705 Linux Server - Winter 2025
    </title>
  </head>
  <body>
    <b>OPS705 Linux Server - Winter 2025/b>
    <p>Name: <b>insertyourfullname</b></p>
    <br>Username: <b>yourstudentusername</b></br>
  </body>
</html>
Save and quit the vim session.
In your local browser, refresh the page. If your changes show up, you're done! (You may need to refresh a few times to force your browswer to overwrite local cache and see your changes.)
Investigation 2: Setting Up A Web Server on Windows Server 2025
Setting up an Internet Information Services web server on an Azure VM is incredibly easy, especially in contrast to the Apache setup.
Part 1: Installing and Verifying the IIS Web Server
- Spin up your Windows Server VM, and wait until it's fully started up.
- Connect to this VM remotely using remote desktop software as you've done in the past.
- Find the Server Manager program. It loads automatically at start, but you can re-open it if you've closed it from the Start Menu.
- At the top right of Server Manager, click on the Manage menu item, then click Add Roles and Features.
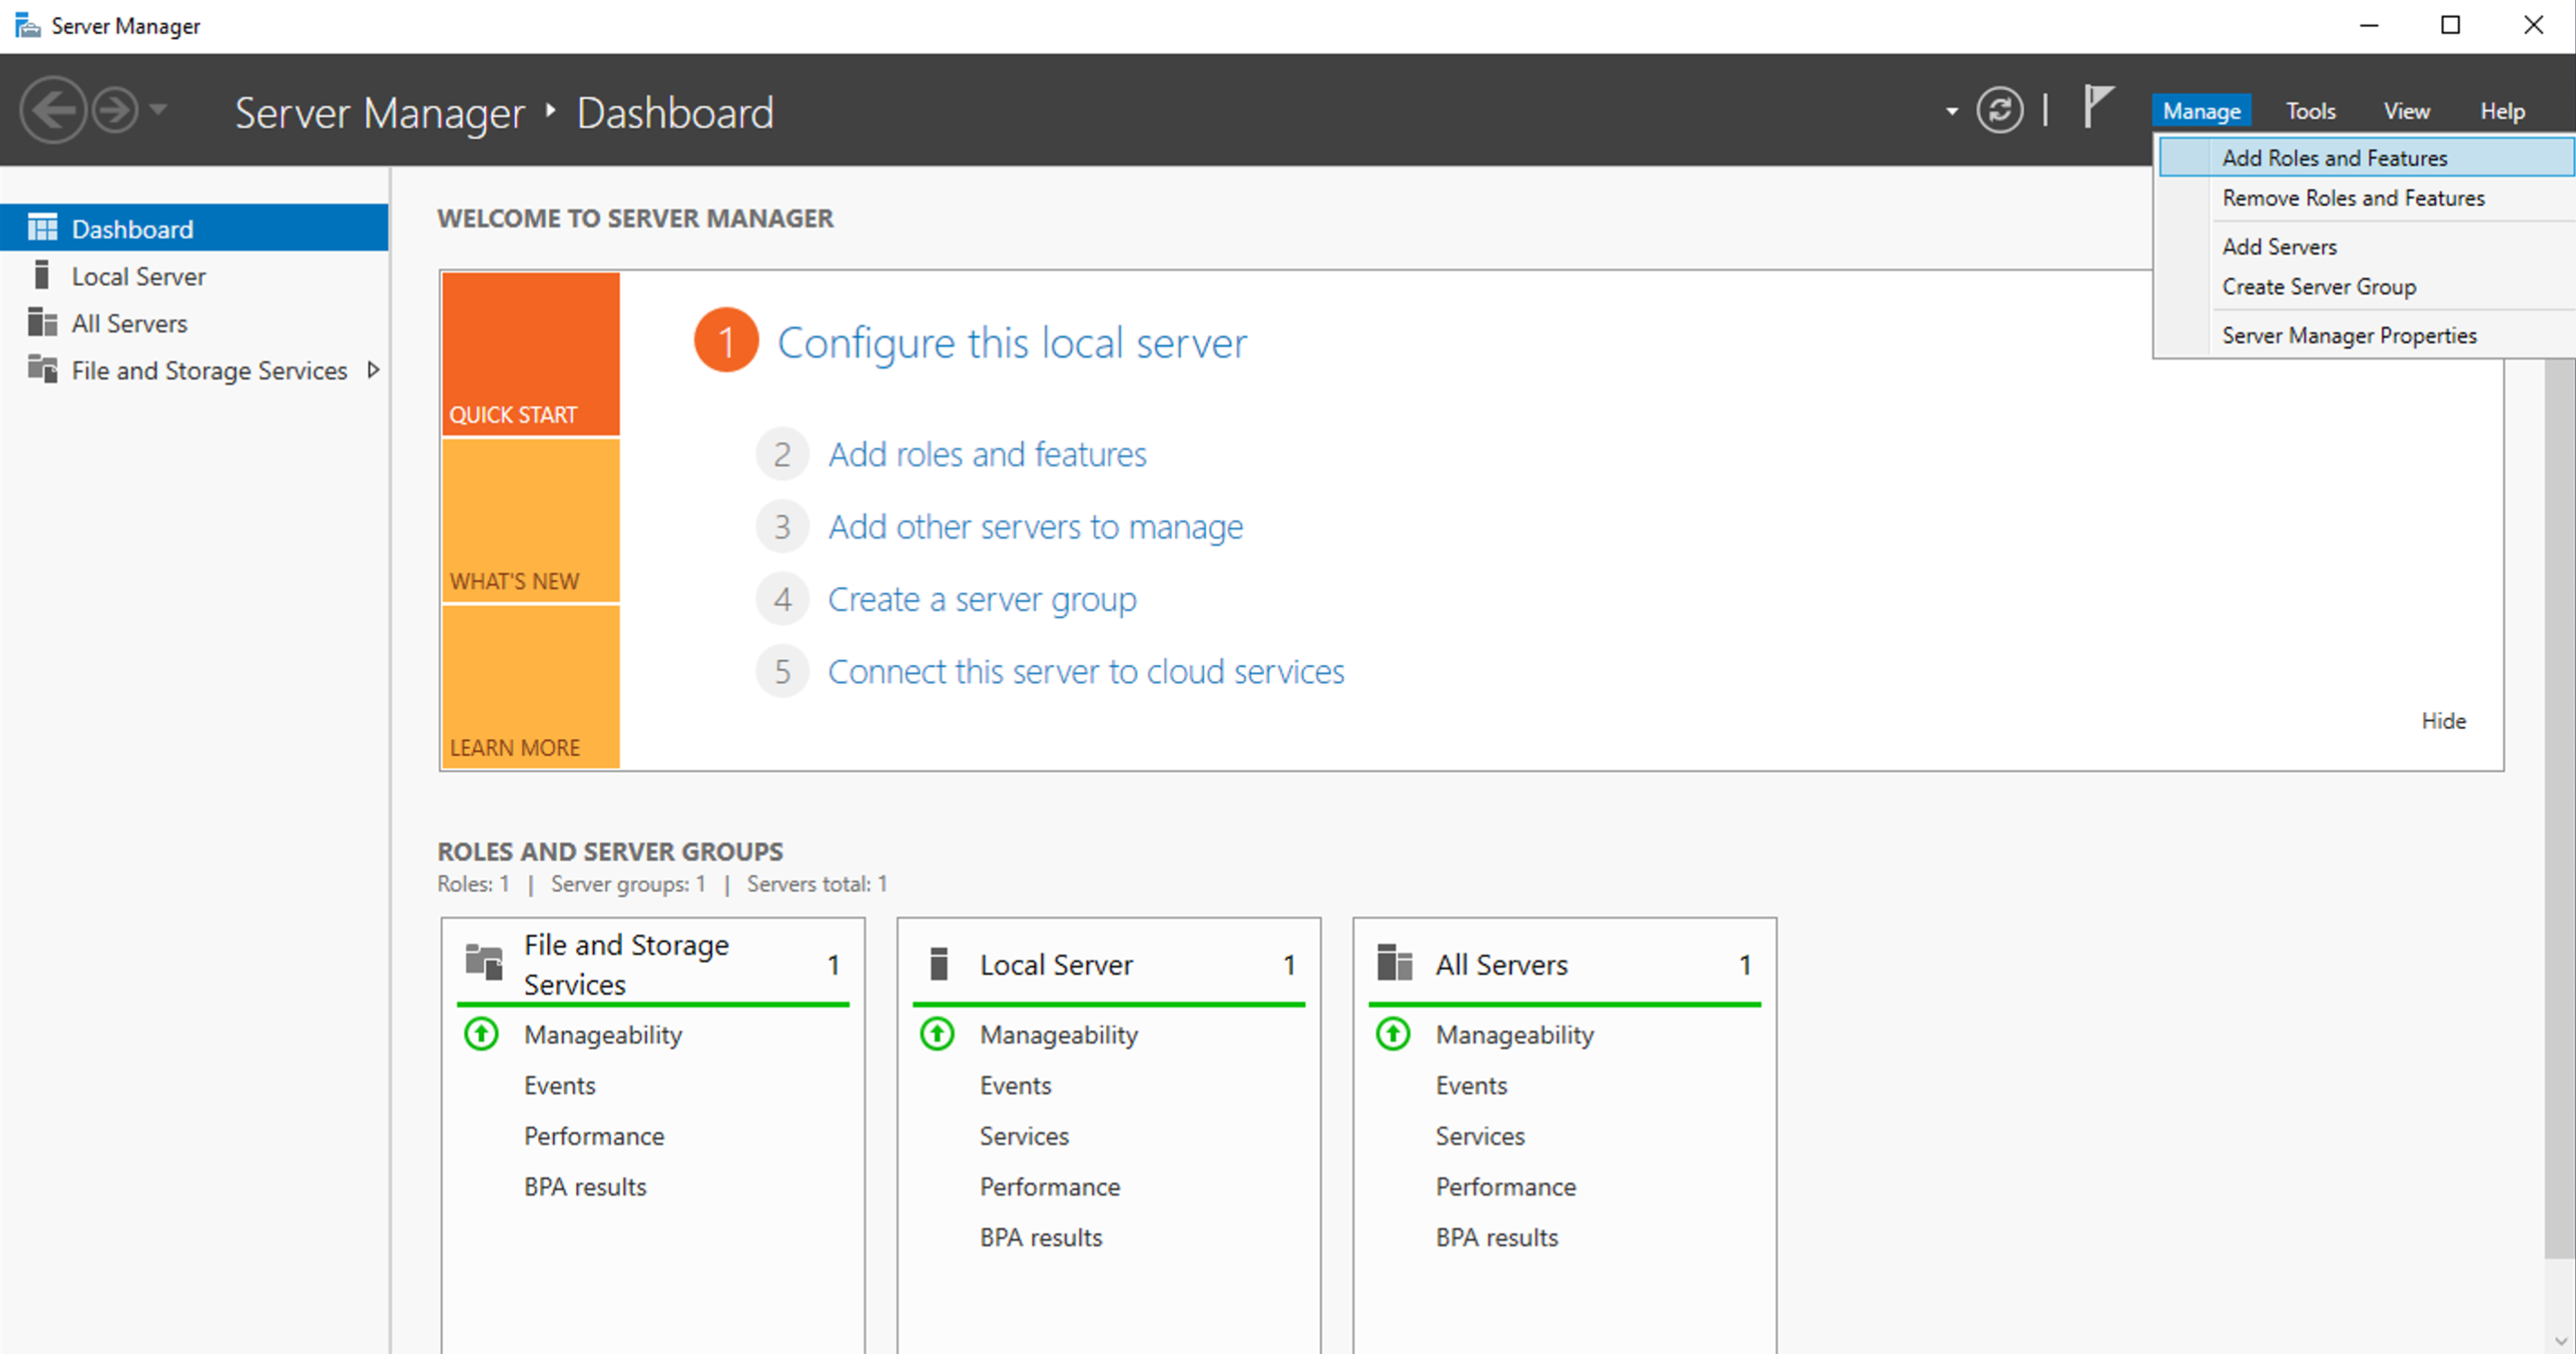
- The Add Roles and Features Wizard pops up.
- Click Next to move past the first page. You should now be in the Installation Type page.
- On Installation Type, stick with the default and just click Next.
- On Server Selection, stick with the default and click Next.
- On Server Roles, find the Web Server (IIS) option, check the box to select it.
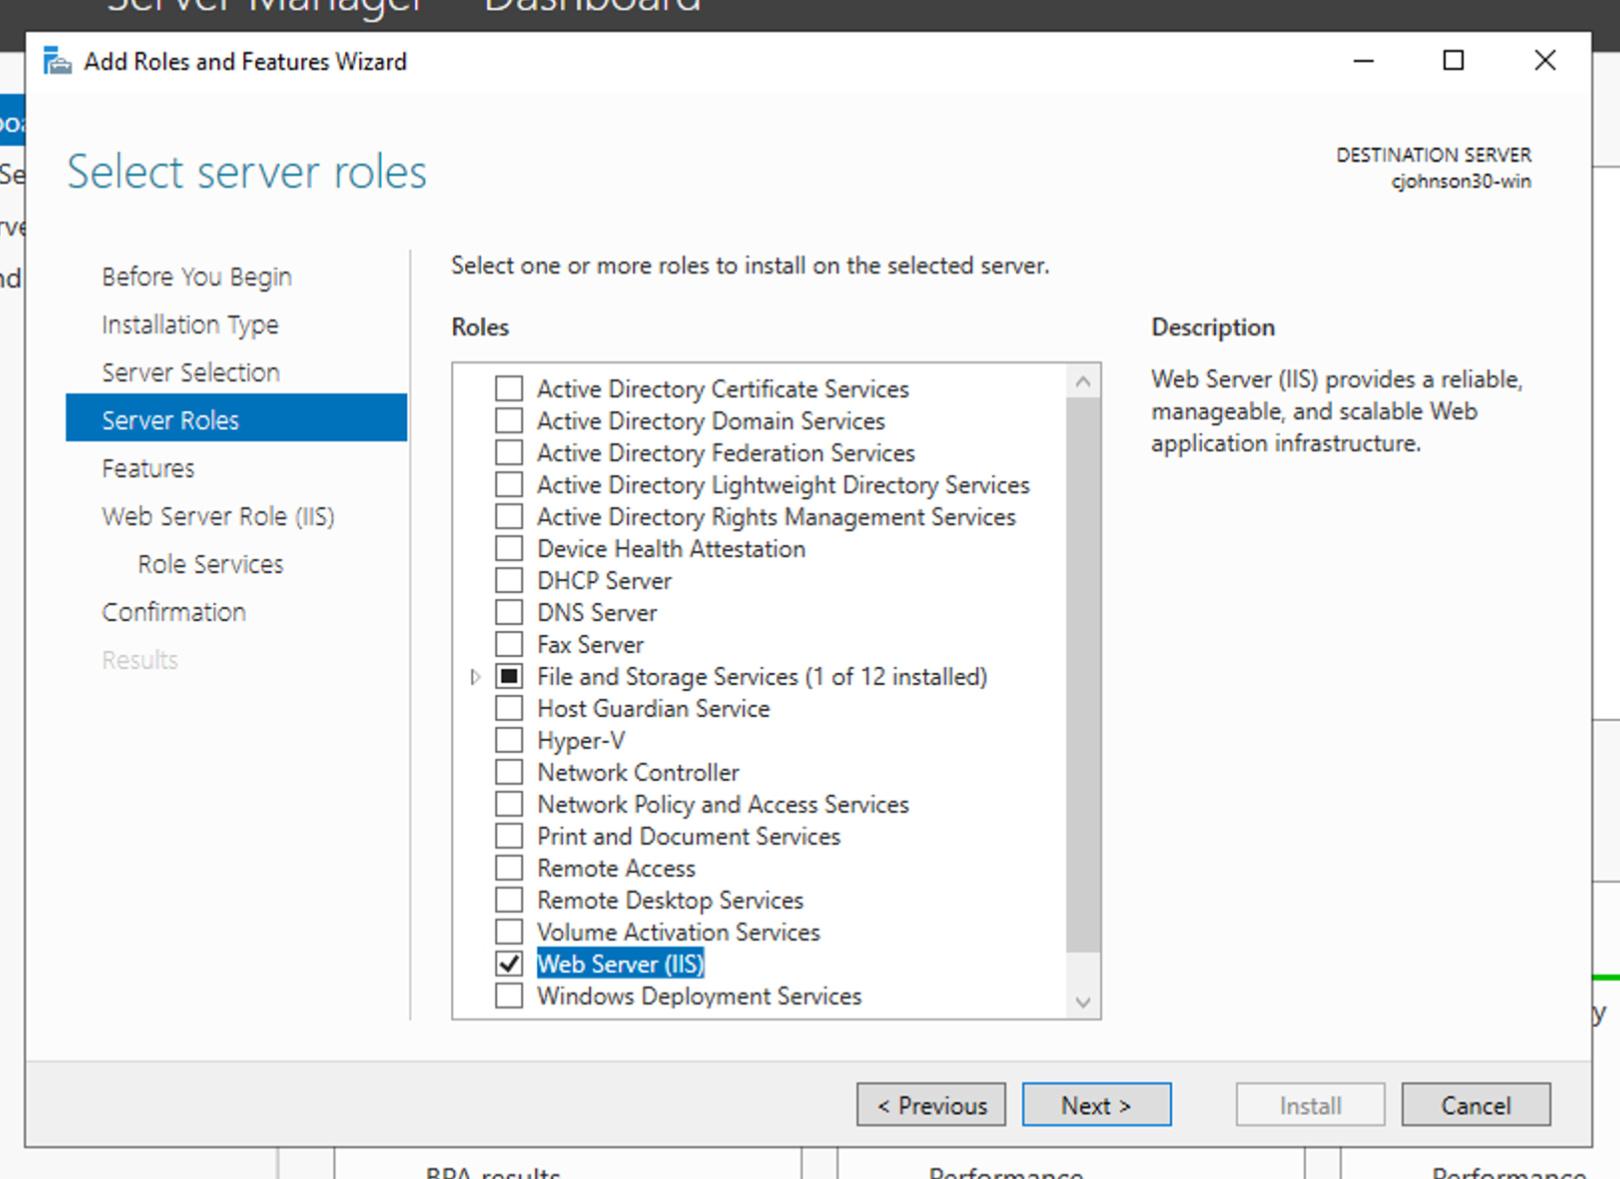
- A dialog box pops up, asking if you'd like to add required features. Click Add Features.
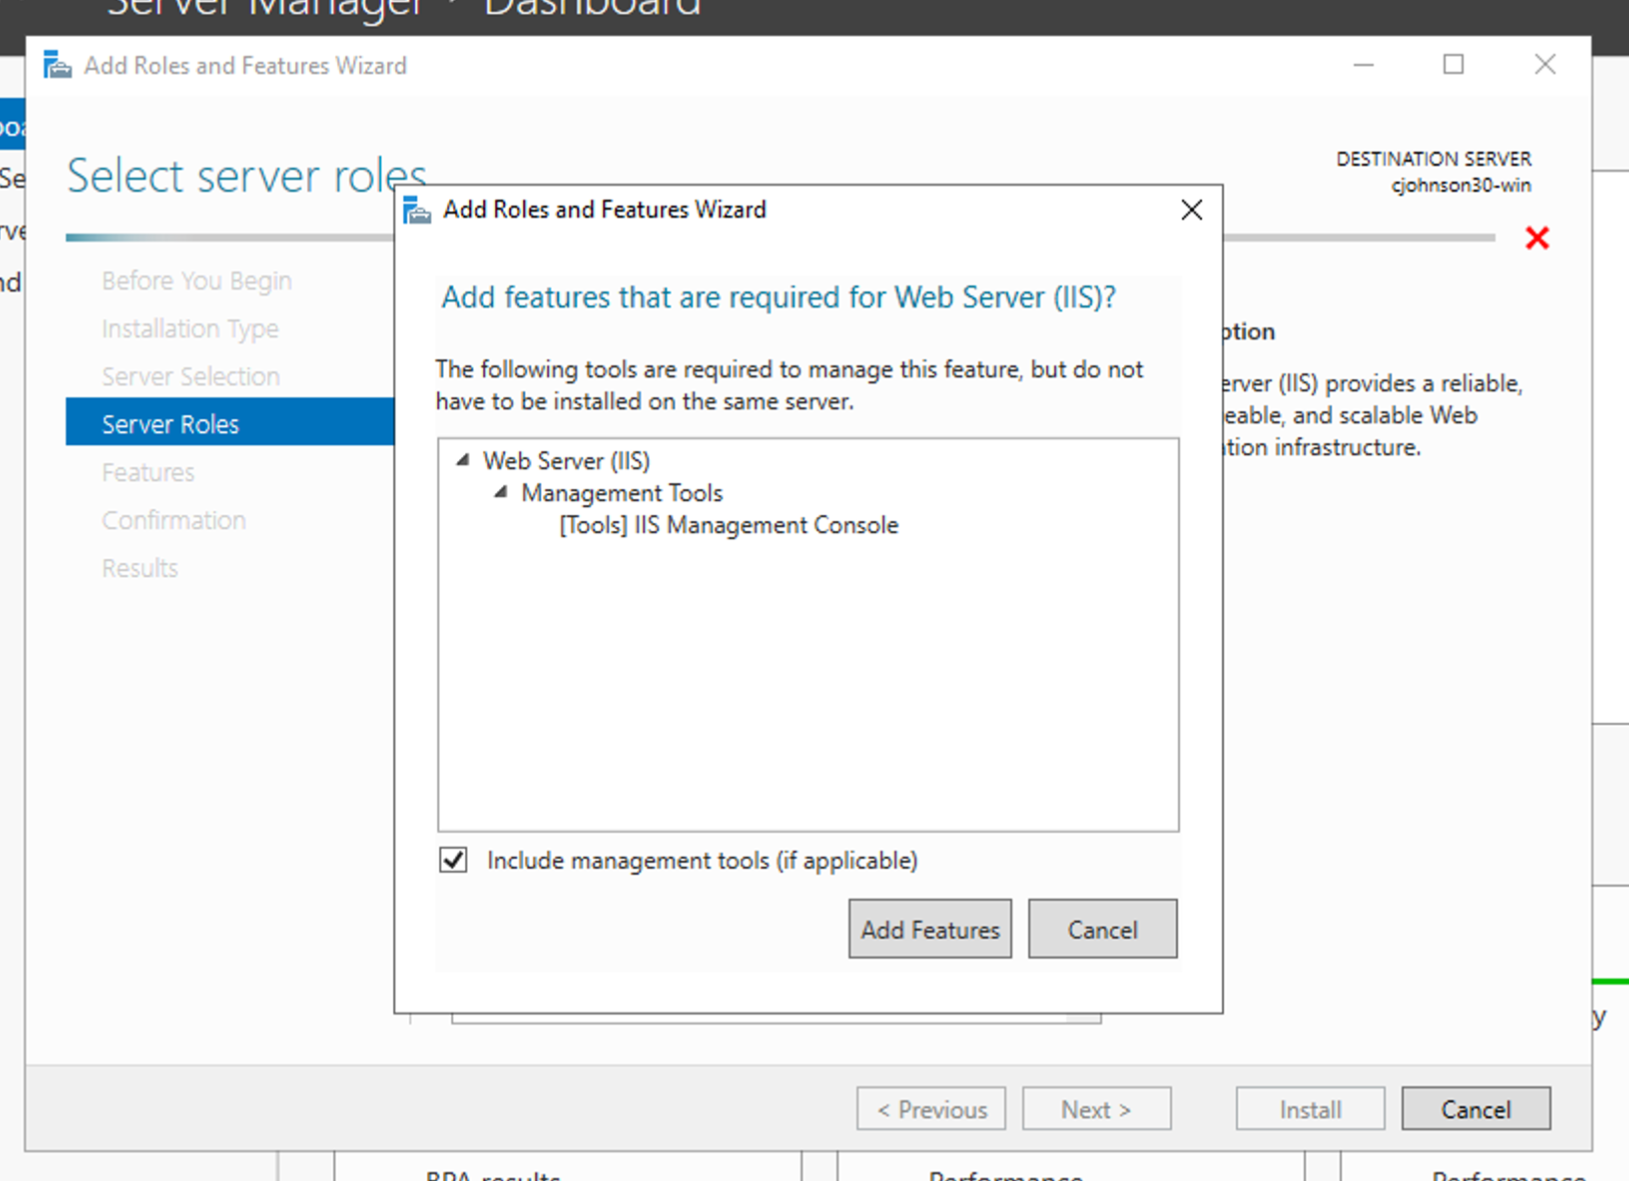
- Back in the Server Roles page, click Next.
- Over the next few pages, stick with the defaults and click Next until you reach the Confirmation page. On this page, click Install.
- Wait for the installation to complete. This may take several minutes.
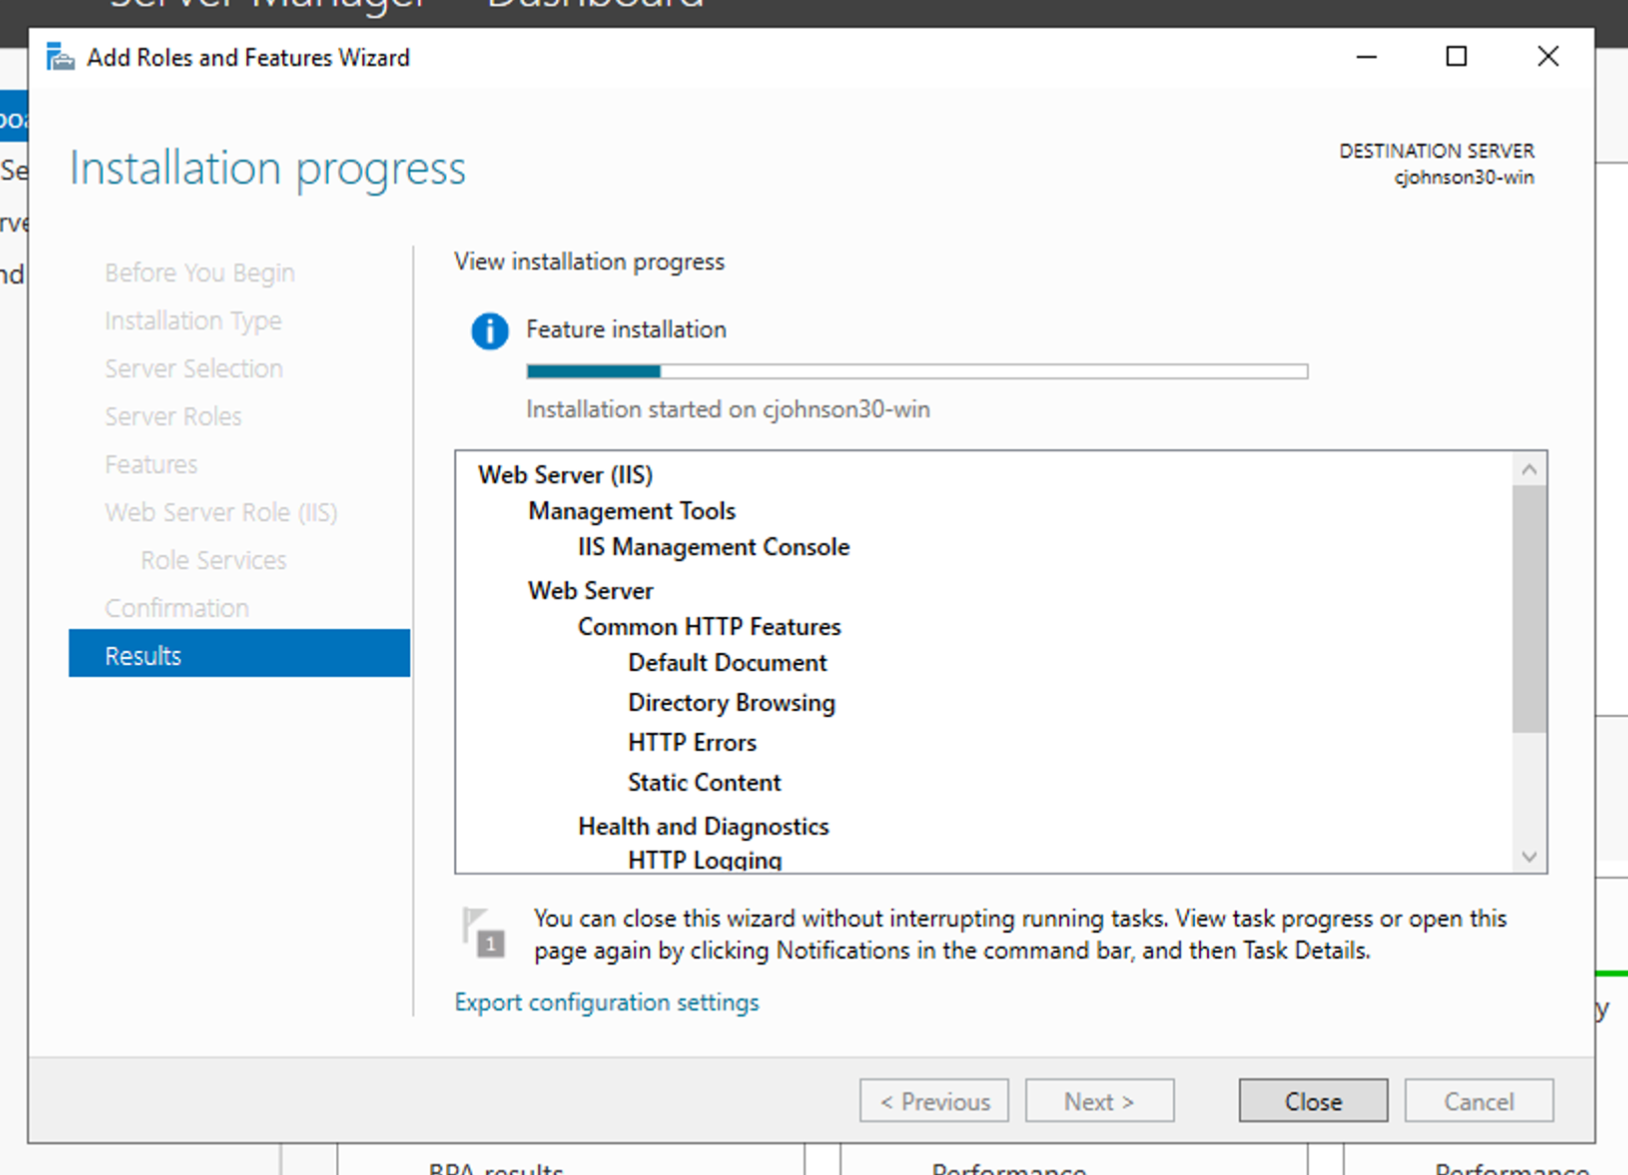
- When complete, open a browser inside the Windows Server VM, and navigate to
http://localhost. You should see the IIS default splash page. Congratulations!
Part 2: Editing Your IIS Website
- First: In a new file explorer window, find the View menu item near the top, and click File name extensions.
- Next: Open Server Manager from the Start menu and click on the Local Server menu bar option.
- Towards the top of the window, click Tools > Internet Information Services (IIS) Manager
- In the new window in the Connections menu column on the left, expand the folder with your VM name on it, then expand the Sites folder and click on Default Web Site.
- In the Actions menu column on the right, click Explore. This will open a new folder where your IIS web pages are stored.
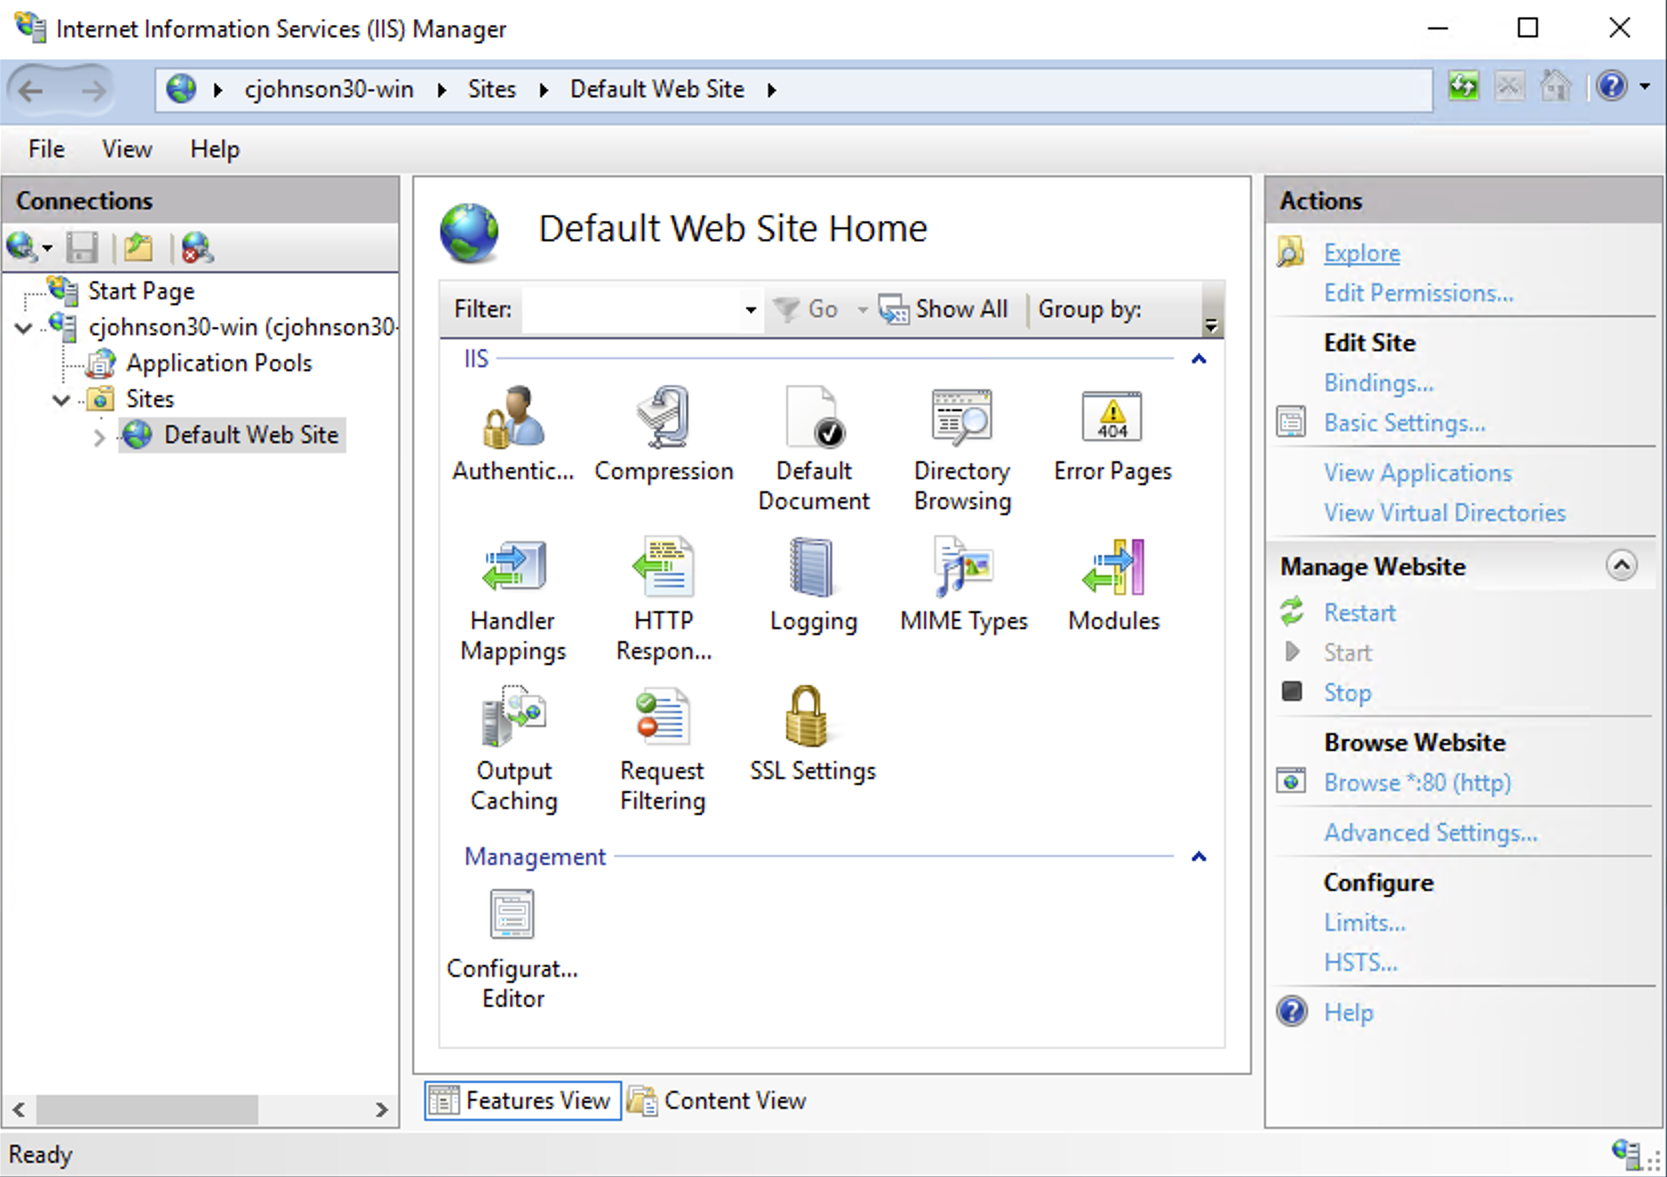
- Right-click anywhere in that window, click New > Text Document. Name it index.html. Save it with double-quotes to make sure it's saved as an HTML file, not text.
"index.html" - Open the text file, and write the same HTML code as Investigation 1, changing the title tag and body text to: OPS705 IIS Web Server - Fall 2024.
- Refresh your browser page from Part 1:
http://localhostYou should see your new code. - On your local computer, open a browser and navigate to the URL you used to remotely connect to your Windows Server VM. Unlike the Linux Server in Lab 3, the web page you created does not appear. We still have some work to do.
Investigation 3: Routing Through Your Linux Server
In this investigation, you'll set up your Linux Server VM to forward requests to your Windows VM's IIS web server. This is an advanced topic. Reviewing the Week 5 material is highly recommended. The following investigation assumes you understand the concepts discussed in those lectures.
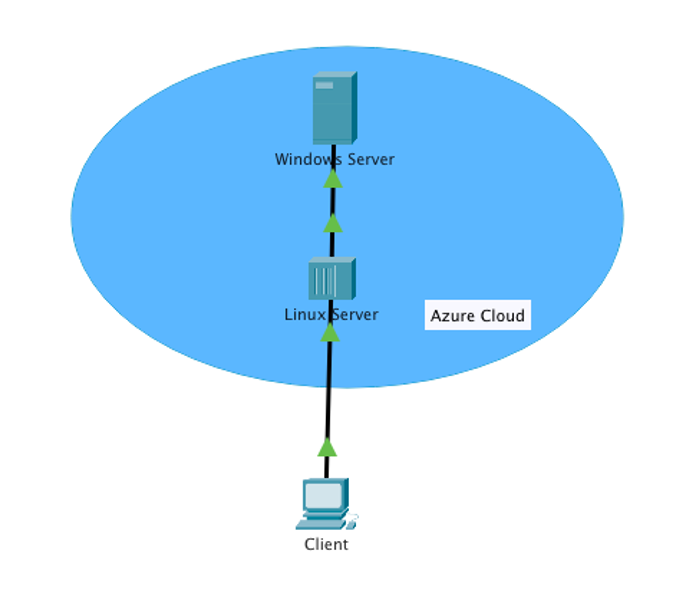
Part 1: Enabling System-Level Forwarding on Your Linux Server
Remote SSH into your Linux Server VM.
Elevate to root.
Use vim to open: /etc/sysctl.conf
Find the line:
#net.ipv4.ip_forward = 1Remove the
#symbol to uncomment the line and make it active.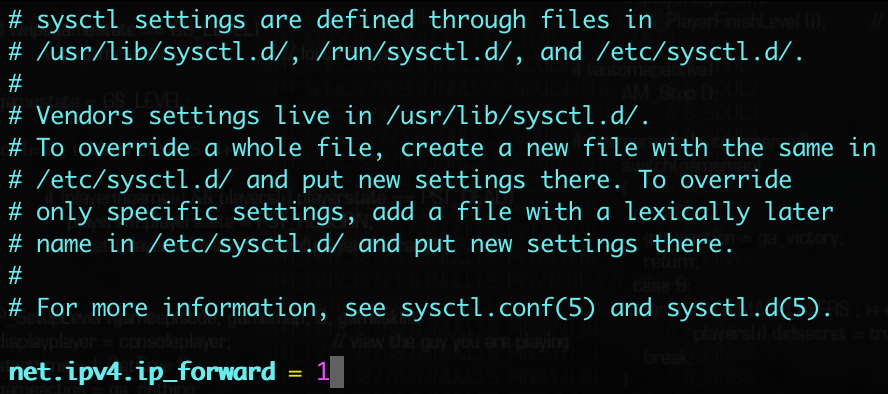
Save and quit vim.
At the command prompt, run:
sysctl -pConfirm you've properly enabled system-level forwarding with the following command:
sysctl net.ipv4.ip_forwardThe response from the command above should say net.ipv4.ip_forward = 1. If not, revisit the steps in Part 2.
Part 2: Port Forwarding Using NAT
Remote into your Windows Server VM, open Command Prompt, and run
ipconfigWrite down the 10.x.x.x IP address displayed.
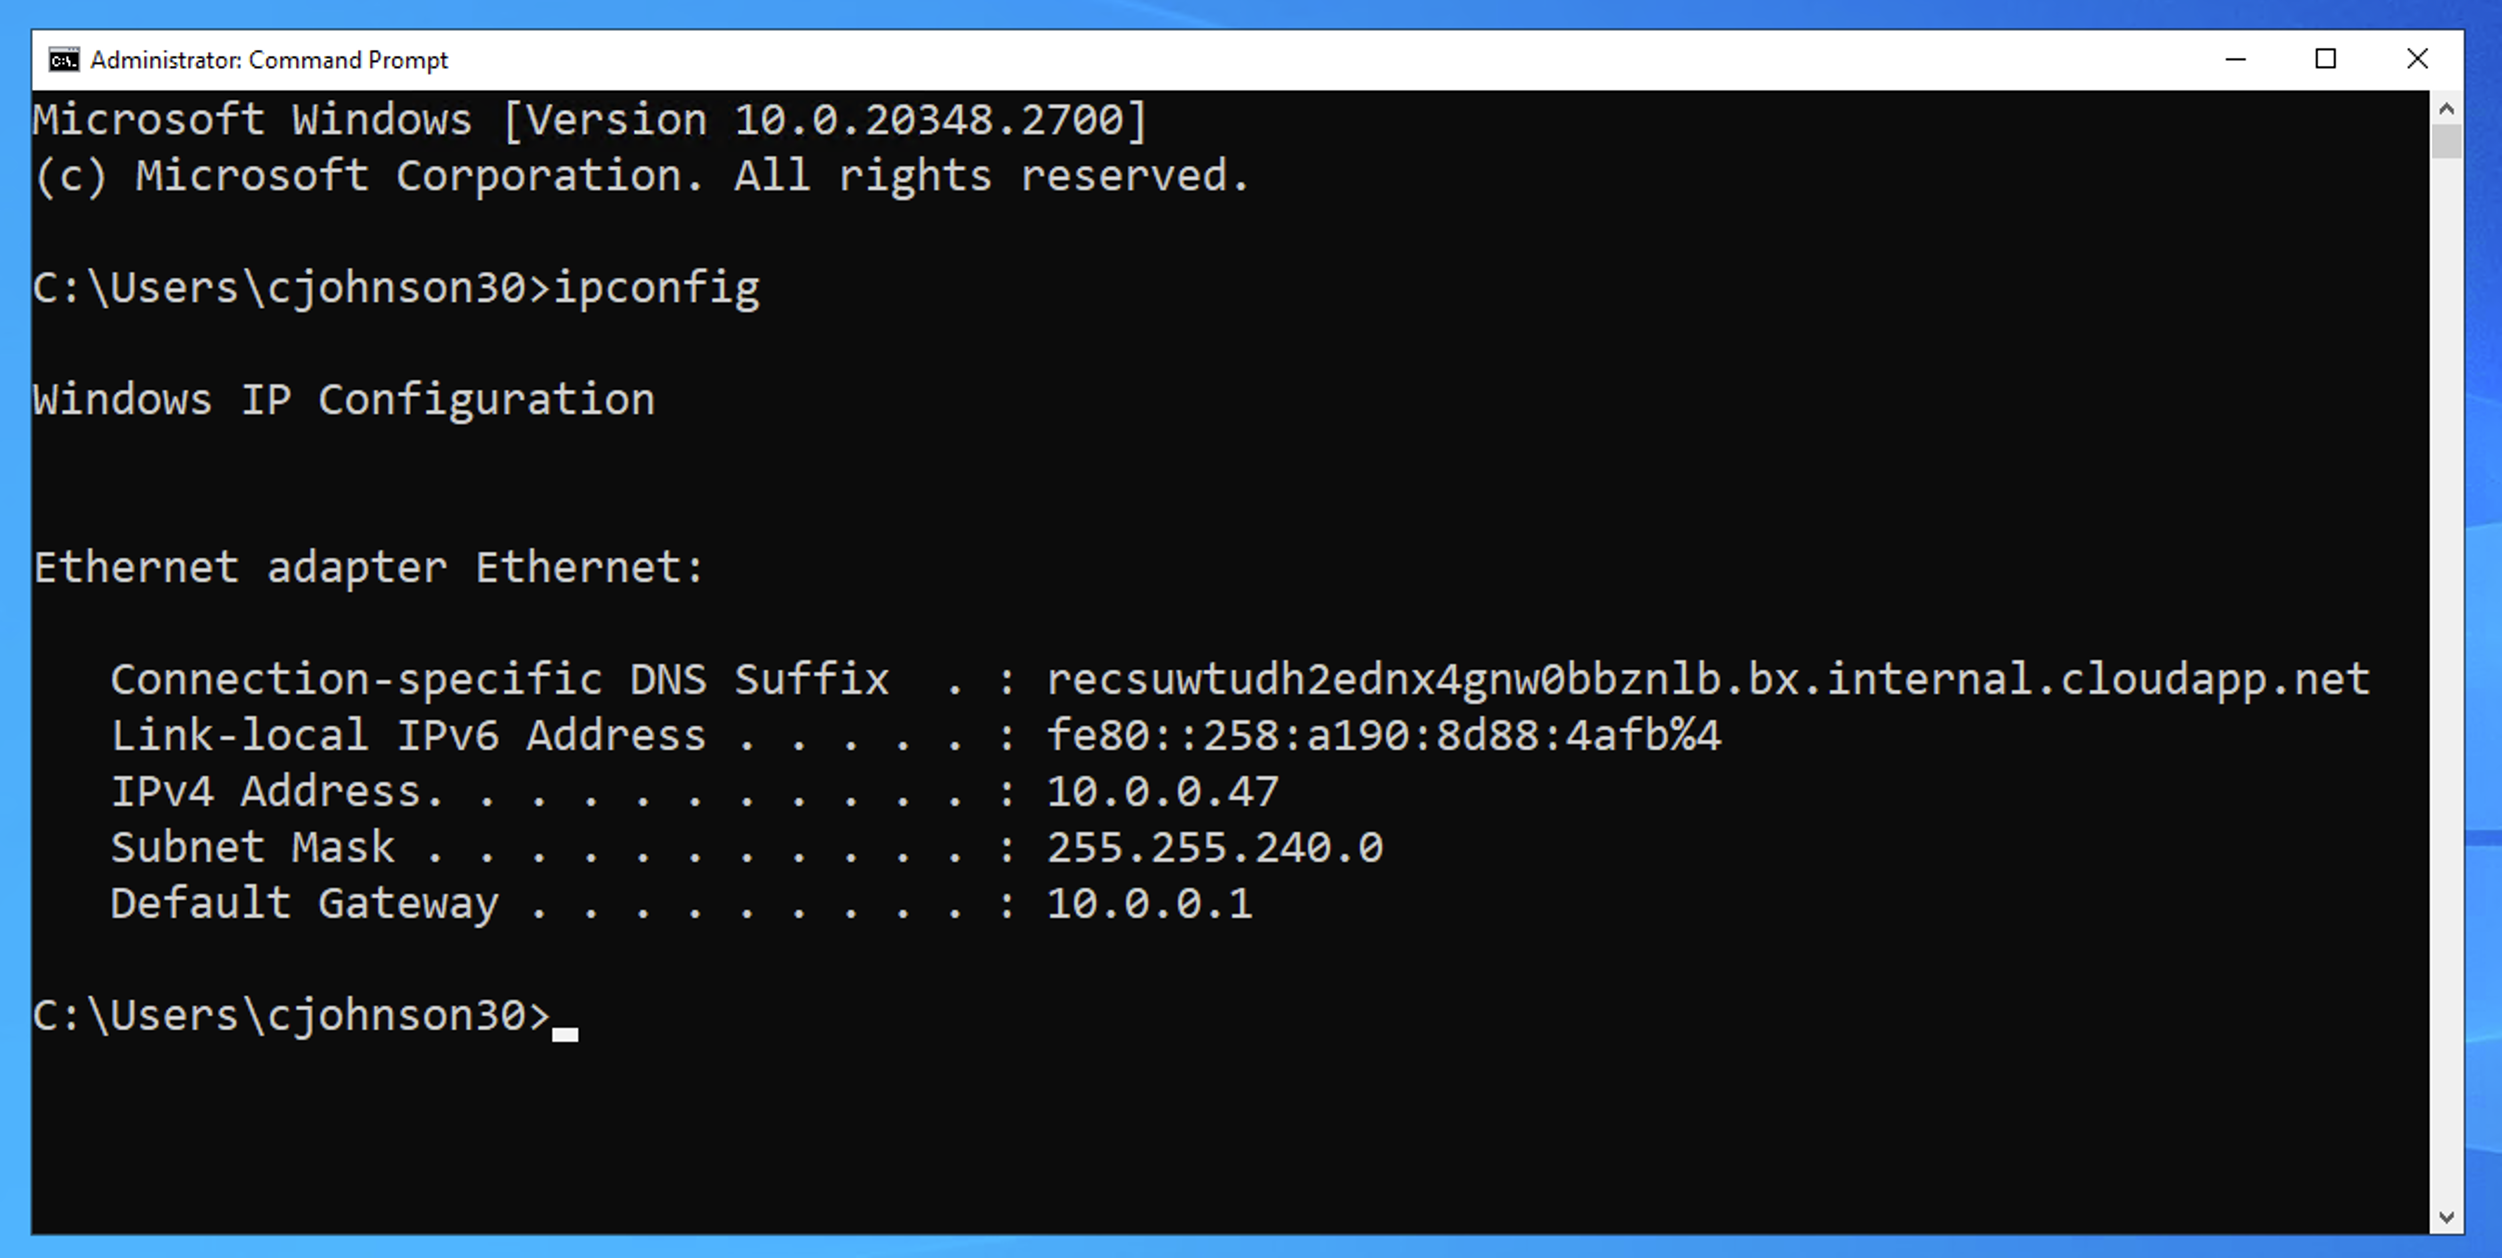
Remote SSH into your Linux Server VM, and elevate to root.
Confirm you can access the IIS web server on your Linux VM by running:
curl **IP-address-from-step-1**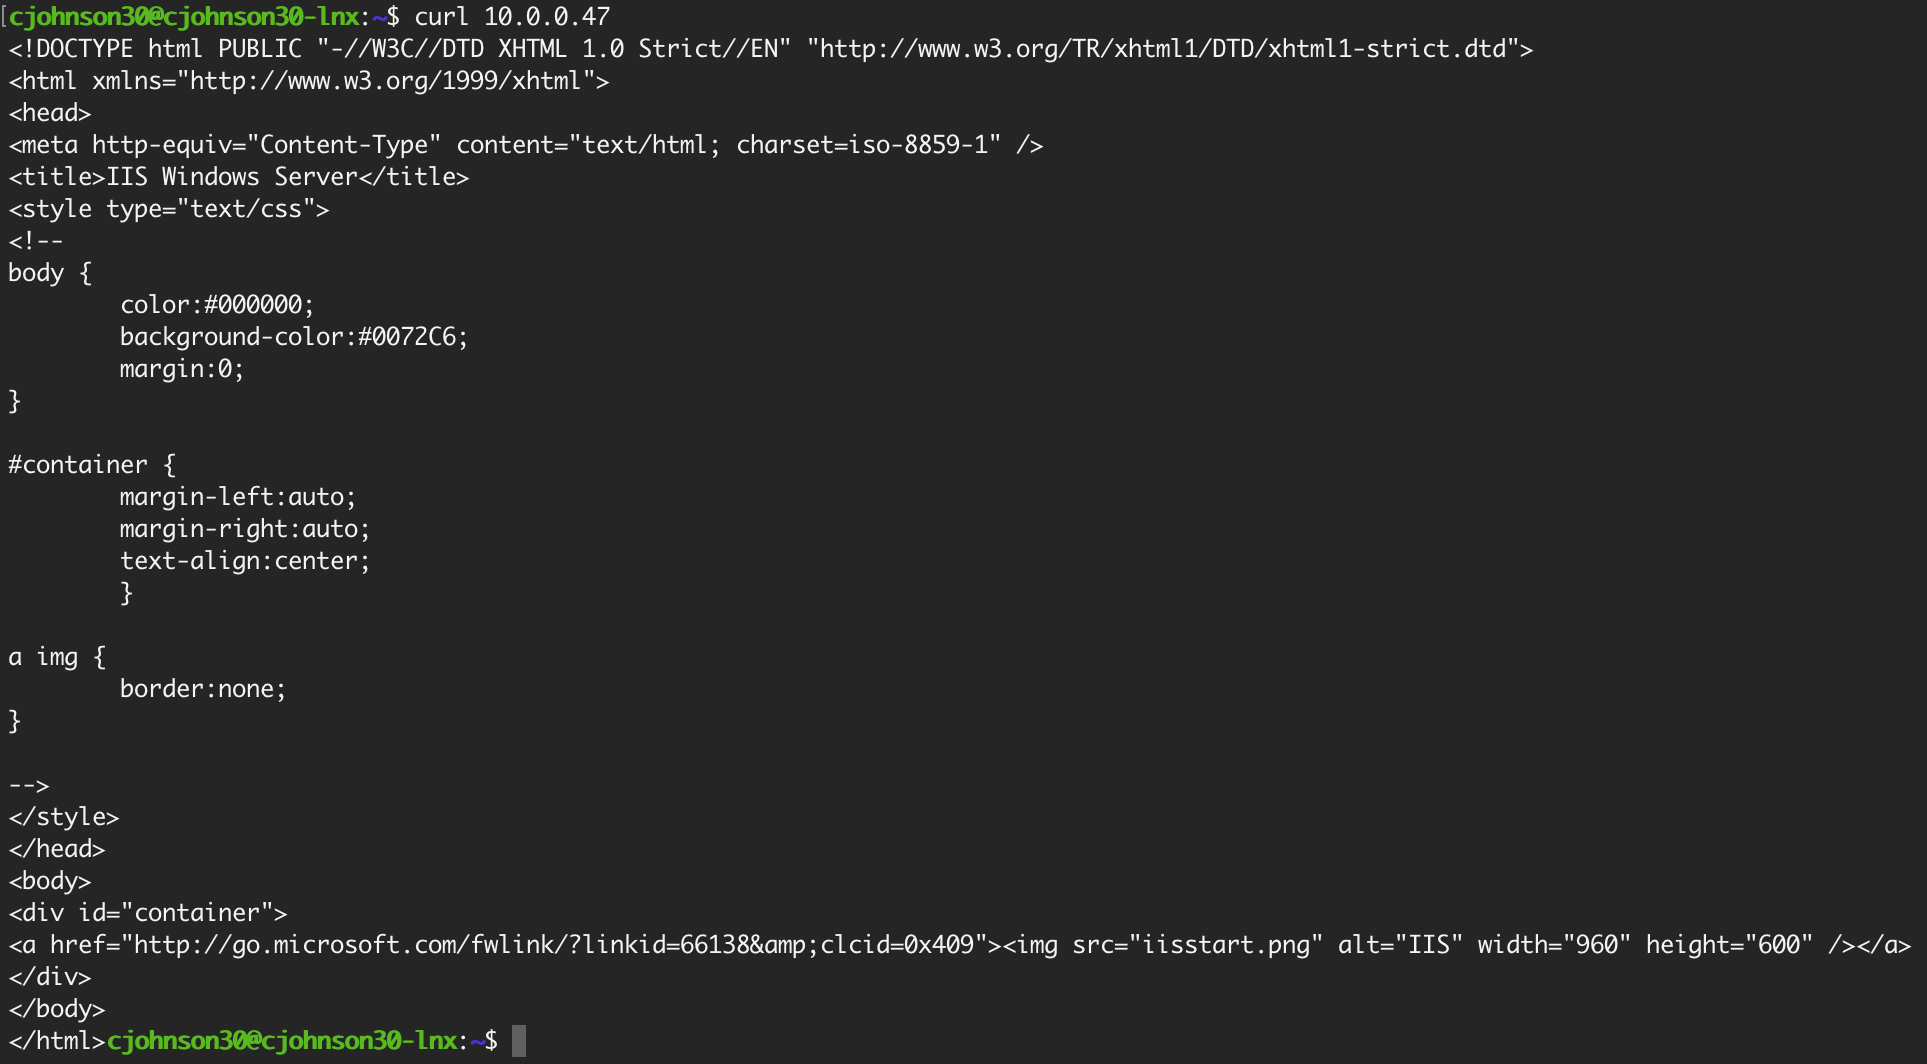
If you see plain HTML code displayed, move to the next step.
We're going to be working with the NAT table. Let's look at the NAT rules listing with the following command:
iptables -t nat -nvL --lineSet up a port forwarding rule so all requests to sent your Linux VM on port 8080 get forwarded to your Windows VM on port 80. Run the following:
iptables -t nat -A PREROUTING -p tcp --dport 8080 -j DNAT --to-destination *windows-server-ip-from-step-1*:80Set up NAT for all forwarded traffic:
iptables -t nat -A POSTROUTING -o eth0 -j MASQUERADEConfirm your new NAT table rules with the command from Step 6.

Once confirmed, save your updated rules!
Part 3: Adding Forwarding Firewall Rule Exceptions
Create a firewall rule to allow forwarded traffic destined for TCP port 80:
iptables -A FORWARD -p tcp --dport 80 -j ACCEPTCreate a firewall rule to allow forwarded traffic sent from TCP port 80:
iptables -A FORWARD -p tcp --sport 80 -j ACCEPTConfirm your new forward rules:
iptables -nvL --line
If correct, save your rules!
Watch your firewall rules and their packet counters with the following command:
watch iptables -nvL --lineIn a browser on your local computer, paste the URL for your Linux VM, adding :8080 to the end of the address, then hit Enter. (Make sure you aren't using https!)
If you've done your work right, the Windows IIS web page should appear!
Review the packet count from your
watchcommand in Step 5. Notice the new forward rules are working! Keep this in mind for troubleshooting.In your SSH session, use the keyboard combination Ctrl and c to halt the watch program.
Now that you know your new rules work, save your new rules!
Lab Submission
Submit to Blackboard full-desktop screenshots (PNG/JPG) of the following:
- Browser window showing the Linux Apache page (on your local computer, not displayed on your VM).
- Browser window showing the Windows IIS page (on your local computer, not displayed on your VM).
- SSH session window with your iptables rules listed.
- SSH session window with your iptables NAT table rules listed.
Reminder: Make sure to fully stop your VMs when you're done!