Lab 1: Installing Debian 12 with VMware Workstation (Graphical Install)
Lab Preparation
Purpose of Lab 1
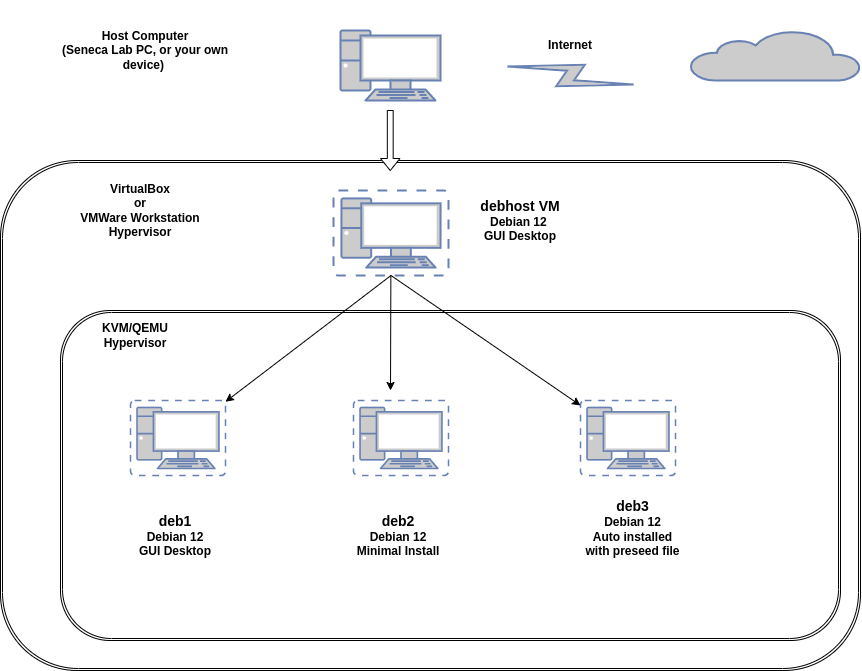
In order to save money and resources when learning to install, to manage, and to connect Linux machines to form networks, we will be using Virtual Machines for this course. In fact, we will be using two virtual machine programs:
- Lab 1: Create a Debian 12 Host virtual machine (called debhost) in the virtual program called VMware Workstation. This host will be stored on your Solid State External Drive (SSD).
- Lab 2: Install a Virtualization program package on your Debian 12 Host virtual machine called KVM which will be used to create 3 remaining Virtual Machines (VMs) that you will use to learn about Linux system administration for the remainder of this course.
The virtualization software will allow you to create and administer 4 different virtual machines (VMs) on your computer system.
It is ESSENTIAL to have a Solid State Drive (SSD) with a minimum storage capacity of 240 GB or 240 GB available on your own computer for you to perform the lab work and provide storage for your Debian 12 host and other VMs that you will create in Lab 2. Due to space requirements, you are NOT permitted to share this SSD drive with any other course material than our OPS245 course.
NOTE: It is feasible to use a notebook computer with sufficient hard disk capacity to perform these labs (as you would for an SSD drive). It would require that your notebook computer can connect to the Internet (including in Seneca's computer labs). You would be required to follow the same instructions for this lab (SSD).
Main Objectives
- Correctly install the Debian 12 host VM (debhost) on your SSD using VMware Workstation.
- Note common Linux commands and record them in your lab logbook.
- Use scripts to generate a post-install report for your Debian 12 host VM.
- Disable Linux Kernel security enhancements to allow for more experimentation.
Minimum Required Materials
- Solid State Drive Minimum Size: 240GB
- Lab Logbook (Click Here to Download)
Linux Command Reference
Package Management
System Information
Networking
Miscellaneous
| grep | wc | pwd | ls | more | file | wget | chmod | vi |
|---|
Matrix Interactive Tutorials
- Linux Basics: /home/ops235/linux-basics
- Using the vi Text Editor: /home/ops235/vi-tutorial
- Shell Scripting - Part I (Scripting Basics): /home/ops235/scripting-1
Investigation 1: Create Your First Virtual Machine (debhost)
In this lab, you will learn how to install your Debian 12 VM using the VMware Workstation application.
debhost VM Details
| Name: | Boot media / Installation: | Disk Space: | CPUs: |
|---|---|---|---|
| debhost | Debian 12 NetInstaller Image File | 240GB | 1 CPU, 4 cores |
Part 1: Format External SSD for exFAT
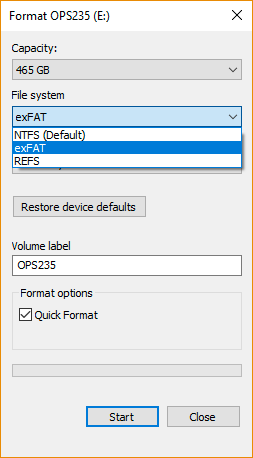
If you are using an external SSD drive on a Seneca Lab Computer you must FORMAT it AS exFAT.
By default, most external drives will be formatted for NTFS. NTFS-formatted drives may cause issues in this course if you are constantly moving between different Seneca Lab computers. When you plug your drive in, open My Computer, right-click on the new drive, and select Format.... If you are storing the vmdk file (VMware Workstation disk image) on your own devices internal storage, this is not necessary.
Part 2: Confirm External SSD Is Recognized
Confirm External SSD Device is Recognized as a Drive in Windows Explorer
It is essential that your Windows machine recognizes your SSD device with a drive letter on your Windows machine. Open up file explorer in Windows and examine the properties of your SSD Device. (Make note of its drive letter and path)
Part 3: Enabling Virtualization (Non-Seneca Computers)
If you are going to complete the labs on your own laptop, or desktop computer at home, there are a few things you need to be aware of:
- RAM Size considerations: Your Seneca Lab Workstations have 16GB of RAM. Your own computer should have also have at least that much RAM in order to function efficiently.
- Enable Virtualisation in home computer's BIOS: Many home computers do not have Virtualisation enabled in their computer's BIOS. In your machines BIOS/UEFI: Enable the options VT-X(required) and VT-D(only if available)
Part 4: Downloading Debian
The Debian Web Site
Open up https://www.debian.org/ in your browser. To get the latest copy of the Debian 12 NetInstaller ISO, click on the Download button.
While you are on the site, lets explore...
One of the most important skills you should graduate with is the ability to teach yourself something new. You will not always have the luxury of attending a training course to learn something new, so we must be prepared to learn independently. This often means reading official documentation. Official documentation is also one of the primary sources of information you should use when troubleshooting or configuring a system. Along with user forums and wiki's. Google searches can often produce results that are not specific to your Linux distribution or version, so they can produce inaccurate results.
Reading documentation, like any skill, requires practice. Reading man pages for example is often very confusing for new users as it hard to understand all of the terminology. However, the more time you spend reading the documentation the easier it will become.
Click on the User Support link. Take a look at some of the support options available. Find the links to the documentation and forums. Take a look around. Bookmark the page. (The Debian website is well known for being difficult to navigate.)
Part 5: Creating the VM in VMware Workstation
Before you can install your Debian Linux OS, you must first create a storage container which is a virtual machine (VM) using VMware Workstation on your host computer.
if you will be completing the course work on your own computer then you should download and install VMware Workstation from the VMware IT Academy Website.
You may have done this already in first semester.
If not your Professor can send a request to enroll you on the IT Academy
If you will be completing the course work on Seneca Lab computers you will need to run VMware Workstation from "MyApps".
Perform the Following Steps:
- Power up the computer in your Seneca Lab in Windows. (or your own device)
- If you haven't already downloaded the Debian 12 NetInstaller DVD/ISO, then do so now.
- If you are using an external SSD drive, connect it to the computer and note the drive letter for that device.
- If you will be working on Seneca Lab computers, format your SSD to use exFAT, not NTFS. Open My Computer, right-click on the SSD, and select Format.... The dialog box should have the exFAT option selected. Once selected, click Start.
- Create a folder called: Virtual Machines on your SSD device or internal storage device. The storage device should have 240GB of usable space.
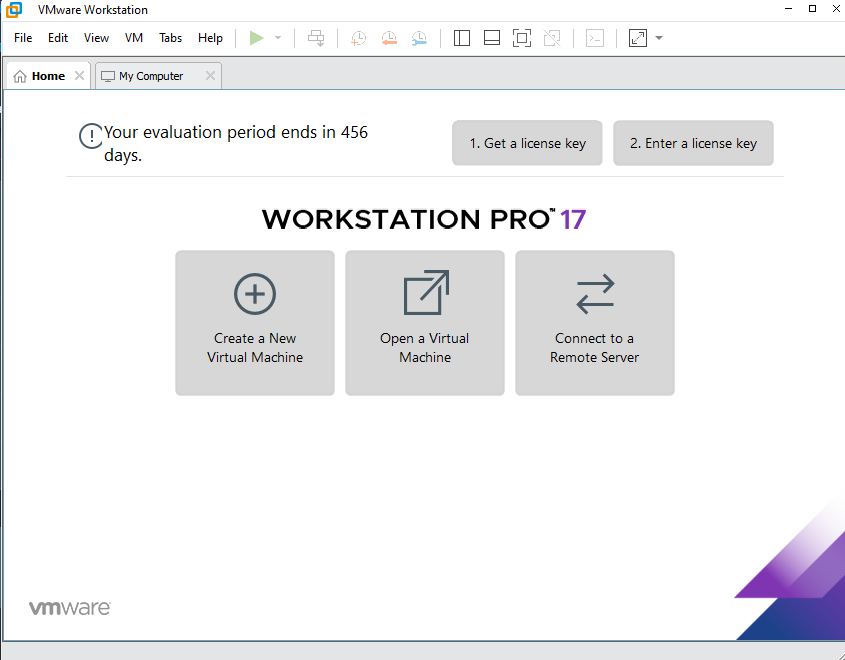
- Launch VMware Workstation.
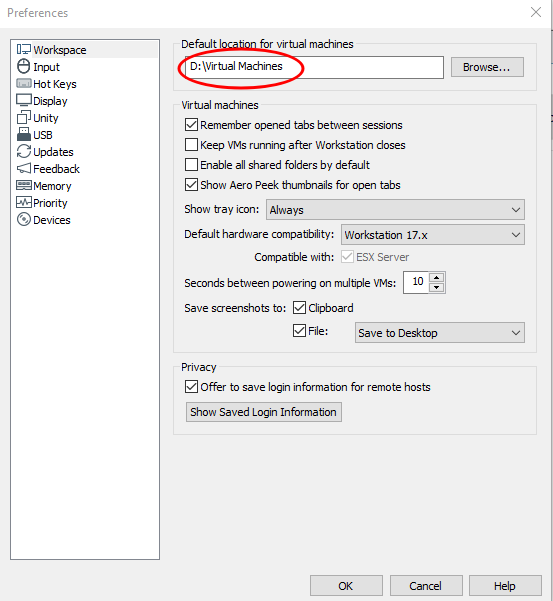
 7. Click the Edit menu, then select Preferences.
- Set the default location for virtual machines to the correct location for Virtual Machines, enter the pathname for the newly created folder in your SSD or internal device, and click OK.
Click on the "Create a New Virtual Machine" icon to create a new VM.
We will just be creating a "shell" for the VM to contain our Debian 12 Linux operating system. This will allow us to configure the VM properly so it will boot-up properly in our Seneca labs.
Select: Custom --> Next
Set Hardware Compatibility: Workstation 17.x --> Next
Select: I will install the operating system later --> Next
Select: Linux and Version Debian 12.x 64 bit --> Next
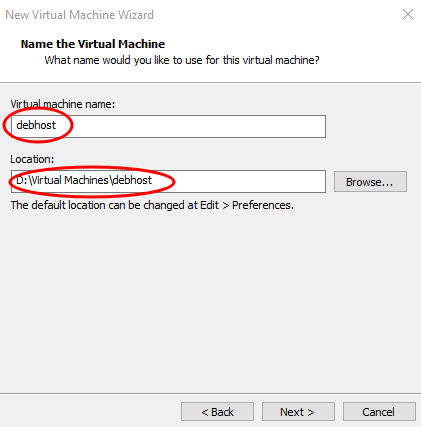
Virtual Machine Name: debhost
Check the location --> Next
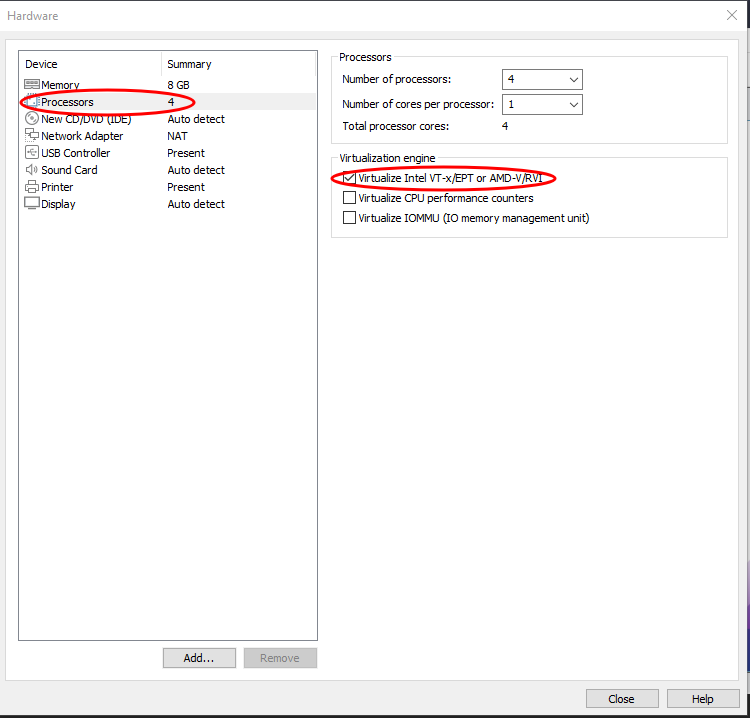
- Number of processors: 4 --> Next
- Number of Cores: 1 --> Next
- Memory for Virtual Machine: 8192 MB --> Next
- Network type: Use network address translation (NAT) --> Next
- SCSI Controller: LSI Logic (Recommended) --> Next
- Select Create a new virtual disk --> Next
- Set the Maximum disk size to 240GB --> Next
- Select Store virtual disk as a single file --> Next
- Disk file: debhost.vmdk --> Next
- Review the settings and click on Finish
- Caution: Before you start the VM we need to make some changes
- Click on Edit the virtual machine settings
- Select Processors and check: Virtualize Intel VT-x/EPT or AMD-V/RVI
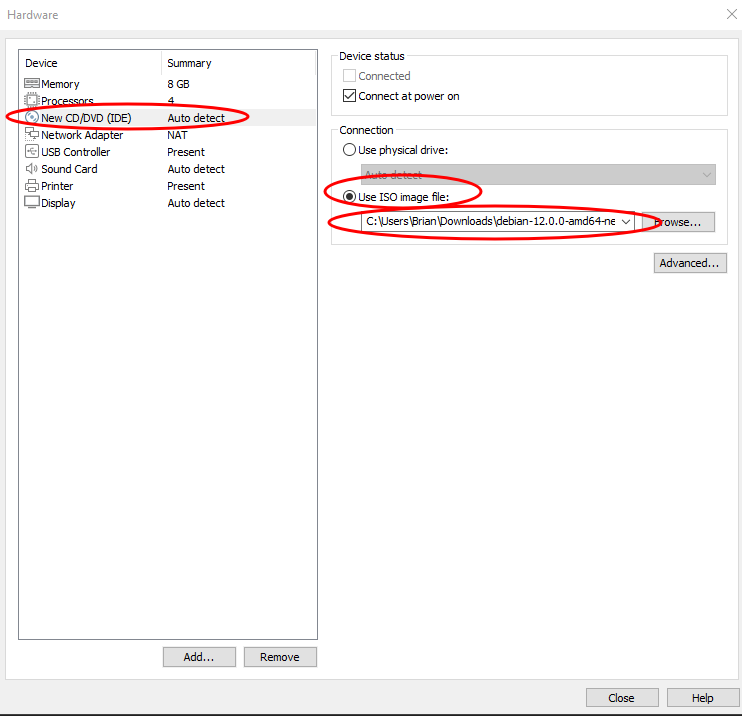
- Select: New CD/DVD (IDE)
- Select: Use ISO image file and Browse to your downloaded Debian ISO
- Select the Options tab at the top
- Select Advanced and select Firmware type: UEFI (Do not skip this step!)
- Click Save
Investigation 2: Install Debian 12 in your Virtual Machine (debhost)
Part 1: Basic System Settings
Start the debhost VM
When the Installer Boot Screen appears, select: Graphic install
Wait for the installer options screen to appear. This may take a few seconds.
Possible installer problem:If the installer starts but it does not correctly display in the window, either with a black or grey screen...
- Close and restart the VM
- Follow the instructions from Lab 1's Expert Install version. (Look for the Installing Debian 12 header section and start from there.)
Each step below is its own screen. Select the following options on that screen and click Continue to move to the next page:
Select a language: English
Select your location: Canada
Configure the keyboard: American English
Wait as the installer detects your hardware, network, and other settings.
Configure the network > Hostname: debhost
Configure the network > Domain name: (Leave blank)
Set up users and passwords > Root password: (Leave both blank)
Explanation: The installation of Debian 12 provides two methods of achieving administrative access to the system:
- If you enable the "root" account and provide it with a password, then to get admin access you need to login as root or use the
sucommand to switch to root. No other accounts will have admin access by default. - If you leave the "root" account disabled during installation, then the first regular account that you create will be able to access administrative privileges by using the
sudocommand.
Generally the second option is considered to be better, especially in environments where multiple users may need admin access to the system. You can always configure root account access after installation if you want both options available.
- If you enable the "root" account and provide it with a password, then to get admin access you need to login as root or use the
Set up users and passwords > Full name for the new user: (Use your full name)
Set up users and passwords > Username for your account: (Use your SenecaID)
Your SenecaID is the first part of your Seneca e-mail address.
Example: jsmith31@myseneca.ca becomes jsmith31)
Set up users and passwords > Choose a password for the new user: Set a password you can remember (we'll reuse this password again). You will need to enter it in both fields on this screen.
"P@ssw0rd" is NOT a secure password!Configure the clock: Eastern
Wait as the installer detects disks and sets up the partition configure wizard.
Part 2: Physical Partitioning
Partition disks > Partitioning method: Manual
It is very important that you setup disk partitioning correctly.
A mistake at this point in the lab could cause problems in future labs and cause you to redo this entire installation.Partition disks: SCSI3 (Note: This is the virtual disk for this VM.)
Partition disks > Create a new empty partition table on this device? : Yes
EFI System Partition
- Partition disks > SCSI3: 257.7 GB FREE SPACE
- Partition disks > How to use this free space: Create a new partition
- Partition disks > New partition size: 500 MB
- Partition disks > Location for new partition: Beginning
- Partition disks > Partition settings:
- Name: (leave blank)
- Use as: EFI System Partition
- Bootable flag: on
- When all options above are complete, select Done setting up this partition, then click the Continue button to apply your changes.
Boot Partition
- Partition disks > SCSI3: 257.2 GB FREE SPACE
- Partition disks > How to use this free space: Create a new partition
- Partition disks > New partition size: 500 MB
- Partition disks > Location for new partition: Beginning
- Partition disks > Partition settings:
- Name: (leave blank)
- Use as: Ext4 journaling file system
- Mount point: /boot
- Bootable flag: off
- Keep all other options at their defaults (ie. don't change them)
- When all options above are complete, select Done setting up this partition, then click the Continue button to apply your changes.
Physical Volume for LVM Partition
- Partition disks > SCSI3: 256.7 GB FREE SPACE
- Partition disks > How to use this free space: Create a new partition
- Partition disks > New partition size: 190 GB
- Partition disks > Location for new partition: Beginning
- Partition disks > Partition settings:
- Name: (leave blank)
- Use as: physical volume for LVM
- Bootable flag: off
- When all options above are complete, select Done setting up this partition, then click the Continue button to apply your changes.
Swap Partition
- Partition disks > SCSI3: 66.7 GB FREE SPACE
- Partition disks > How to use this free space: Create a new partition
- Partition disks > New partition size: 16 GB
- Partition disks > Location for new partition: Beginning
- Partition disks > Partition settings:
- Name: (leave blank)
- Use as: swap area
- Bootable flag: off
- When all options above are complete, select Done setting up this partition, then click the Continue button to apply your changes.
Part 3: Logical Partitioning with LVM
The remaining storage will be configured using Logical Volume Management (LVM).
- Partition disks: Configure the Logical Volume Manager
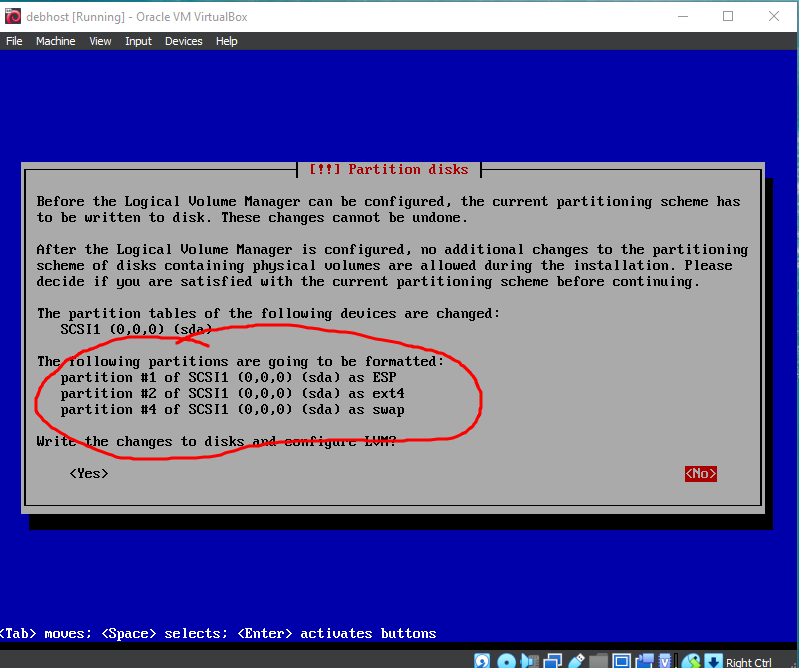
- Partition disks: Compare your settings with the image below, make sure they are correct, and then choose yes to write those changes to disk. (If not correct, go back and fix your mistakes before choosing yes.)
LVM Volume Group: vg_debhost
- Partition disks > LVM configuration action: Create volume group
- Partition disks > Volume group name: vg_debhost
- Partition disks > Devices for the new volume group: Select checkbox for /dev/sda3 189999MB and continue.
LVM Logical Volume: Root
- Partition disks > LVM configuration action: Create logical volume
- Partition disks > Volume group: vg_debhost
- Partition disks > Logical volume name: lv_root
- Partition disks > Logical volume size: 30G
LVM Logical Volume: Home
- Partition disks > LVM configuration action: Create logical volume
- Partition disks > Volume group: vg_debhost
- Partition disks > Logical volume name: lv_home
- Partition disks > Logical volume size: 40G
LVM Logical Volume: KVM Images
Partition disks > LVM configuration action: Create logical volume
- Partition disks > Volume group: vg_debhost
- Partition disks > Logical volume name: lv_images
- Partition disks > Logical volume size: 100G
Apply LVM settings
- Partition disks > LVM configuration action: Finish
Part 4: Formatting LVM Partitions
We will now configure and format the LVM logical volumes we just created.
LVM Partition: Home (/home)
Partition disks > LVM VG vg_debhost, LV lv_home - 40.0 GB Linux device-mapper (linear): #1 40.0 GB
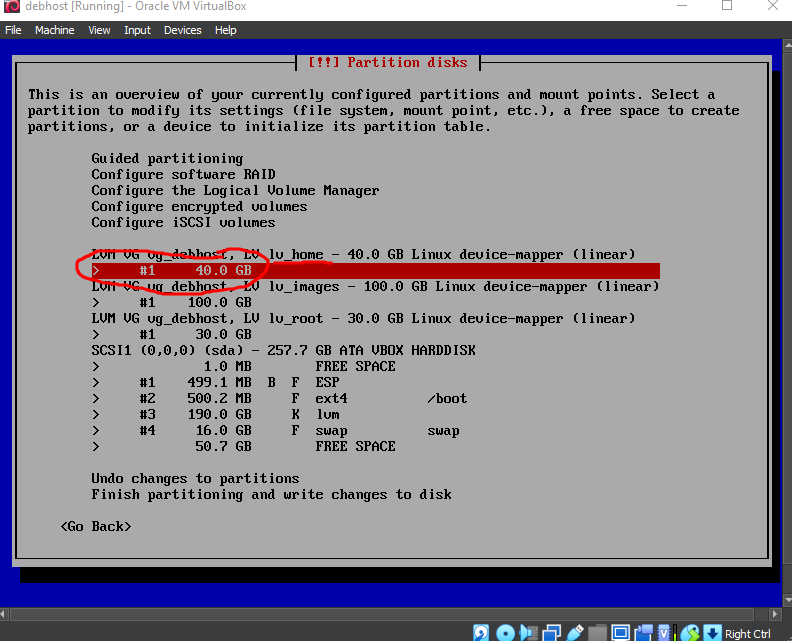
Partition disks > Partition settings:
- Use as: Ext4 journaling file system
- Mount point: /home
- Keep all other options at their defaults (ie. don't change them)
- When all options above are complete, select Done setting up this partition, then click the Continue button to apply your changes.
LVM Partition: Images (/var/lib/libvirt/images)
Partition disks > LVM VG vg_debhost, LV lv_images - 100.0 GB Linux device-mapper (linear): #1 100.0 GB
Partition disks > Partition settings:
- Use as: Ext4 journaling file system
- Mount point: Enter manually
- Mount point for partition: /var/lib/libvirt/images
- Keep all other options at their defaults (ie. don't change them)
- When all options above are complete, select Done setting up this partition, then click the Continue button to apply your changes.
LVM Partition: Root (/)
Partition disks > LVM VG vg_debhost, LV lv_root - 30.0 GB Linux device-mapper (linear): #1 30.0 GB
Partition disks > Partition settings:
- Use as: Ext4 journaling file system
- Mount point: /
- Keep all other options at their defaults (ie. don't change them)
- When all options above are complete, select Done setting up this partition, then click the Continue button to apply your changes.
Review and Apply Partition Settings
Carefully review your partition settings before moving to the next step.
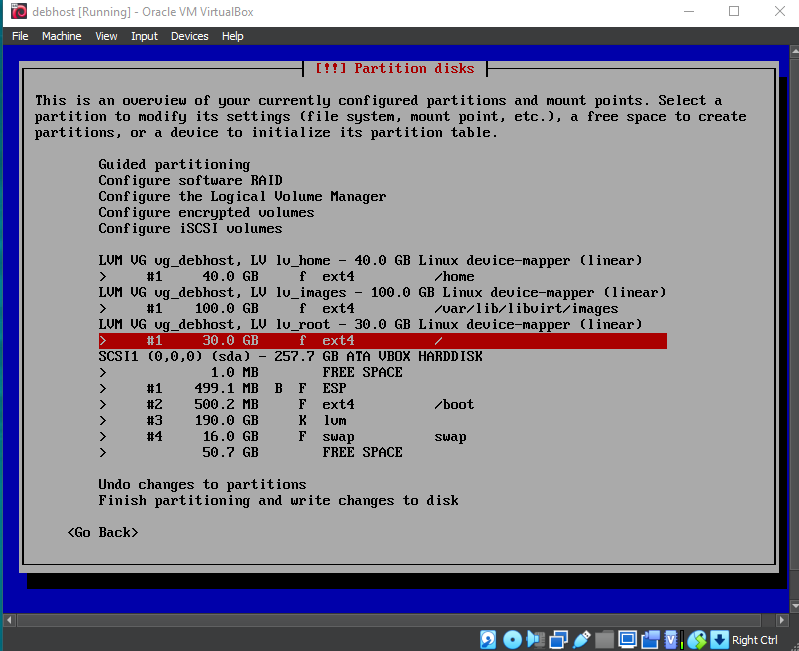
Do your partition settings look like this? If not, go back.
Partition disks: Finish partitioning and write changes to disk
Partition disks > Write the changes to disks? : Yes
Part 5: Choosing Installation Packages
- Wait for the installer to finish writing the base system files.
- Configure the package manager > Scan extra installation media? : No
- Configure the package manager > Debian archive mirror country: Canada
- Configure the package manager > Debian archive mirror: deb.debian.org
- Configure the package manager > HTTP proxy information (blank for none): (Leave blank)
- Wait as more software is installed.
- Configuring popularity-contest > Participate in the package usage survey? : No
- Software Selection > Choose software to install: (Select checkboxes for the following)
- Debian desktop environment
- GNOME
- SSH server
- standard system utilities
- Wait as the installer writes the rest of the system files.
- Finish the installation > Installation complete: Continue to reboot.
Part 6: First Run
When the system reboots, you will be presented a graphical login screen. Login with the username and password you configured during installation.
You will then be presented with the "Welcome" application:
- "Next" for English
- "Next" keyboard layout
- Turn off Location services and then "Next"
- "Skip" connecting your online accounts
- Click "Start Using Debian GNU/Linux"
Investigation 3: Common Post-Installation Tasks
VMware Workstation Tips
- To have the VM capture the keyboard and mouse click on the VM window.
- To have the VM release the keyboard and mouse back to Windows type CTRL+ALT
- To switch between windowed mode and full screen type CTRL+ALT+RETURN
- Click on View --> Autofit Guest
It is recommended to run VMware Workstation in full screen mode. You can press CTRL+ALT+RETURN to toggle between windowed and full screen mode. It is recommended that you stay in full screen mode for the duration of your lab work. You should use Firefox within the VM to access the various websites for this course.
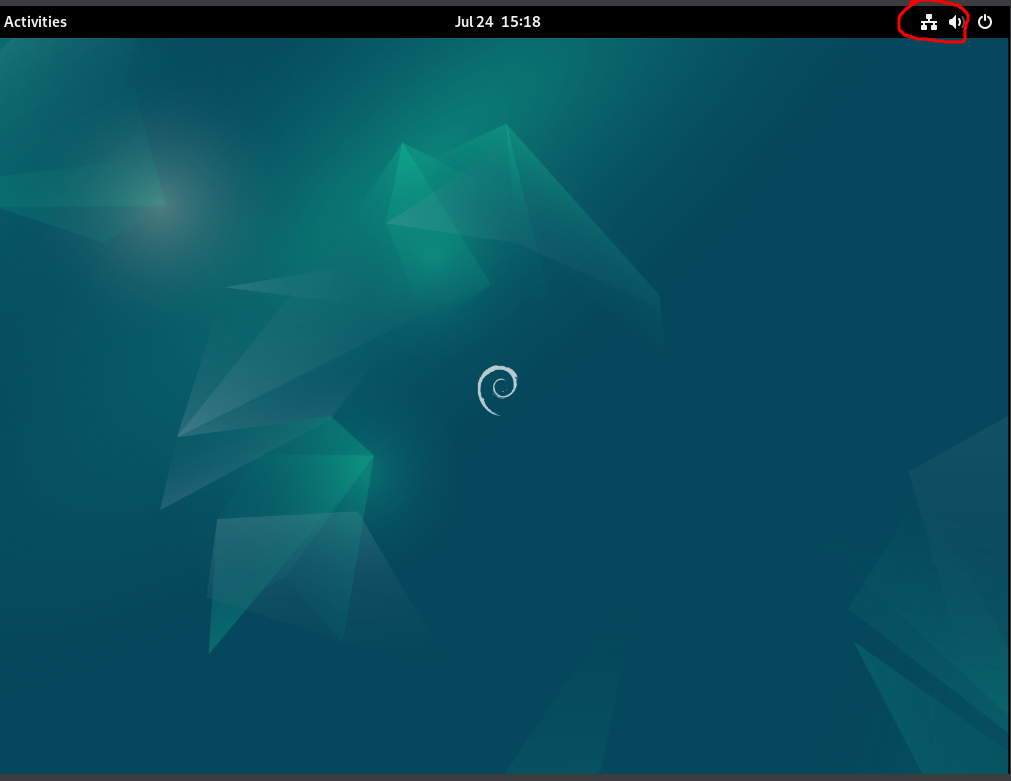
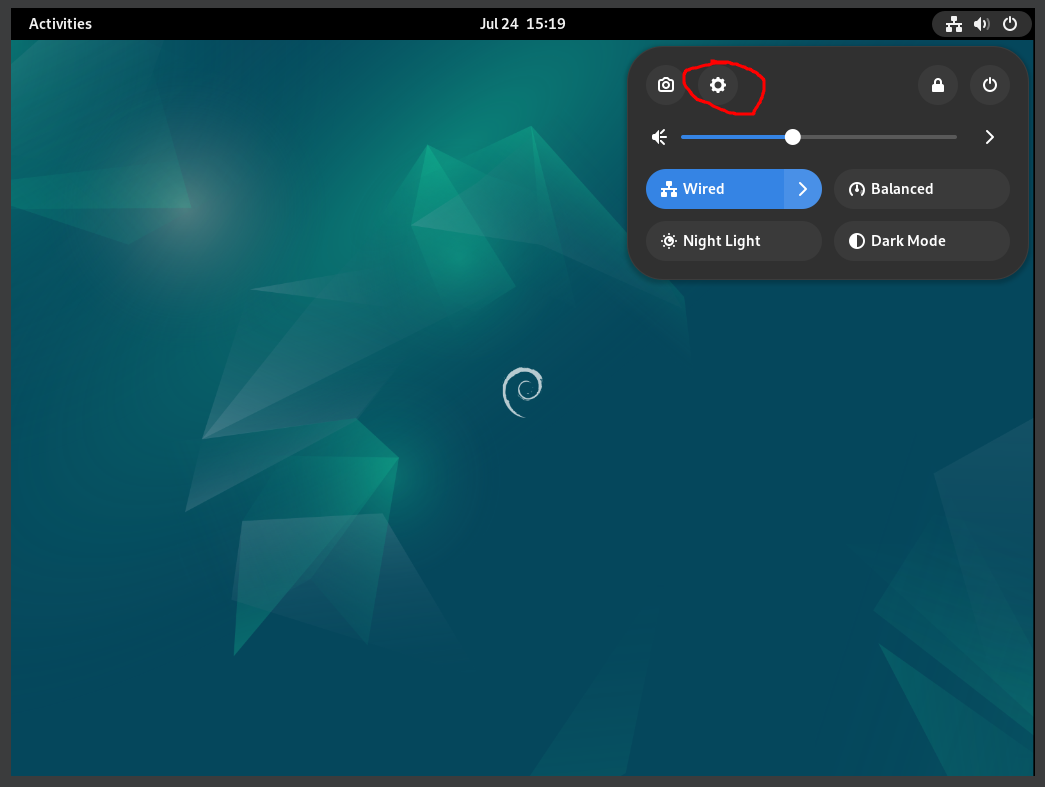
Switch to Full Screen Mode
Click on the icons in the top right corner and then the settings icon
 Then choose the "Displays" option
Choose a display resolution that looks better. Start with 1920x1440 and then experiment with different resolutions until you find your preference.
Enable the root account
During the installation process, we left the "root" account disabled. Lets now enable that account. All that is required is to set a password for the "root" account.
- Click on "Activities" or press the "Windows Key" to search for applications.
- Search for "terminal", right click on the terminal application and select "pin to dash"
- Open the terminal application to gain access to the bash shell.
To change the root password we need to use elevated or administrative permissions.
Our account has been given "sudo" access which means we can run a command with root permissions simply by preceding the command with sudo
- Type
sudo passwdto run the passwd command as root. Then enter roots new password twice. (You will be required to enter your password to "unlock" sudo)
To test the account we can use the su command.
su is short for "switch user" and we can use it to start a new bash shell as another user. (Default: root)
- Type
su -, you will be prompted for the root account password. - Type
whoamito confirm the switch and thenexitto return to the previous shell. - Type
whoami - Type
sudo whoami, We now see there are two methods of accessing root permissions:- Using the
sudocommand at the beginning of our command line to run it as root. We are prompted for our own password to unlock sudo - Using the
sucommand to start a new shell as root. We are prompted for the root account password.
- Using the
We will use sudo to temporarily gain root privileges in order to run a command, but still be our normal user.
This method of obtaining elevated privileges has several advantages over logging in as root:
- First, it only requires each administrator to know their own password.
- Second, we can control exactly which commands a user is allowed to run as root (We will learn how to do this later in the course), instead of giving them access to everything.
- Third, the system will log any command that is run using sudo, so that it can be audited later in case something goes awry.
Because it is configurable to a fine degree, and because it provides for better security logging/accountability for System Admins, the preferred method of accessing root permissions is sudo . There are some circumstances where using the actual root account may be required.
In order to simplify running the lab checking scripts in future labs, using the same root password for ALL machines (debhost and virtual machines). Also use the same regular username and passwords for all of your machines (debhost and virtual machines).
Do not do this in a production environment!
Changing Locked Screen-saver Power Settings
Your system automatically enables a screen-saver application which is a useful security tool to prevent unauthorized viewing of information on a terminal after a certain amount of inactivity. Turning-off the locked screen-saver for this course however is more useful.
To Disable the Locked Screen-saver, Perform the following steps:
- Click on the power button at the top right-hand corner of the window.
- Click the Settings icon
- Click on Privacy
- Click on Screen and set "Blank Screen Delay" to Never
- Turn off "Automatic Screen Lock"
Test your internet connection
- Open "Firefox" in debhost and test your Internet connection.
- Add Firefox bookmarks for the course web page and schedule.
- Add bookmarks for Blackboard and Outlook as well.
Perform a system update
The primary source of software and programs that we can install in Debian is the online "repositories".
These repositories are online databases of different available software organized into "Packages".
The repositories and packages are maintained by Debian and they are maintained separately for each release. We should check for updated packages frequently (at the beginning of each lab) as they often contain security updates and bug fixes.
To interact with the repositories and manage our software packages, we will use the apt command.
apt is the command line package management tool used by Debian and many other distributions of Linux.
To check for and install updated packages we need to use 2 separate apt commands:
apt updatewill update the local copy of the repository databaseapt upgradewill check the database for packages that need to be updated, download them and install them along with any required dependencies.- To make changes to the software on the system requires root privileges, so we will need to add
sudoto the beginning of the command. We can also run both commands on a single command line. - Type
sudo apt update && sudo apt upgrade
Using && as a separator between the 2 commands will cause the 2nd command to execute only if the first command is successful.
Safe Shutdown and Restart, and safely removing the external SSD
You are required to correctly shutdown your Debian 12 host virtual machine as you would with any operating system.
Also, you are required to use the "Safely Remove Hardware"" and "Eject Media" tool in the system tray on your Windows machine to properly disconnect your SSD device.
FAILURE TO DO THIS MAY DAMAGE YOUR HOST VM AND NOW ALLOW IT TO BOOT PROPERLY (YOU HAVE BEEN WARNED).
- Click on the power icon in the top right corner of the display and then click on the power icon again
- Click on Restart or Shutdown
What was installed?
An installation log file called /var/log/installer/status has been created to record the installation of your debhost machine. This file is an ASCII text file which can be viewed with the less command.
- Type the command
less /var/log/installer/statusand browse the list of packages installed - Type the command
man apt - Read the man page for the apt utility and figure out a command to list only the installed packages.
- How many packages were installed?
Customizing your desktop/shell
- Explore the Appearance tab in the Settings app to personalize your desktop.
- Search for an App called "Tweaks" and use it to customize your Gnome Desktop
- Read and edit your
~/.bashrcfile and add an alias calledupdatethat will run the command linesudo apt update && sudo apt upgrade - Both
nanoandviare installed by default. You could/should also installvim- Type
sudo apt install vim
- Type
Turning off AppArmor
It is highly discouraged and unsafe to disable AppArmor on a public-facing server. AppArmor is a Mandatory Access Control framework. When enabled, AppArmor confines programs according to a set of rules that specify what files a given program can access. This goes beyond the traditional protection of file system permissions and helps protect the system against both known and unknown vulnerabilities.
Some of the tasks we will be doing may require additional and tedious steps to configure AppArmor to not prevent our changes. So for the purposes of this course we will disable AppArmor. It is quite safe to do so because we are operating in a VM so our host is not visible to the public Internet.
- Run the following commands to disable AppArmor:
sudo systemctl stop apparmorsudo systemctl disable apparmor
- We will learn more about these commands later
Investigation 4: Using Shell Commands to Generate System Information Reports
It is very common for System Administrators to keep records regarding their installed computer systems. For example, it is necessary to have a record of all the hardware information for each machine in order to help fix computer hardware problems, and to assist when purchasing additional consistent computer hardware.
Therefore, it makes sense to also have a record of the installed software and important system configurations as well. This can contain information regarding the Linux operating system, installed software, and network connectivity information.
Please review the Bash Shell Reference Guide to help with the rest of Investigation 3
Perform the Following Steps:
Study the Linux commands and their purpose to note computer software information for your installed debhost VM. You should take time to issue each of these commands to view the output, and record this chart in your lab1 logbook. Run each one as a regular user, then with sudo to see the differences.
Make certain to record output from these commands (except for the ps -ef output) in your lab1 logbook.
Linux/Unix System Information Utilities
| Command(s) | Purpose |
|---|---|
uname -rv, hostname, ps -ef | Basic Linux OS information such as kernel version, host-name of Linux server, and all processes that are running on the system after installation. |
ip address show, ip route show, nslookup (at prompt, enter command: server) | Obtain network connectivity confirmation including: IP ADDRESS, Netmask, routing (default gateway), and the default Domain Name Server. |
- Refer to the Bash Shell Reference Guide prior to proceeding with this section.
- Create a directory called bin in your home directory to store your shell scripts by issuing the command:
mkdir ~/bin
Change to that newly-created bin directory
Using output redirection, send the output from each of the following commands to a file called report.txt. Note that when you are done, you should have one file that has output from all of the commands.
date +'%A %B %d, %Y (%I:%M %p)'hostnameuname -rvps auxip address show
View the report.txt contents. You should be able to understand them because you just put that content there, but what would this look like if you look at the file several months from now? In order to make this file more readable, use the command line to add a blank line between the output from each command, and a header before each command briefly describing what the output is (note that this will likely require re-running all of these commands).
Answer Investigation 3 observations (all parts and questions) in your lab log book.
Investigation 5: Using BASH Scripting to Generate System Information Reports
You may have learned about creating and running Bash Shell Scripts in your ULI101 course. Shell scripts help Linux users and system administrators to automate repetitive tasks to become more efficient and to help them save time. We can take what we have learned from the commands above and put them into a bash script to generate information reports for your newly-installed Linux host machine.
- Create a new file in your ~/bin directory called myreport.bash
- Populate the beginning of the file with sh-bang line and block comment describing what this script does:
#!/usr/bin/bash
# Author: *** INSERT YOUR NAME ***
# Date:   *** CURRENT DATE ***

# Purpose: Creates system info report
# USAGE: ./myreport.bash
- Add a line that will print out the heading System Report
echo "System Report"
- Save your script and run it. Does it work?
- You'll notice that the script is currently sending its output to your terminal (STDOUT). We can just use output redirection on the command line when you run the script to send the output to ~/bin/sysreport.txt.
- Open your script in a text editor (like vim) again, and add the following lines below the echo statement:
# Print a heading for the date command output
date=$(date +'%A %B %d, %Y (%I:%M %p)')
echo "Report Date:  $date"
Save your script and run it again. Observe the output?
Based on the previous investigation and output, add the extra commands for your script to also output (with appropriate headings):
- The hostname of the machine.
- The kernel version.
- The IP address
- The list of all installed packages.
Run your script to make sure it works. Note that the output does not need to match investigation 3 exactly, but it should be very close.
What other commands and information could we document? Perhaps a list of storage devices, partitions and mount points?
Lab 1 Sign-Off
Follow your Professors submission instructions for lab 1 on Blackboard.
Shell scripting is so essential for Linux administration that this course has created a shell script for every lab for this course that a student must download and run in order to check their work.
If you have performed the lab correctly, then you will get a series of OK messages and you can proceed with the SIGN-OFF for lab1.
On the other hand, if there were errors, then a WARNING message will appear with general suggestions that you will need to fix on your debhost VM in order to have your professor sign-off on this lab. Your lab should be correct before moving to Lab 2.
Perform the Following Steps:
- Make certain that your debhost VM is running, open the Bash Shell terminal.
- Change to the ~/bin directory.
- Download the checking script by issuing the following Linux command:
wget https://raw.githubusercontent.com/jmcarman/osl740-debian-labs/main/lab1-check.bash
- Give that downloaded shell script file execute permissions (for the file owner).
- Run the shell script using sudo and if there are any warnings, make fixes and re-run shell script until you receive a "congratulations" message.
- Arrange evidence (command output) for each of these items on your screen:
- Run the lab1-check.bash script (must have all
OKmessages, and the congratulations message) - Proof of anything else your Professor asks to see.
Practice For Quizzes, Tests, Midterm & Final Exam
- Define the term Virtual Machine.
- List the major screens (steps) in the installation of Debian 12.
- What key-combination is used to toggle the view of your running VM from "window-mode" to "full-screen-mode"?
- List the steps for updating the Debian software.
- What is the home directory for the user "root"?
- How do you determine the host name of your GNU/Linux workstation?
- What command can display the NIC MAC address?
- What command is used to get a list of running processes on your newly-installed system?
- Write the Linux command to download the on-line file: http://linux.server.org/package.tar.gz
- Write a bash Shell Script to prompt the user for a directory, and then display the file types for all files in that specified directory (hint: use the read command and then use the file command and command substitution with the ls command). Test the Bash Shell script by adding execute permissions and run the Bash Shell Script.