Assignment 1 - Roaming Employee Laptop
Lab Preparation
Purpose of Assignment 1
In this assignment, you will provision a new Windows 11 “office laptop,” validate how it behaves on premises (HQ Network) versus remote (over the Internet via VPN), and explain routing/DNS differences between the two scenarios.
Scenario Overview: A new employee has been hired and you are in charge of onboarding them. This means provisioning a new company laptop for them to use for their work.
Scenario 1 - On-Premises: Your employee will be in the office with their new company laptop, physically connected to the internal network.
Scenario 2 - Remote: Your new employee also needs to work from home. Their remote work requires access to the company's internal network resources.
This is a technical assignment with a reflection component. Your deliverable will be online inside a single PDF through Blackboard. (Check the Submission section at the end of this assignment.)
You will produce screenshots and short written explanations (“why/why not?”) to prove each step. The assignment instructs you when to do each with the following notes:
Screenshots: Heads up of screenshots you will need to take shortly, with a list at which steps each screenshot should be taken.
Reflection: Questions you will answer to show some thought and understanding of the overall effects of what you're doing.
If you encounter technical issues, please contact your professor via e-mail or in your section's Microsoft Teams group.
Objectives
By the end, you will:
- Distinguish on-prem VS remote access paths and when VPN is required.
- Enable and configure L2TP/IPsec (PSK) in RRAS (RRAS is already installed).
- Connect a client to your server using VPN over the Internet.
- Prove DNS/web reachability to internal services using FQDNs.
- Use
tracertandnslookupoutput to explain routing/DNS behavior.
Minimum Progression Requirements
Before beginning, you must have:
- Successfully completed Lab 1-5.
- Watched the Introduction to Assignment 1 recorded lecture available through Blackboard.
- Your external SSD (or personal computer) with your VMs.
- Optional, but recommended: Caffeine delivery system.
Minimum Hardware Requirements
It is possible to run Assignment 1 on a non-lab computer. I have done my best to reduce requirements. You may be able to run A1 on your personal computer. You will need an Intel/AMD-based computer with VMware Workstation installed. Check the grid below.
Lab computers are available on campus during Study Week and outside of class time.
Absolute Minimum Hardware
This may result in slow performance and disruptions, but is possible.
| VM | OS | Cores | RAM |
|---|---|---|---|
| srv1 | Windows Server 2025, Desktop Experience | 2 cores | 4 GB |
| srv2 | Windows Server 2025, Core | 2 cores | 4 GB |
| laptop1 | Windows 11 Education | 2 cores | 4 GB |
| Total: | - | 4-6 cores | 8-12 GB |
Note: Most of your work only requires srv2 to be on temporarily. The absolute minimum would be 4 cores and 8 GB of RAM. I cannot guarantee stability under these settings. Use at your own risk.
Recommended Minimum Hardware
This is the recommended minimum hardware requirements for A1.
| VM | OS | Cores | RAM |
|---|---|---|---|
| srv1 | Windows Server 2025, Desktop Experience | 4 cores | 8 GB |
| srv2 | Windows Server 2025, Core | 2 cores | 4 GB |
| laptop1 | Windows 11 Education | 2 cores | 4 GB |
| Total: | - | 6-8 cores | 12-16 GB |
Note: Most of your work only requires srv2 to be on temporarily. The absolute recommended minimum would be 6 cores and 12 GB of RAM.
Investigation 1: Installing laptop1 VM
In this investigation, you will create and install a new VM called laptop1. This VM will be created in VMware Workstation, not Hyper-V.
Scenario: You are setting up a company laptop for a new employee.
Before You Begin
Time to Backup! You will be making major changes to srv1. This is a good time to backup the srv1 VM so you can restore from it if something catastrophic occurs.
With srv1 turned off, copy the entire srv1 folder in your SSD to a separate location. This can be a backup directory on your SSD, or even a separate physical drive. Leave the copy be and use the original going forward. (If you need space, compress the backup folder.)
Do not continue until the copy has fully completed.
Part 1: Creating laptop1 VM
In this part, you will create a new Windows 11 virtual machine using the hardware specifications below.
Note: Keep all other VMs off until told otherwise.
Virtual Machine Specifications:
- Hypervisor: VMware Workstation
- Name: laptop1
- Location: OSM620/Virtual Machines/laptop1
- Encrytiption Information: See note below.
- RAM: 4 GB
- CPU: 2 processors
- Storage: 64 GB
- NIC: 1, set to NAT
- ISO: Windows 11 Education
If you can't remember how to create a VMware virtual machine, please refer back to Lab 1.
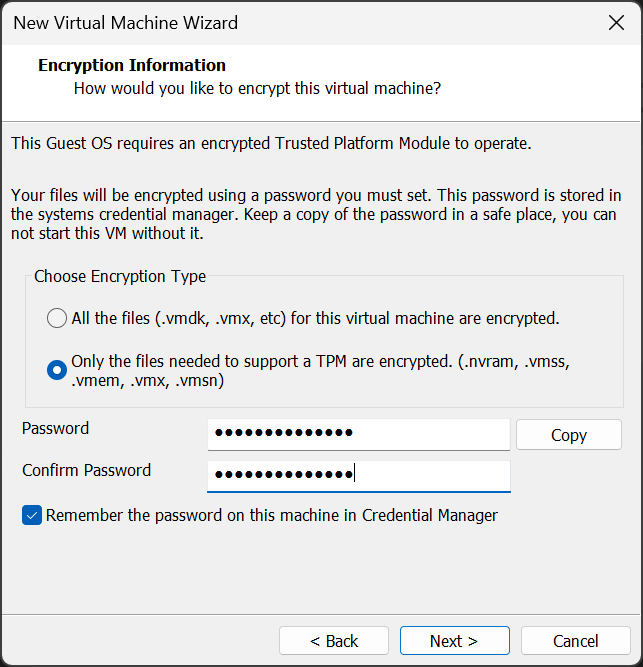
Encryption Information Page
Like with client1 and client2, this VM's Windows 11 uses a TPM to encrypt certain important files. Unlike Hyper-V, VMware Worksation adds the TPM module automatically.
- Choose Encryption Type: Only the files needed to support a TPM are encrypted.
- Password: Your normal VM password.
You do need to choose the encryption type and give it a password. Use the same password you've used for all other VMs in this course.
Figure 1. The Encryption Information page for creating a new Windows 11 VM in VMware.
Part 2: OS Installation and Configuration
Use the following instructions to install the OS and run post-installation tasks on your new laptop1 VM.
- Create the VM with the specifications above.
- When creating the user, use
firstname.lastname - Run through the standard Post-Installation Tasks you ran in Lab 2.
- When complete (including internal name and updates!), shut down the VM.
Investigation 2: Add laptop1 to Local HQ Network
Here, we'll connect our new laptop1 machine to office HQ network and access some local resources.
Scenario: A physical laptop connected to Ethernet inside our company's physical office.
Before You Begin
We will not be using our Hyper-V VMs in this assignment. To make things easier, change srv1's hardware settings in VMware Workstation while the VM is powered off.
On srv1:
- CPU: Change from 6-cores to 4-cores.
- RAM: Change from 16 GB to 8 GB
On srv2:
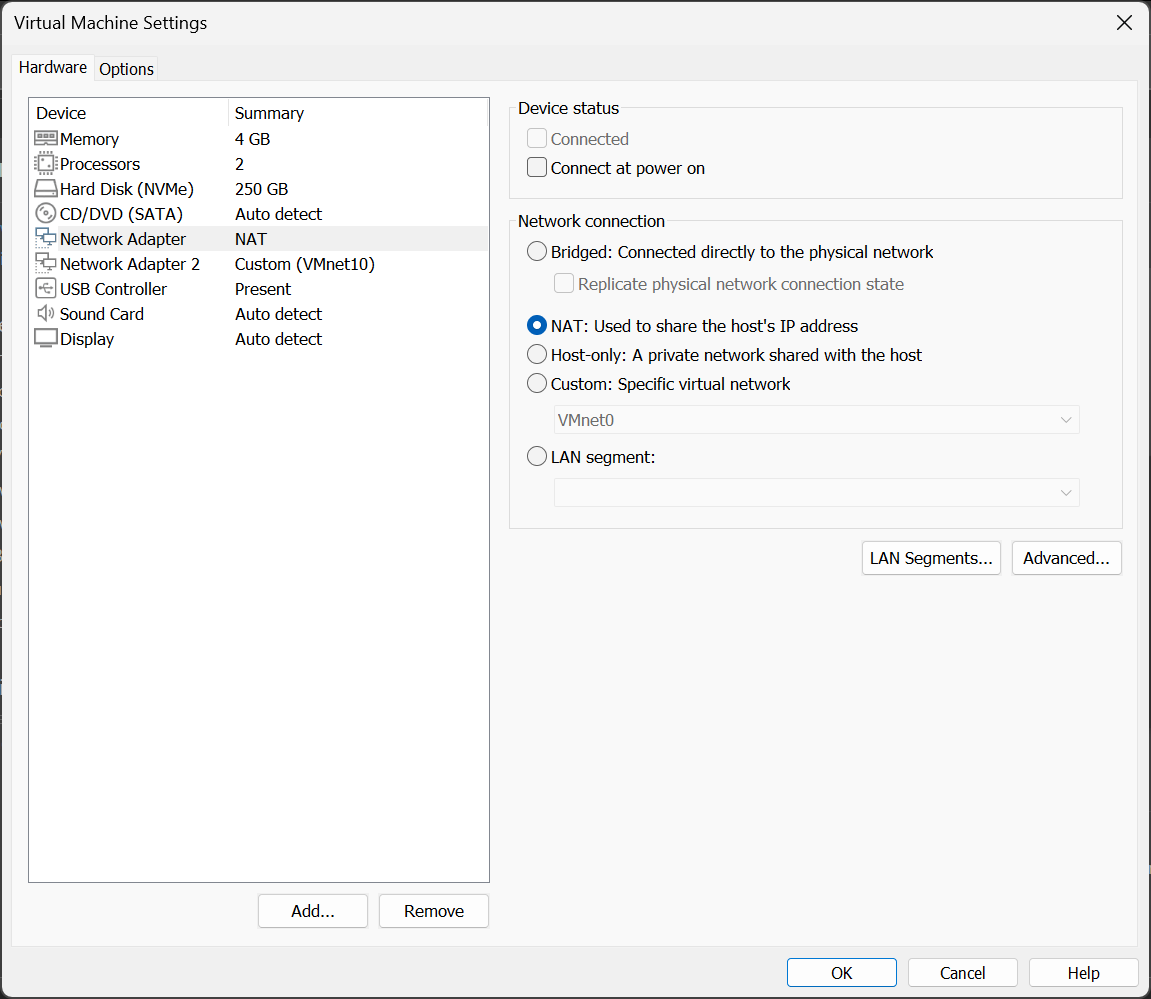
- Disconnect the NAT NIC, leaving only the NIC with the 10.0.
UID.2 online. srv2 should only be reachable though the 10.0.UID.0/24 network (HQ Network). (Refer to Fig. 2 and Fig. 3 below.)
Figure 2. NIC1 connected in VMware's Hardware Settings.
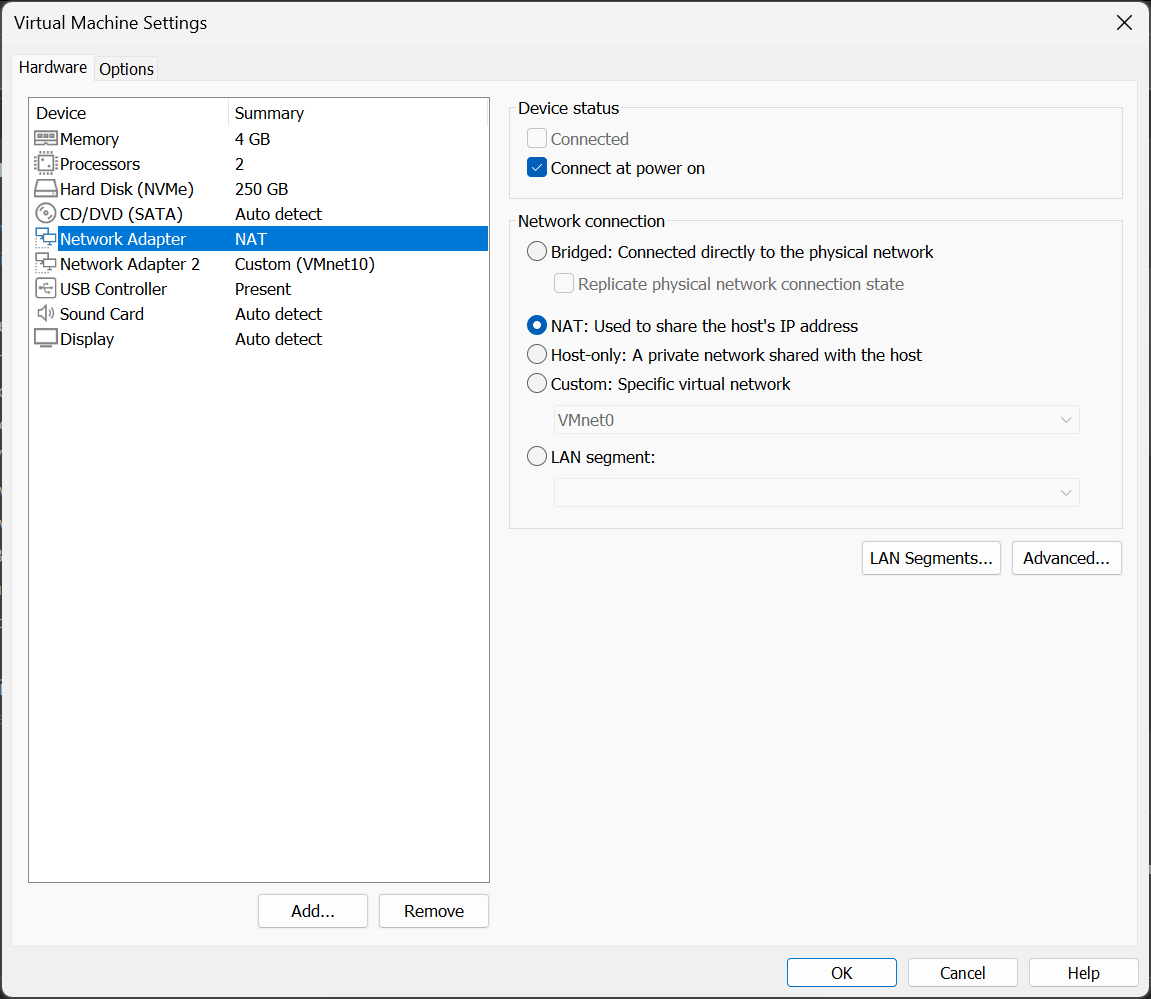
Figure 3. NIC1 disconnected in VMware's Hardware Settings.
Part 1: Switching the Network
We need to switch laptop1's network connection from the basic Internet to our office's internal network.
- Power on
srv1. - Power on
srv2. - Power on
laptop1and login with yourfirstname.lastnamecredentials. - In VMware's hardware settings for
laptop1, change NIC1 from NAT to VMnet10. - Wait for the changes to apply. This may take a few moments.
Part 2: Testing Connections to HQ Resources
Let's see if we can access all the HQ resources we were able to with our other VMs in previous labs.
Screenshots: Take full desktop screenshots of the end of the following steps:
- Step 4 (Screenshot 1)
- Step 5 (Screenshot 2)
- Step 6 (Screenshot 3)
- Switch to
laptop1. - Open Command Prompt.
- Reset DNS cache:
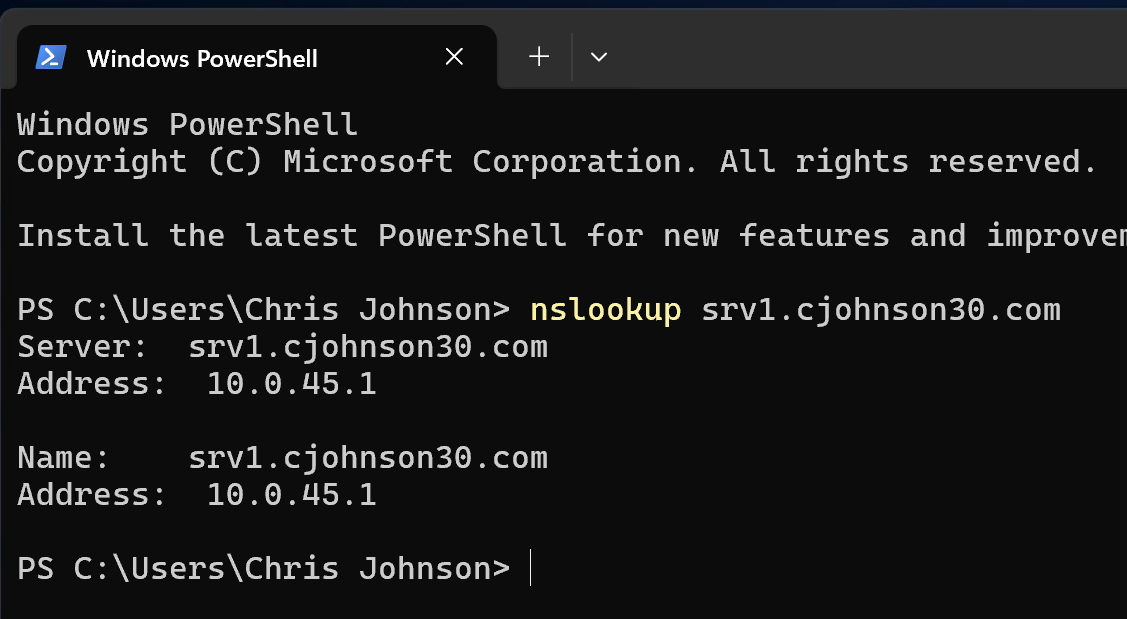
ipconfig /flushdns - Let's check DNS resolution. Run the following:
nslookup srv1.YourSenecaUsername.comnslookup srv2.YourSenecaUsername.comnslookup eff.org
Figure 4. Example of a successful DNS lookup using srv1.
- Now, let's confirm we have connections to these resources:
ping srv1.cjohnson30.comping srv2.cjohnson30.comping eff.org
- Finally, let's take a look at the path through the network that our connection to these resources is taking.
tracertis a utility that tracks each hop taken between your computer and the destination and shows any others it travelled through to get there. Run the following:tracert srv1.cjohnson30.comtracert srv2.cjohnson30.comtracert eff.org
Reflection 1: Why do these tests work? Be specific.
Part 3: Connecting to HQ Network Resources
In this part, we'll connect to actual resources on the HQ network. Remember, in this scenario, we are in the office and connected to the HQ network directly.
We will be connecting to the following services from laptop1:
- RDP
- SSH
- Webpage
Screenshots: Take screenshots of the following:
- Step 3 (Screenshot 4)
- Step 5 (Screenshot 5)
- Step 8 (Screenshot 6)
- Step 10 (Screenshot 7)
- Step 11 (Screenshot 8)
- Power on
laptop1and login. - Open the Remote Desktop Connection application.
- Connect with to srv1 with:
srv1.YourSenecaUsername.com - If you see the Server1 desktop, congrats! Close the RDP connection.
- Back on laptop1: Open an RDP connection directly to:
srv2.YourSenecaUsername.com - If you see the Server2 desktop with the
sconfigwindow, congrats! Close the RDP connection. - Open Command Prompt and login to srv2's SSH connection:
ssh Administrator@srv2.YourSenecaUsername.com - To confirm your work, run the following commands in your SSH session:
hostnamewhoami
- Close the connection.
- In Firefox, navigate to:
http://srv1.cjohnson30.com - In Firefox, navigate to:
http://www.eff.org
Reflection 2: Why did these connections work? Be specific. What's happening when we connect to
srv2based on ourtracertoutput? What's happening when we connect toeff.org?
Investigation 3: Virtual Private Networking (VPN)
In this investigation, you will configure a VPN service on srv1. This will allow laptop1 to log into the local HQ network over the Internet and access internal office resources like srv2 from outside the office.
Before You Begin
Only the following VMs need to be turned on:
- srv1
Shut down the rest for now (including laptop1).
Check the following on srv1 when online:
- In Network Connections, all three adapters (External Network, Internal Network, and vEthernet (HQ Network)) have IPv6 disabled.
- At the VMware level, check the hardware settings for srv1:
- NIC1: NAT (Internet)
- NIC2: VMnet10 (local network)
- DNS is running.
- DHCP is running.
- RRAS is running.
Part 1: Adding VPN to RRAS
Routing and Remote Access (RRAS) is a service you worked with in previous labs to set up NAT. It also offers VPN services, but our earlier setup didn't include it.
In many services, you can simply add a function or additional configuration. In others, like RRAS, you can't. We have to delete the configuration and start again. This isn't as daunting as it sounds! You aren't uninstalling the Server Feature; this is just reconfiguration within the RRAS tool.
Let's begin.
- Open the Routing and Remote Access window. (Server Manager application -> Tools -> Routing and Remote Access)
- Find your local server in the column list on the left (likely SRV1-SENECAUSERNAME (local)).
- Right-click it and select Disable Routing and Remote Access.
- You will get a warning that this will remove its configuration. This is what we want. Select Yes.
- This may take a few moments. Be patient.
- Once complete, the left-hand column list should refresh, showing almost nothing aside from the server name. The server name will also have a red status icon next to it showing you it's disabled. (If the left-hand column list is unchanged, refresh the view.)
- Right-click SRV1 and select Configure and Enable Routing and Remote Access
- You're brought back into the Routing and Remote Access Server Setup Wizard from earlier in the course.
- Select Next on the first info page. You are now in the Configuration page.
- In the Configuration page, select: Custom configuration and click Next.
- In the Custom Configuration page, select the following options and click Next:
- VPN Access
- NAT
- LAN routing
- The last page is the confirmation page. If the above selections show up in the display, click Finish to complete. (If not, hit the Back button and fix your selection. Feel free to ask for help!)
- A popup window will appear asking if you'd like to start the service. Select Cancel. We have more configuration to do before starting it up.
Figure 2. Select CANCEL on this screen!
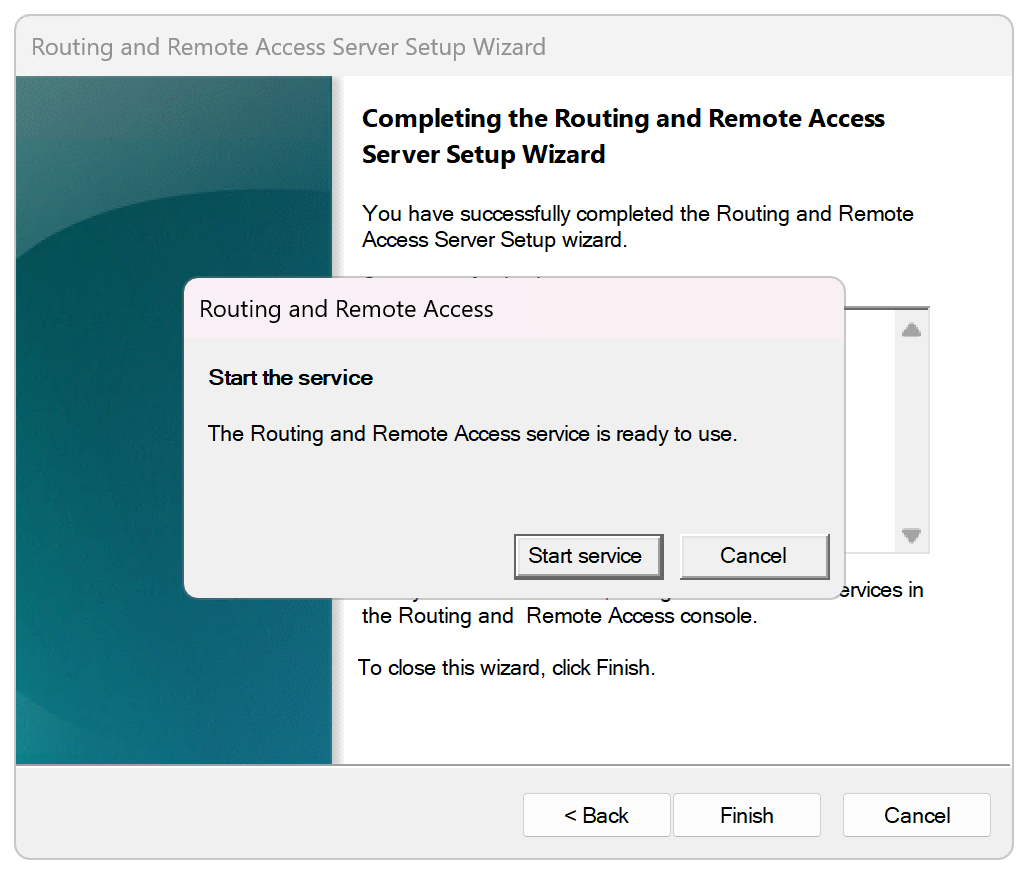
Note: Keeping the RRAS server offline for now allows us to make additional changes without having to restart the service every time we make a change. This saves us a ton of time and frustration.
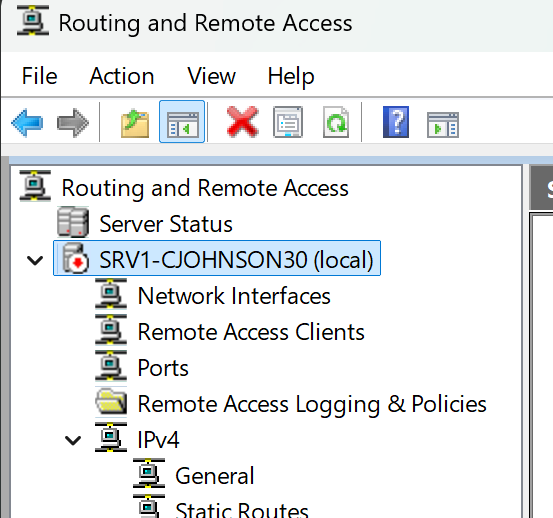
- You should now see the familiar list of items in the left-hand menu column, with two new additions:
- Ports
- Remote Access Clients
- Check: The RRAS service should still be offline. Look for the red status icon over SRV1.
Figure 3. RRAS service offline with red status icon.
- If the service is online (green), right-click it and go to: All Tasks > Stop
Part 2: Reconfiguring NAT
In this part, we'll reconfigure NAT to what we had set up before.
- In the left-hand column, click on and expand the IPv4 entry.
- Click on IPv4 -> NAT.
- Inside the NAT main window, right-click in the white space and select New Interface. Add the following:
- External Network -> Interface Type: Public interface connected to the Internet -> Enable NAT on this interface checked.
- vEthernet (HQ Network) -> Interface Type: Private interface connected to private network
Part 3: Configuring the Server for IPv4 and Local Networks
In this part, we'll configure the RRAS service to only use IPv4 and to take network information from our vEthernet (HQ Network) where our DHCP and DNS live.
- Back in the left-hand column, right-click on SRV1 and select Properties.
- In the Properties window, click on the IPv6 tab.
- Disable those pesky IPv6 options by unchecking the following:
- Enable IPv6 Forwarding
- Enable Default Route Advertisement
- Click in the IPv4 tab.
- Near the bottom of the tab, look for the Adapter entry and click on the drop-down menu.
- Select vEthernet (HQ Network)
- Click Apply (not OK!). We have more work to do here.
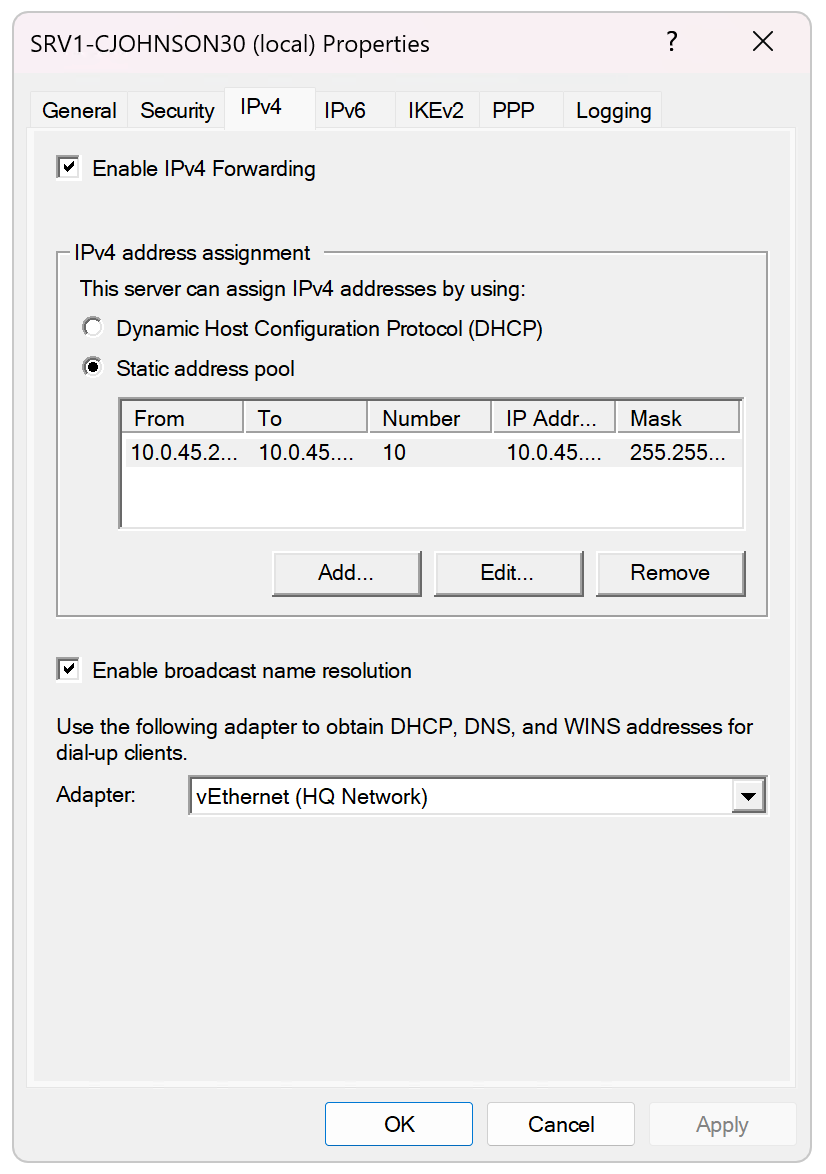
Part 4: Assigning IP Ranges for VPN Clients
In this part, we're going to assign IP addresses that the VPN can use. When a client (like laptop1) connects to the server using VPN, it'll be given an internal 10.0.UID.x address so it's part of the local network. That's how laptop1 will be able to access internal network resources.
Remember in our DHCP lab where we specified that the DHCP could only use 10.0.UID.2-10.0.UID.199, even though we could have gone up to .254? That wasn't arbitrary! We'll use those remaining addresses here.
Screenshots: Take screenshots of the following:
- Step 2.v (Screenshot 9)
- In RRAS, open the Properties window of SRV1-SENECAUSERNAME (local) and click on the IPv4 tab. (If this is already open from Part 3, skip to Step 2.)
- Look for the IPv4 address assignment section in this tab.
- Change the selection from Dynamic Host Configuration Protocol (DHCP) to Static address pool.
- Below that, click the Add button.
- The New IPv4 Address Range window pops up.
- Enter the following:
- Start IP address: 10.0.
UID.200 - End IP address: 10.0.
UID.209 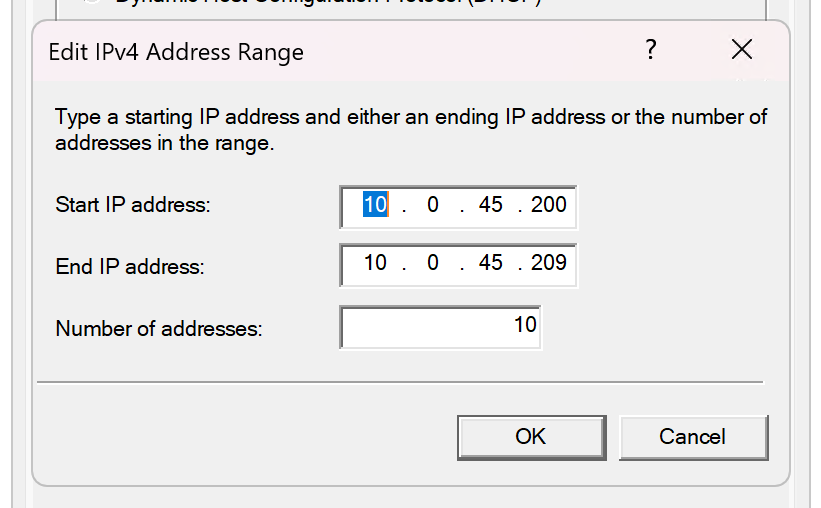
- This should give you 10 in the field below automatically. Click OK.
- Start IP address: 10.0.
- You should now see that IP address range in the Static Address pool table. (See Figure 4 below.)
- Click Apply (not OK!). We have just a little more work to do here.
Figure 4. Completed IPv4 tab.
Part 5: VPN Security and Authentication
Here, we'll decide how clients (like laptop1) will authenticate to srv1 when using VPN. These are security settings and must match on both the server and the client.
PROD NOTE: We'll be using an older protocol called L2TP and a Shared passphrase. This is an older, deprecated setup with security flaws and should not be used in normal production environments! We're using it here in an educational environment for simplicity.
In a production environment, we'd use certificate-based IKEv2 instead of L2TP. It's more sophisticated, secure, and Microsoft recommended. We'll look at this briefly after Active Directory is installed in a later lab.
Screenshots: Take screenshots of the following:
- Step 6 (when all changes complete) (Screenshot 10)
Let's begin our setup.
- In RRAS, open the Properties window of SRV1-SENECAUSERNAME (local). (If this is already open from Part 3, skip to Step 2.)
- Change to the Security tab.
- One of the first things you can see is Authentication provider. It's set to Windows Authentication. Leave it as is.
- Just below that, there's a button labelled Authentication Methods.... Click it.
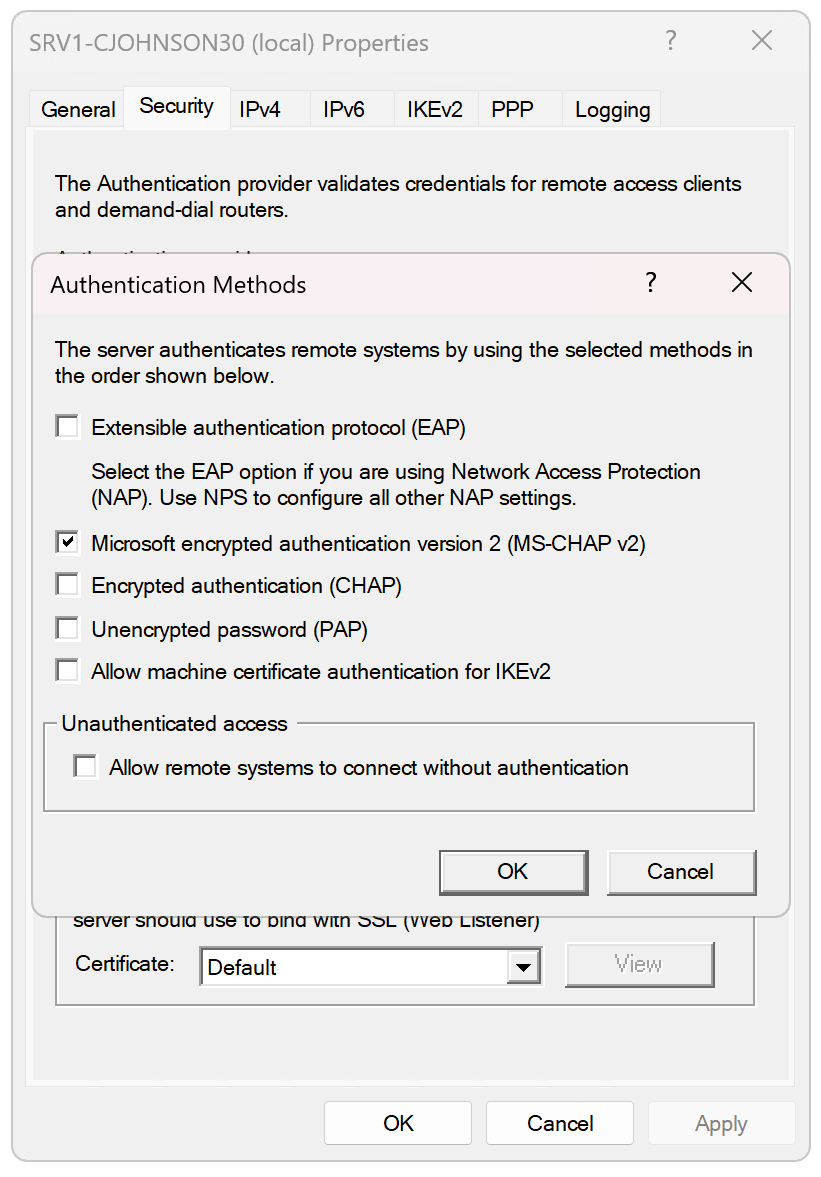
- The Authentication Methods pop-up window appears. We're going to be changing a few settings here
- Verify the following settings, and change the ones on your setup that don't match the values below (Refer to Figure 5 below):
- Extensible authentication protocol (EAP): Unchecked
- Microsoft encrypted authentication version 2 (MS-CHAP v2): Checked
- Encrypted authentication (CHAP): Unchecked
- Unencrypted password: Unchecked
- Allow machine certificate authentication for IKEv2: Unchecked
- Allow remote systems to connect without authentication: Unchecked
- Click OK when done.
- Click OK on the Properties -> Security tab to close the window.
Figure 5. Properly selected authentication methods.
Part 6: Starting up the RRAS service with VPN
In this part, we'll start up the RRAS service, check our VPN work, and make a small change to our VPN configuration we couldn't do until the service was running.
First, let's start up the RRAS service.
- In RRAS, find the SRV1-SENECAUSERNAME (local) entry and right-click it.
- In the drop-down context menu, click All tasks, then Start. This may take a few moments to start up.
- When complete, the local server entry should now have a green icon.
- Right-click SRV1 again and select Properties.
- In the Security tab, change the following:
- Allow custom IPsec policy for L2TP/IKEv2 connection: Checked
- Preshared Key: OSM620-2025F-L2TP-ONLY-DoNotReuse!
Figure 6. Example of an entered Preshared Key value.
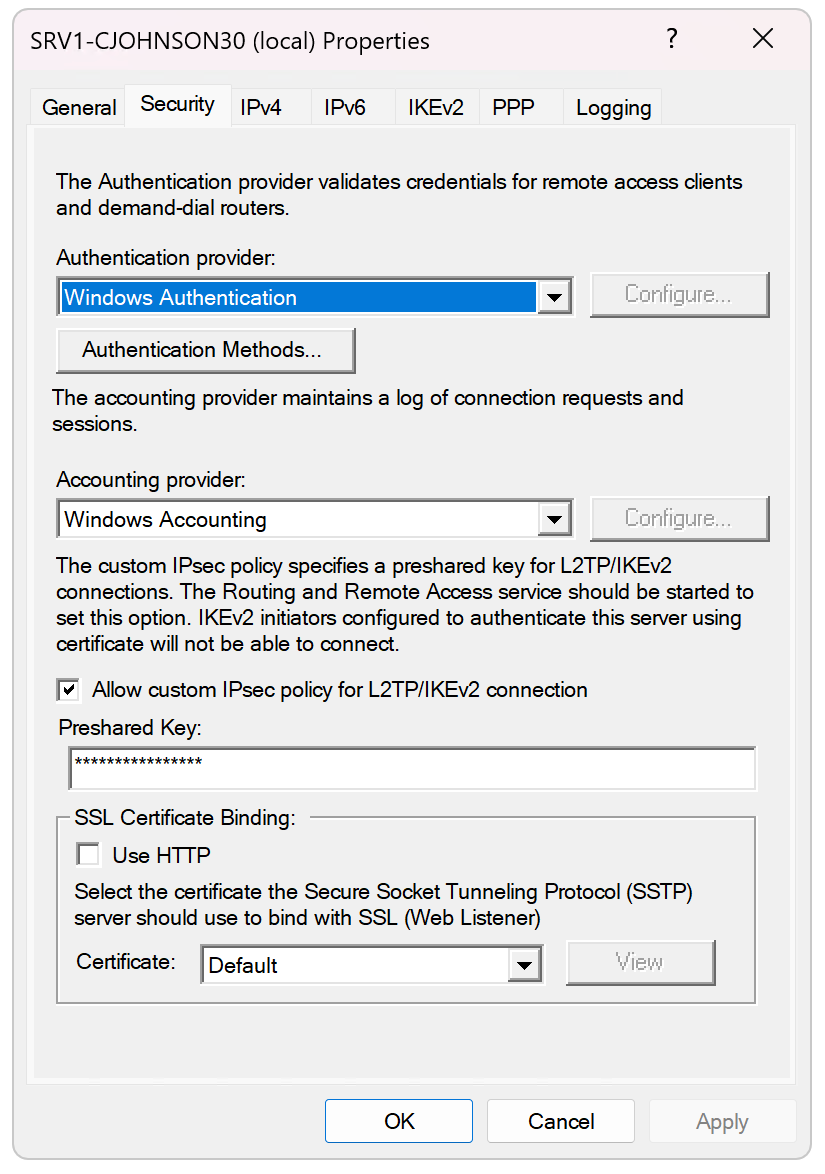
- Click OK to apply and close the window.
- It may ask you to restart the service. Click OK.
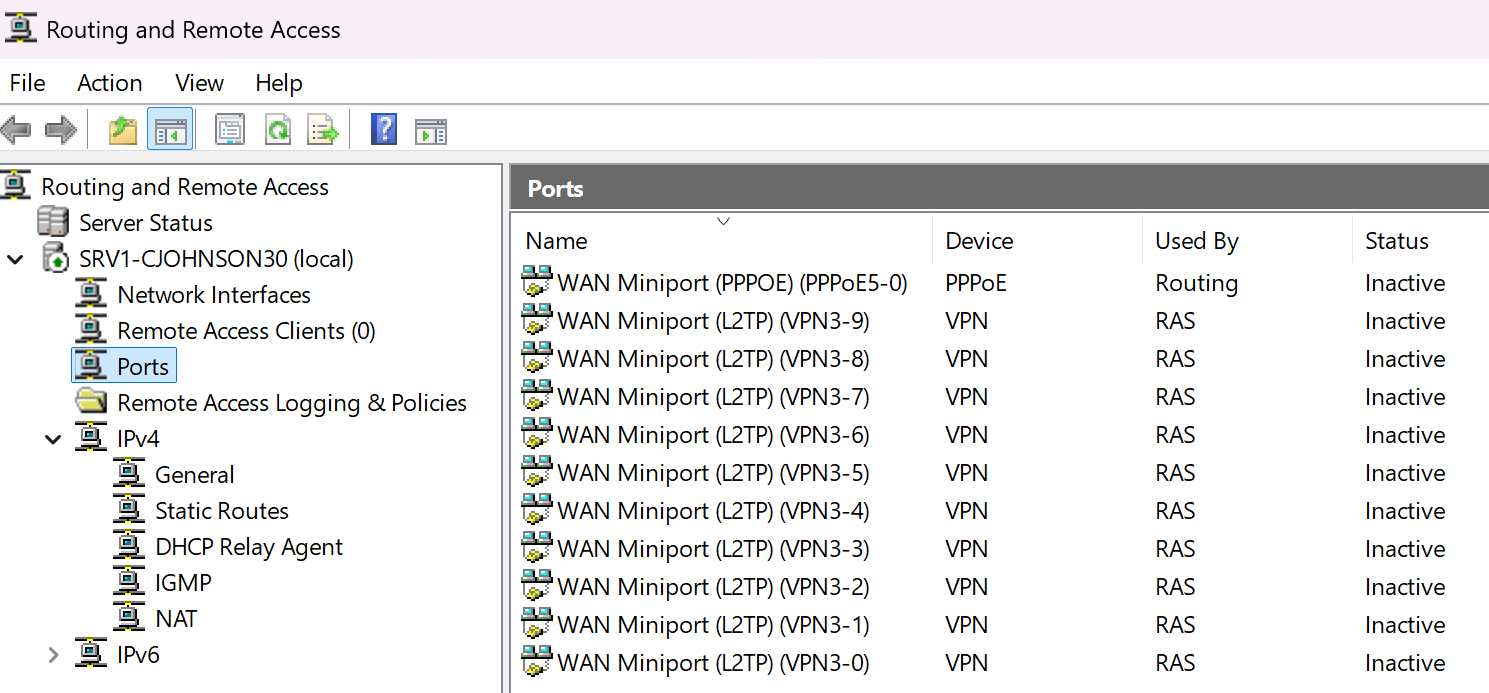
Part 7: Creating Available Ports for VPN Connections
In this part, we'll create a pool of ports that can be used for individual VPN client connections. Each connection must have its own unshared port. These are recycled after disconnect.
In production environments, decisions have to be made from a business perspective at this point. How many people do we expect to be logging in to the VPN at any given time? We need to have enough ports available for that number, otherwise ports will run out and additional people won't be able to connect.
For us, we're going to stick with a demo number of 10 ports. That means we will support 10 simultaneous active VPN client connections. (If an 11th person tried to connect when 10 others were online, they'd get a connection error.)
IMPORTANT: The RRAS service must be in a Started state (green icon)! Adding the ports below when the service is disabled will cause configuration damage that is very difficult to fix.
Screenshots: Take screenshots of the following:
- Step 8 (Screenshot 11)
Let's set this up.
- In RRAS, verify that the service is online (look for the green icon.) If it isn't, right-click and select: All Tasks > Start.
- Find the Ports entry.
- Right-click and select Properties.
- The Ports Properties window appears.
- We have some major changes to make here. To make changes, you'll click on one of the entries and then select the Configure... button. When you change the number of ports, a popup asking if you're sure will appear when you hit OK. Select Yes.
- Verify the following settings, and change the Number of ports on your setup that don't match the values below:
- WAN Miniport (SSTP): 0
- WAN Miniport (IKEv2): 0
- WAN Miniport (PPTP): 0
- WAN Miniport (PPPoE): 1 (Though we don't need it, server will not let you set this to zero.)
- WAN Miniport (GRE): 0
- WAN Miniport (L2TP): 10
- Note: Select Remote access connections (inbound only) in this window.
- Note: When you make this change, a popup will ask if you want to restart the RRAS server. Select Yes.
- Your srv1 computer will restart. This is normal.
- When you've finished restarting and logged back in, reopen the RRAS application.
- In the main Ports window, the list in the main window should only contain the 10 L2TP ports (and 1 PPPoE).
Figure 7. Completed L2TP ports listing.
Part 8: Network Policy Server
In this section, we'll open the Network Policy Server application and enable the profile that allows VPN authentication. This is an easy security task. This feature is installed by default through our previous lab work.
- Open Server Manager.
- Click Tools -> Network Policy Server
- In the Network Policy Server application, use the left-hand column to go to Policies > Network Policies.
- In the main window, find the policy entry listed as Connections to Microsoft Routing and Remote Access Server.
Figure 8. Network Policy Server application with the correct profile selected to edit.
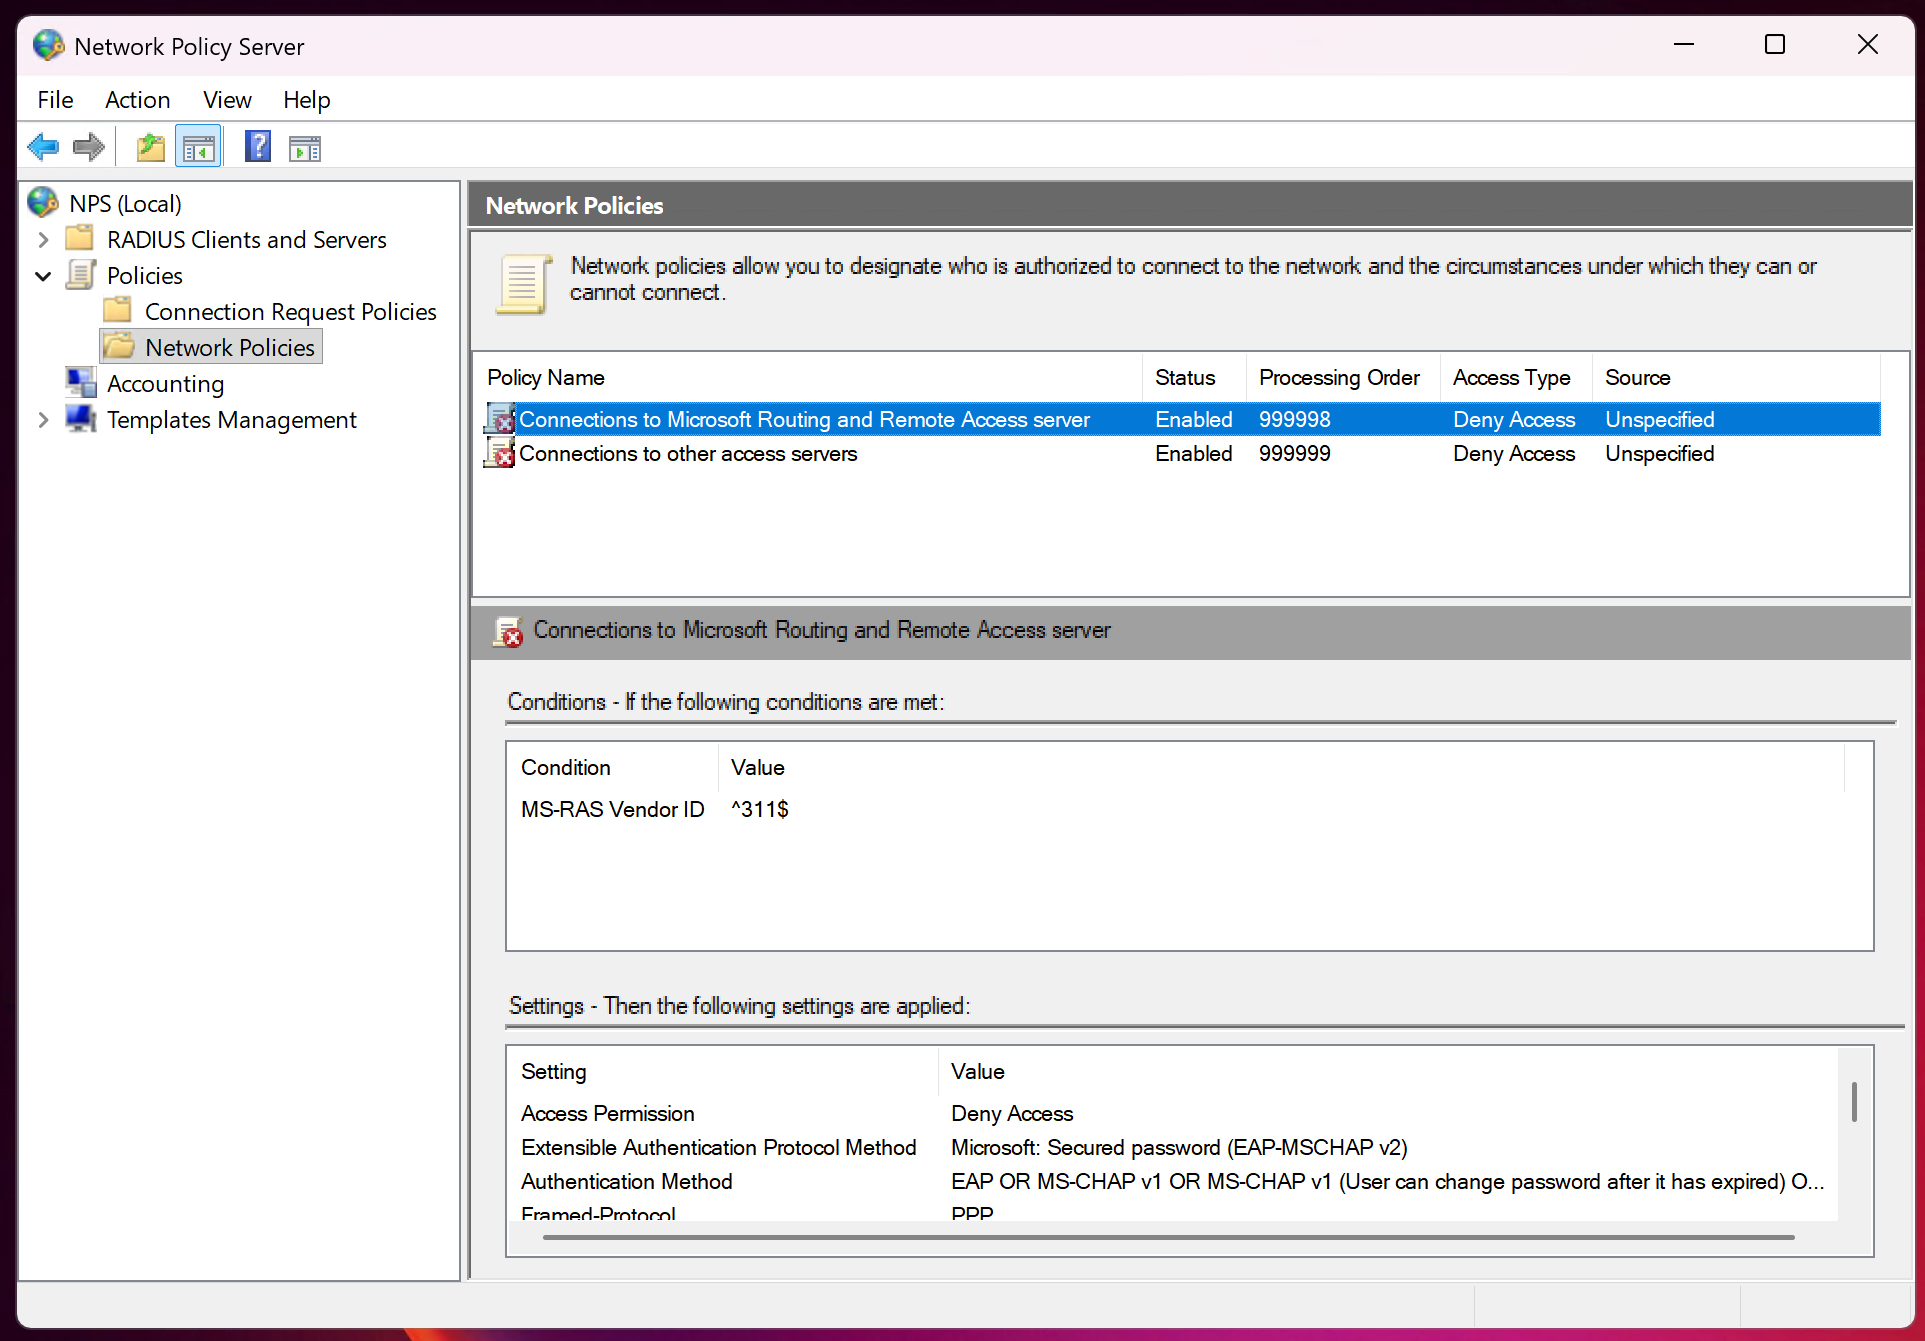
- Double-click this entry.
- In the new Properties window, stay on the Overview tab.
- Find the section on that tab labelled Access Permission.
- Select: Grant access. Grant access if the connection matches this policy.
Figure 9. Granting access to the defined policy we're editing.
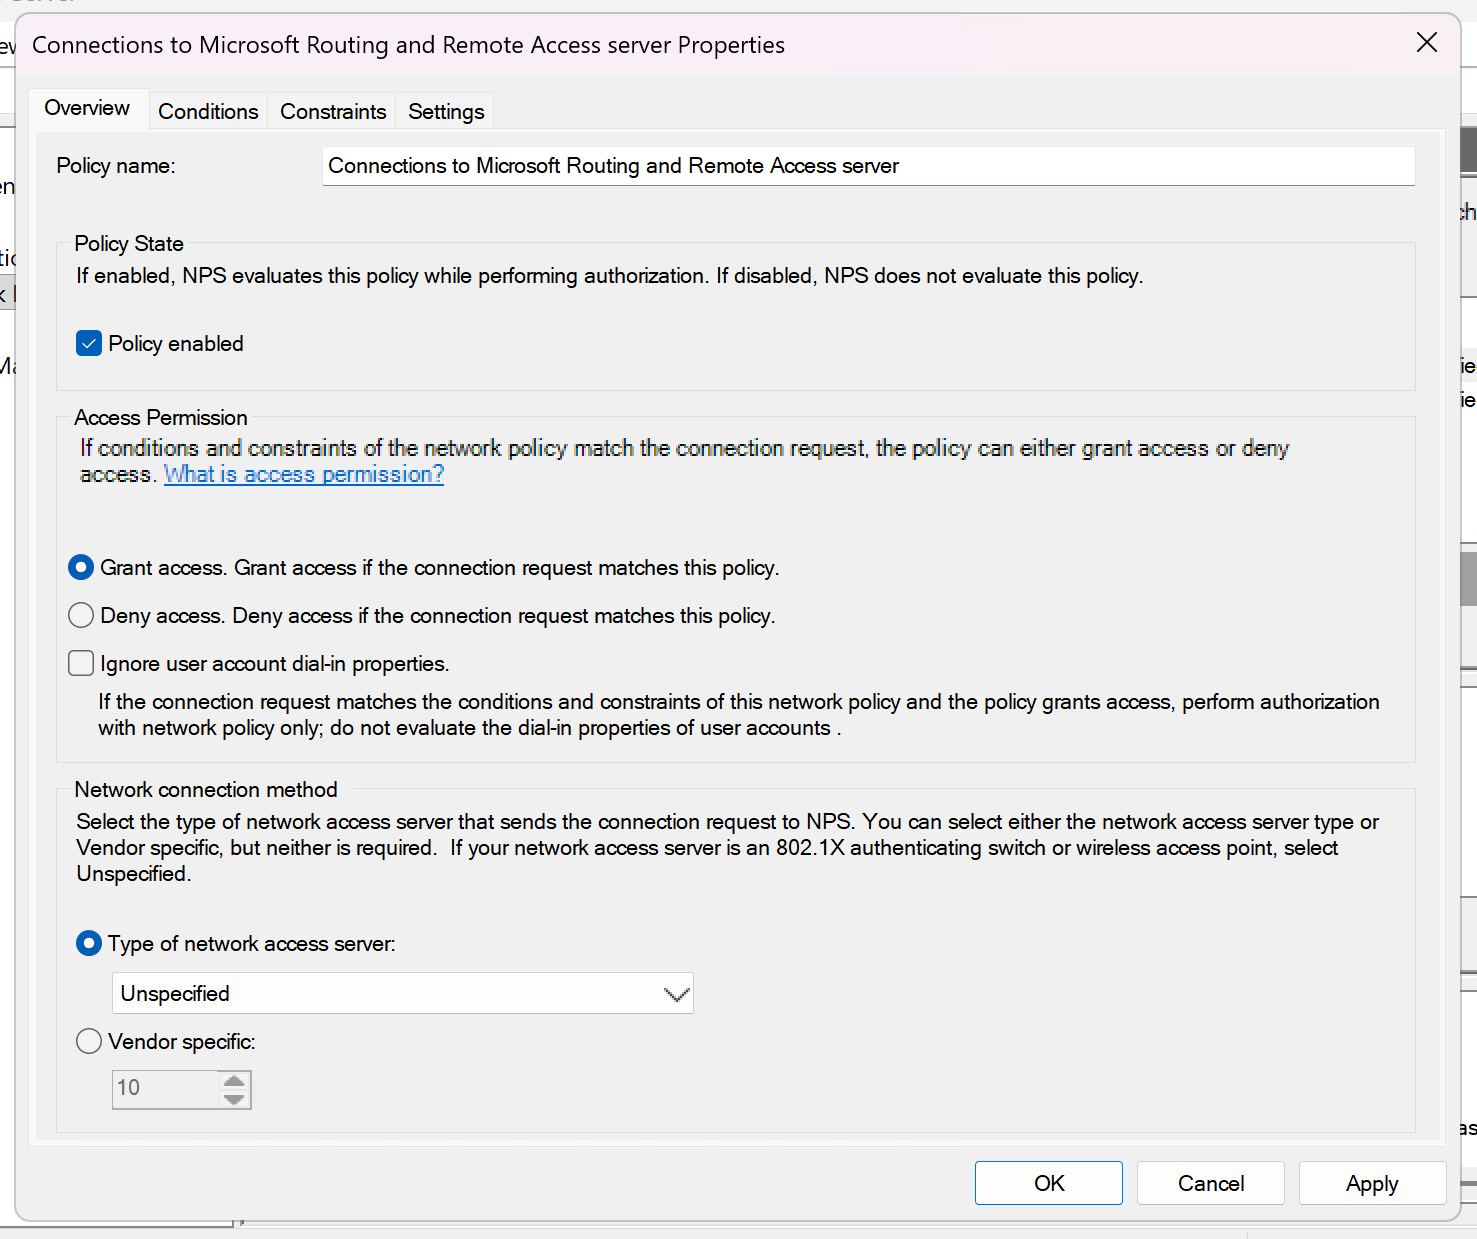
- Click OK to apply and close the window.
- The policy name in the main window should now have a green icon next to it.
- You can now close the Network Policy Server application.
Part 9: Creating a Local User
Up to this point, you've been using the basic Administrator account. As the name implies, it has administrative privileges and can modify the system and access other users' files. The laptop we've set up is for a normal employee, not someone on the admin team. Giving our normal employee admin access is a terrible security choice, so we won't!
For the employee to connect to srv1, we need to give them an account on that server. We'll create one for them below. It's a quick process. (There are other ways of creating VPN users, but this is easiest.) A new local account is, by default, not an admin.
Screenshots: Take screenshots of the following:
- Step 7 (Screenshot 12)
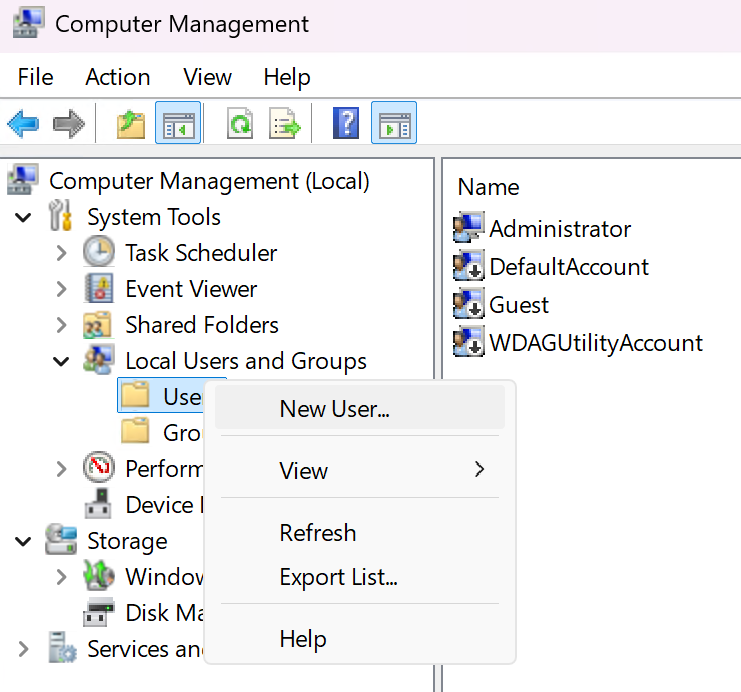
- On srv1, open Server Manager.
- Click Tools -> Computer Management
- In the Computer Management application, use the left-hand column to go to Local Users and Groups > Users.
- Right-click the Users folder and select New User...
Figure 10. New User selection from context menu.
- In the New User popup window, fill out the following values:
- User name:
firstname.lastname(This is the same as you used for laptop1) - Full name: Enter your full name (Example: Chris Johnson)
- Description: VPN User
- Password: Same as laptop1
- Confirm password: Same as laptop1
- User must change password at next login: Unchecked
- User cannot change password: Unchecked
- Password never expires: Checked
- Account is disabled: Unchecked
- User name:
Figure 11. New User Dialog Box - Filled Out.
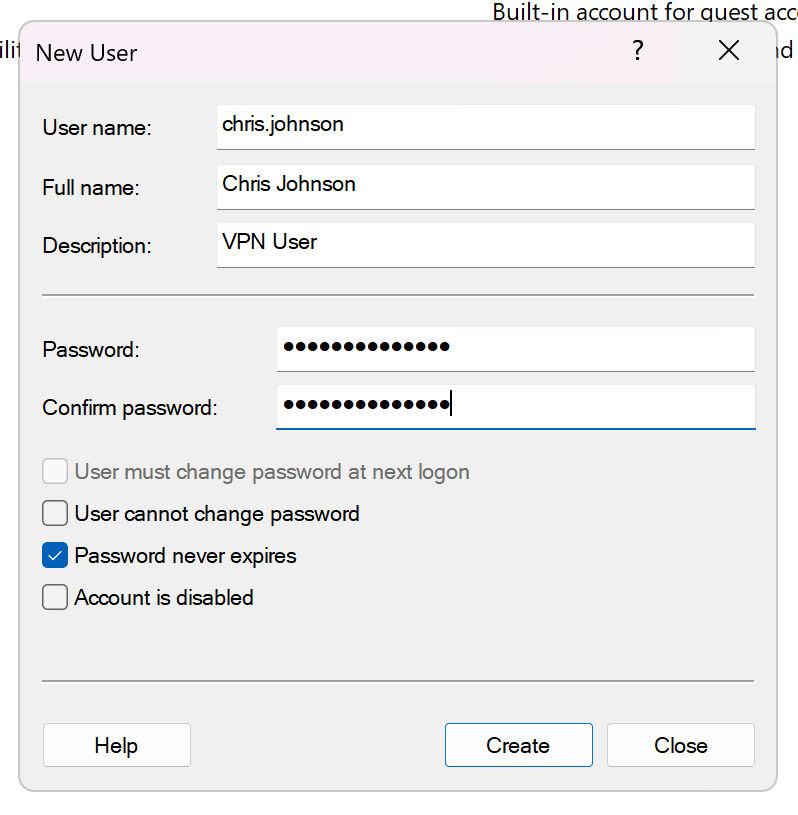
- Confirm your settings are correct and click Create.
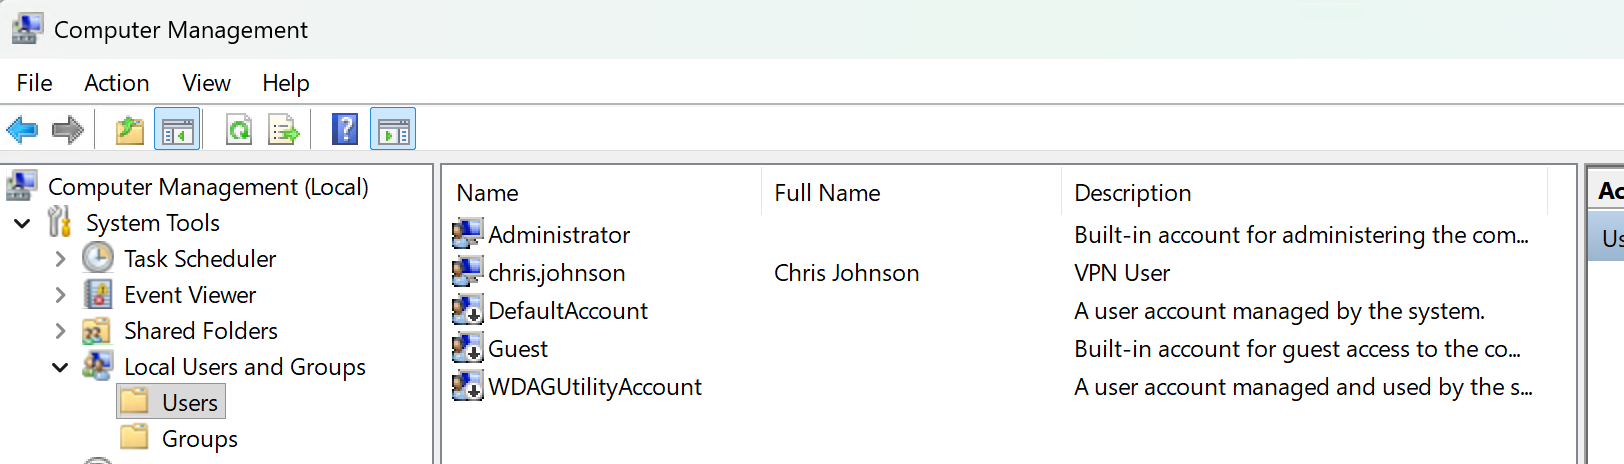
- Confirm you can see your new user in the list. If so, move on to the next Investigation!
Figure 12. New user successfully added to list.
Investigation 4: Connecting to the VPN with laptop1
In this investigation, we will set up laptop1 to connect to the VPN service we configured on srv1.
Scenario: Our new employee wants to connect to office resources from home. Let's make sure they can.
Before You Begin:
Turn on the following VMs:
- srv1
- srv2
- laptop1
IMPORTANT! Check the following on laptop1:
In Network Connections, the single adapter Ethernet0 has IPv6 disabled.
This should already be set from previous labs, but now is a good time to check. Missing this will break this investigation in interesting and very frustrating ways.
Part 1: Switching laptop1's Network
Here, we'll emulate taking our new laptop home. This means removing it from the HQ network and putting it on NAT. Basically, giving it a standard Internet connection you'd get if you used it at home with your normal setup.
Screenshots: Take screenshots of the following:
- Step 2 (Screenshot 13)
- Step 8 (Screenshot 14)
- Turn on laptop1.
- Once logged in, open Command Prompt and run:
ipconfig - Observe the IP address and other network information. This will be important later.
- In VMware Workstation, open laptop1's Settings.
- Find the Network Adapter and click on it.
- Change the network selected from VMnet10 to NAT.
- Give it a few moments to apply the change.
- Back inside laptop1, run the
ipconfigcommand again. - Has the IP address changed from the 10.0.
UID.x address? Good!
Reflection 3: Why has the IP address changed and what does it mean for what laptop1 can now access compared to Investigation 2?
Part 2: Testing Connections to Resources Under NAT
We will now check our ability to connect to several HQ network and Internet resources to see the difference between our on-premises (ie. in office) connection and a typical out-of-office Internet connection.
Screenshots: Take screenshots of the following:
- Step 3 (Screenshot 15)
- Step 4 (Screenshot 16)
- On laptop1, open Command Prompt.
- Reset DNS cache:
ipconfig /flushdns - Let's check DNS resolution. Run the following:
nslookup srv1.YourSenecaUsername.comnslookup srv2.YourSenecaUsername.comnslookup eff.org
- Now, let's check our connections to these resources:
ping srv1.cjohnson30.comping srv2.cjohnson30.comping eff.org
Reflection 4: Why can't you connect to certain things but can connect to others?
Part 3: Creating the FQDN: vpn.YourSenecaUsername.com
In this part, we'll create a local entry on laptop1 that points a new FQDN (URL), vpn.YourSenecaUsername.com to srv1. This is necessary for our VPN connection in Part 3.
Why are we doing this?
Normally, in a production or corporate environment, we'd have a registered domain name that works on the Internet. So, an address like vpn.cjohnson30.com would point to our srv1's External Network NIC. This is the one that has an IP address that allows Internet connections, so it can be reached through the Internet from anywhere.
We don't have a purchased domain name like cjohnson30.com. We're doing everything local. So, we have to cheat a little.
We trick laptop1 into thinking vpn.YourSenecaUsername.com is a valid Internet address.
PROD NOTE: This is only done in lab testing environments! Never do this on production.
Screenshots: Take screenshots of the following:
- Step 9 (Screenshot 17)
Let's trick laptop1:
- First, on srv1: Open Command Prompt and run:
ipconfig- Write down the IP address of the External Network. We'll need this shortly.
- Over on laptop1: Open the folder:
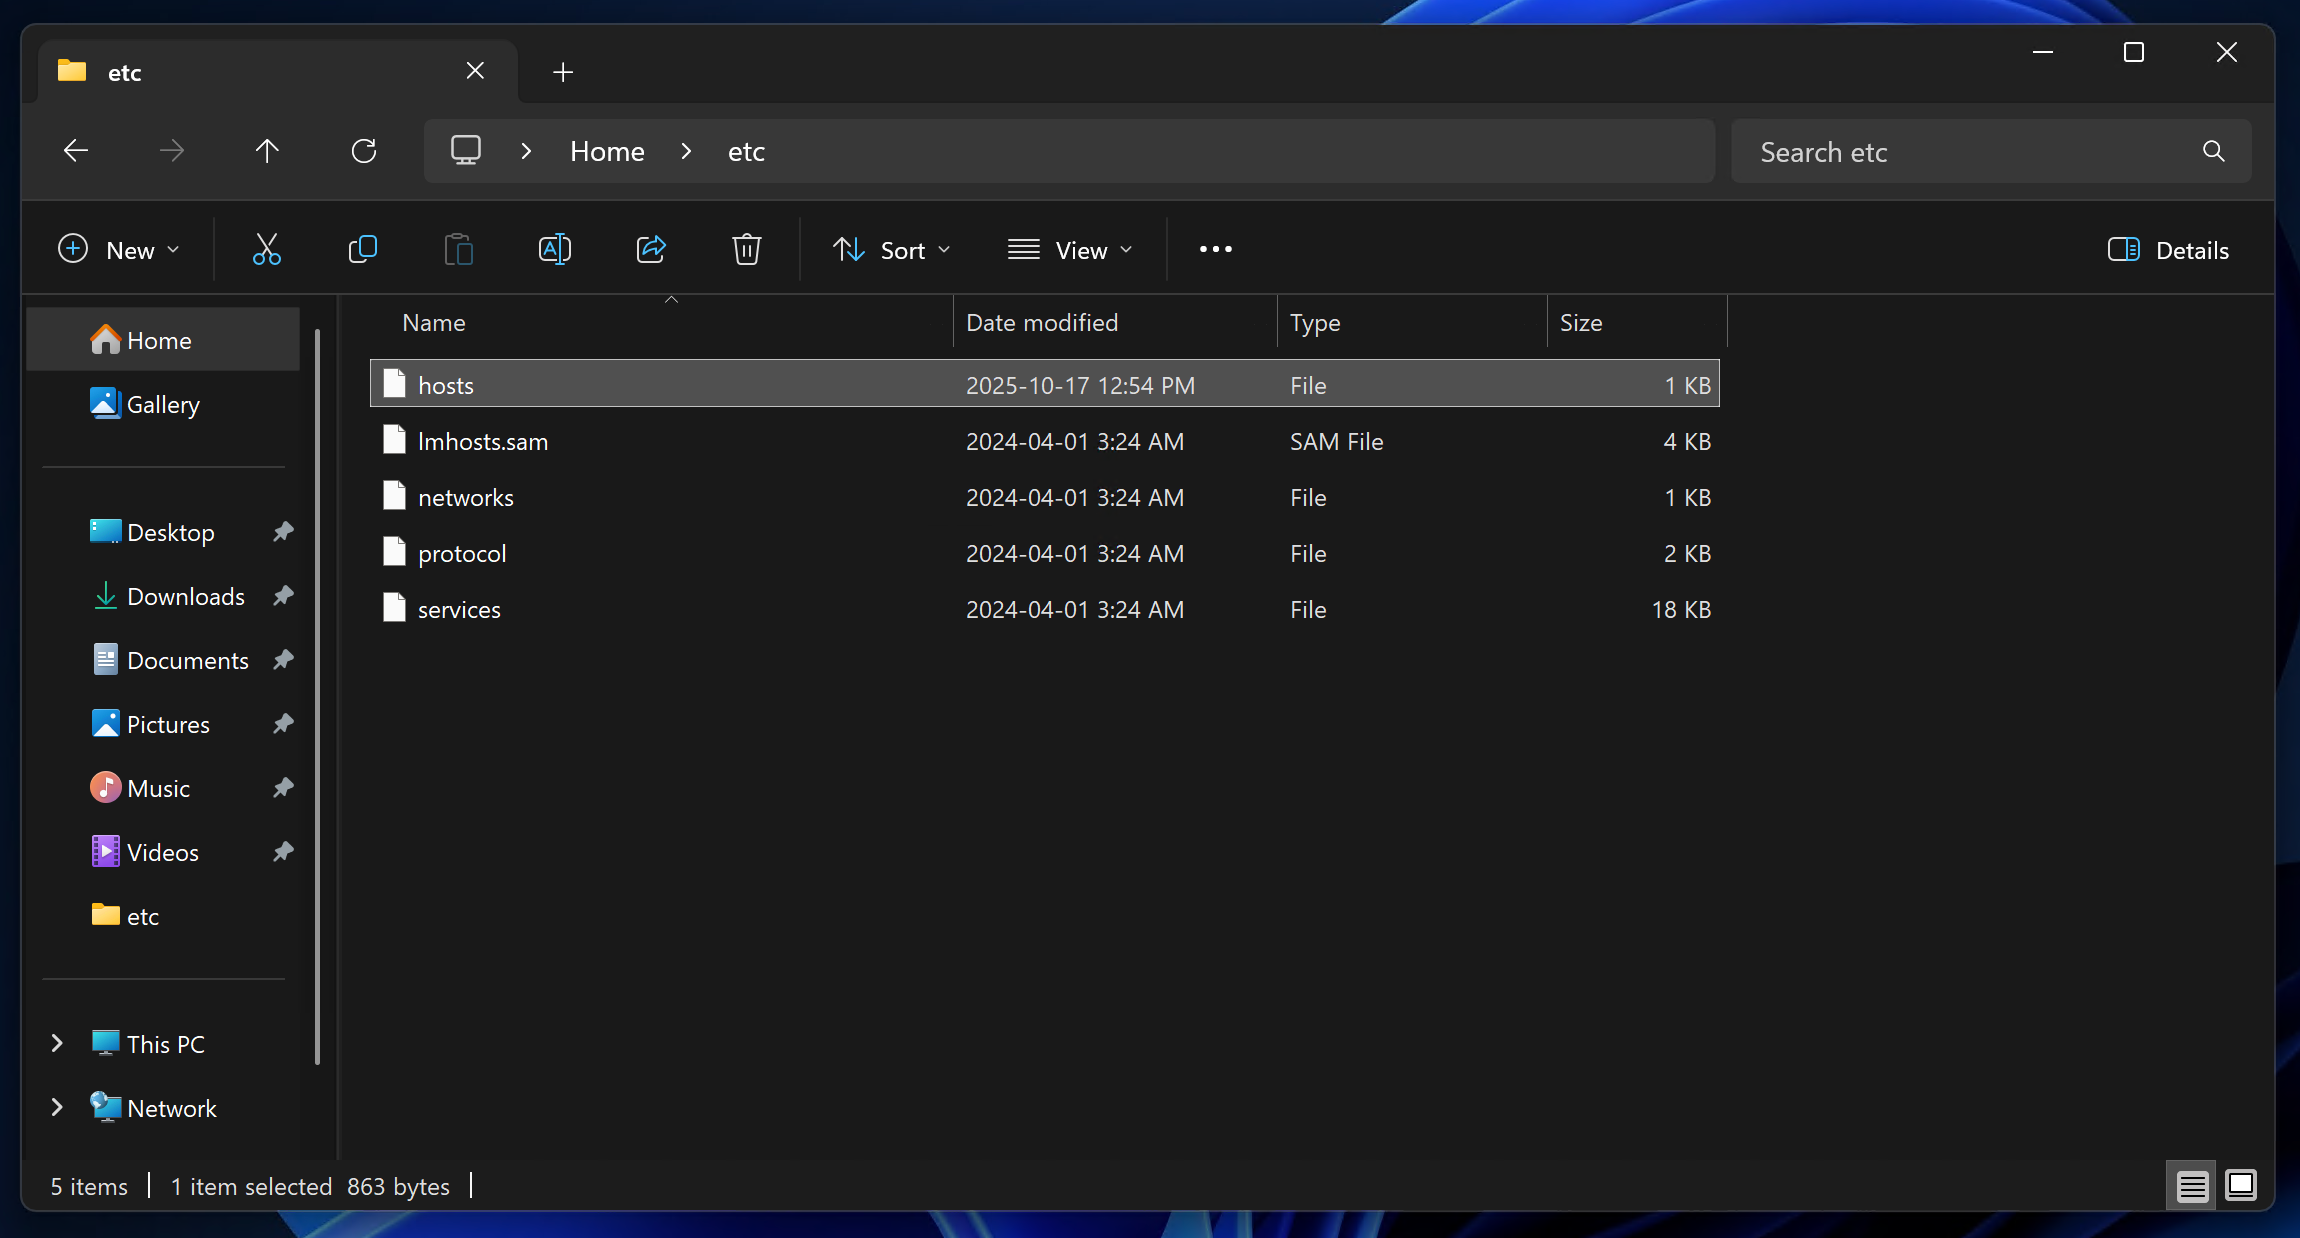
C:\Windows\System32\drivers\etc - There are several files here, including one called:
hosts
Figure 13. List of files in: C:\Windows\System32\drivers\etc
- Copy the
hostsfile to your laptop1 desktop. - Double-click it to open it. The system will ask you what application to use. Choose Notepad.
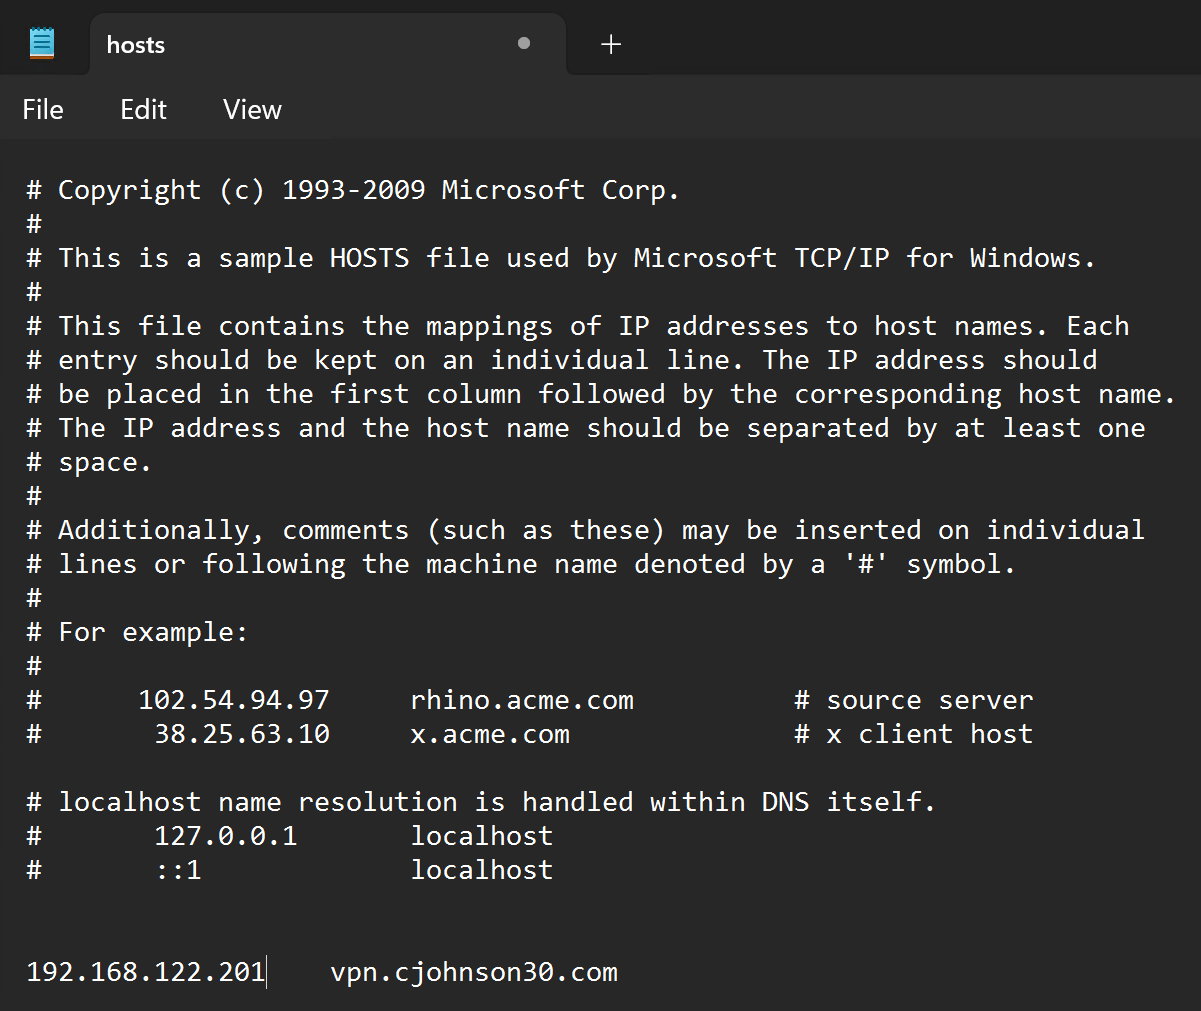
- At the very bottom of the text document, add the following line (and change it according to your setup!):
- srv1 External Network IP address vpn.
YourSenecaUsername.comExample:
192.168.122.105 vpn.cjohnson30.com
- srv1 External Network IP address vpn.
Figure 14. Example VPN entry in hosts file.
- Save this file. When the dialog box comes up asking for a name, use this:
"hosts"- Those double-quotes are necessary. This ensures it doesn't add .txt to the end.
- Copy the file back to:
C:\Windows\System32\drivers\etc - Check your work by opening Command Prompt and running the following command:
ping vpn.YourSenecaUsername.com - If you received a response pointing for your srv1 external IP address, congrats! Move to Part 4.
Part 4: Configuring a VPN Connection on laptop1
In this part, we'll use our laptop1 client VM to connect to the VPN on srv1. This involves creating a VPN profile and then connecting.
Screenshots: Take screenshots of the following:
- Step 3 (completed) (Screenshot 18)
- Step 7 (Screenshot 19)
- On laptop1, open: Settings > Network & internet > VPN
- Click on Add VPN
- Use the following settings:
- VPN Provider: Windows (built-in)
- Connection name: SRV1 VPN
- Server name or address: vpn.YourSenecaUsername.com (replace with your domain)
- VPN type: L2TP/IPsec with pre-shared key
- Pre-shared key: OSM620-2025F-L2TP-ONLY-DoNotReuse!
- Type of sign-in info: Username and password
- Username:
firstname.lastname - Password:
password you used for the above account on srv1 - Remember my sign-in info: Checked
Figure 15. Example of filled out VPN client information.
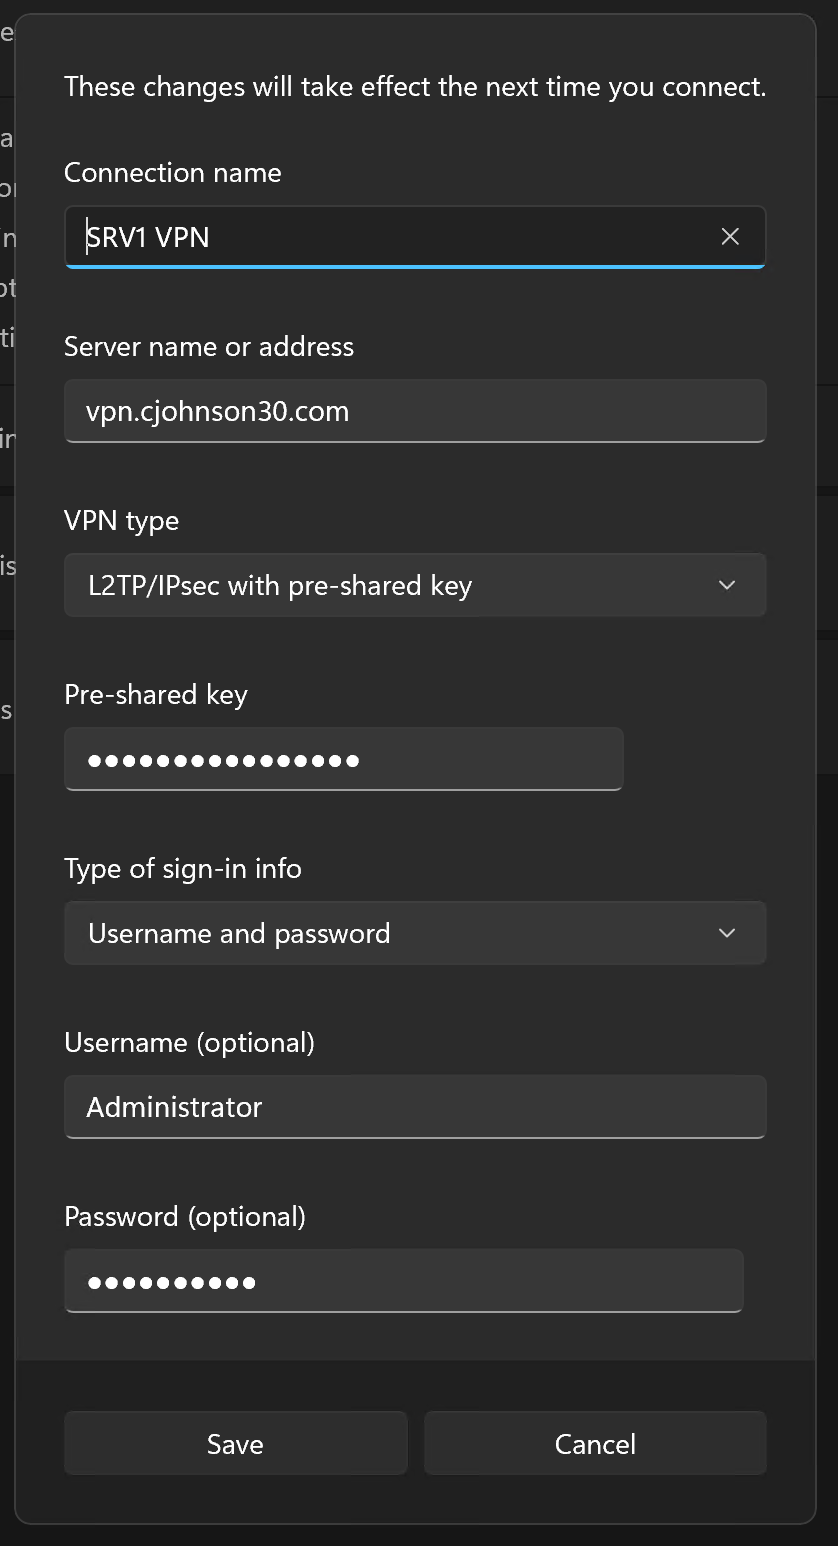
- Double-check the above information, then click Save.
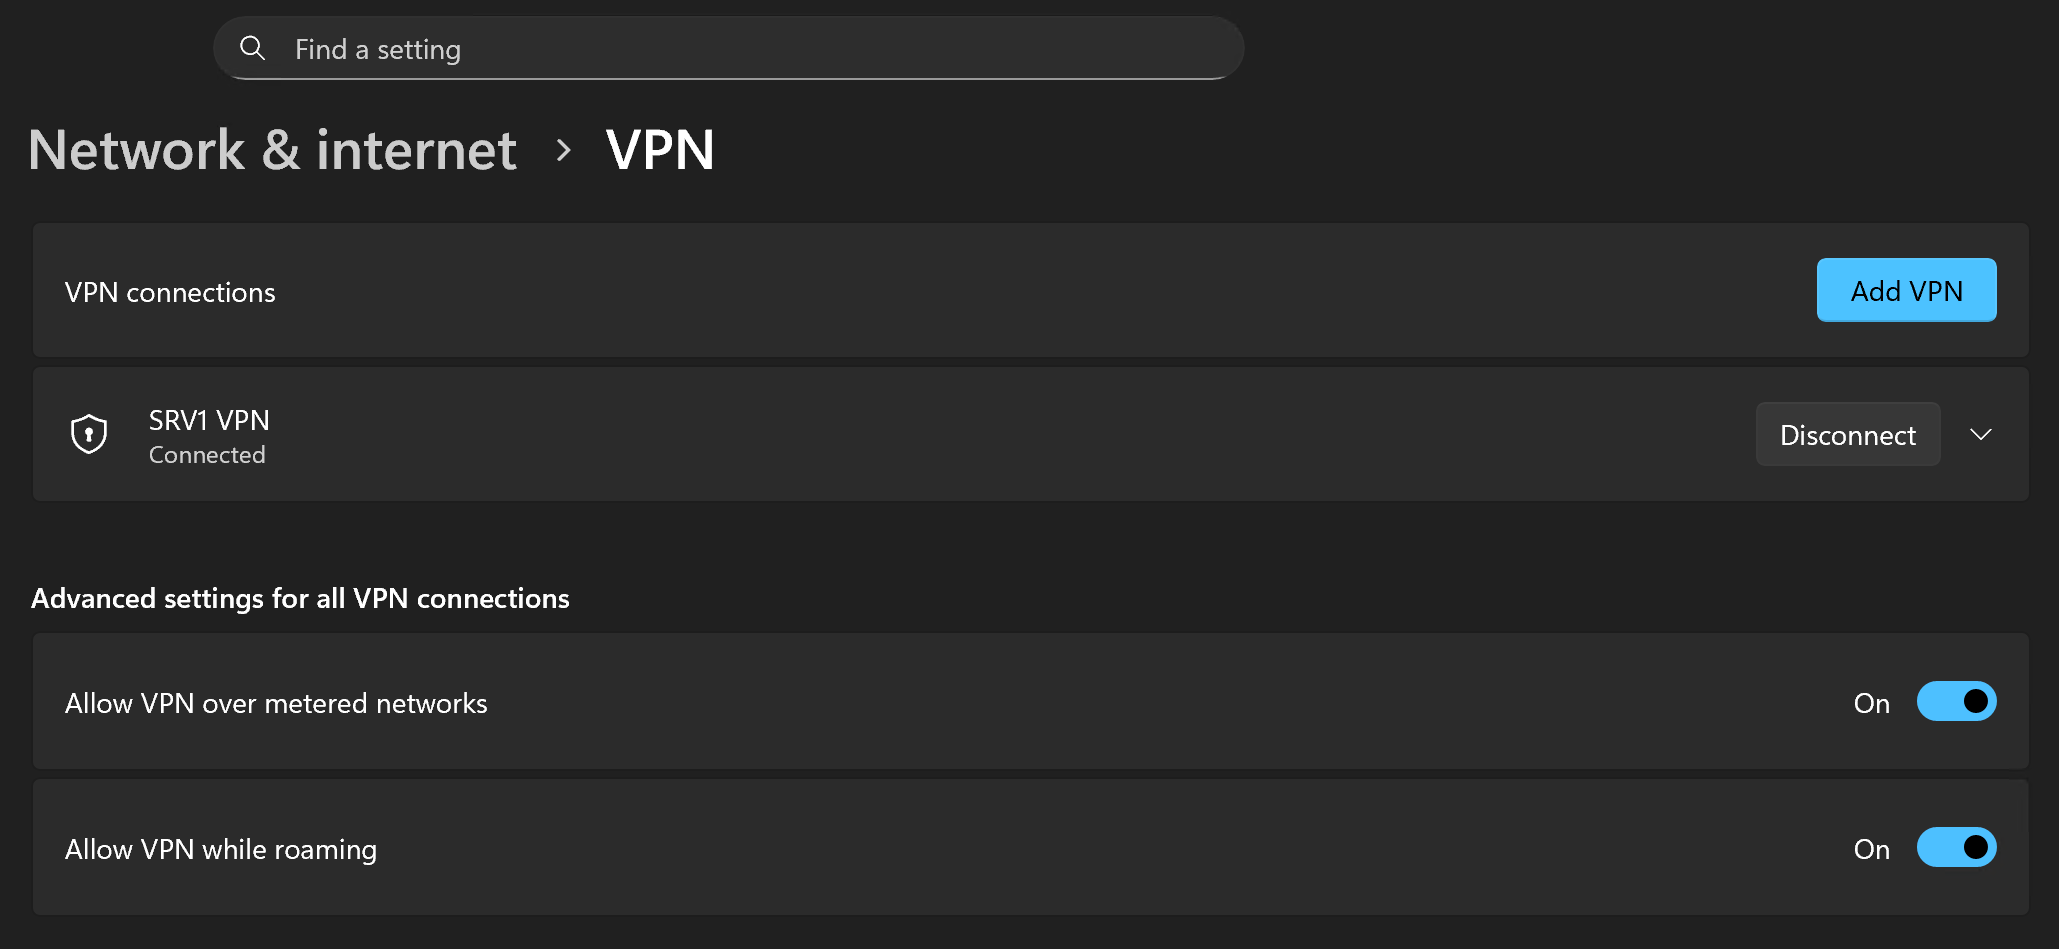
- Back in the VPN window, a new entry has appeared: SRV1 VPN
- Click the Connect button.
- After a few moments, it should say Connected.
Figure 16. VPN connected.
- If not, review your previous settings and/or ask for help.
- Check your work once more by opening Command Prompt and running:
ipconfig
Reflection 5: What do you notice that's different? Why do you think this is? What might this mean?
Part 5: Testing Connections to HQ Network Resources
This is the fun part. Let's test our connection to HQ network resources, things that aren't accessible through a normal Internet connection.
Screenshots: Take screenshots of the following:
- Step 3 (Screenshot 20)
- Step 4 (Screenshot 21)
- Step 5 (Screenshot 22)
- On laptop1, open Command Prompt.
- Reset DNS cache:
ipconfig /flushdns - Let's check DNS resolution. Run the following:
nslookup srv1.YourSenecaUsername.comnslookup srv2.YourSenecaUsername.comnslookup eff.org
- Now, let's confirm we have connections to these resources:
ping srv1.cjohnson30.comping srv2.cjohnson30.comping eff.org
- Finally, let's take a look at the path through the network that our connection to these resources is taking:
tracert srv1.cjohnson30.comtracert srv2.cjohnson30.comtracert eff.org
These should all work! If they don't, start troubleshooting.
Reflection 6: How are these results different from when you ran them in Investigation 2? How are they not? How are these results different from when you ran them in Part 2 above? Why?
Part 6: Connecting to HQ Network Resources
In this final part, we'll connect to actual resources on the HQ network through the VPN. Remember, in this scenario, we are at home and not on the HQ network directly.
We will be connecting to the following services from laptop1:
- RDP
- SSH
- IIS (Website)
Screenshots: Take screenshots of the following:
- Step 3 (Screenshot 23)
- Step 5 (Screenshot 24)
- Step 8 (Screenshot 25)
- Step 10 (Screenshot 26)
- Step 11 (Screenshot 27)
- On laptop1, connect to the SRV1 VPN. (If you already are, skip to Step 2.)
- Open the Remote Desktop Connection application.
- Connect to srv1 with:
srv1.YourSenecaUsername.com - If you see the Server1 desktop, congrats! Close the RDP connection.
- Back on laptop1, open an RDP connection directly to:
srv2.YourSenecaUsername.com - If you see the Server2 desktop with the
sconfigwindow, congrats! Close the RDP connection. - Open Command Prompt and login to srv2's SSH connection:
ssh Administrator@srv2.YourSenecaUsername.com - To confirm your work, run the following commands in your SSH session:
hostnamewhoami
- Close the connection.
- Open Firefox and navigate to:
http://srv1.YourSenecaUsername.com - Open Firefox and navigate to:
http://www.eff.org - Now, disconnect from the VPN and re-run the RDP, SSH connections and Firefox steps.
Reflection 7: Why did these connections only work while the VPN was running? What still works with the VPN off? What's happening when the VPN is connected? Hint: Think about the
ipconfigandtracertresults you saw earlier.
Submission
Submission for assignments is a bit different from labs. Instead of live checks, you will be submitting a report.
You will submit to Blackboard with a single PDF document that includes the following:
- Title page that includes:
- Full name
- Student ID Number
- Course code and section
- Calendar Semester (Fall 2025)
- Date
- For each Investigation:
- The requested screenshots.
- The reflection questions and your answers to each.
- Each Investigation should start on a new page, and screenshots/reflection answers should be placed in the appropriate Investigation pages.
- Number your pages!
Export to PDF from your editor with images embedded. No external links!