Lab 8 - Introduction to Azure
Lab Preparation
Purpose / Objectives of Lab 8
In this lab, you will login to Microsoft Azure for the first time, navigate your way to DevTest Labs, and spin up two VM images. The main purpose of this lab is to learn how to create Windows virtual machines in the cloud using a pre-built image, how to remotely connect to each, and basic management of these VMs from the Azure web interface.
While you are working through this lab, it is highly recommended that you write down general notes and commands to help you remember how to do this lab. You may use your notes during tests, so fill it out accordingly!
If you encounter technical issues, please contact your professor via e-mail or in your section's Microsoft Teams group.
Minimum Requirements
Before beginning, you must have:
- Read these notes AND the invitation Blackboard message on how to connect the first time.
- Your Seneca login credentials.
- A computer with an Internet connection. (Windows/macOS/Linux)
- A mobile device (phone/tablet) to setup 2FA (two-factor authentication).
- Your copy of the OSM620 Lab Logbook.
Investigation 1: Connecting to Your Azure Account
In this investigation, you'll log in to your Seneca-provided Azure account and ensure you have access to our DevTest Labs digital classroom.
Part 1: Logging In For The First Time
- Follow the link to our DevTest Lab e-mailed to you via Blackboard.
- Enter your Seneca credentials. (Same username and password you use for your e-mail)
- You'll next be asked to set up two-factor authentication. Do not bypass this step!
- Once you've set that up, verify it by logging out and logging back in again.
- Conduct a small celebration (pat on the back, a quick jig, perhaps a fist pump) and move on to Investigation 2.
Part 2: Logging In Afterwards
Logging in after initial setup is quite easy.
- Navigate to the Azure portal:
https://portal.azure.com - Use your Seneca credentials.
- Complete 2FA authentication.
- Our classroom DevTest Lab will be in your recent list, or you can use the search bar to bring up DevTest Labs by looking for OSM620.
WARNING
DO NOT search for Virtual Machines in the search bar. You will find yourself in the wrong area and things will not work.
Investigation 2: Managing a Windows Server 2025 VM in Azure
In this investigation, you'll create, configure, and manage a Windows Server 2025 Virtual Machine using Microsoft Azure and a pre-built image. This means no tedious and time-consuming Windows installation! You'll also login to the VM remotely using Microsoft's Remote Desktop Protocol to share its desktop.
This can be done from any normal computer. No local VMs required. (Put down that copy of VMware Workstation!)
Part 1: Creating A Windows VM From An Image
To create your Windows Server 2025 Virtual machine, perform the following steps:
-
Navigate to DevTest Labs > OSM620 > My virtual machines
-
Click the + Add button.
-
Wait for the Choose a base listing to populate. This may take a few moments.
-
Select the item titled Windows Server 2025 Datacenter. Be careful here! There are many other options.
-
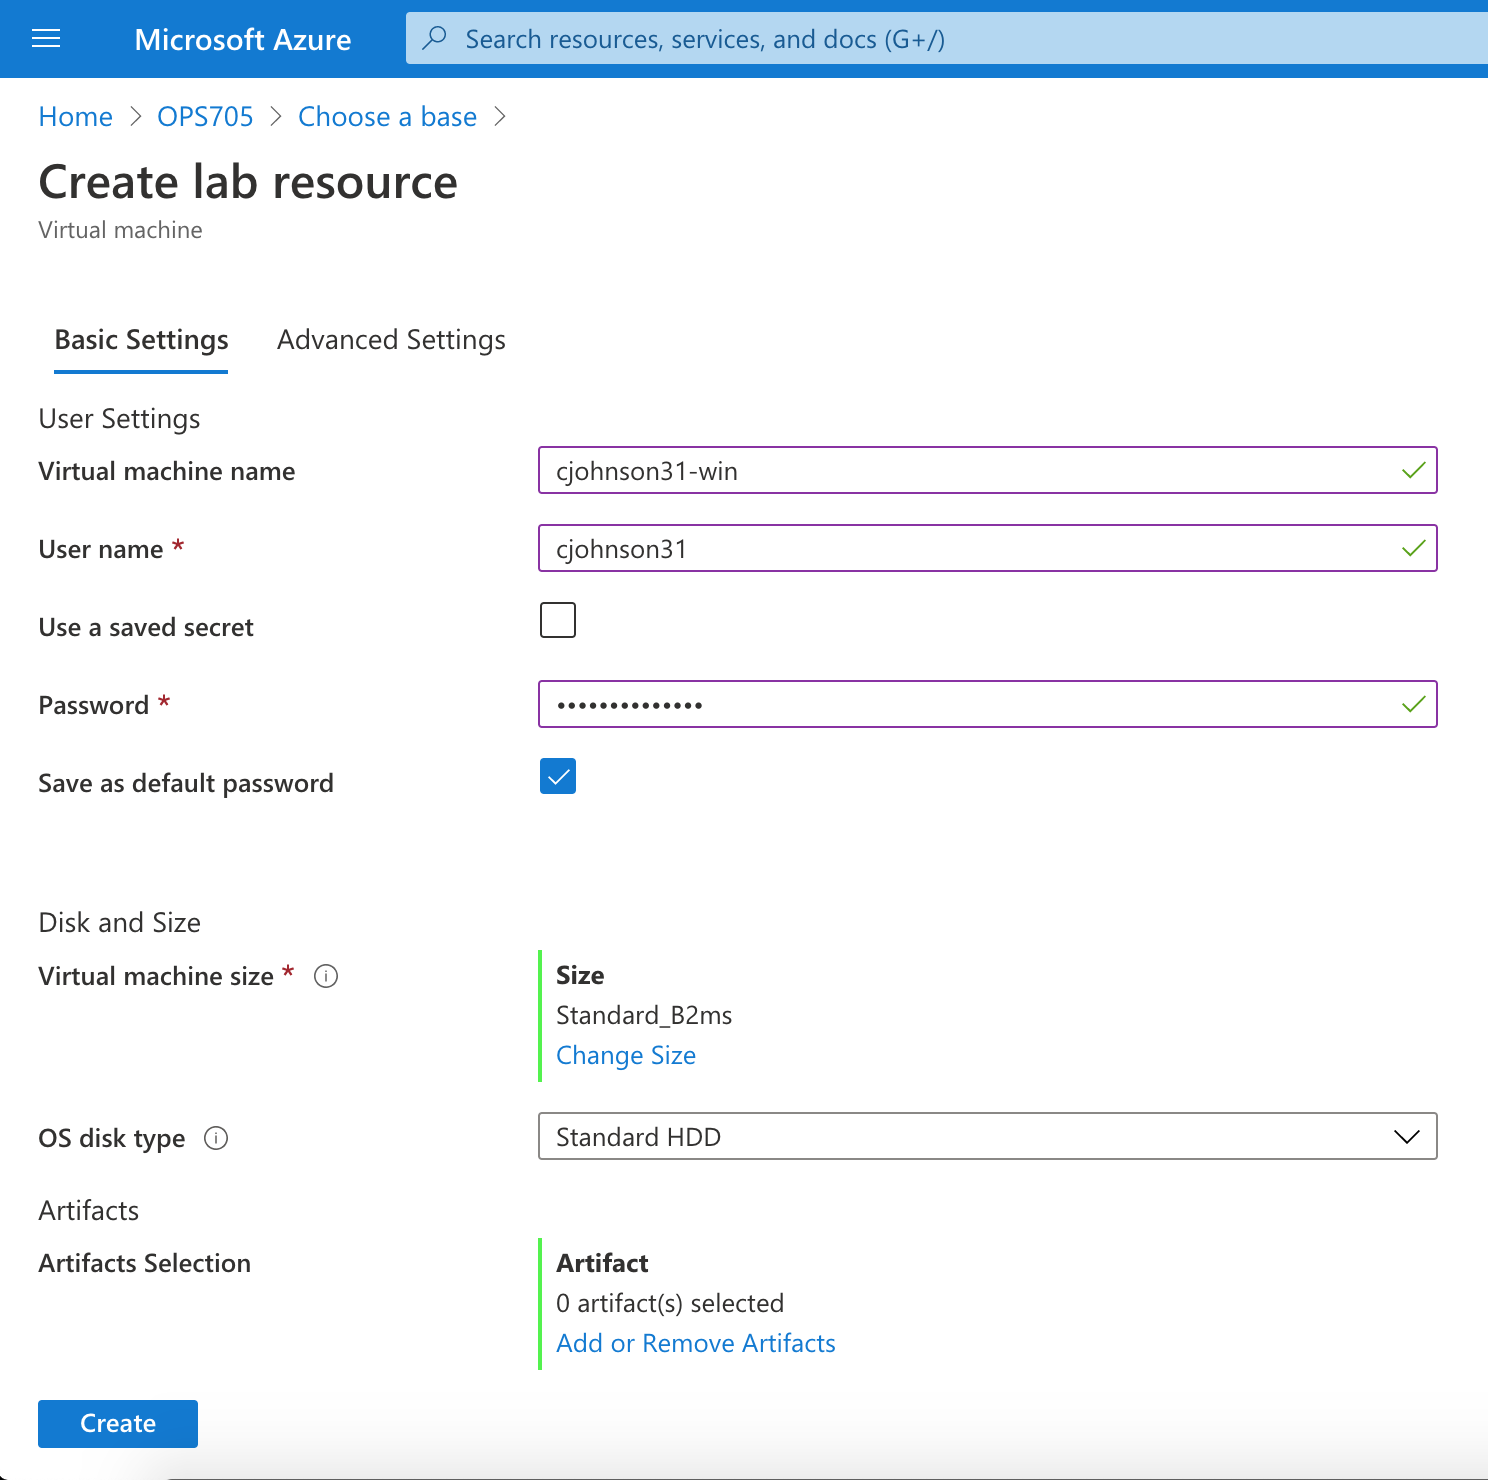
A new blade, Create lab resource appears.
-
In the Virtual machine name field, type: az-srv## (you have been assigned a 2-digit UID, found in gradebook. Use that. Example: az-srv11)
-
Username: yourSenecaUsername
-
Use a saved secret: Unchecked
-
Password: Your choice, but use the same for all VMs and resources in this course.
-
Save as default password: Checked.
-
Virtual machine size: Standard_B2ms
-
OS disk type: Standard HDD
-
Leave the remaining options as they are.
-
Click on the Create button at the bottom of the screen.
-
You are now back in the My virtual machines blade while Azure creates your personal virtual machine. This may take a few minutes.
-
When it finishes, you should see a "Your deployment is complete." message near the top of the page. Congratulations!
-
Click on the Go to resource button at the bottom left of the page and move on to the next part of the lab.
Part 2: Accessing Your Windows Server VM Remotely Using RDP
In this section, we'll discover how to remotely connect to the Windows Server's desktop environment over the Internet from your computer. It's a very simple process.
-
In the Overview tab for the Virtual Machine created in Part 1, click the Connect button. This will download an RDP profile file (usually vmname.rdp).
-
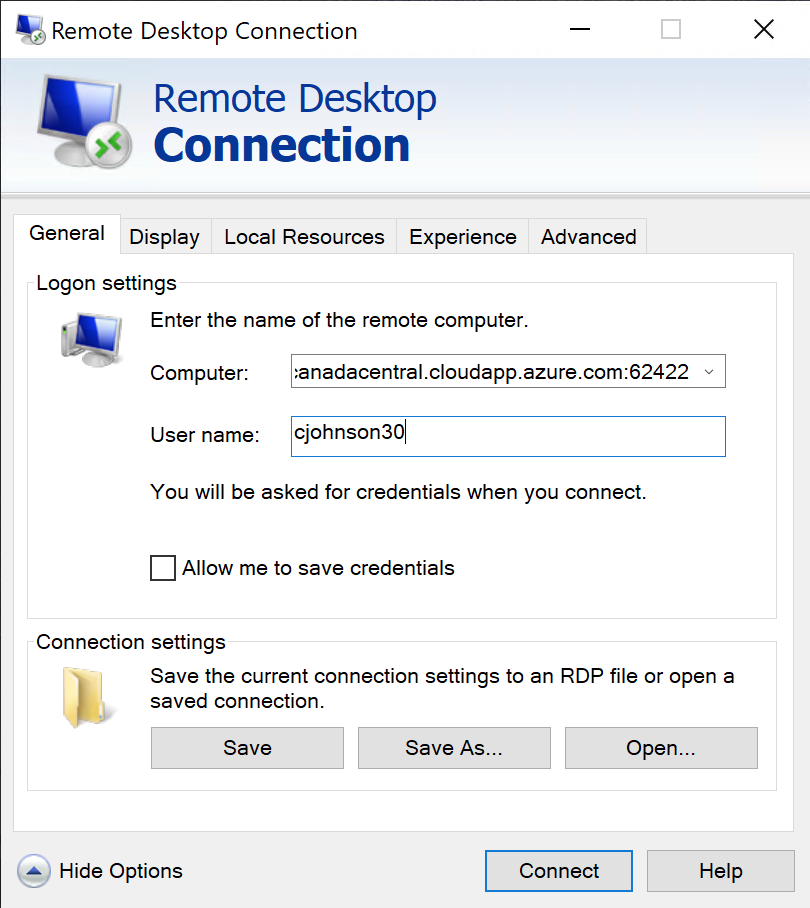
Open the RDP file. It should launch the Remote Desktop application and automatically try to connect to your VM.
-
Upon opening, the VM's URL, port number, and username are automatically provided to the RDP application.
-
Type the password you used when creating the VM in Part 1.
-
Accept the certificate warning. (Click yes.)
-
You should see a login progress screen, and a Windows Server desktop after a few moments.
-
Congratulations! You've set up a Windows Server VM and logged in remotely.
-
Open Notepad, and write:
My name is *insertFullName*, and I've completed the Lab 1 Windows Server VM investigation! -
Save the file to your VM's desktop, with the filename yourSenecaUsername.txt.
-
Do not skip Part 3 at this stage! Otherwise, you'll be bleeding funds by leaving the VM running.
Part 3: Fully Stopping Your Windows Virtual Machine
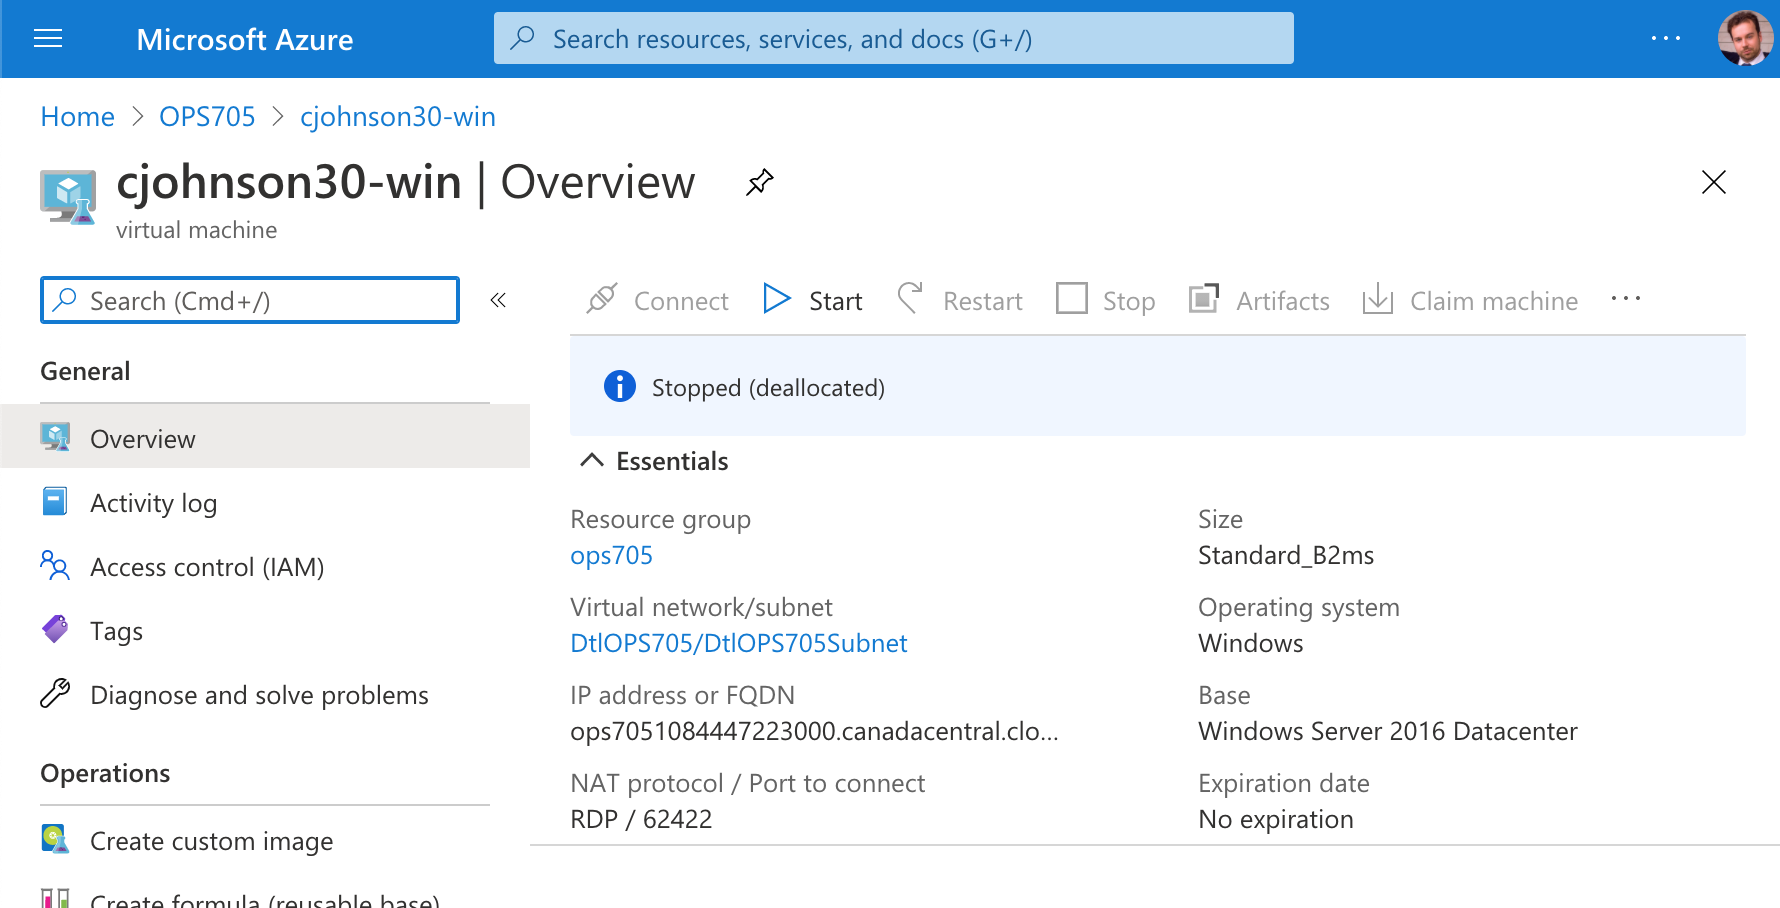
This section is fairly simple. The one thing to never forget: Ensure your VM's status is set to Stopped (Deallocated).
- In the Overview blade of your Windows Server VM, click on the Stop button.
- A notification will appear in the top right of your browser window, confirming your action.
- Don't worry about going into the Windows OS and shutting down first. Azure sends a signal to the VM to shut down safely. This may take a minute or two.
- If your VM status says stopped, but does not include the (Deallocated) text, then resources are still being held by the VM and we're still being charged. The stop button will still be available, so click it.
Investigation 3: Managing a Windows 11 VM in Azure
In this investigation, we'll create, configure, and manage a Windows 11 Virtual Machine using Microsoft Azure.
Part 1: Creating A Windows 11 VM From An Image
To create your Windows 11 VM, follow the steps from Investigation 2, Part 1, but with the following settings:
- Choose a base: Windows 11 Pro
- Virtual machine name: az-w7client## (Use 2-digit UID)
- User name: yourSenecaUsername
- Authentication type: Password
- Use a saved secret: Unchecked
- Password: Same as your Windows Server VM
- Save as default password: Checked
- Virtual machine size: Standard_B2ms
- Leave all other options as they are.
- Click Create!
When deployment is complete, click on the new VM in My virtual machines to verify its status and find the VM's address. Write this down.
Part 2: Accessing Your Windows 11 VM Remotely Using RDP
In this section, we'll discover how to remotely connect to the Windows 11's desktop environment over the Internet from your computer. It's a very simple process.
-
In the Overview tab for the Virtual Machine created in Part 1, click the Connect button. This will download an RDP profile file (usually vmname.rdp).
-
Open the RDP file. It should launch the Remote Desktop application and automatically try to connect to your VM.
-
Upon opening, the VM's URL, port number, and username are automatically provided.
-
Type the password you used when creating the VM in Part 1.
-
Accept the certificate warning. (Click yes.)
-
You should see a login progress screen, and a Windows Server desktop after a few moments.
-
Congratulations! You've set up a Windows Server VM and logged in remotely.
-
Open Notepad, and write:
My name is *insertFullName*, and I've completed the Lab 1 Windows 11 Client VM investigation! -
Save the file to your VM's desktop, with the filename yourSenecaUsername.txt.
-
Turn off your VM after you're done. Stopped (Deallocated).
Investigation 4: Managing Your VMs Directly Through Azure's UI
In this quick investigation, we'll walk through how to directly manage virtual machines from the Azure Dashboard interface on a basic level. This is useful for starting up VMs, shutting them down when unresponsive, and deleting them when you're finished. (Warning: Do not delete either VM created in this lab!)
IMPORTANT
After creating your VMs for the first time, you must log out and log back in to Azure.When you first create a VM in DevTest Labs (DTL) and it's in a fully running state, you need to log out and log back into the Azure Portal for permissions to be added properly to your account.
If you don't, you'll get Permission denied warnings from Azure if you try to do this investigation.
Part 1: Powering On A Virtual Machine
From the DevTest Labs blade:
- Click on the My virtual machines menu bar item.
- Click on the virtual machine you'd like to manage to move to its Overview blade.
- Click the Start menu button near the top.
Part 2: Powering Off A Virtual Machine
From the DevTest Labs blade:
- Click on the My virtual machines menu bar item.
- Click on the virtual machine you'd like to manage to move to its Overview blade.
- Click the Stop menu button near the top.
Remember the difference between the status Stopped and Stopped (deallocated)!
Part 3: Restarting A Virtual Machine
There are two methods to restarting a VM. Either within the OS, or through the Azure Dashboard.
Inside the OS:
- Windows: Click on Start, and select Power Off.
- Linux: From the command line (SSH), type
sudo reboot
In either OS, you will be disconnected from your remote session. Wait a few minutes while the VM restarts, and reconnect.
From Azure Dashboard:
- Click on the Restart button from the VM's Overview blade.
- Wait until the VM's status has changed to Running before logging back in.
Part 4: Deleting A Virtual Machine
WARNING
Do not actually do this! This is for informational purposes only.
Deleting a Virtual Machine is useful when you no longer need it long-term, or if there's a catastrophic issue with the OS inside. Be careful! Any saved data inside the VM will be deleted as well!
- Navigate to the VM's Overview blade.
- If the VM status isn't Stopped (Deallocated), stop the VM. Wait until its status updates.
- Click on the Delete button at the top of the blade.
Part 5: A Note About Resource Usage
As throughout this lab, using resources responsibly is incredibly important. We pay for what we use. While we have a failsafe in place to stop all VMs at 2:00am EST daily, don't rely on it! Fully stop your VMs when you're not using them.
Your total allowed resource allocation has been restricted for this course. This means you can only have two VMs (or services) at a time. If you have two already, you won't be able to add another until you delete one.
Investigation 5: Updating Windows via Azure
Updating your Windows VMs in Azure is very easy. It takes advantage of the cloud infrastructure to allow point-and-click updates.
Part 1: Updating Windows Server 2025 with Artifacts
-
Spin up your Windows Server VM, and wait until it's fully started up.
-
In the Azure blade for your Windows Server VM, click on the Artifacts item in the menu bar to the left, within the Operations drop-down.
-
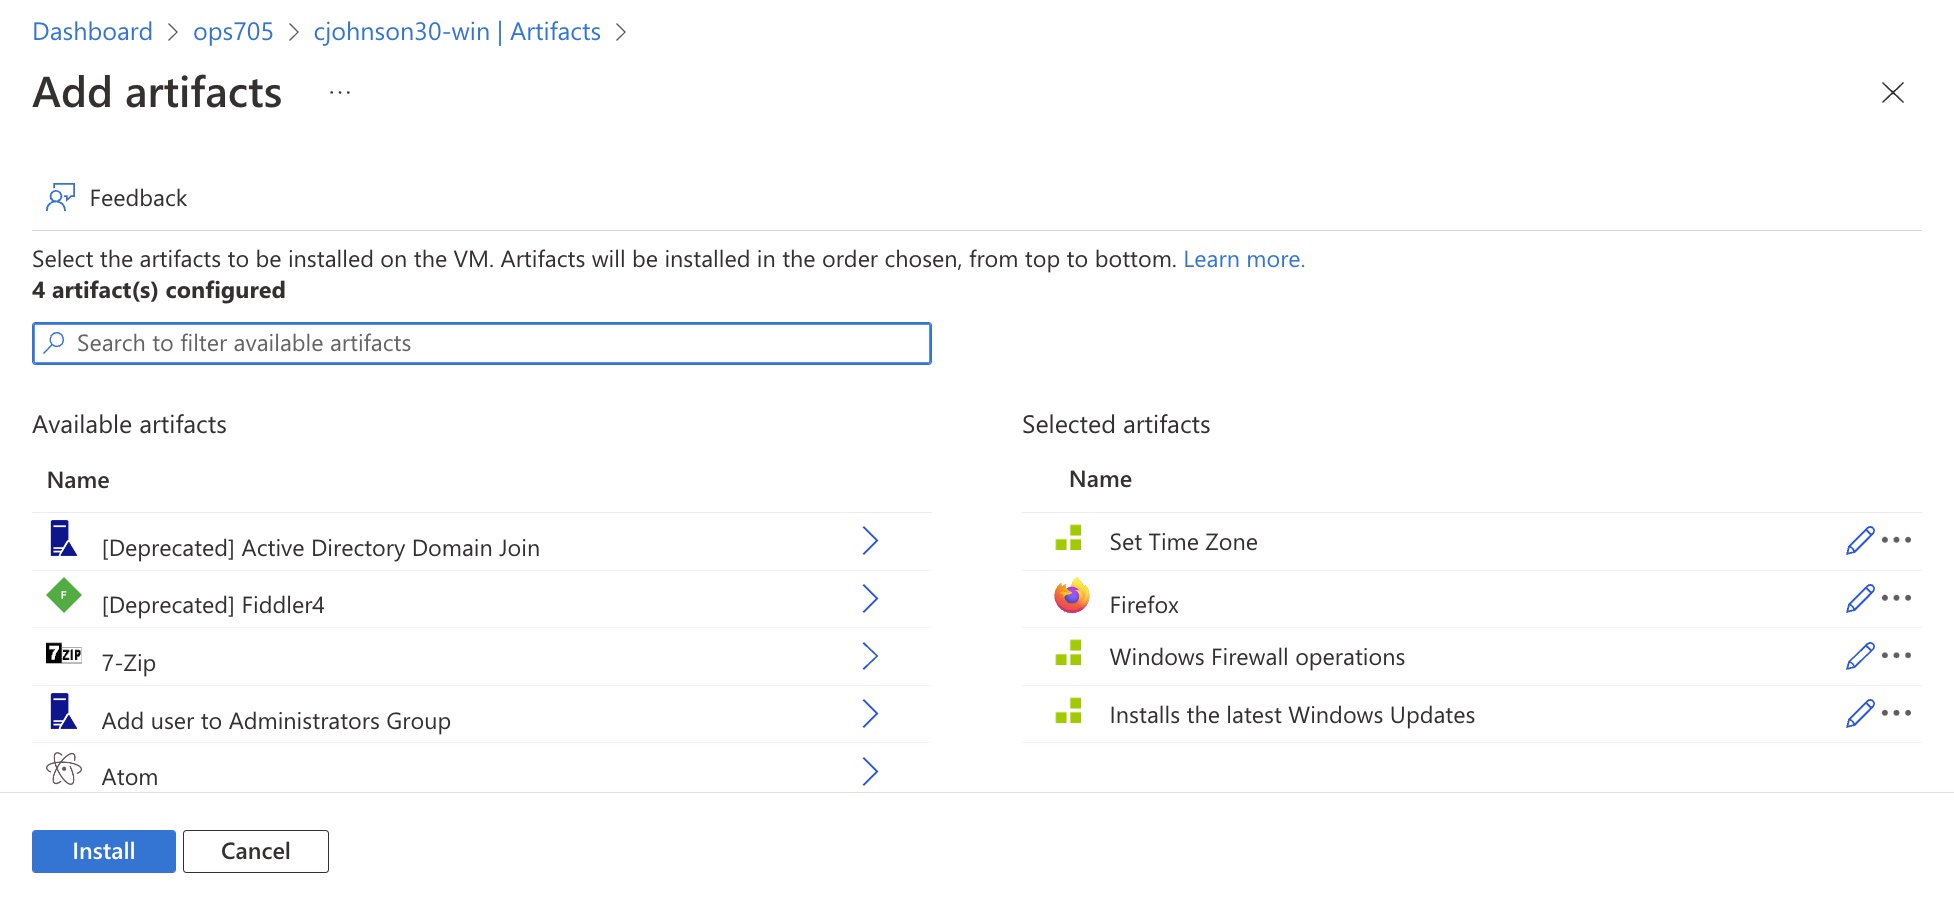
In this new window, click on the Apply artifacts button. This will bring you to the Add artifacts screen.
-
In the Add artifacts search field, type Time.
-
Click on Set Time Zone in the results listing, select Eastern Standard Time from the menu in the popup, then click OK.
-
You'll be returned to the Add artifacts window.
-
Add the following additional artifacts:
- Firefox
- Windows Firewall operations – Enable ICMP (Ping)
- Installs the latest Windows Updates
-
You'll be returned to the Add artifacts window with a list or artifacts waiting to be installed. Simply click Install to start the process them.
-
The Artifacts window will return, and a new entry for each artifact will appear. (You may need to click on the Refresh button next to *Apply artifacts.) Their statuses will cycle through Pending, Installing, and finally Succeeded.
-
This may take 10-20 minutes. However, you don't have to wait! You can move on to Part 2 while this VM is running updates without having any impact on your other VM. Move to Part 2 after reading the note below.
NOTE
When all artifacts are in a Succeeded state, they've completed their tasks. You don't even have to remain logged into the VM or the Azure website. Check back later if you want.
Part 2: Updating Windows 11 with Artifacts
Repeat Part 1's steps, but on your Windows 11 VM.
That's it!
Lab Submission
Submit to Blackboard full-desktop screenshots (PNG/JPG) of the following:
- Your view of the OSM620 DevTest Labs Overview blade.
- The Azure Overview blade for your Windows Server VM.
- The Azure Overview blade for your Windows 11 VM.
- The text file created for your Windows Server VM, open in Notepad.
- The text file created for your Windows 11 VM, open in Notepad.
- Listing of your applied artifacts in Azure for your Windows Server VM.
- Listing of your applied artifacts in Azure for your Windows 11 VM.
Reminder: Make sure to fully stop your VMs when you're done!