Lab 1 - Environment Setup
Welcome to OSM620 - Fundamentals of Microsoft Systems! In this lab, you'll install a few Windows virtual machines (VMs) using VMware Workstation. These VMs will act as your working environment for the course.
We'll add a few more later in the course, make changes, explore, and learn how it all works. Don't be afraid to experiment and try things for fun.
If you haven't used our school's OER sites like this one before, take a quick look at our How to Use This Lab Website guide.
Lab Preparations
Purpose of Lab 1
In this lab you will stand up the base environment you’ll use for the course. You’ll obtain official installation media and keys, prepare VMware Workstation, and deploy two servers, one router, and one client:
- srv1: Windows Server 2025 Datacenter, GUI (Desktop Experience)
- srv2: Windows Server 2025 Datacenter, CLI (Core)
- client1: Windows 11 Education
- router: Linux VyOS
You’ll complete essential post-install tasks (time zone, naming, activation, updates), then place both servers on a internal network layout so they can talk to each other on a private subnet while still reaching the internet for updates.
By the end, the machines are clean, consistent, and ready for later labs (security hardening, DNS, DHCP, Hyper-V and eventually Active Directory).
Objectives
By the end of this lab, you will be able to:
- Acquire Windows Server 2025 Datacenter, *Windows 11 Education, and Linux VyOS installation media and your individual product key from Azure Education and store them securely.
- Access VMware Workstation on a Seneca Lab PC (locally or via MyApps) or install it on a personal PC.
- Provision four VMs with the required specs and networks:
- Linux VyOS Router - router-
yourSenecaUsername - Windows Server 2025 GUI - srv1-
yourSenecaUsername - Windows Server 2025 CLI - srv2-
yourSenecaUsername - Windows 11 Education - client1-
yourSenecaUsername
- Linux VyOS Router - router-
- Complete essential post-install tasks on each VM.
- Verify basic Internet connectivity prerequisites for later labs within each VM.
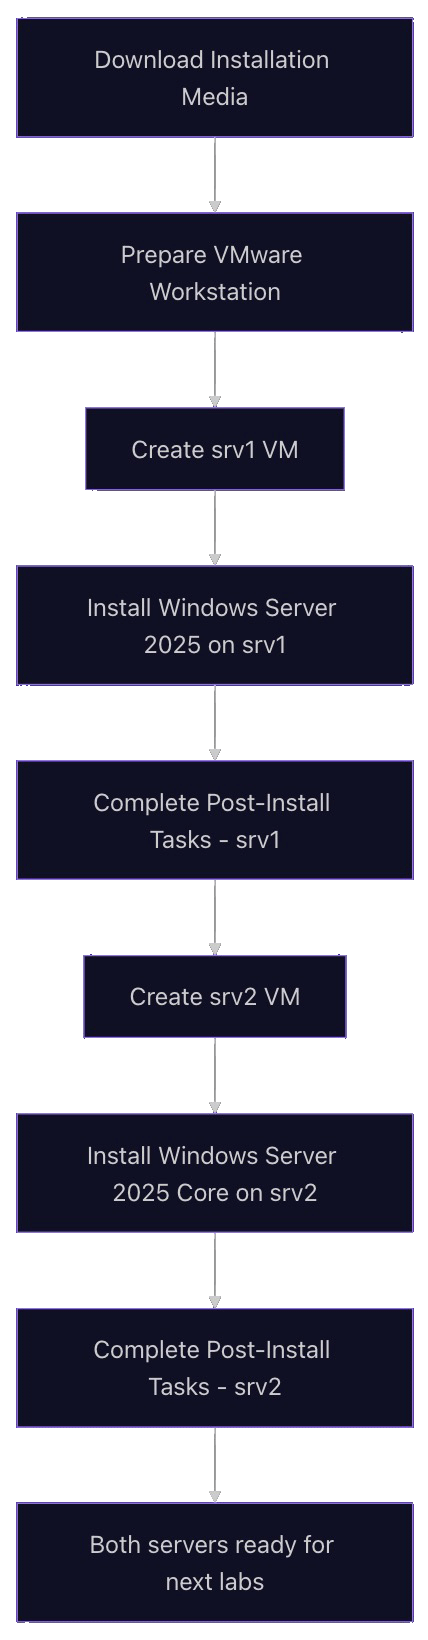
Here's a basic flowchart of what we'll be doing with Lab 1 to give you a visual overview:
Minimum Requirements
Before beginning, you must have:
- Attended the Week 1 lecture.
- Read through the Week 1 slides, and have them handy as a reference for concepts.
- Working access to portal.azure.com with your Seneca credentials.
- Access to VMware Workstation (Seneca lab PC or personal PC meeting course specs).
- Your external SSD with at least 500 GB of dedicated space for this course.
- Your assigned UID (from Blackboard Grades) handy for addressing.
- Your physically printed OSM620 Lab Logbook for notetaking and saving commands.
- Optional, but recommended: Caffeine delivery system.
Investigation 1: Downloading Installation Media
In this investigation, you will download the three ISOs required to install all our virtual machines for this course, along with serial keys assigned to your Seneca username.
Part 1: Windows Server 2025 Datacenter
In this part, you will be downloading your Windows Server OS installation media by logging into your Seneca-based Azure account. You will also generate your personal serial keys for your copy of Server.
- Navigate to the Microsoft Azure site: portal.azure.com
- Use your Seneca e-mail address and password to login.
- Once on the main Azure page, look for the Search bar at the top of the page.
- In the Search bar, type: Education, then hit Enter.
- In the Education | Overview page, look to the left. You will see menu items already displayed on screen. (Overview, Learning resources, etc.)
- Inside Learning resources in the left menu, click on Software.
- In the main Software page, there is a Search bar just below the word Software (it says Search inside it.)
- In that search field, type and enter: Windows Server 2025 Datacenter
- In the item that appears below (there should only be one), click the link for Windows Server 2025 Datacenter.
- On the right, an information box appears describing the software. Using your mouse to hover over this information box, scroll down to the bottom.
- You should now see two items: View Key and Download
- Click on Download first to begin downloading the Server 2025 ISO. You will need this for your operating system installation. (Don't forget where you've saved it!)
- While the ISO file is downloading, click on View Key.
- Copy this key into a text file that you save locally on your personal computer or personal USB key. You will need this for the Server installation and for any reinstalls later in the semester.
Reminder: Always store all serial keys in a secure location only you have access to.
Do not lose this key and do NOT share it with anyone!
Part 2: Windows 11 Education
This part is similar to Part 1. We'll follow many of the same steps and download a copy of Windows 11 instead.
- Log back into the Microsoft Azure website.
- Go to: Education > Learning Resources > Software
- In the search field, type and enter: Windows 11 Education
- Download the ISO.
- Click on View Key to save your Windows 11 Education serial key in a secure text file.
Reminder: Always store all serial keys in a secure location only you have access to.
Do not lose this key and do NOT share it with anyone!
Part 3: Linux VyOS
Here, we'll download a small Linux ISO that will act as our router.
- Download the VyOS ISO directly from here: https://community-downloads.vyos.dev/stream/1.5-stream-2025-Q2/vyos-1.5-stream-2025-Q2-generic-amd64.iso
- If it has saved to your default Downloads folder (especially on Seneca Lab computers!), move it to your SSD or wherever you are storing OSM620 material.
- As this is Linux, there is no serial key required.
Investigation 2: Using VMware Workstation
The use of VMware Workstation is required for this course. You can either use a Seneca Lab computer (Option 1a / Option 1b) or a personal computer (Option 2).
If you use an external SSD, you can use both!
WARNING: Seneca Lab computers erase any locally saved data when restarted from their internal drives. Save all work to an external drive or online storage.
Option 1a: Seneca Lab Computers w/VMware Workstation Installed Locally
How do you know if your particular Seneca Lab classroom has VMware Workstation installed?
When you log in, the VMware Workstation icon will be visible on the desktop. If it is not, jump to Option 1b.
- Log in to the Seneca workstation with your Seneca username (don't include @myseneca.ca) and password.
- Once the desktop has fully loaded, double-click on the VMware Workstation icon on the desktop. (If not present, jump to Option 1b instructions.)
- When the VMware Workstation application appears on screen, continue to the next Investigation.
Option 1b: Seneca Lab Computers without VMware Workstation Installed
Do not use this option if your lab computer already has VMware Workstation installed. Go back to Option 1a.
- Log in to the Seneca workstation with your Seneca username (don't include @myseneca.ca) and password.
- Once the desktop has fully loaded, double-click on the Seneca MyApps icon on the desktop.
- In the browser that launches, log in with your Seneca credentials.
- Do not ignore dialog boxes! Read them carefully instead of just clicking Cancel or randomly.
- In the search bar in the middle of the screen, type VMware and hit Enter.
- One result should show up, VMware WS Pro. Click this result.
- In the new VMware WS Pro page, click on the version number (Example: 17.6.1). This will launch the application over the network.
- Click on allow for any dialog boxes that appear. Remember, do not ignore dialog boxes!
- Be patient. It can take a bit for the background files to transfer over the network.
- When complete, the VMware Workstation application should appear on screen. (You will also see the VMware Workstation icon on the desktop. You can launch it from here if you accidentally close the program.)
- Proceed to the next investigation.
Option 2: Personal Computer
You can absolutely install and run VMware Workstation on your own personal computer if you have the following minimum hardware:
- CPU: 6-core Intel/AMD
- RAM: 32 GB
- Storage: 500 GB SSD free, reserved for this course (if external, USB3.0 or higher)
- Internet connection: High speed, stable
CPU architecture is vital. You cannot use ARM or SnapDragon based computers for this course. This includes all Apple Silicon computers (M1/M2/M3/M4, etc).
If you'd like to go this route, follow the instructions over here: Lab 1.1 - Personal VMware Installation
Investigation 3: Virtual Machine Installation - router VM
In this investigation, we'll be adding a Linux-based router to our setup. This low-footprint virtual machine will take the place of a typical physical router to provide an Internet connection to all your other VMs.
Most on-premises installations (offices, warehouses, schools, your home) will have a physical router that does this does instead of relying on a VM to do that work.
Setting this up is extremely easy and should only take a few minutes.
After you're done, you will need to have this VM powered on during all lab work. We'll remind you of this often.
IMPORTANT: When opening virtual machines on different computers (moving from one lab to another, etc), if VMware ever asks during power on if this VM has been 'moved' or 'copied', always select MOVED.
Selecting 'copied' will severerly break this VM (and your Windows VMs later on.)
VM Specifications
| Setting | Value |
|---|---|
| Hypervisor | VMware Workstation |
| VM Name | router |
| Role | Router / NAT (edge) |
| OS / Image | VyOS (current stable ISO) |
| vCPU | 1 |
| RAM | 512 MB |
| Disk | 20 GB |
| NICs | 2 |
| NIC1 | VMware NAT |
| NIC2 | VMnet10 |
| NIC2 IPv4 | 10.0.UID.254/24 (static) |
Instructions to set this up are provided below.
Part 1: Virtual Machine Hardware
Here we'll create the hardware for your VM.
- Open VMware Workstation.
- In the main window, you should see a large + symbol icon titled Create a New Virtual Machine. Click it.
- In the new dialog box, keep Typical selected and click the Next button.
- On the next screen, Guest Operating System Installation, do the following:
-
Select Installer disc image file (ISO):
-
Now click Browse.
-
Navigate to where you saved your VyOS downloaded ISO and select it.
-
Once selected, on the previous screen select:
Debian 13.x 64-bit
-
Click Next.
-
- On the "Name the Virtual Machine" screen, do the following:
-
Virtual machine name: router-yourSenecaUsername
Explanation: For example, if my Seneca e-mail address is
cjohnson30@myseneca.ca, then my Seneca username is cjohnson30. This would give me a VM name of router-cjohnson30. -
Location: If using an external SSD (like with our lab computers), click Browse and navigate to your external SSD.
- Create the following directory structure in your SSD: OSM620 > Virtual Machines/router-cjohnson30
- Select this new router-cjohnson30 folder.
- Make sure you now see this change in the Location field.
-
Click Next.
-
- On the "Specify Disk Capacity" screen, do the following:
- Maximum disk size (GB): 20
- Select Split virtual disk into multiple files.
- Click Next.
- On the "Ready to Create Virtual Machine" screen, do the following:
- Click on Customize hardware...
- On the new "Hardware" screen, do the following:
- Select Memory, and change the value to: 512
- Select Processors, and change:
- Number of processors: 1
- Number of cores per processor: 1
- Virtualize Intel VT-x/EPT or AMD-V/RVI: Checked
- Virtualize CPU performance counters: Unchecked
- Virtualize IOMMU (IO memory management unit): Checked
- Select Network Adapter and confirm:
- Connected at power on: Checked
- NAT: Checked
- Click on the Add... button on the bottom left of the Hardware window.
- Select Network Adapter and click Finish.
- Back in the Hardware window, click on Network Adapter 2.
- Under Network connection, click the Custom: Specific virtual network radio button.
- Just below that, click the drop-down (it likely says VMnet0 by default). Find and select VMnet10.
- Click Close.
- Back in the "Ready to Create Virtual Machine" screen, click Finish.
- The virtual machine should launch.
- If you get a dialog box about Side channel mitigations, check the box for Do not show this hint again and click OK.
- Your new Virtual Machine should now finish creating and then turn on and begin the OS installation.
Part 2: OS Setup Instructions
Now, we'll go through the operating system installation and configuration process. This is an incredibly quick and easy process.
NOTE: You will select a password for this VM in a few steps. Use the same secure password for all VMs you create in this course.
At least: 8 characters, one upper-case letter, one number, and one non-alpanumeric character.
This will make your life much easier. In a normal environment, having the same password for everything is a security risk, but we are in a learning environment.
- If it does not automatically do so, power on the VM yourself.
- In the boot menu, select the first option: Live system (vyos)
- Login with these credentials:
- Username: vyos
- Password: vyos
- Install VyOS on the disk using this command:
install image- Would you like to continue?: y
- What would you like to name this image?: Just hit Enter to select the default
- Please enter a password for the "vyos" user: yourNormalAdminPassword
- What console should be used as default?: Hit Enter to select default
- Which one should be used for installation?: Enter to select default
- Installation will delete all data on the drive. Continue?: y
- Would you like to use all the free space on this drive:? y
- What would you like to use as boot config?: Enter to select default
- The installation proceeds (it's very fast). When finished, reboot:
sudo reboot - Wait for the machine OS to boot up again.
- Use the following credentials for your new VM:
- Username: vyos
- Password: yourNormalAdminPassword
Part 3: Configuring Routing
Now that our new virtual machine is installed and running, we need to configure it to do our routing. This is a one-time process.
NOTE: Please have your UID ready before starting this section. Your UID is the 2-digit number assigned to you by your professor. Each student's UID is different.
Example: UID = 14
If you are unsure, ask your professor for help.
- Power on router VM and login. (If you haven't already.)
- Run the following commands ONE AT A TIME (Replace UID!):
configure
set interface ethernet eth0 address dhcp
set system name-server eth0
set interface ethernet eth1 address 10.0.UID.254/24
set nat source rule 20 outbound-interface name eth0
set nat source rule 20 source address 10.0.UID.0/24
set nat source rule 20 translation address 'masquerade'
set system ipv6 disable
commit
save
exit
Figure 1. Example of VyOS commands
- Check your router can access the Internet:
ping eff.org
Figure 2. Proper ping completion
- If it receives proper ping, move on to the next step. If not, ask for help! Ping will be covered in more detail in Lab 2.
- Log out:
exit - Keep this VM up! Minimize and move on to the next Investigation.
Congratulations! You now have a router VM that uses minimal resources.
Note: After this lab, whenever you have other Windows VMs turned on, turn this one on first. (You don't need to log into it, just let it do its thing.)
This is your connection to the Internet for all your other VMs.
Investigation 4: Windows Server 2025 Datacenter (srv1)
Now that we have our starting network, we will now install our very first Windows Server virtual machine.
VM Specifications
| Setting | Value |
|---|---|
| Hypervisor | VMware Workstation |
| VM Name | srv1-yourSenecaUsername |
| Role | Windows Server - GUI |
| OS / Image | Windows Server 2025 Datacenter |
| vCPU | 4 cores |
| RAM | 8 GB |
| Disk | 250 GB |
| NICs | 1 |
| NIC1 | VMnet10 |
| NIC1 IPv4 | 10.0.UID.1/24 (static) |
Instructions to set this up are provided below.
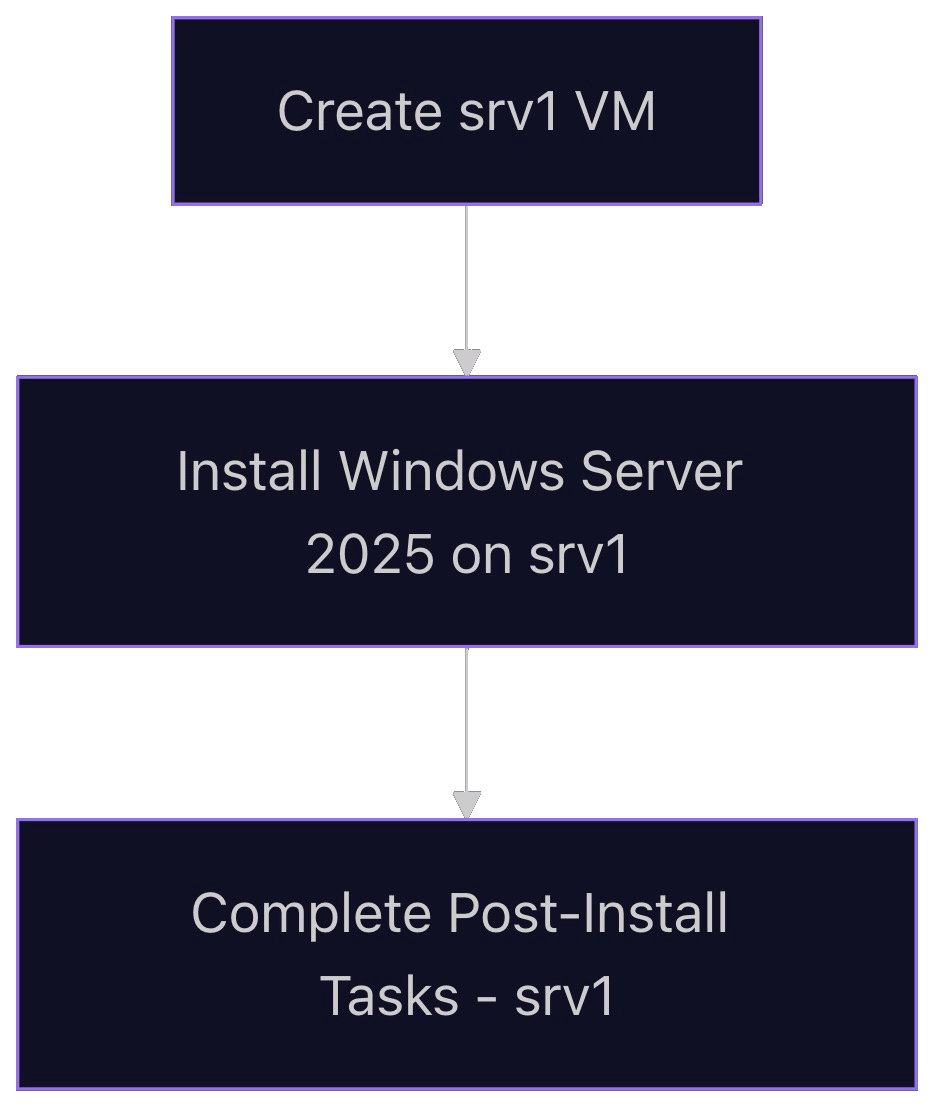
Flowchart Visualization of Investigation 4
Part 1: Setup Instructions
In this part, we'll create the VM and start the OS install process all in one go.
-
In the main window, you should see a large + symbol icon titled Create a New Virtual Machine. Click it.
-
In the new dialog box, keep Typical selected and click the Next button.
-
On the next screen, Guest Operating System Installation, do the following:
-
Select Installer disc image file (ISO):
-
Now click Browse.
-
Navigate to where you saved your Windows Server 2025 Datacenter downloaded ISO and select it.
-
Once selected, the previous screen should now say:
Windows Server 2025 detected.
This operating system will use Easy Install.
-
If it doesn't, you haven't selected the right file, or your download was corrupted. Ask for help.
-
Click Next.
-
-
On the "Easy Install Information" screen, do the following:
- Paste in your serial key.
- Version of Windows to install: Select Windows Server 2025 Datacenter
- Personalize Windows:
- Full Name: Administrator
- Password (both fields): Select a strong password you will remember. You will use this same password for all VMs in this course.
- Do not select "Log on automatically".
- Click Next.
-
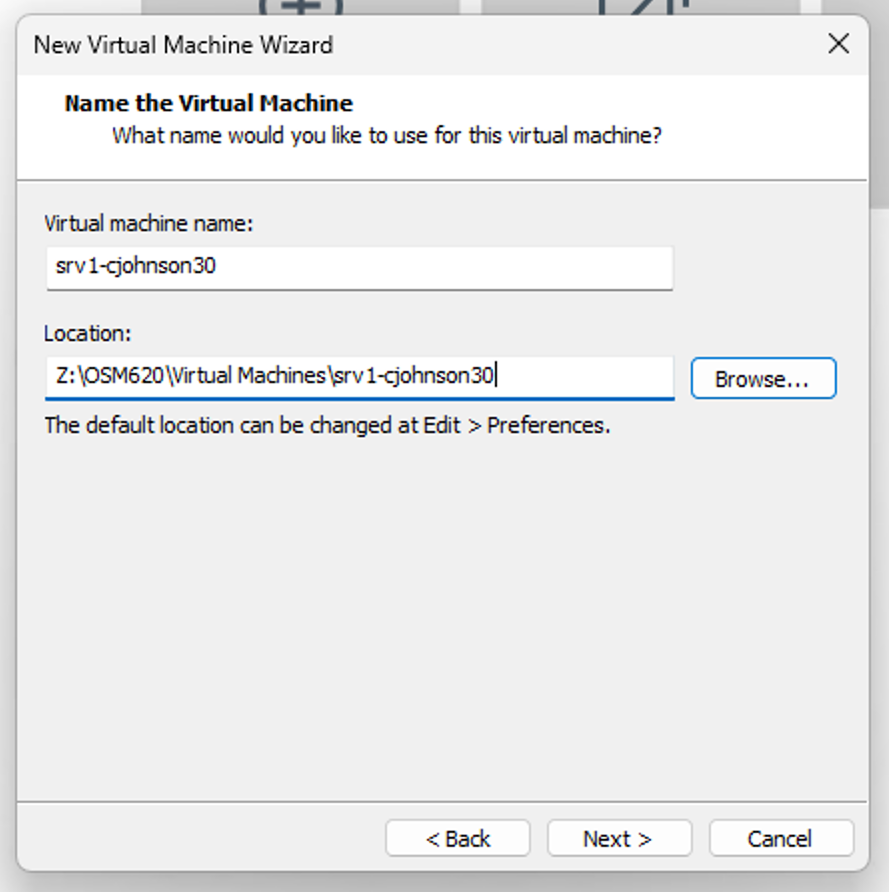
On the "Name the Virtual Machine" screen, do the following:
-
Virtual machine name: srv1-yourSenecaUsername
Explanation: For example, if my Seneca e-mail address is
cjohnson30@myseneca.ca, then my Seneca username is cjohnson30. This would give me a VM name of srv1-cjohnson30. -
Location: If using an external SSD (like with our lab computers), click Browse and navigate to your external SSD.
-
Create the following directory structure in your SSD: OSM620 > Virtual Machines/srv1-cjohnson30
-
Select this new srv1-cjohnson30 folder.
-
Make sure you now see this change in the Location field.
Example: Z:\OSM620\Virtual Machines\srv1-cjohnson30
-
-
Click Next.
-
-
On the "Specify Disk Capacity" screen, do the following:
- Maximum disk size (GB): 250
- Select Split virtual disk into multiple files.
- Click Next.
-
On the "Ready to Create Virtual Machine" screen, do the following:
- Click on Customize hardware...
-
On the new "Hardware" screen, do the following:
- Select Memory, and change the value to: 8192
- Select Processors, and change:
- Number of processors: 1
- Number of cores per processor: 4
- Virtualize Intel VT-x/EPT or AMD-V/RVI: Checked
- Virtualize CPU performance counters: Unchecked
- Virtualize IOMMU (IO memory management unit): Checked
- Select Network Adapter and confirm:
- Connected at power on: Checked
- Under Network connection, click the Custom: Specific virtual network radio button.
- Just below that, click the drop-down (it likely says VMnet0 by default). Find and select VMnet10.
- Click Close.
-
Back in the "Ready to Create Virtual Machine" screen, click Finish.
-
The virtual machine should launch.
-
If you get a dialog box about Side channel mitigations, check the box for Do not show this hint again and click OK.
-
Your new Virtual Machine should now finish creating and then turn on and begin the OS installation.
-
Windows installation is automated at this point and won't require any input from you. It may restart several times.
Time Note: Installation may take some time.
Feel free to get some caffeine or make a sandwich.
-
Eventually, you will be presented with the desktop and the VMware Tools installer having completed and asking if you'd like to restart. Choose Yes.
-
Once you've restarted, your installation is complete.
Part 2: Applying Time Zone Settings
After installing a new operating system, there are always a number of post-installation tasks to complete. These aren't optional!
Our first post-installation task is fairly straight-forward. Having the proper time zone set (EST) is essential for proper time keeping and ensuring encrypted webpages connect properly.
- In the Server Manager application, click on Local Server in the left-hand menubar.
- In the main Properties area, on the right-hand column, look for the Time Zone line. It should say (UTC-05:00) Eastern Time (US & Canada).
- If the Time Zone line item doesn't say the above, click on the displayed time zone and change it to UTC-05:00 as seen above.
Part 3: Server Name Change
The default name applied to your new server will be semi-randomized. For proper identification (and to not wonder which server you're on when you have several), we're going to change this.
- In the Server Manager application, click on Local Server in the left-hand menubar.
- In the main Properties area, on the left-hand column, look for the Computer name line.
- Click the current computer name.
- In the System Properties dialog box that pops up, find the Change button and click it. (Ignore the Computer Description field. It's tempting, but wrong!)
- In the new Computer Name/Domain Changes dialog box that pops up, find the Computer name field. Replace it with srv1-SenecaUsername.
- When you click OK, the system will warn you about restarting. Choose to restart the system when asked.
- Once you've restarted and logged back in, go back to the Server Manager from Part 1 and double-check your new computer name is correct. Do not skip this step!
- If it is, you're done!
Part 4: Installing OS Updates
A critical part of a security-conscious mindset is running regular updates. This is NOT something you do only once at the start of installation. You should be running these regularly to keep up to date with security fixes and zero-day exploits.
- If you're already in the Settings application, look through the left menubar for Windows Update and click it. (Otherwise, click on the Start menu and search for Updates.)
- In the Windows Update main screen, scroll down to Advanced Options and click it.
- The very first option is Receive updates to other Microsoft products. Toggle this from Off to On.
- At the top of the screen, where it says Windows Update > Advanced Options, click Windows Update to go back to the previous screen.
- You will likely already see updates ready. Click on Download & install all.
- As you might expect, this can take a while. Timing will depend on your Internet connection, how fast your computer is, how fast your SSD is, and how many updates there are. Please be patient. Your computer may restart.
- Once updates have begun, take a break while it does its thing. Grab a drink, make a sandwich, text a friend.
- After updates are complete, go back into Windows Update and click Check for updates again. There may be (and often times are) more.
- If there are more updates, complete Steps 5-8 again until there are no more updates available.
- In Windows Update, scroll back down to Advanced options again and click it.
- Inside Windows Update > Advanced options scroll down to Optional updates and click it.
- Select all available updates that appear (you may have to expand some lists).
- Click Download & install.
- Once all updates are complete, restart your VM if asked, then move onto the next section.
Part 5: Internet Connectivity Check w/Edge
We'll double-check we can access the Internet using the built-in Microsoft Edge application.
- Open Microsoft Edge.
- Go through the first-run questions.
- When able, use the browser to navigate to eff.org.
- If the website loads, move on to the next step. If not, ask your professor for help.
Part 6: Download and Install Firefox
There are a ton of feature and privacy reasons not to use Microsoft Edge. Instead, we'll download and install Mozilla Firefox and use that going forward.
- Open Microsoft Edge.
- Navigate to: Download Mozilla Firefox
- Wait for the installer to finish, then open it.
- Follow the installer instructions.
- Once complete, open Firefox and navigate to eff.org to check everything is okay.
- Close Microsoft Edge forever.
When complete, shut down this VM from within Windows. You will not need it again until the end of the lab.
Resource conservation is important. There's no reason to tie up 4 CPU cores and 8 GB of RAM if we're not using it at the moment. It'll make your second VM install slower.
Remember this is you go through these labs. Turn off and on VMs as you're told.
Investigation 5: Windows Server 2025 Core (srv2)
In this investigation, we'll create a second Windows Server virtual machine that is in Core mode. This is a CLI-only environment.
VM Specifications
| Setting | Value |
|---|---|
| Hypervisor | VMware Workstation |
| VM Name | srv2-yourSenecaUsername |
| Role | Windows Server - CLI |
| OS / Image | Windows Server 2025 Datacenter |
| vCPU | 2 cores |
| RAM | 4 GB |
| Disk | 250 GB |
| NICs | 1 |
| NIC1 | VMnet10 |
| NIC1 IPv4 | 10.0.UID.2/24 (static) |
Instructions to set this up are provided below.
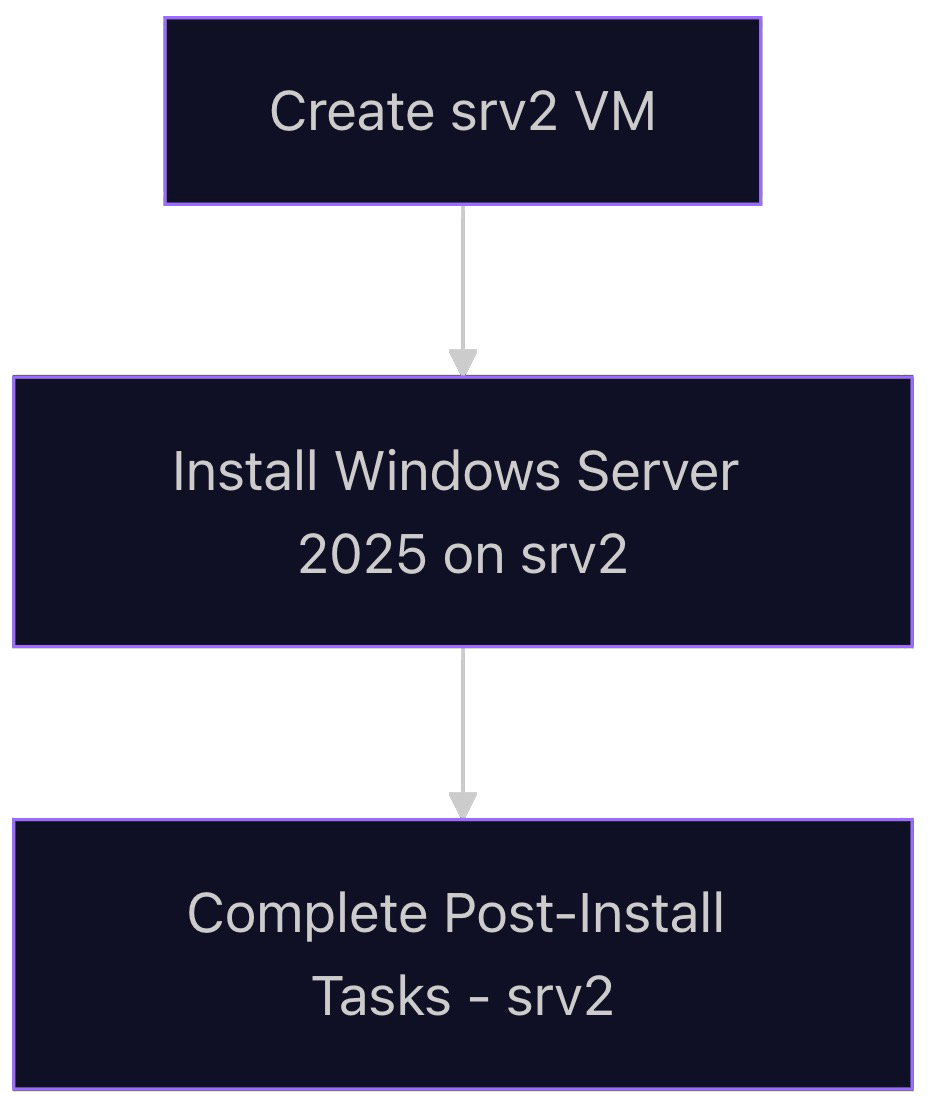
Flowchart Visualization of Investigation 5
Part 1: Setup Instructions
-
In the main window, you should see a large + symbol icon titled Create a New Virtual Machine. Click it.
-
In the new dialog box, keep Typical selected and click the Next button.
-
On the next screen, Guest Operating System Installation, do the following:
- Select Installer disc image file (ISO):
- Now click Browse.
-
Navigate to where you saved your Windows Server 2025 Datacenter downloaded ISO and select it.
-
Once selected, the previous screen should now say:
Windows Server 2025 detected.
This operating system will use Easy Install.
-
If it doesn't, you haven't selected the right file, or your download was corrupted. Ask for help.
-
- Click Next.
-
On the "Easy Install Information" screen, do the following:
- Paste in your serial key.
- Version of Windows to install: Select Windows Server 2025 Datacenter (Core)
- Personalize Windows:
- Full Name: Administrator
- Password (both fields): Select a strong password you will remember. You will use this same password for all VMs in this course.
- Do not select "Log on automatically".
- Click Next.
-
On the "Name the Virtual Machine" screen, do the following:
-
Virtual machine name: srv2-yourSenecaUsername
Explanation: For example, if my Seneca e-mail address is
cjohnson30@myseneca.ca, then my Seneca username is cjohnson30. This would give me a VM name of srv2-cjohnson30. -
Location: If using an external SSD (like with our lab computers), click Browse and navigate to your external SSD.
- Create the following directory structure in your SSD: OSM620 > Virtual Machines > srv2-cjohnson30
- Select this new srv2-cjohnson30 folder.
- Make sure you now see this change in the Location field. (Example: Z:/OSM620/Virtual Machines/srv2-cjohnson30)
-
Click Next.
-
-
On the "Specify Disk Capacity" screen, do the following:
- Maximum disk size (GB): 250
- Select Split virtual disk into multiple files.
- Click Next.
-
On the "Ready to Create Virtual Machine" screen, do the following:
- Click on Customize hardware...
-
On the new "Hardware" screen, do the following:
- Select Memory, and change the value to: 4096
- Select Processors, and change:
- Number of processors: 1
- Number of cores per processor: 2
- Virtualize Intel VT-x/EPT or AMD-V/RVI: Checked
- Virtualize CPU performance counters: Unchecked
- Virtualize IOMMU (IO memory management unit): Checked
- Select Network Adapter and confirm:
- Connected at power on: Checked
- Under Network connection, click the Custom: Specific virtual network radio button.
- Just below that, click the drop-down (it likely says VMnet0 by default). Find and select VMnet10.
- Click Close.
-
Back in the "Ready to Create Virtual Machine" screen, click Finish.
-
The virtual machine should launch.
-
If you get a dialog box about Side channel mitigations, check the box for Do not show this hint again and click OK.
-
Your new Virtual Machine should now finish creating and then turn on and begin the OS installation.
-
Windows installation is automated at this point and won't require any input from you. It may restart several times.
Time Note: Installation may take some time.
Feel free to get some caffeine or make a sandwich.
-
Eventually, you will be presented with the Command Prompt window open to the SConfig text-based application, and the VMware Tools installer having completed and asking if you'd like to restart. Choose Yes.
-
Once you've restarted, your installation is complete.
Part 2: Setting Up srv2's Network Connection - Internal Network
In this part, we'll rename the network interface card (NIC) and then give it a 10.x.x.x address so we can use it to communicate with the Internet.
You've also have your first experience with PowerShell commands.
- Login to srv2.
- In the
sconfigapplication, select Option 8 (Network Settings). - You will have one network adapter. We're going to change part of its configuration.
- Select that adapter's entry's number from the first column to go into its options.
- In Network Adapter Settings, select Option 4 (Rename network adapter).
- Type the following and hit Enter:
Internal Network - Note the Interface Name and its IP information. It doesn't have a valid network address yet. We're going to change that, but not here.
- Go back to the main
sconfigscreen. - Select Option 15 to exit to the command line.
We're now going to apply network settings to our network adapter using PowerShell.
- First, confirm the name of your adapter with the following command:
Get-NetAdapter
- Now, assuming it look correct, run the following:
New-NetIPAddress -InterfaceAlias "Internal Network" -IPAddress 10.0.UID.2 -PrefixLength 24
- Double-check your work by running:
Get-NetIPAddress -InterfaceAlias "Internal Network"
If it has the proper 10.x.x.x IP address, well done! Move on to Part 2.
If the network information is wrong, you can remove it and try again by running:
Remove-NetIPAddress -InterfaceAlias "Internal Network" -AddressFamily IPv4
As a quick test, check your internet connection by running the following:
ping 1.1.1.1
ping eff.org
If both work, you have successfully applied new network settings and provided srv2 with an Internet connection!
Tip: To return to
sconfig, either runsconfigor typeexit.
You can go back into the SConfig network settings and see your applied changes, if you'd like. It's a nice way to double-check your work.
Part 3: Applying Time Zone Settings
This is a repeat of your srv1 work, but done in the Core environment. Remember, post-installation tasks are NOT optional!
This one is fairly straight-forward. Having the proper time zone set (EST) is essential for proper time keeping and ensuring encrypted webpages connect properly.
- In the SConfig application, select Option 9 (Date and Time). Use your keyboard.
- The Date and Time dialog box pops up.
- Look for the Time Zone line. It should say (UTC-05:00) Eastern Time (US & Canada).
- If the Time Zone line item doesn't say the above, click on the Change time zone... button and change it to UTC-05:00 as seen above.
- Click OK to close out of Date and Time.
- Back in SConfig, choose Option 9 again to confirm your changes have stuck. If yes, continue to Part 2.
Part 4: Server Name Change
The default name applied to your new server will be semi-randomized. For proper identification (and to not wonder which server you're on when you have several), we're going to change this.
- In the SConfig application, select Option 2 (Computer name). Use your keyboard.
- In the new Computer name screen, enter your new computer name in the waiting text field: srv2-yourSenecaUsername
- Press Enter on your keyboard to confirm the change.
- The system now asks you about restarting. Enter Y to choose yes and hit the Enter key to confirm.
- Once you've restarted and logged back in, go back to the Computer name screen from Part 2 and double-check your new computer name is correct. Do not skip this step!
- If it is, you're done!
Part 5: Installing OS Updates
A critical part of a security-conscious mindset is running regular updates. This is NOT something you do only once at the start of installation. You should be running these regularly to keep up to date with security fixes and zero-day exploits.
IMPORTANT: If Windows Update fails with errors, you may have Internet connectivity issues. Ask your professor for help!
- In the SConfig application, select Option 5 (Update settings). Use your keyboard.
- In the new Update setting screen, enter 5 (Opt-in to Microsoft Update) and hit Enter to confirm.
- The next screen will ask you confirm again. Enter y and hit Enter to continue. (Then, hit Enter again.)
- In the SConfig application, select Option 6 (Install updates). Use your keyboard.
- In the new Install updates screen, enter 1 (All quality updates) and hit Enter to confirm.
- After a short check, you are asked which updates to install. Select a to install all updates and hit Enter to confirm.
- As you might expect, this can take a while. Timing will depend on your Internet connection, how fast your computer is, how fast your SSD is, and how many updates there are. Please be patient.
- Once updates have begun, take a break while it does its thing. Grab a drink, make a sandwich, text a friend.
- If asked to restart, choose yes.
- After updates are complete, go through Steps 4-6 again. Do so until the system tells you there are no new updates. (It may take a few cycles to get them all.)
- When complete, shut down srv2 safely. Use the on-screen menu options in SConfig to do so.
That's it! Now you're done. Congratulations!
Investigation 6: Windows 11 (client1)
In this investigation, we'll install a Windows 11 client to simulate an employee workstation environment. Imagine a physical computer at an employee's desk.
Part 1: Creating client1 VM
In this part, you will create a new Windows 11 virtual machine using the hardware specifications below.
Note: Keep all other VMs (except the router) off until told otherwise.
VM Specifications
| Setting | Value |
|---|---|
| Hypervisor | VMware Workstation |
| VM Name | client1-yourSenecaUsername |
| Role | Employee Workstation |
| OS / Image | Windows 11 Education |
| vCPU | 2 cores |
| RAM | 4 GB |
| Disk | 64 GB |
| NICs | 1 |
| NIC1 | VMnet10 |
| NIC1 IPv4 | 10.0.UID.2/24 (static) |
| Encryption | See note below. |
If you can't remember how to create a VMware virtual machine, please refer back to earlier investigations in this lab.
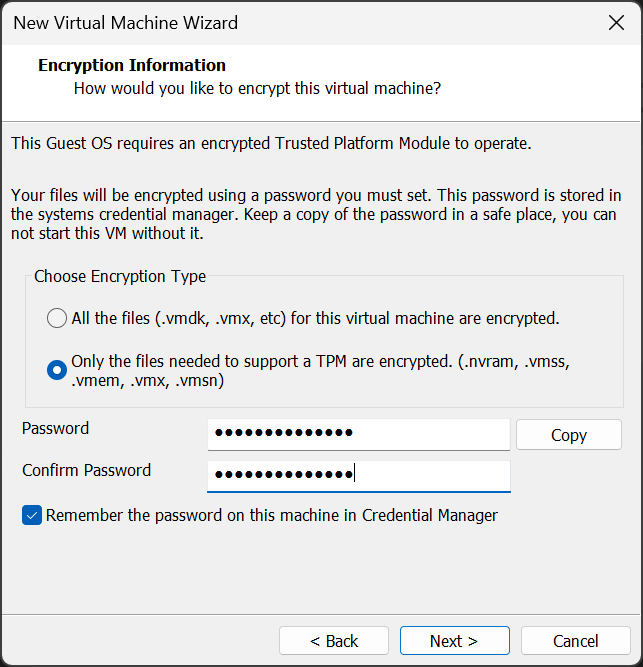
Encryption Information Page
Windows 11 uses TPM hardware to encrypt certain important files. VMware Worksation adds the TPM module automatically as long as you select the right options:
- Choose Encryption Type: Only the files needed to support a TPM are encrypted.
- Password: Your normal VM password.
You do need to choose the encryption type and give it a password. Use the same password you've used for all other VMs in this course.
Figure 1. The Encryption Information page for creating a new Windows 11 VM in VMware.
Part 2: Installing Windows 11 (client1)
Installing Windows 11 is a bit different from Windows Server 2025. There's a bit more manual work without the Easy Install option available.
- Power on the client1 VM.
- Once the Windows 11 Setup screen appears:
- On Select language settings, keep the defaults and click Next.
- On Select keyboard settings, keep the defaults and click Next.
- On Select setup option, do the following:
- Select Install Windows 11
- Check the box next to I agree everything will be deleted, including files, apps, and settings
- Click Next.
- On the Product key page, enter your product key and click Next.
- On Applicable notices and license terms, click Accept.
- On Select location to install Windows 11, keep the defaults and click Next.
- On Ready to install, click Install.
- The Windows Installer will now install the OS. This may take some time, and the percentage may freeze at certain points. Be patient.
- When the installer finishes, Windows 11 will start up and you will be launched into the First-Run Setup. Go to Part 3.
Part 2: First-Run Setup
- On Is this the right country or region?, select Canada and click Yes.
- On Is this the right keyboard layout or input method?, stick with the default and click Yes.
- On Want to add a secondary keyboard layout?, click Skip.
Note: If it has an Internet connection, Windows will now check for available updates from the Internet. If it finds any, it will install them automatically.
If it doesn't have an Internet connection, this step will be skipped.
This process may take some time. Please be patient. Your VM may restart on its own.
Part 3: Account Creation
Now that language/keyboard and installer updates have been applied, it's time to create your account.
Note: Steps 1-2 may not be necessary. If you're asked for a name, start with Step 3.
- On Let's set things up for work or school, select Sign-in options.
- On this next screen, click on Domain join instead.
- On Who's going to use this device?, enter your Seneca username, (Not your full name), then click Next.
- On Create a super memorable password, enter the same password you've used for your other VMs and click Next.
- Confirm it on the next screen and continue.
- On Now add security questions, fill out three security questions, clicking Next after each.
- On Let Microsoft and apps use your location, select No, then click Accept.
- On Find my device, select No, then click Accept.
- On Send diagnostic data to Microsoft, scroll down to select Required only, then click Accept.
- On Improve inking & typing, select No, then click Accept.
- On Get tailored experiences with diagnostic data, select No, then click Accept.
Note: If it has a valid Internet connection, Windows will now check for more available updates. As before, if it finds any, it will install them automatically.
If not, it will simply continue.
This process may take some time. Please be patient. Your VM may restart on its own.
Once complete, you will be presented with a login screen. Move to the next part to continue.
Part 4: Network Configuration (client1)
In this part, we'll log in for the first time and configure our client's network connection.
- Enter your password to login. First-login may take a few minutes as your profile is set up.
- Click on the Start button and search for Network Connections. Open it when found.
- Find the only Ethernet adapter (it may have different names).
- Right-click it → Properties and do the following:
- Internet Protocol Version 6 (TCP/IPv6): Unchecked
- Internet Protocol Version 4 (TCP/IPv4): Select and click Properties
- IPv4 address: 10.0.
UID.11 - Subnet mask: 255.255.255.0
- Default gateway: 10.0.
UID.1 - Preferred DNS server: 10.0.
UID.1 - Alternate DNS server: 8.8.8.8
- Leave all other fields blank and click OK.
- IPv4 address: 10.0.
- Open Microsoft Edge and navigate to eff.org. If the page loads, you're done!
Part 5: Setting the Time Zone (client1)
- Login again if you aren't still there.
- Find the time on the bottom right of the screen (in the VM, not your host machine!)
- Right-click on the time and select Adjust date and time.
- Check the displayed time and time zone.
- The time should match current time, and the time zone should say "(UTC-5:00) Eastern Time (US & Canada)".
- If the time zone is wrong, change it to the value above.
- Confirm your time zone and time matches local time.
Part 3: Setting Internal Computer Name
When we created our VM, we gave it the name client1-SenecaUsername. This only applies to how VMware Workstation sees the VM, not to how the internal Windows OS sees itself. We need to change that to match.
- In the Settings window you still have open (or reopen it from the Search bar), look to the left-hand menu bar and select System.
- The very first thing you see at the top is the current computer name. This is what we're going to change.
- Click on the Rename text link.
- In the Name your device field, enter your VM's name: client1-SenecaUsername (replacing SenecaUsername with your actual username)
- Click Next.
- You will now be asked if you'd like to restart. Click Restart now.
- After restarting and logging back in, go into Settings > System and confirm your computer name is now client1-SenecaUsername.
Part 4: Remaining Post-Installation Tasks
Use the following list to run the remaining post-installation tasks on your new client1 VM.
- Install all available updates.
- Install VMware Tools (if you haven't already).
- Install Firefox.
- When complete (including internal name and updates!), shut down the VM.
Lab 1 Sign-Off
It is extremely important that you complete Lab 1 correctly as these virtual machines will be the platform on which the rest of the course will be completed.
When you have completed Lab 1, ask your instructor to come and check your installation. This must be done in class. They will ask you to complete a set of tasks/commands. If everything has been completed correctly, your instructor will mark your Lab 1 as complete.
Sign-Off Checklist
For your router VM:
- Open VMware Hardware Settings window for router to confirm you're using the right hardware resources.
- router is currently running.
For each of your three Windows VMs:
- Open VMware Hardware Settings window to confirm you're using the right hardware resources.
- The VM is currently running and logged in.
- No new updates available.
- Server names have been applied correctly.
- Time zone is in EST.
- srv1 and client1: Firefox installed and open to eff.org.