Lab 3 - Implementing DNS
Lab Preparation
Purpose / Objectives of Lab 3
In this lab, you will deploy and validate a local DNS service on your Windows Server GUI VM (srv1), then configure all machines in your lab environment to use it. By the end, you will be able to:
- Install the DNS Server role on srv1.
- Create a Forward Lookup Zone for yourSenecaUsername.com.
- Add A records for srv1, srv2, client1 and client2.
- Configure forwarders so srv1 can resolve Internet names.
- Point srv1 to itself via loopback (127.0.0.1) for DNS.
- Reconfigure srv2, client1, and client2 to use srv1 as their DNS.
- Create a Reverse Lookup Zone and PTR records. Verify forward and reverse resolution with
nslookup,ping, and browser tests.
If you encounter technical issues, please contact your professor via e-mail or in your section's Microsoft Teams group.
Minimum Requirements
Before beginning, you must have:
- Successfully completed Lab 2.
- Attended the Week 4 lecture
- Read through the Week 4 slides and have them handy as a reference for concepts.
- Your external SSD (or approved personal computer) with your VMs from Labs 1-2.
- Your VM login credentials.
- Optional, but recommended: Caffeine delivery system.
Key Concepts
What DNS Does - Domain Name System
DNS maps names to IP addresses. Humans remember reddit.com. The Internet only understands how to route to 151.101.193.140. It’s hierarchical and distributed, so no single server knows everything. Authoritative servers answer for their zones and resolvers figure the rest out.
Forward vs. Reverse Lookups
- Forward: URL to IP (e.g., srv1.yourSenecaUsername.com converts to 10.0.UID.1) using A/AAAA records.
- Reverse: IP to URL (e.g., 10.0.UID.1 to srv1.yourSenecaUsername.com) using PTR records in a Reverse Lookup Zone.
Reverse lookup is gold for troubleshooting and clean logs.
Zones and Authority
A zone is the authoritative dataset for a chunk of namespace. In this lab you create:
- Forward zone: yourSenecaUsername.com
- Reverse zone: 10.0.UID.0/24 (IPv4 reverse)
Each zone has an SOA (start of authority) and NS records defining who’s in charge. We keep dynamic updates disabled here for control and repeatability.
Authoritative vs. Recursive (srv1 does both)
- Authoritative: Answers with authority for names inside its zones.
- Recursive: Chases down answers it doesn’t know yet.
In our setup, srv1 is authoritative for your lab domain and recursive for everything else (via forwarders).
Forwarders vs. Root Hints (and Conditional Forwarders)
- Forwarders: send unknown queries to specific upstream resolvers (what we configure for the classroom).
- Root hints: the built-in map to the DNS root—slower to “warm up.”
- Conditional forwarders: send only certain domains to specific DNS servers (handy in enterprises; not needed here).
We will only be using forwarders in this lab for ease of set up.
Records You’ll Actually Touch
- A: Hostname to IPv4.
- PTR: IPv4 address to hostname (reverse).
- CNAME (alias): points a name to another name.
- Rule of thumb: a CNAME can’t live alongside other records at the same name (no A+MX+CNAME pileups).
FQDNs and the DNS Suffix
- Fully-Qualified Domain Name (FQDN): Full path (e.g., srv1.yourname.com.).
- Short names (e.g., ping srv1) rely on a DNS suffix search list. To keep tests deterministic, we use FQDNs in this lab.
Caching and TTL
DNS answers are cached to reduce load. The TTL controls how long.
Tips:
- After changing records, clear caches where relevant:
- Client:
ipconfig /flushdns - Server: DNS Manager > right-click server > Clear Cache
Ports and Firewall
DNS uses UDP/53 for most queries, TCP/53 for large responses and zone transfers. With the DNS Server Role installed, inbound DNS rules should be enabled (Private/Public).
Verify. Never assume.
Loopback and Why We Use It on srv1
The loopback interface (127.0.0.1) sends traffic to the local host. It is immune to network interface card (NIC) misconfigurations. Pointing srv1 at 127.0.0.1 ensures it always asks itself first, which simplifies troubleshooting.
Loop: srv1 > 127.0.0.1 > srv1
Split-Horizon (a.k.a. Split-Brain) DNS (just awareness)
Enterprises often serve different answers internally VS externally for the same name. In this lab your domain is internal-only. Don’t register it publicly.
Troubleshooting Toolkit
- nslookup (classic): Quick forward/reverse tests.
- Resolve-DnsName (PowerShell): Richer diagnostics (optional).
- Get-DnsClientServerAddress: Confirm which DNS your client is using.
- If names resolve but pings fail, think firewall (Lab 3), not DNS.
Investigation 1: Configuring DNS on Windows Server (srv1)
Part 1: Confirm a Static IP Address on srv1
As srv1 will be our primary network services provider, we have to give it a static IP address. This is so it doesn't periodically change. If it did change, any other machines relying on this one would suddenly be unable to connect and lose access to all services provided, including the very DNS we're about to set up!
We already did this during Lab 2, Investigation 1, Part 3. Doing so is called manual static network configuration.
Let's confirm our work:
- Open Command Prompt.
- Run the following command:
ipconfig - Confirm the Internal Network adapter uses: 10.0.
UID.1 - Find the External Network adapter's current DNS address. Write this down. You will need it later in this lab.
Static IP addressing is always required for a computer or device providing network services. Remember that.
If the proper static IP is confirmed, move on to Part 2.
Part 2: Installing the DNS Server Role on srv1
Let's install the DNS Server Role.
- Login to srv1 with your Administrator account.
- Open the Server Manager application (icon is on the taskbar or Start menu).
- In the left menu, click on Local Server if you’re not already there.
- At the top right, click Manage > Add Roles and Features.
- In the Add Roles and Features Wizard window:
- On Installation Type, select Role-based or feature-based installation, then Next.
- On Server Selection, confirm Select a server from the server pool and choose srv1, then Next.
- On Server Roles, scroll down and check the box for DNS Server.
- A pop-up will ask to add required features, click Add Features.
- Back on the Server Roles page, click Next.
- On the Features page, leave defaults, click Next.
- On the DNS Server page, read and click Next.
- On the Confirmation page, click Install.
- Wait for installation to finish (may take a few minutes).
- When you see Installation succeeded on srv1, click Close.
Part 3: Configuring a New DNS Zone
We are now going to create a new DNS foward lookup zone. This is what allows us to put all of our machines under a single domain name. Just like reddit.com and eff.org, you will create your own domain name using yourSenecaUsername.com.
- Back in Server Manager, in the top right, click Tools > DNS to open the DNS Manager.
- In the left pane, expand srv1 and then Forward Lookup Zones.
- Right-click on Forward Lookup Zones and select New Zone…
- In the New Zone Wizard:
- On Zone Type, select Primary zone, click Next.
- On Zone Name, enter yourSenecaUsername.com, replacing yourSenecaUsername with your actual username.
- For example, mine might be: cjohnson30.com
- Click Next.
- On Zone File, keep Create a new file selected, click Next.
- On Dynamic Update, keep Do not allow dynamic updates (default), then click Next.
- Click Finish to create the zone.
Part 4: Adding Host (A) Records
A records (also known as host records) are the entries that allow us to say what name goes to what IP address. So, we can link the IP address 10.0.UID.1 with srv1, for example.
Note: An A record adds to your domain name. If you make an A record called srv1, then the full path is srv1.yourSenecaUsername.com.
The formula is always: A_recordname+domainname
- In DNS Manager, expand your new yourSenecaUsername.com zone.
- Right-click in the right pane and select New Host (A or AAAA)…
- For each of your lab VMs, create a record:
- srv1
- Name:
srv1 - IP address:
(Use the IPv4 address of srv1) - Click Add Host
- Name:
- srv2
- Name:
srv2 - IP address:
(Use the IPv4 address of srv2) - Click Add Host
- Name:
- client1
- Name:
client1 - IP address:
(Use the IPv4 address of client1) - Click Add Host
- Name:
- srv1
- When finished, you should see all three names listed in the zone.
Part 5: Configure DNS Forwarders on srv1
We want srv1 to answer local names (your zone which contains srv1, srv2, etc.) and resolve Internet names. If srv1 isn’t authoritative for a name (i.e. doesn't have a definition for it), it should forward the query upstream.
At the moment, it's only set up to give the IP addresses of our VMs, not the Internet.
To fix this, we have to tell this server where to look if it doesn't have the answer locally. If it can't answer locally, it will forward the request to an Internet-based DNS server.
This is called a Forwarder. Let's set it up:
- In DNS Manager on srv1, right-click on your server’s name in the left pane.
- Select Properties.
- Go to the Forwarders tab.
- Click Edit… Investigation 1, Part 1, Step 4.
- In the IP address field, enter the IP address from Investigation 1, Part 1, Step 4, then hit Enter for it to be verified. If it can reach it, you should see a domain name populate next to the IP address.
- Add a second DNS for fallback, using CIRA's DNS:
- 149.112.121.20
- Make sure CIRA's DNS is the second entry in the list.
- Click OK to add.
- Click OK again to close Properties.
ℹ️ Note: In managed networks you might use Root Hints instead. We’re using Forwarders for predictable performance in a classroom environment.
Part 6: Configuring srv1 To Use DNS From srv1
Now that we've set up our DNS server locally on srv1, we have to tell srv1 to use itself for DNS resolution instead of what Seneca (or your ISP) provides.
We're going to do this by using the Loopback Interface. This is a special network interface on all modern operating systems that, when network traffic (like DNS!) is sent to it, will loop it back to itself. Hence, the name.
The Loopback interface's address is always 127.0.0.1 on all systems. (You may sometimes see localhost used for this. That's the URL version of the exact same network interface.)
This special interface is great for a number of reasons, but most importantly: It's completely separate from our other networks and so isn't affected by network configuration mistakes. When you use loopback, you know you're getting the most direct link. Helpful in troubleshooting!
Network Flow with Loopback: Send Traffic from srv1 > srv1 Loopback > Receive Traffic from srv1
-
To do this, open up the Network Properties for External Network and change its TCP/IPv4 settings to the following:
- Preferred DNS server: 127.0.0.1
- Alternate DNS server:
<blank>
-
Click OK on each open dialog box until you're back at Network Connections.
-
Repeat Steps 1-2 for vEthernet (HQ Network).
-
Verify your work by opening Command Prompt and running:
ipconfig /all -
You should see both interfaces and their DNS settings set to 127.0.0.1.
If you do, move on to the next part!
Part 7: Test srv1 DNS Resolution
Our first task is to confirm this works locally by telling the server to talk to itself first for DNS resolution. This lets us test our DNS service and records while removing the network and firewall pieces. (See the explanation above in Part 6.)
- Open Command Prompt.
- To test DNS resolution functionality on your local network, run the following commands one at a time:
nslookup srv1.cjohnson30.com
nslookup srv2.cjohnson30.com
nslookup client1.cjohnson30.com
- Now, let's run a lookup for an address on the greater Internet:
nslookup eff.org
nslookup reddit.com
- If each returns the proper IP address value, you're done! If not, revisit your earlier configuration steps and check to see what might be missing.
- Don't be afraid to ask for help!
- If any of your lookups above failed, ask for help! Do not move onto the next Investigation if failed.
Investigation 2: Configuring Other Machines For DNS Use
In this investigation, we will configure our other VMs to use srv1 as the DNS server for all DNS resolution.
ℹ️ A note about the loopback address from Investigation 1
The loopback address we used on srv1 only works locally. You cannot use this address outside of srv1. You must use its Internal Network address.
Part 1: Windows Server Core (srv2)
- Turn on the following VMs:
- srv2
- client1
- client2
- On srv2, log in as Administrator.
- At the prompt, run:
Get-NetIPAddress
- Look for the section that contains srv2's normal Internal Network IP address. Make a note of the InterfaceIndex number just below it. (For example, 4. Yours may differ.)
- Set the DNS server to srv1’s IP (replace X.X.X.X with srv1’s actual address, and 4 with your NIC’s ifIndex):
Set-DnsClientServerAddress -InterfaceIndex 4 -ServerAddresses `10.0.UID.1`
- Confirm the change:
Get-DnsClientServerAddress
-
Repeat Steps 2-5 for the External Network address/network interface.
-
When done, the command on Step 5 should provide a similar output to this:
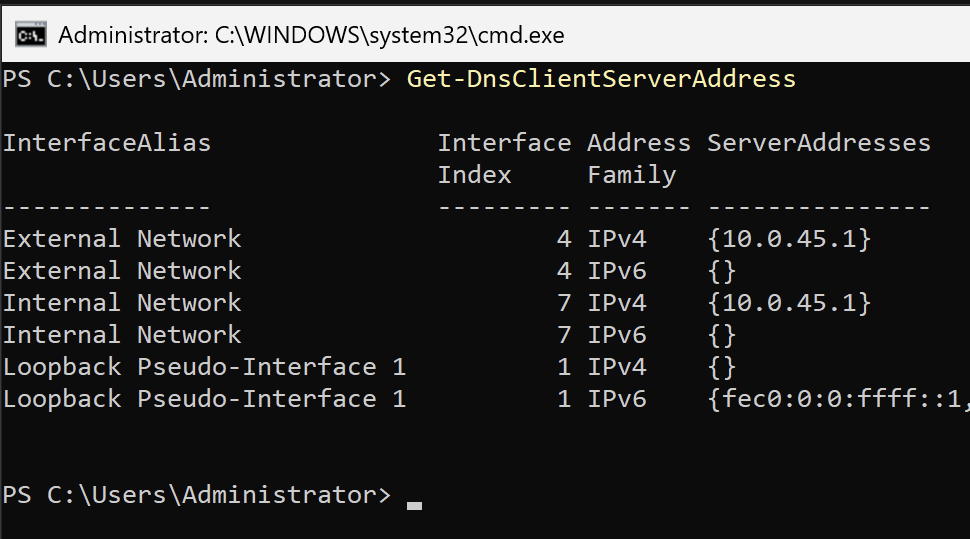
-
To test DNS resolution functionality, run the following commands one at a time:
nslookup srv1.cjohnson30.com
nslookup srv2.cjohnson30.com
nslookup client1.cjohnson30.com
nslookup eff.org
- If each returns the proper IP address value, you're done! If not, revisit your earlier configuration steps and check to see what might be missing.
- Don't be afraid to ask for help!
- Last, ping each other machine to prove you no longer need to remember IP addresses:
ping srv1.cjohnson30.com
ping client1.cjohnson30.com
- Cool, right?
Part 2: Windows 11 Client (client1)
- Login as Administrator.
- Right-click the Network icon in the system tray, click Network and Internet settings.
- Click Ethernet.
- Scroll down to DNS server assignment and click the Edit button next to it.
- In the Edit DNS settings pop-up window, click the drop-down menu to change it from Automatic (DHCP) to Manual.
- Find the new IPv4 option and toggle it On.
- In the Preferred DNS field, enter the srv1 IP address.
- Leave all others on their defaults and click Save.
- Remove saved DNS cache. Open Command Prompt and type:
ipconfig /flushdns
- To test DNS resolution functionality, run the following commands one at a time:
nslookup srv1.cjohnson30.com
nslookup srv2.cjohnson30.com
nslookup client1.cjohnson30.com
nslookup eff.org
nslookup reddit.com
- If each returns the proper IP address value, you're done! If not, revisit your earlier configuration steps and check to see what might be missing.
- Don't be afraid to ask for help!
- Last, ping each server to prove you no longer need to remember IP addresses:
ping srv1.cjohnson30.com
ping srv2.cjohnson30.com
If those work, you're done! Move on to the next Investigation.
Investigation 3: Configuring Reverse Lookup (PTR) Records
In this investigation, we will set up Reverse Lookup (PTR) records so we can look up a server by its IP address and get a FQDN address back. Very helpful in troubleshooting and a best practice.
You'll also see how it helps for self-identification a little later.
Part 1: Create a Reverse Lookup Zone
- In DNS Manager on srv1, right-click Reverse Lookup Zones in the left pane.
- Click New Zone…
- In the New Zone Wizard:
- On Zone Type, select Primary zone. Click Next.
- On Reverse Lookup Zone Name, choose IPv4 Reverse Lookup Zone. Click Next.
- On Network ID, enter the first three octets of your VMs’ subnet (for example, if your VMs’ IPs are 10.0.45.x, enter 10.0.45). Click Next.
- On Zone File, keep defaults. Click Next.
- On Dynamic Update, keep defaults (Do not allow dynamic updates). Click Next.
- Click Finish to create the zone.
Part 2: Add PTR Records for Each VM
- We're going to automatically add PTR records using our existing A records for ease of use.
- Inside the Forward Lookup Zones, in the cjohnson30.com zone, right-click each A record you created (srv1, srv2, client1, client2) and select Properties.
- Check the box next to “Update associated pointer (PTR) record” and click OK.
- If the box was already checked, uncheck it, click Apply, check it again, then click Apply again. This forces the PTR generation.
- This should automatically create PTR records in your new reverse zone.
- Double-check your work. Click on the folder inside Reverse Lookup Zone to see its contents. If empty, right-click on the folder and click Refresh.
- They should now appear. If they do not, retrace your steps or ask for help.
Part 3: Test Reverse DNS Resolution
- On srv2, open PowerShell.
- Run nslookup on each VM's IP address:
nslookup 10.0.UID.1
nslookup 10.0.UID.2
nslookup 10.0.UID.11
- You should see the PTR record and corresponding hostname for each IP address.
Example Output:
Server:  srv1.cjohnson30.com
Address:  10.0.45.1

Server:  srv2.cjohnson30.com
Address:  10.0.45.2

Name:    client1.cjohnson30.com
Address:  10.0.45.11
- Notice that the server entry no longer says "UnKnown" as it did before. Now it can identify itself!
Congratulations, you've now set up basic DNS services from srv1 to each VM in your environment and allowed for local resolution to your other VMs by name!
Troubleshooting and Common Pitfalls
- Forwarders not working: Verify upstream DNS IPs are reachable from srv1 and listed in the Forwarders tab (not just in adapter DNS settings).
- Wrong adapter DNS: On srv1, both adapters should use 127.0.0.1. On other machines, adapters should use 10.0.UID.1.
- Names resolve, but pings fail: That’s likely firewall (Lab 3). The important bit for this lab is that nslookup returns correct answers.
- PTRs missing: Re-toggle “Update associated PTR” on each A record, Apply, then Refresh the reverse zone.
- Typo domain: Be consistent (e.g., cjohnson30.com everywhere).
- UID mismatch: Ensure all A/PTR records and tests use your UID subnet (10.0.UID.x).
Lab 3 Sign-Off
It’s essential to complete Lab 3 correctly. All later labs assume working forward and reverse name resolution.
When you finish Lab 3, ask your instructor for a sign-off.
Sign-Off Checklist
Please have the following on screen and ready to show.
On srv1:
nslookup srv1.yourdomain: Returns 10.0.UID.1nslookup eff.org: Returns a public IP (forwarder working)- Both adapters show 127.0.0.1 as DNS in
ipconfig /all - Your Forward Lookup Zone page open for review.
- Your PTR Records page open for review.
On srv2:
Get-DnsClientServerAddress: Shows 10.0.UID.1nslookup client1.yourdomain.comandnslookup client1.yourdomain.com: Correct IPsnslookup 10.0.UID.1andnslookup 10.0.UID.11: Correct PTR to FQDN.
On client1:
- DNS set to 10.0.
UID.1 (Manual/IPv4) nslookup srv2.yourSenecaUsername.com: Resolves to 10.0.UID.2nslookup reddit.com: Resolves a public IP (forwarder working)- In Firefox:
http://www.reddit.comloads the Reddit main page.