Lab 1 - Building the "Physical" Network
Overview
This week's lab will cover the following:
- Installing our host system (Ubuntu)
- Installing 4 Virtual Machines
- 2 VMs that will act as routers using Debian
- 1 Host machine using Mint
- 1 Host machine using Windows 11
- Using KVM to replicate physical network with a virtual one
Lab 1 Note
While lab 1 is not difficult, it is very important as you will be creating an environment/network that the next 3 labs rely on. Take your time to ensure everything is done correctly. Even a small mistake in this lab may result in you being unable to proceed in labs 2, 3, or 4. If this happens, you will have to start from Lab 1. You have been warned!
Getting Started
The first thing we are going to do in Lab 1 is get our host system set up. We will be using Ubuntu 26.04 for our host system. You can find the ISO file download here --> Ubuntu 26.04
You will have to create a bootable USB flash drive just like you did in Lab 1 back in OPS245. The difference here is that you will be using Ubuntu instead of Debian. If you need a refresher on how to create a bootable USB flash drive, see the OPS245 Lab 1 page.
If you have another tool other than Rufus you prefer, feel free to use it but one way or another you will need to create a bootable USB flash drive with the Ubuntu installer on it. Once you have that you will install it and boot to it on an external SSD drive connected to a lab computer the same way you did with Debian in OPS245.
Investigation 1: Installing the Ubuntu Host System
Once you have successfully launched the installer, use the following instructions to install Ubuntu 26.04 to your external SSD:
- Select “English”, click “Next”
- Click “Next” on Accessibility screen
- Select “English (US) on Keyboard layout screen, click “Next”
- Select "wired connection"
- Select "Install Ubuntu"
- Select Interactive installation
- Select "Default selection" for apps
- Install third-party software for graphics and Wifi, but don’t download and install support for additional media formats
- Select “Erase disk and install Ubuntu”, click “Next”
- VERY IMPORTANT: select your external hard drive, NOT THE INTERNAL ONE! (it will likely be labelled as "sda" followed by your hard drive manufacturer but double check with your teacher if you are not sure)
- Select "No encryption"
- Create your account
- Provide your full name
- Use “ubuntuhost” for your computer's name (hostname)
- Use your Seneca username for username (the string before the @ sign in your myseneca email address, ex hheim@myseneca.ca --> hheim)
- Create a password and DO NOT FORGET IT
- Ensure “Require my password to log in” is checked
- Click next. Select Toronto and click next.
- Double check that you are installing Ubuntu on the correct hard drive and click Install.
- A screen will pop up with two options: "Continue testing" and "Restart now". Select "Continue testing".
- Click the power button in the top right and "Poweroff" the system.
- You should see a "remove the installation medium, then press ENTER" message. Remove your install USB and press enter.
- Once your system fully powers off, wait 10-15 seconds and then power it back on.
- Hit F12 to get to the boot menu once again and this time select your external hard drive to boot into Ubuntu.
When you have booted up and logged into Ubuntu for the first time, perform the following post-installation tasks:
- On “Welcome to Ubuntu” screen, click “next”
- Do not turn on "Location services"
- Do not share anything on the "Help improve ubuntu" screen
- Customize Ubuntu's appearance to your liking on the following screen
- Click “Finish”
- Open the terminal and add a root password (AND DON'T FORGET IT)
sudo passwd
- Update your system
sudo apt update && sudo apt upgrade
- Stop and disable apparmor
sudo systemctl stop apparmor
sudo systemctl disable apparmor
- Reboot your system. Note, you may have to fully power off your system (not restart it) to ensure the lab machine recognizes your external install of ubuntu.
- Install vim
sudo apt install vim
- Install KVM
sudo apt install qemu-system libvirt-daemon-system virtinst virt-manager
- Fully power off the system
sudo poweroff
- Boot up and log back into Ubuntu.
Investigation 2: Installing Virtual Machines
Before we begin installing our VMs, we will need the images of the Operating Systems we will be using.
Download the following to your Ubuntu host system:
- Click "Download"
- Download Cinnamon version
- Select “Windows 11”, click “confirm”
- Select “English (United States)” for language. Click “confirm”
- Click “64-bit Download”
Once you have all 3 ISO images, you can begin installing your VMs.
Creating Debian Router VMs
- In KVM, select “Create a new virtual machine”
- Select “Local install media”, click “Forward”
- Browse and select your Debian ISO image file, unckeck “Automatically detect from installation media” and manually select “Debian 13”. Click “Forward”
- Leave default Memory and CPUS (should be 2048 and 2). Click “Forward”
- Change disk image size to 15.0GB. Click “Forward”
- Change Name to “deb-router-1". Network selection should be “default: NAT”. Check “Customize configuration before install”. Click “Finish”.
- Under “CPUs”, make sure “Copy host CPU configuration (host-passthrough) is checked, then click “Begin Installation”
- Select “Graphical install”
- Select a language: “English”
- Select your location: “Canada”
- Configure the keyboard: “American English”
- Enter “deb-router-1" for the hostname
- Leave Domain name blank
- Do not set a root password
- Enter your full name
- Use your seneca id for your username (the string before the @ sign in your myseneca email address, ex hheim@myseneca.ca --> hheim)
- Use the same password you used for your Ubuntu host system and do not forget it!
- Configure the clock: Eastern
- Partition disks: Guided – use entire disk
- Only vda should show up, click “Continue”
- Select “All files in one partition”
- Select “Finish partitioning and write changes to disk”, click “Continue”
- Write changes to disk? Select “Yes” and click “Continue”
- Scan extra installation media? No
- Debian archive mirror country: Canada
- Select default archive mirror: deb.debian.org
- Leave HTTP proxy blank
- Participate in the package usage survey? No
- Choose software to install:
- uncheck “Debian Desktop Environment”
- uncheck “GNOME”
- Check “SSH server”
- Leave “standard system utilities’ checked
- Click “Continue”
- Install the GRUB boot loader to your primary drive? Yes
- Device for boot loader installation: “/dev/vda”
- Click “Continue” to reboot
Post-installation tasks for Debian router
- Login using the credentials you set up and run “sudo passwd”. Use the same password as you have been for the super user password.
- Check to make sure you can login as root using the “su” command. If successful, run “exit”.
- Update the system.
- Stop and disable Apparmor.
- Install vim.
- Reboot the VM.
Once it successfully reboots, you can power it off.
Create another Debian VM using the exact same installation steps and post-installation tasks that you used for deb-router-1 except this time the VM will be called “deb-router-2" and its hostname will also be “deb-router-2".
Creating Linux Mint Client VM
- In KVM, select “Create a new virtual machine”
- Select “Local install media”, click “Forward”
- Browse and select your Mint ISO image file, unckeck “Automatically detect from installation media” and manually select “Generic Linux 2024”. Click “Forward”
- Set Memory and CPUS to 2048 and 2. Click “Forward”
- Leave default disk image space (should be 25GB). Click “Forward”
- Change name to “mint-client”. Network selection should be “default: NAT”. Check “Customize configuration before install”. Click “Finish”
- Under “CPUs”, make sure “Copy host CPU configuration (host-passthrough) is checked, then click “Begin Installation”
- Select “Start Linux Mint”. Your VM will eventually boot to the Live Mint image.
- Double click the “Install Linux Mint” icon on the desktop.
- Under the welcome screen, select “English” and click “Continue”
- For Keyboard layout, select “English (US)” for both selections
- Leave the “Install multimedia codecs” unchecked
- Select “Erase disk and install Linux Mint”, click “Install Now”
- Click “Continue” at the prompt
- Select “Toronto” if it is not already selected
- At the “Who are you?” screen:
- Enter your full name
- Use “mint-client” for the computer’s name
- Use your seneca id for your username (the string before the @ sign in your myseneca email address, ex hheim@myseneca.ca --> hheim)
- Use the same password you used for your Ubuntu host system and do not forget it!
- Ensure “Require my password to log in” is checked
- Click “Continue”
- Install will proceed. Click “Restart Now” when prompted.
- Press “Enter” on the keyboard when prompted.
Mint will reboot.
Post-installation tasks for Mint client
- Log in.
- Hit the blue “x” button to exit the Welcome window.
- Open a terminal window.
- Run “sudo passwd”. Use the same password as you have been for the super user password.
- Check to make sure you can login as root using the “su” command. If successful, run “exit”
- Update the system.
- Stop and disable Apparmor.
- Install vim
- Reboot the VM. Once it successfully reboots, you can power it off.
Creating MS Windows Client VM
Note: It is best to keep other VMs turned off while installing this VM
- In KVM, select “Create a new virtual machine”
- Select “Local install media”, click “Forward”
- Browse and select your MS Windows 11 ISO image file, leave “Automatically detect from installation media” checked and KVM should automatically select “Microsoft Windows 11”. Click “Forward”
- Set Memory at 4096 and CPUS to 4. Click “Forward”
- Set disk space to 90.0GB. Click “Forward”
- Change name to “win-client”. Network selection should be “default: NAT”. Check “Customize configuration before install”. Click “Finish”
- Under “CPUs”, make sure “Copy host CPU configuration (host-passthrough) is checked, then click “Begin Installation”
- On the language settings screen, set both options to “English (United States)”
- On the Keyboard settings screen, set keyboard to “US”
- On the select setup option screen, select “Install Windows 11” and check the “I agree...” button below
- On the Product key screen, click on “I don’t have a product key”
- On the Select Image screen, select “Windows 11 Education N”
- Accept the license terms
- Select the only available disk and click “Next”
- Click “Install”
- The install process will take some time and the VM will reboot several times
- Eventually you will land on the country/region screen. Select “Canada”
- Select “US” on the keyboard layout screen
- “Skip” adding a second keyboard layout
- On the sign in screen, click on “Sign-in options” and click “Domain join instead”
- Enter your full name and click “Next”. Enter the same password you have been using and click “Next”
- Enter 3 security questions and answers
- Click “No”, “No”, “Required Only”, “No”, “No” for the next 5 screens
- Windows will then continue to download/install for a while (so get comfy or go grab a coffee or something) and eventually you will be in
- Reboot windows
Post-Installation Tasks for MS Windows client
- Click the Windows icon at the bottom of the screen and then type “Computer Name” and press “Enter”.
- Change the computer name to “win-client” and reboot the system.
- After reboot, log back in and click the Windows icon at the bottom of the screen and then type “Windows Update” and press “Enter”.
- Download and install all main updates (you don’t need to install any “Preview” updates).
- Restart Windows when everything looks to be completed. When you log back in, go back to “Windows Updates” and make sure Windows tells you “You’re up to date”.
- Shut down Windows
Investigation 3: Building the "Physical" Network Infrastructure
Overview of our goal
We now have 4 VMs set up and ready to use. These 4 VMs are connected together via a default virtual network that was automatically set up by KVM between all the VMs and the Ubuntu host system. This means that all VMs can ping one another and they can also ping the host system. They are all also able to connect to the Internet through the Ubuntu host system.
In this next section, we are going to change all this because we want to turn our current network environment into something that more closely resembles a physical network environment (although we won't be able to mirror one exactly).
Essentially, we are going to turn our network environment into this:
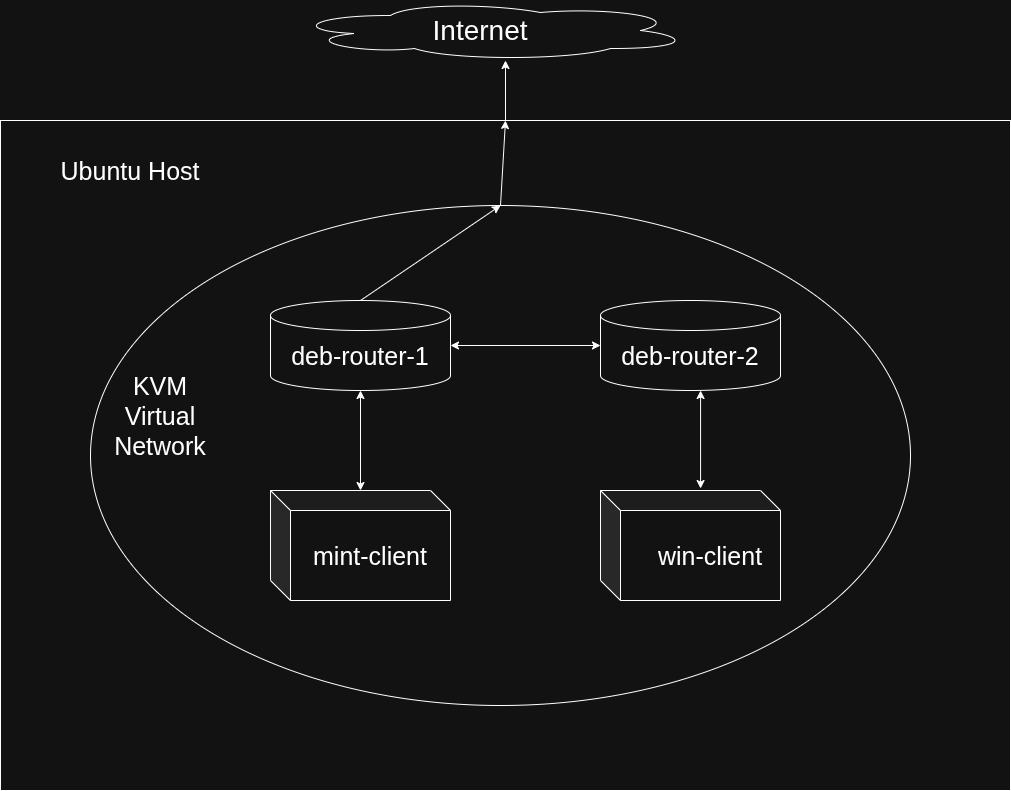
The goal is to have our Debian VMs acting as routers that our client VMs will rely on to send traffic to where it needs to go, whether that destination is on the same subnet, a different subnet, or on the Internet.
We will also be turning deb-router-1 into a gateway to the Internet and NAT device. This means that all traffic that goes to or comes from the Internet will go through deb-router-1. All other devices in our network will be connected locally only and will rely on deb-router-1 to get to the outside world.
Technically, the Ubunutu host system also plays a role in Internet connectivity in this setup (as it is through the Ubuntu host that deb-router-1 will be able to access the Internet), but for the purpose of learning how to properly configure and route our network, we are going to ignore the Ubuntu host moving forward and pretend that our virtual machines are physical devices connected with physical cables.
In order to do that, however, we need to re-build the "physical" networking portion of our environment to make it resemble a physical network environment.
This will require us dive a little deeper into KVM and its network configurations.
Creating and Modifying KVM Networks
KVM can be used to create several different types of networking schemes. For most of OPS245, you used the default mode for creating a virtual network - "NAT" mode. This ensured that all VMs had access to one another and the Internet via the host system (the OS on which KVM was installed). Basically, the host system acted as a router and NAT device for all the VMs inside it.
Recall that in OPS245, eventually you switched your VMs over to a private virtual network. You manually configured their IP addresses to allow them to connect with one another but you lost access to the Internet because the host system was no longer acting as a router/gateway which allowed access outside of the local network. The network was still technically capable of having all your VMs connect to the host but it was not longer acting as a router/gateway.
In this class, we also don't want our host system to act as a router/gateway for all of our VMs. We don't really want our host system to do anything other than host the VMs and act as a pathway for deb-router-1 to get to the Internet. We want to set everything else up manually. For that, we are going to go a step further and rely on a new mode in KVM - "isolated" mode.
We are going to set up these "isolated" network segments so that they are NOT connected to the Ubuntu host at all. They will strictly be used by our VMs to talk to one another.
Before we get started with that, ensure that everything is currently set up with the default network settings in KVM. The easiest way to do this is to:
- Start up all 4 of your VMs (deb-router-1, deb-router-2, mint-client, and win-client)
- Using the command line on all 4, run “ping google.com” and ensure that all 4 have internet access.
If successful, shut down all 4 VMs.
Next we will add 3 isolated network segments into KVM.
- The first will be an isolated network that acts as our “backbone” which links our two routers.
- The second will be an isolated network that connects mint-client to deb-router-1.
- The third will be an isolated network that connects win-client to deb-router-2.
To begin, open your Virtual Machine Manager, highlight "QEMU/KVM", click on “Edit” >> “Connection Details” >> “Virtual Networks”
-
Click the green “+” in the bottom left and add a new network with the following config:
- Name: backbone
- Mode: isolated
- Enable IPv4: unchecked
- Enable IPv6: unchecked
- Use network name: selected
- Click “Finish”
-
Click the green “+” in the bottom left again and add a new network with the following config:
- Name: cn1
- Mode: isolated
- Enable IPv4: unchecked
- Enable IPv6: unchecked
- Use network name: selected
- Click “Finish”
-
Click the green “+” in the bottom left again and add a new network with the following config:
- Name: cn2
- Mode: isolated
- Enable IPv4: unchecked
- Enable IPv6: unchecked
- Use network name: selected
- Click “Finish”
You should have 4 virtual networks now: the three you just created (backbone, cn1, cn2) and the default network that came with Virtual Machine Manager which is currently providing Internet access to all four of our VMs.
- Close the "Connection Details" window.
Next, we are going to attach our VMs to these networks. We are also going to detach all of our VMs from the “default” network except for deb-router 1. This means that for a time, only deb-router-1 will have internet access. However, we are going to configure deb-router-2, mint-client, and win-client so that they can access the internet via deb-router-1 in lab 2.
"Physically" attaching our VMs to our network segments
First we will attach deb-router-1 to its new networks:
- Double click on the “deb-router-1" VM but do not power it on.
- Click on “View” >> “Details”
- Click on “Add Hardware” in the bottom left
- Click on “Network” and then change “Network Source” to the “backbone” isolated network we created. Click “Finish”
- Click on “Add Hardware” again.
- Click on “Network” and then change “Network Source” to the “cn1” isolated network we created. Click “Finish”
Your deb-router-1 VM should now have 3 NICs: one attached to the “default” NAT network, one attached to the “backbone” isolated network, and one attached to the �“cn1” isolated network. Make note of their MAC addresses for easier identification later.
Next, we will adjust the networks that deb-router-2 is attached to:
- Double click on the “deb-router-2" VM but do not power it on.
- Click on “View” >> “Details”
- Click on “Add Hardware” in the bottom left
- Click on “Network” and then change “Network Source” to the “backbone” isolated network we created. Click “Finish”
- Click on “Add Hardware” again.
- Click on “Network” and then change “Network Source” to the “cn2” isolated network we created. Click “Finish”
- Click on the NIC that is currently attached to the “default” NAT network. Click “Remove” to remove that NIC from deb-router-2. This will disconnect the deb-router-2 VM from your Ubuntu Host system.
Your deb-router-2 VM should now have 2 NICs: one attached to the “backbone” isolated network and one attached to the “cn2” isolated network. Make note of their MAC addresses for easier identification later.
Next, we will adjust the networks that mint-client is attached to:
- Double click on the “mint-client" VM but do not power it on.
- Click on “View” >> “Details”
- Click on “Add Hardware” in the bottom left
- Click on “Network” and then change “Network Source” to the “cn1” isolated network we created. Click “Finish”
- Click on the NIC that is currently attached to the “default” NAT network. Click “Remove” to remove that NIC from mint-client. This will disconnect the mint-client VM from your Ubuntu Host system.
Your mint-client VM should now have 1 NIC that is attached to the “cn1” isolated network. Make note of their MAC addresses for easier identification later.
Finally, we will adjust the networks that win-client is attached to:
- Double click on the “win-client" VM but do not power it on.
- Click on “View” >> “Details”
- Click on “Add Hardware” in the bottom left
- Click on “Network” and then change “Network Source” to the “cn2” isolated network we created. Click “Finish”
- Click on the NIC that is currently attached to the “default” NAT network. Click “Remove” to remove that NIC from win-client. This will disconnect the win-client VM from your Ubuntu Host system.
Your win-client VM should now have 1 NIC that is attached to the “cn2” isolated network. Make note of their MAC addresses for easier identification later.
At this point your VMs should be connected as follows:
deb-router-1 connected to:
- “default” NAT network
- “backbone” isolated network
- “cn1” isolated network
deb-router-2 connected to:
- “backbone” isolated network
- “cn2” isolated network
mint-client connected to:
- “cn1” isolated network
win-client connected to:
- “cn2” isolated network
Boot up all 4 VMs and try to ping google.com from their command lines. Only your deb-router-1 should be successful. If any other VM can ping google, go back and double check your configuration and the steps you used to get here.
Lab 1 Sign-Off
Take screenshots showing the following:
- The "details" screen of deb-router-1 showing its NICs and which networks they are attached to
- The "details" screen of deb-router-2 showing its NICs and which networks they are attached to
- The "details" screen of mint-client showing its NICs and which networks they are attached to
- The "details" screen of win-client showing its NICs and which networks they are attached to
- deb-router-1 successfully pinging google.com