Lab 5 - Introduction to Amazon Web Services (AWS) and AWS Networking
Overview
This week's lab will cover the following:
- Investigating the AWS Learner Lab.
- Using the AWS Console interface.
- Modifying Virtual Private Cloud (VPC) Security Groups.
- Exploring Amazon Elastic Cloud Compute (EC2).
- Adding an instance in AWS.
- Creating SSH key pairs & paired key encryption.
- Creating a Virtual Private Cloud (VPC).
- Creating and Modifying Virtual Private Cloud (VPC) Security Groups.
- VPC components:
- Subnets
- Gateways
- NAT gateways
- Internet gateways
- Egress-only internet gateways
- Carrier gateways
- Route tables
Investigating the AWS Learner Lab
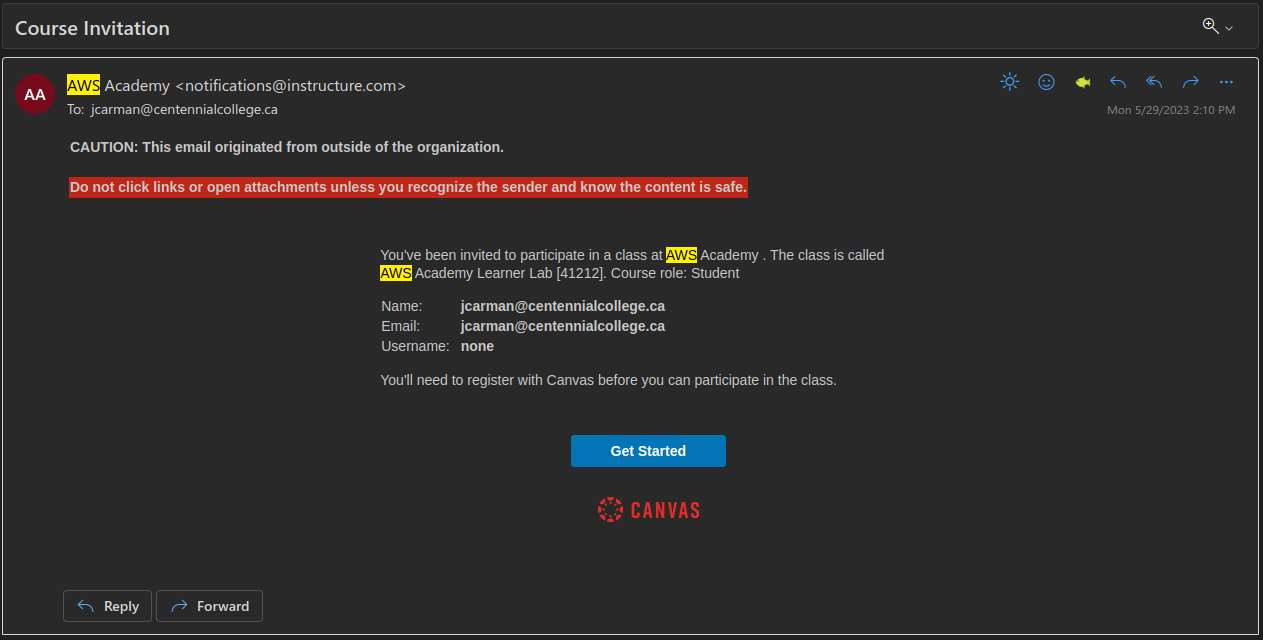
You should have received an email (in your Seneca Polytechnic email) from your professor inviting you to participate in the AWS Academy Learner Lab. If you have received and accepted this invitation you may proceed with this lab. If you have not received this invitation you should contact your professor immediately. You may continue with the rest of the lab once you have received the invitation. Here is a sample email.
The AWS Learner Lab provides a sandbox environment where you can build, configure and deploy AWS assets such as instances. There are some limitations as to what you can do, however it provides all the functionality we require for this course. You are limited to $50 credit at no cost within the learner lab. Once this runs out your learner lab will be disabled. Additionally, there is no way to add funds to this pool. If you follow the lab instructions properly you should not have any issues.
Once you have accepted your invitation and logged into the AWS Learner Lab navigate to Courses (on the left hand side) > Modules > Learner Lab. You should see a screen that looks like the following:
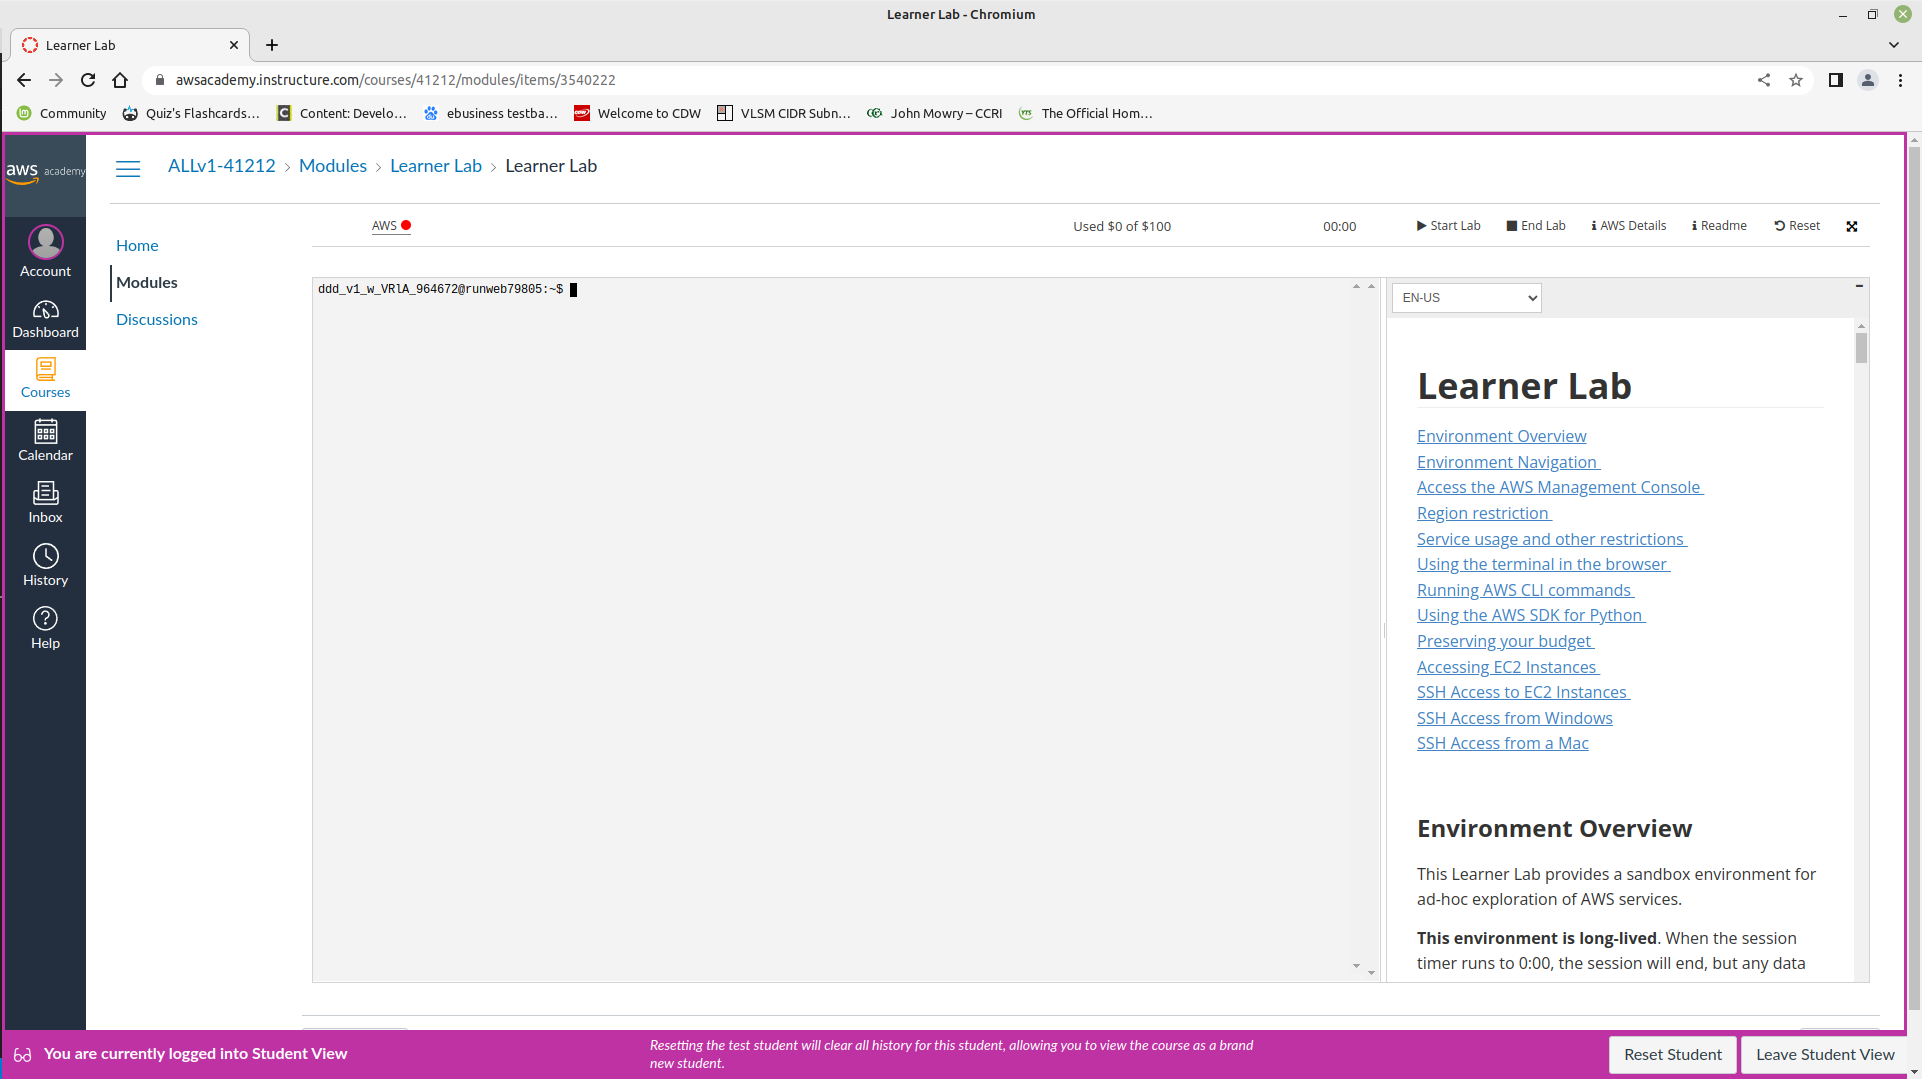
Some important things to note on this screen:
Start Lab: Starts the Learner Lab environment.
Stop Lab: Stops the Learner Lab environment.
Used $0 of $50: Shows the balance used of your $50 credit. If this hits $50 of $50 used, your learner lab is disabled. Be careful.
AWS with a red dot next to it: Once your lab has started, this will turn green. You can then click on this to open the environment.
Using the AWS Console interface
Start your session in the Learner Lab by clicking on the Start Lab button. Once the red dot has turned green, click on it to enter the Learner Lab. This will take you to the AWS Console (depicted below), which will be where you will do most of your work. It also mirrors a production AWS interface. Note: Your screen may not look 100% identical to the one depicted, but should be mostly the same.
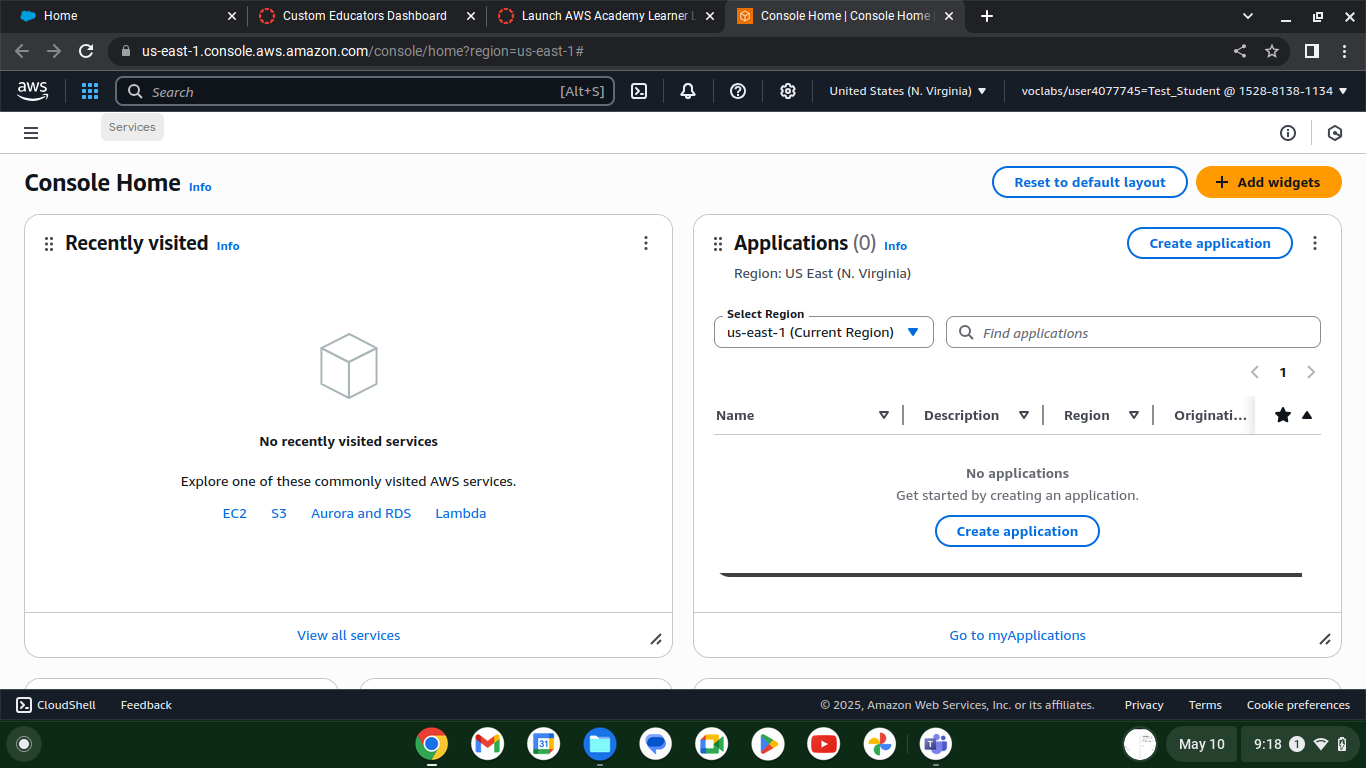
If you click on Services in the top left corner (beside the AWS logo), you will see all the services you can configure in the AWS learner lab. Common ones we will use are EC2 and VPC. You can search for these in the search bar, or browse the categories. Recently visited services will show up under the heading Recently visited. If you hover over any service you will see a greyed out star to the left of the name. You can click on this to add it to your favourites for easy access.
Modifying VPC Security Groups
An Amazon Virtual Private Cloud (VPC) is a dedicated virtual network within AWS' public cloud. It work similar to how a traditional network does in a data center. w3schools has some additional information.
Click on Services > Compute > EC2. Security Group settings are located in the left side navigation under Network & Security > Security Groups. Click on Security Groups.
Your screen should look like the following:
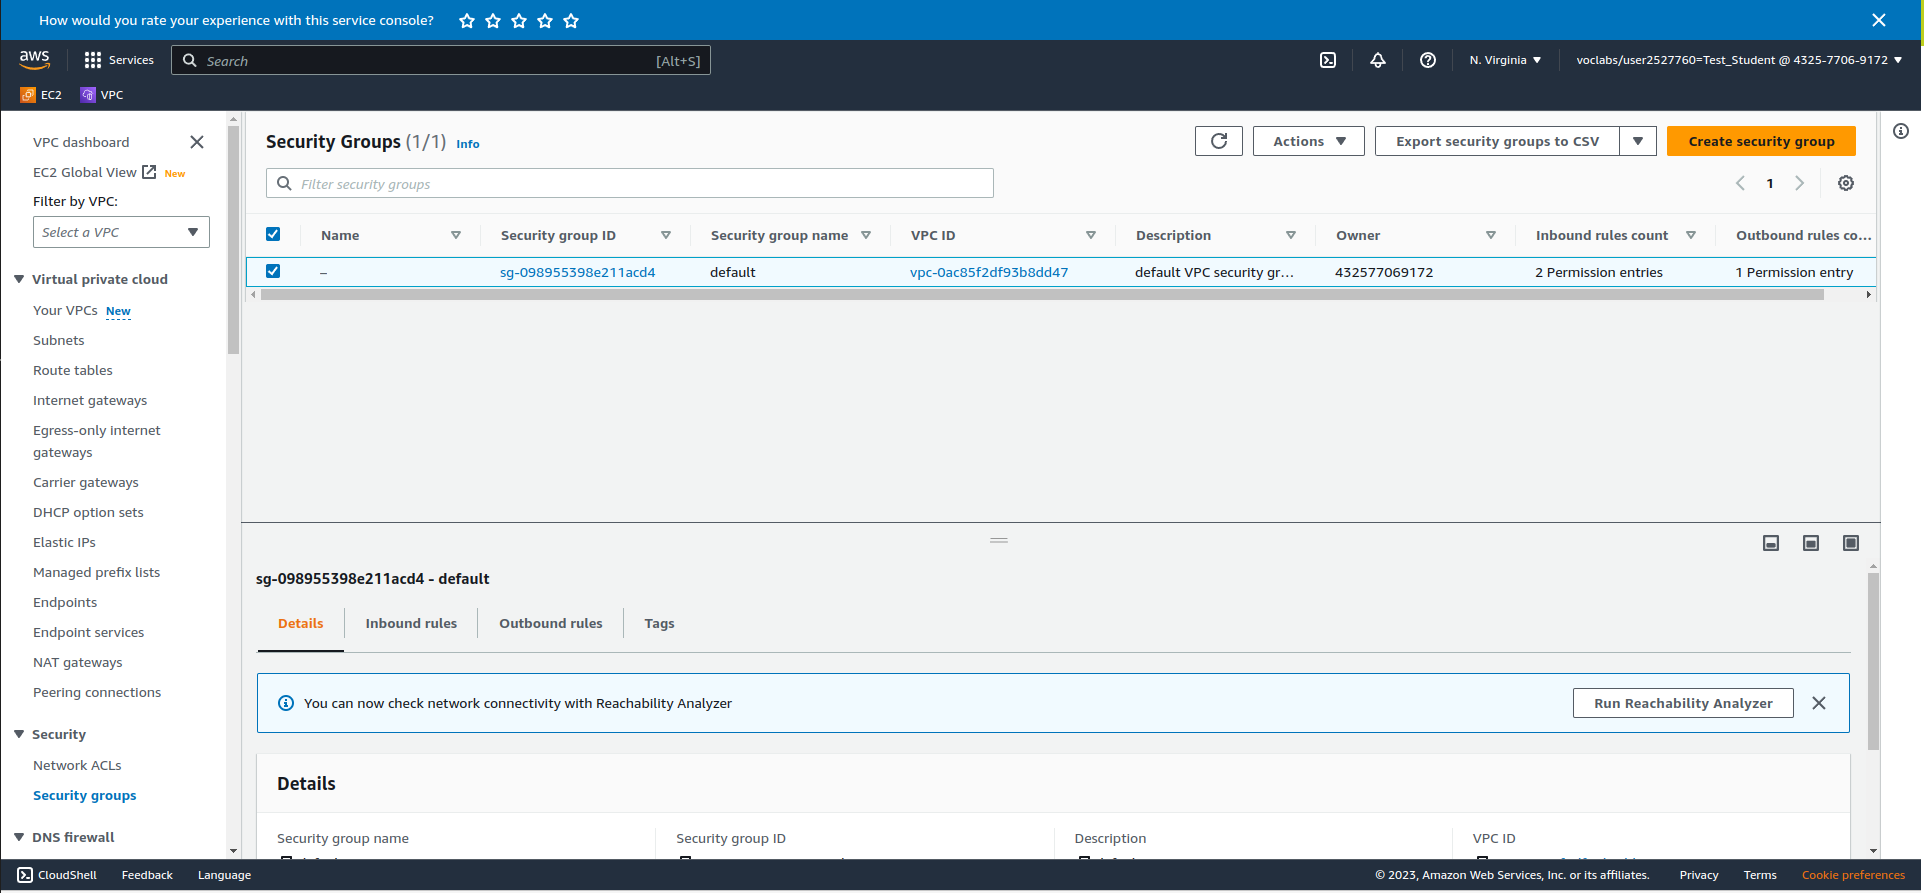
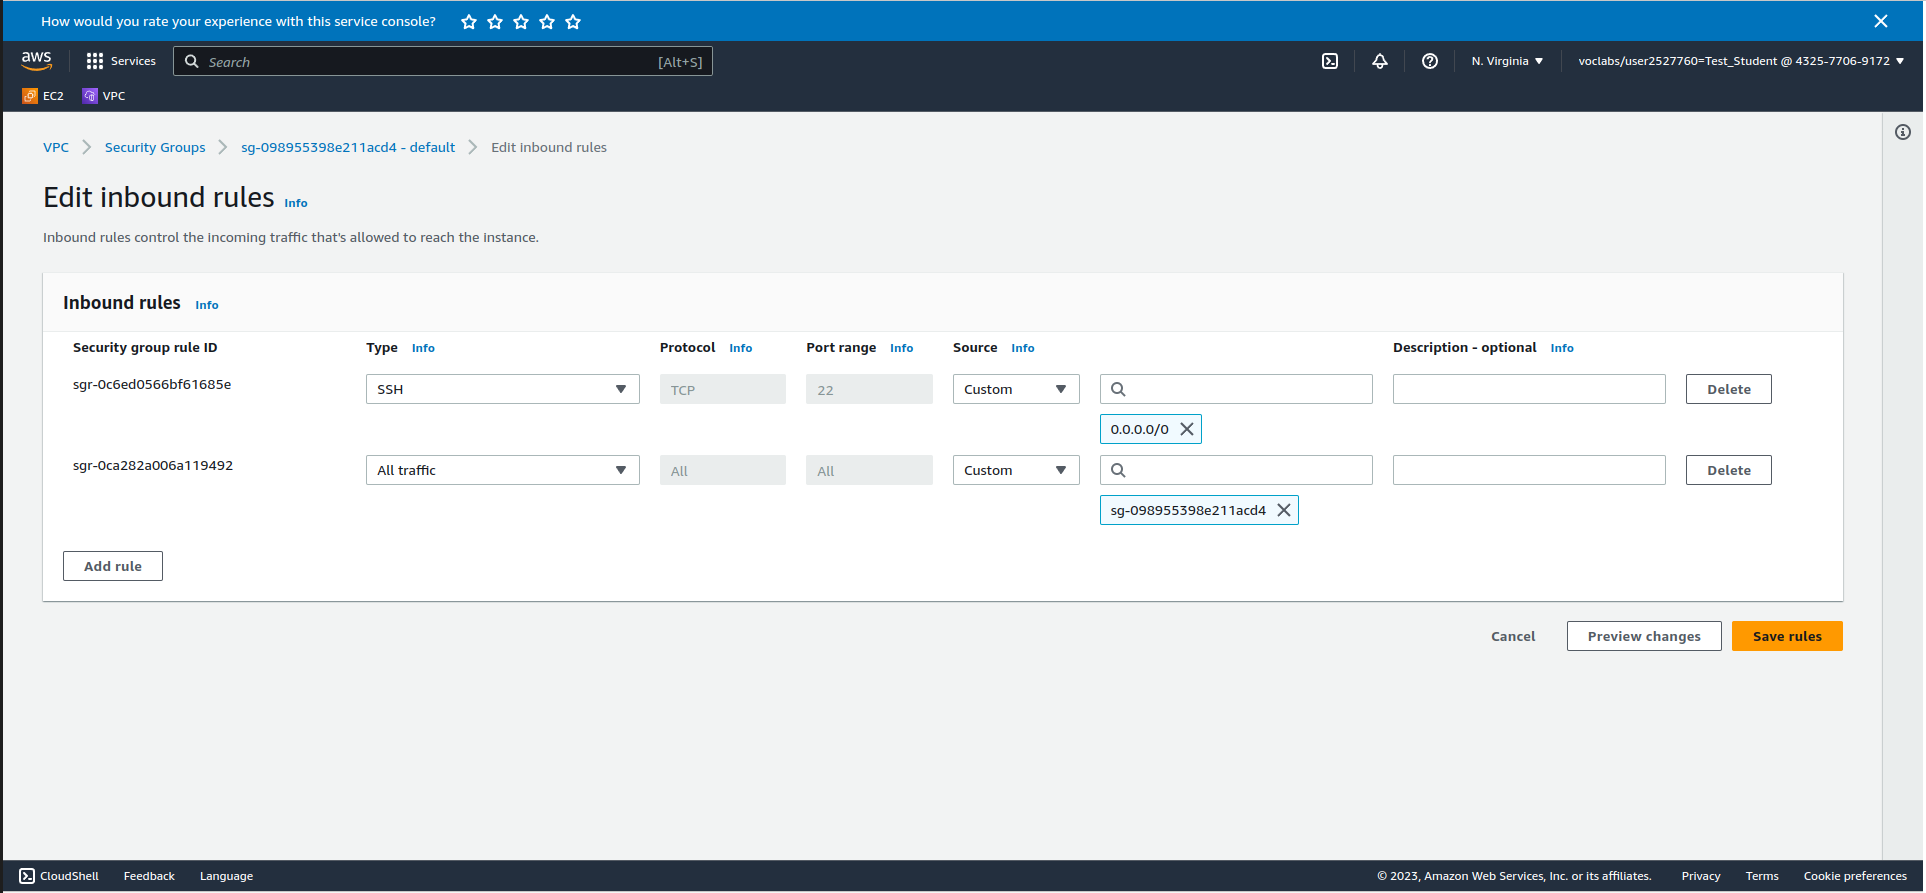
Make sure the box beside your Security Group is checked. Click on InBound rules > Edit InBound Rules and add the following rule:
- Type: SSH or Port Range: 22 (both will accomplish the same thing)
- The box beside the magnifying glass: 0.0.0.0/0
- Click Save Rules
This will allow incoming SSH connections from anywhere. We will use this in the next part to connect to your instance. The screenshot below shows what your inbound rules should look like:
Exploring Amazon Elastic Cloud Compute (EC2)
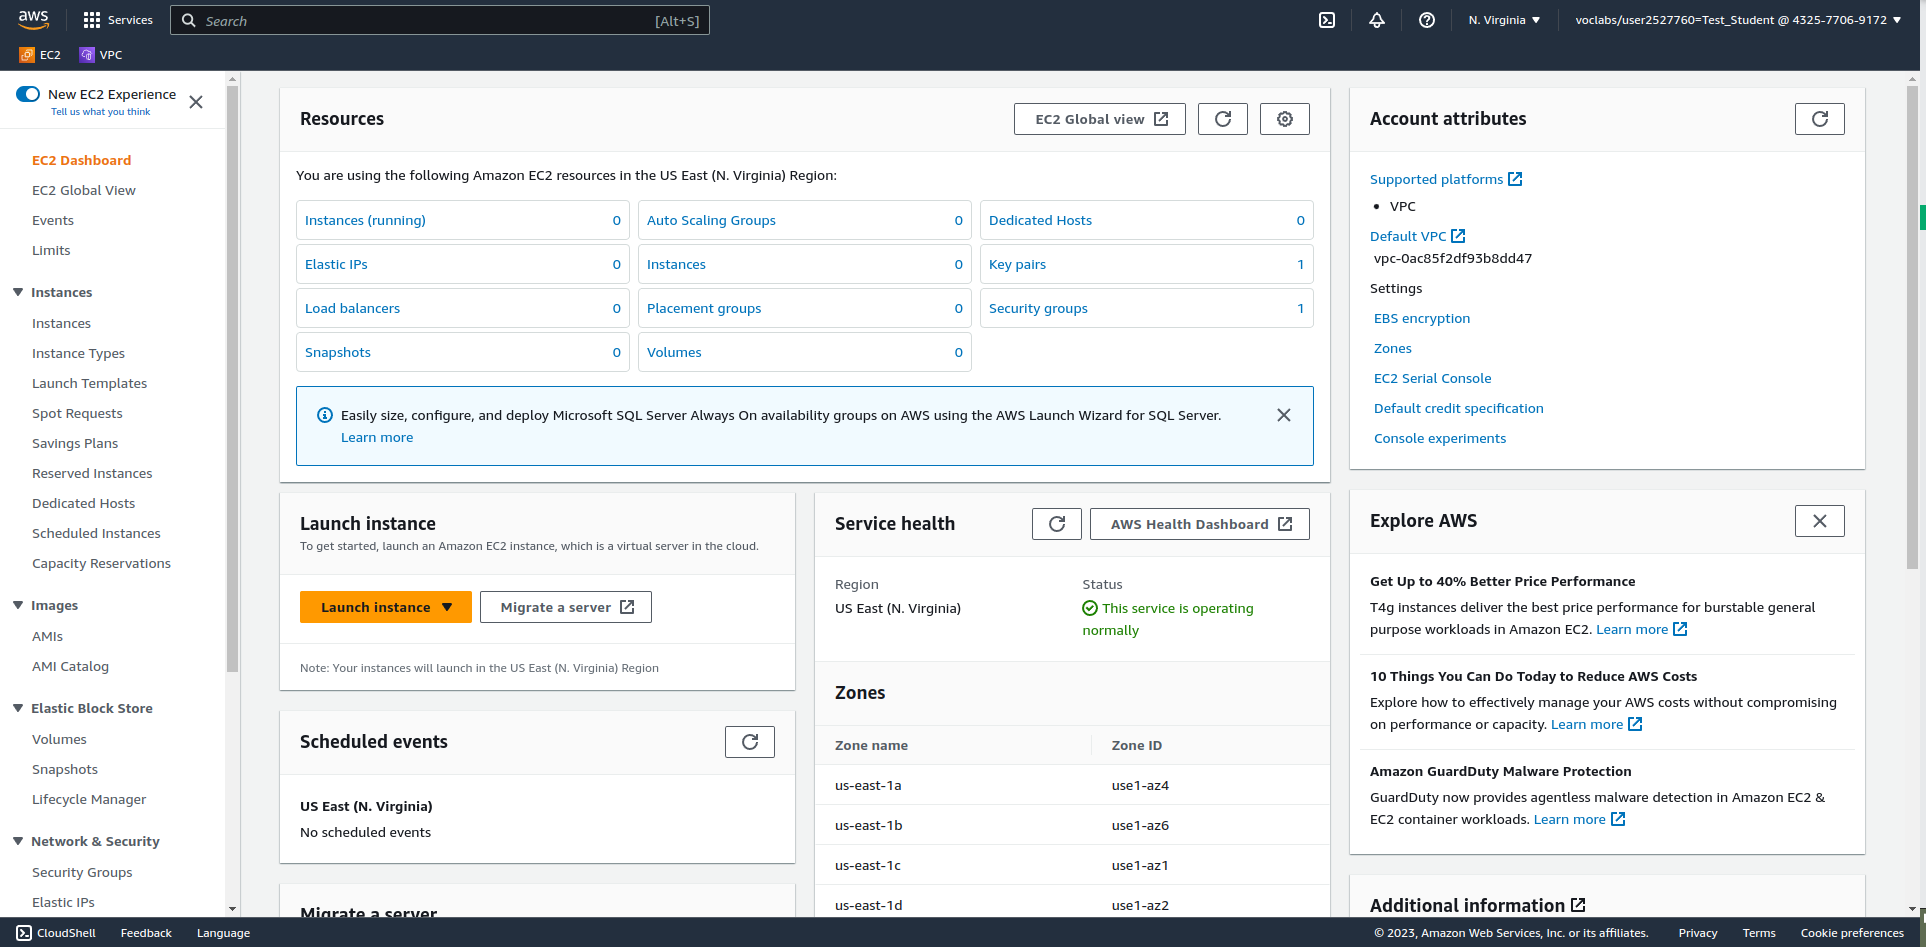
EC2 is where you will end up spending a lot of time configuring things in this course. From here you can do things like launch instances, manage networking services and much more. To access EC2, click on Services (top left corner beside the AWS icon), and navigate to Compute > EC2. You may wish to add this to your favourites for easy access by hovering over and clicking the star. Your initial screen should look something like the following. w3schools has some additional information
Creating your first instance in AWS
Click on Launch instance just below the Resources pane. From the Launch an instance screen, select the following options:
- Name: first
- OS: Ubuntu
- Amazon Machine Image (AMI): Make sure Ubuntu Sever 24.04 is selected
Creating SSH key pairs & using public key cryptography
Under Key pair (login) click Create new key pair. Give it the name "ops345", accept the rest of the defaults and click "Create key pair". It will download to your default download location immediately.
Create a new directory in your home directory on your Ubuntu host system called "AWS" and place the key in there.
Important: Do not lose your key pair or you will be unable to connect to your instances using SSH.
Under Network Settings click Select existing security group. Click the dropdown and check the default. Click Launch instance. Once it has finished completing (you should see a success message), click on the instance ID in the Success message. This will take you to Instances in EC2.
Accessing Your Instance
Click on the Instance ID for your first instance. click Connect.
Note there are a few ways to connect to your instance from here:
- EC2 Instance Connect: Allows you to connect to your instance from within your web browser.
- SSH client: Allows you to connect to your instance using the SSH key pair (which you generated when you created the instance) in a Linux terminal window .
Please use the SSH client method for the remainder of this course. The EC2 Instance Connect browser method can be used for quick checks but it is prone to locking up and causing other issues. You have been warned!
Connecting via An SSH Client
- Open a terminal on your Ubuntu host system
- In the Linux EC2 Instance details page, click the Connect button.
- Click on the SSH client tab.
- Copy the example command near the bottom of the page. (Use your example command)
- In your Ubuntu terminal, change directories to your "AWS" directory that you created that should have your .pem file inside it.
- Change the file permissions of your .pem file with this command:
sudo chmod 400 ops345.pem
- Paste the example command from the Connect to instance page, and press Enter.
- The SSH command will ask you to confirm connecting. Type yes and press Enter.
- If login is successful, you should see a prompt like this:
ubuntu@ip-172-31-91-76:~$
- To quit, type quit or exit.
Congratulations! You have created your first AWS instance.
This instance, however, is of little use to us because it is part of the default network configuration that comes with the AWS learner lab. Next we will create our own network configuration and launch another instance that we can use moving forward.
Amazon Web Services (AWS) Networking
Next, you will create all the networking infrastructure required to host a web application. You will be creating the server and database and configuring the application in future labs.
Virtual Private Cloud
First, you are going to create a new Virtual Private Cloud (VPC). This will be the virtual network environment in which you will be operating for the remainder of this course.
It is extremely important that you create everything in the next section of this lab correctly as all the other labs will rely on it.
Note that the instance you created in the first part of this lab will be inaccessible in this VPC (we'll be creating another one to use).
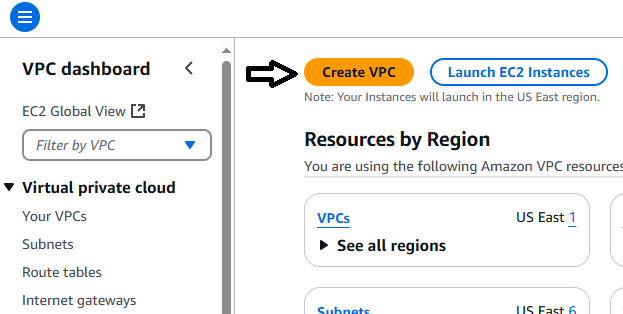
Navigate to VPC (which you may have added to your favourites). On the VPC dashboard, click Create VPC. See the following screenshot for reference.
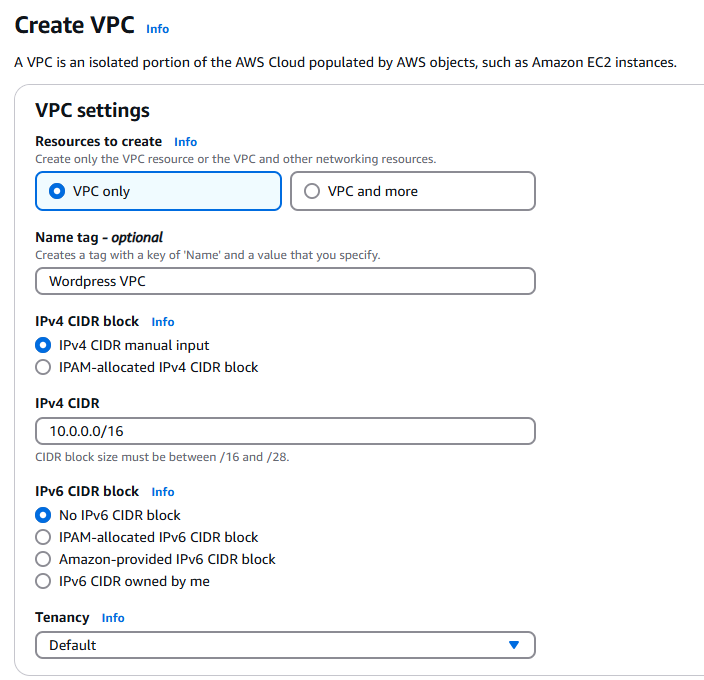
Input the following settings:
- Select VPC only
- Name tag: Wordpress VPC
- IPv4 CIDR: 10.0.0.0/16
- Leave all other settings on default
Confirm the settings match the following screenshot.
Click Create VPC at the bottom right.
Once created, click the Actions drop down in the top right corner and select Edit VPC Settings. Make sure the following boxes are Checked:
- Enable DNS resolution: Checked
- Enable DNS hostnames: Checked
Click Save
Subnets
You are going to create 4 subnets in your VPC. Two private subnets, and two public subnets. One of each type (private and public) will be in a different availability zone. This will provide redundancy, ensuring better uptime for servers and applications you create in your VPC.
- Click on Subnets (located on the left side under Virtual private cloud).
- Click Create subnet (top right corner).
- Select Wordpress VPC from the VPC ID dropdown.
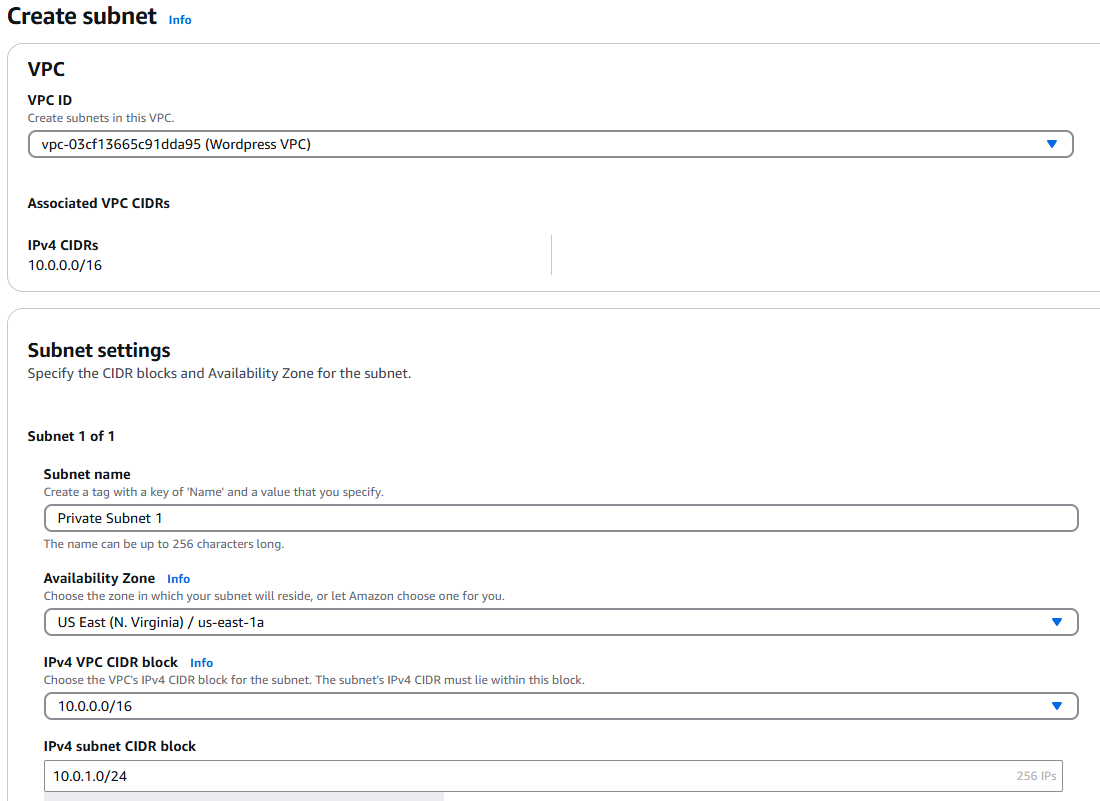
- Create a subnet with the following information:
- Subnet Name: Private Subnet 1
- Availability Zone: us-east-1a
- IPv4 VPC CIDR block: 10.0.0.0/16
- IPv4 subnet CIDR block: 10.0.1.0/24
- Your screen should look as follows:
- Click Add new subnet at the bottom of the page and repeat the process for the following three subnets:
Create one private IPv4 subnets in this VPC:
- Private Subnet 2 - 10.0.2.0/24 - us-east-1b
Create two public IPv4 subnets in this VPC:
- Public Subnet 1 - 10.0.11.0/24 - us-east-1a
- Public Subnet 2 - 10.0.12.0/24 - us-east-1b
Once you have confirmed your settings are correct, scroll down and click Create Subnet in the bottom right.
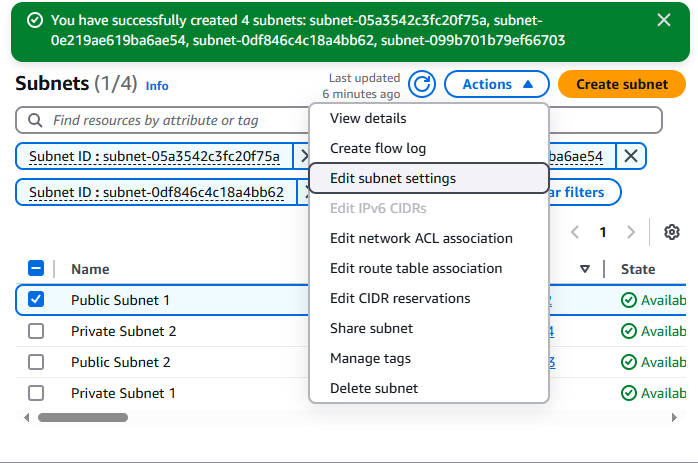
Check the box beside Public Subnet 1. Click on the Actions dropdown (top right) and select Edit subnet settings. See the following screenshot.
Make sure the following are Checked:
-
Enable auto-assign public IPv4 address: Checked
-
Enable resource name DNS A record on launch: Checked
-
Click Save.
-
Repeat the process for Public Subnet 2
Adding an Internet Gateway
Your VPC requires a Gateway to access outside resources. There are four types of gateways
Internet Gateway
An internet gateway is a horizontally scaled, redundant, and highly available VPC component that allows communication between your VPC and the internet. It supports IPv4 and IPv6 traffic. It does not cause availability risks or bandwidth constraints on your network traffic.
An internet gateway enables resources in your public subnets (such as EC2 instances) to connect to the internet if the resource has a public IPv4 address or an IPv6 address. Similarly, resources on the internet can initiate a connection to resources in your subnet using the public IPv4 address or IPv6 address. For example, an internet gateway enables you to connect to an EC2 instance in AWS using your local computer.
Egress-only Internet Gateway
An egress-only internet gateway is a horizontally scaled, redundant, and highly available VPC component that allows outbound communication over IPv6 from instances in your VPC to the internet, and prevents the internet from initiating an IPv6 connection with your instances.
An egress-only internet gateway is for use with IPv6 traffic only. To enable outbound-only internet communication over IPv4, use a NAT gateway instead.
Carrier Gateway
A carrier gateway is a VPC component that allows connectivity between AWS and your on-premises network using AWS Direct Connect or AWS Site-to-Site VPN. It is specifically designed for use with AWS Outposts, enabling communication between your Outposts and the internet, or between your Outposts and other AWS services. The carrier gateway supports both IPv4 and IPv6 traffic and provides a highly available and redundant connection.
A carrier gateway is used when you need to connect your Outposts to the internet or to other AWS services, ensuring that your on-premises applications can communicate seamlessly with AWS resources.
NAT Gateway
A NAT gateway is a Network Address Translation (NAT) service. You can use a NAT gateway so that instances in a private subnet can connect to services outside your VPC but external services cannot initiate a connection with those instances.
When you create a NAT gateway, you specify one of the following connectivity types:
-
Public – (Default) Instances in private subnets can connect to the internet through a public NAT gateway, but cannot receive unsolicited inbound connections from the internet. You create a public NAT gateway in a public subnet and must associate an elastic IP address with the NAT gateway at creation. You route traffic from the NAT gateway to the internet gateway for the VPC. Alternatively, you can use a public NAT gateway to connect to other VPCs or your on-premises network. In this case, you route traffic from the NAT gateway through a transit gateway or a virtual private gateway.
-
Private – Instances in private subnets can connect to other VPCs or your on-premises network through a private NAT gateway. You can route traffic from the NAT gateway through a transit gateway or a virtual private gateway. You cannot associate an elastic IP address with a private NAT gateway. You can attach an internet gateway to a VPC with a private NAT gateway, but if you route traffic from the private NAT gateway to the internet gateway, the internet gateway drops the traffic.
A NAT gateway is for use with IPv4 traffic only. To enable outbound-only internet communication over IPv6, use an egress-only internet gateway instead.
You are going to create an Internet Gateway.
- Click on Internet Gateways (located on the left side under Virtual private cloud).
- Click Create internet gateway (located in the top left corner)
Create a new Internet Gateway with the following:
- Name: Wordpress Gateway
- Click Create internet gateway
- Once created, click on the Actions dropdown and select Attach to VPC.
- In the Available VPCs input field, select your Wordpress VPC.
- Click Attach internet gateway to attach it to your Wordpress VPC.
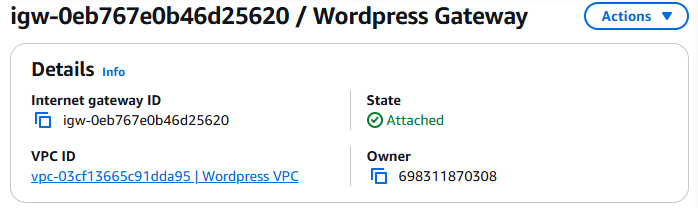
- Once completed, your Wordpress Gateway should display the following:
Route Tables
You are going to create Route tables in your VPC to allow traffic from within your VPC to be routed externally through the Internet Gateway you created. In the search box at the top, type VPC.
- Click on Route Tables (located on the left side under Virtual private cloud. See screenshot for clarity).
- Next, click Create route table (top right corner).
Create a second route table:
- Name: Wordpress Website Route Table
- VPC: Wordpress VPC
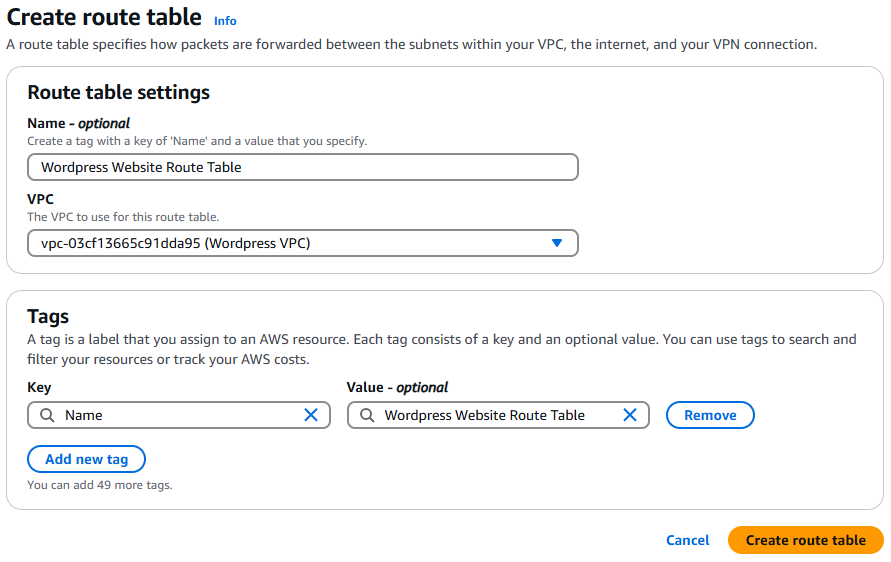
- Click Create route table (bottom right corner).
- Click Edit routes and add the following routes. The first route should already exist but double check to be sure.
- Route Entry 1:
- Destination: 10.0.0.0/16
- Target: local
- Route Entry 2:
- Destination: 0.0.0.0/0
- Target: Internet Gateway – Wordpress Gateway
- View the following screenshot to confirm your settings are correct. If they are, click Save changes.

Security Groups
Now we are going to create some security groups and define their allowed to traffic so we can control what is and is not allowed into our virtual network.
Security Group settings are located in the left side navigation under Security > Security Groups. Click on Security Groups. Note: You can also access Security groups through EC2 (as you did in lab 5). The menu they are under is different.
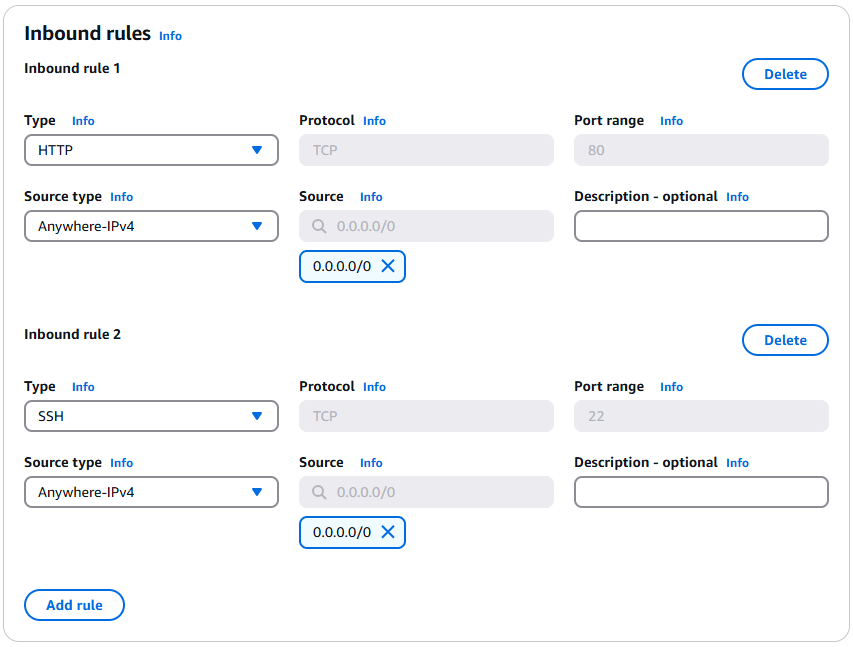
Click on Create security group and create a security group with the following settings
- Security group name: Wordpress Website SG
- Description: Allows HTTP and SSH traffic inbound
- VPC: Wordpress VPC
- Inbound Rules:
- Allow HTTP
- Type: HTTP
- Source: Anywhere – IPv4 (0.0.0.0/0)
- Allow SSH
- Type: SSH
- Source: Anywhere – IPv4 (0.0.0.0/0)
Warning: Do not modify the outbound rules.
Verify your inbound rules with the following screenshot.
Return to the main Security Group page and click Create security group again.
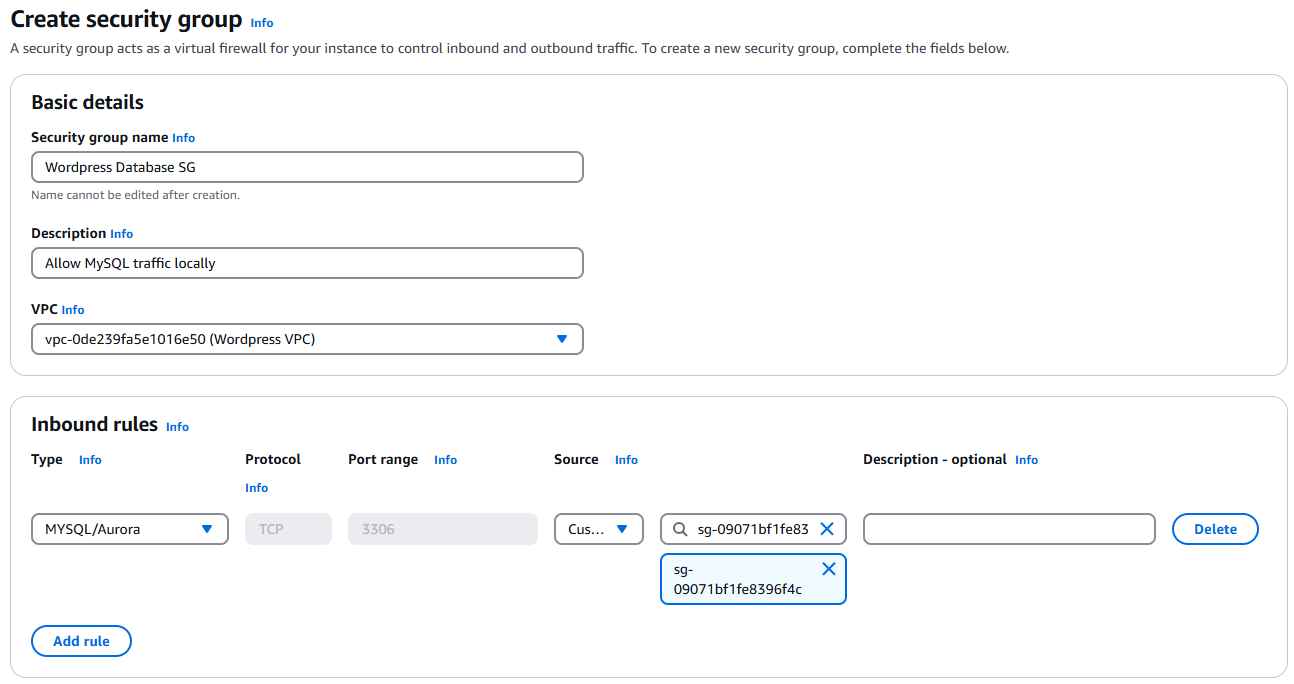
Repeat the above steps to create another security group with the following settings:
- Name: Wordpress Database SG
- Description: Allows MySQL traffic locally
- VPC: Wordpress VPC
- Inbound Rule:
- Type: MYSQL/Aurora
- Source: Custom (Select Wordpress Website SG in the search field)
Warning: Do not modify the outbound rules.
Verify your inbound rules with the following screenshot.
Editing Public Subnet route table associations
- Click on Subnets under Virtual private cloud (left side).
- Check the box beside Public Subnet 1
- Click Actions > Edit route table association
- Select Wordpress Website Route Table in the Route table ID dropdown menu.
- Click save.
Repeat the steps for Public Subnet 2
Creating a new instance (www)
Create a new instance in AWS (like you did in Lab 1), with the following configuration:
- Name: www
- OS: Ubuntu
- Amazon Machine Image (AMI): Make sure Ubuntu Server 24.04 is selected
- Use your existing key pair that you created earlier.
- Network Settings: Click edit
- VPC: Select the Wordpress VPC you created.
- Subnet: Select Public Subnet 1
- Security Group: Select the Wordpress Website Security Group you created.
Verify your settings are correct and click Launch Instance.
Once the instance has created, confirm you can connect to it using:
- EC2 Instance Connect
- Via SSH
Lab 5 Sign-Off
Take screenshots showing the following:
- 4 new subnets (Public Subnet 1, Public Subnet 2, Private Subnet 1 & Private Subnet 2)
- Your Wordpress VPC Route Table
- Your Wordpress VPC Internet Gateway
- Your Wordpress Website and Wordpress Database Security Groups with correct rules
- Access to www via SSH in a terminal in Ubuntu
When you shut off your learner lab, all resources (such as instances) are shut off. You do not need to shut down your instance. It will be automatically started again the next time you start your learner lab. Shut down your learner lab by navigating to the Learner Lab home page and click End Lab.
The following Exploration Questions are for furthering your knowledge only, and may appear on quizzes or tests at any time later in this course.
Exploration Questions
- How do you start/stop the AWS learner lab?
- How do you enter the AWS learner lab once you have started it?
- What happens to your learner lab if your credits hit $50 used?
- Where do you go to edit networking configuration options such as security groups?
- Where do you go to launch an instance?
- What is an instance?
- What command do you use to access an instance in AWS from your command line?
- What is public-key cryptography?
- What is a VPC?
- What are the steps to create a VPC?
- What are subnets and route tables?
- What is an Internet Gateway?