Lab 2: Creating and Using Virtual Machines
Lab Preparation
Purpose / Objectives of Lab 2
In this lab, you will create 3 virtual machines using a virtualisation program called KVM that will run in your debhost system. These VMs will be used throughout the remainder of this course to learn how to administer them (installing software, managing services, networking, etc).
While you are performing this lab, it is recommended to generally note the major differences in the different installation methods, and which method you prefer to use if you were a Linux system administrator in charge of installing many Linux distributions for an organization.
Main Objectives
Installing additional Virtualisation Software on your debhost machine (KVM)
Create 3 separate VMs (virtual machines) using different installation methods:
- deb1: Network Debian Installation (Graphical Desktop Environment)
- deb2: Network Debian Installation (minimal install - CLI only)
- deb3: Network Debian Unattended Installation deployed using a preseed file (CLI only)
Manipulate virtual machines by CLI (virsh)
Properly backup VM images and backup VM configuration files
Create and run Bash Shell scripts to automatically backup our installed VM's
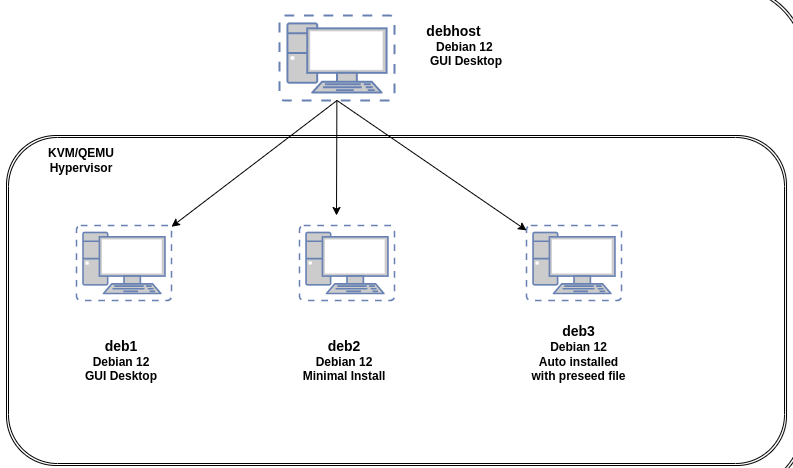
At the end of Lab 2, your debhost will contain 3 virtual machines (deb1, deb2, deb3 VMs in your KVM application). You will now have the option to run one virtual machine at a time, or run all machines simultaneously to learn about networking (covered in later labs)
Minimum Required Materials
- Solid State Drive
- USB key (for backups)
- Lab2 Log Book
- Debian 12 netinst ISO
Linux Command Reference
Virtualization:
Installation Guides:
Miscellaneous
| gzip , gunzip | ip | grep | wc | pwd | ls | more | file | wget | chmod | vi |
|---|
Investigation 1: Setup For Nested Virtual Machines
Part 1: Install KVM Virtualisation Application
We will now install the KVM package in order to create our VMs. We will also be starting several services. We will learn more about managing firewalls in later labs.
Perform the following steps:
- Log into your
debhostmachine. - perform a software update on your debhost VM by issuing the following command:
sudo apt update && sudo apt upgrade
- Install the qemu-system libvirt-daemon-system, virtinst, and virt-manager packages
sudo apt install qemu-system libvirt-daemon-system virtinst virt-manager
About KVM
There are actually several key programs installed for virtualisation using KVM:
- kvm/qemu - the hypervisor and other hardware emulation systems.
- A system service named libvirtd that manages the VMs.
- A graphical tool for managing virtual machines (virt-manager) and the virsh command-line tool.
- Now we will confirm the status of the "libvirtd" virtualisation service:
sudo systemctl status libvirtd
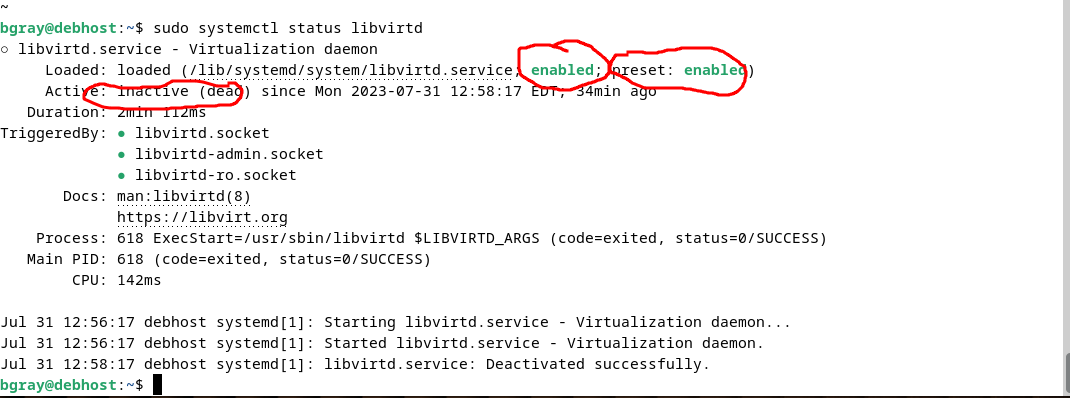
In the screenshot above you can see the first "enabled" indicates that this service will start automatically when the system starts. The "preset: enabled" indicates that "enabled" is the default when this service is first installed by apt. The "inactive (dead)" indicates that the service is not currently running.
We want the service to be "enabled" and "active":
Make note of the following commands for working with services:
# To see the status of a service (Notice sudo isn't needed with a status check!)
systemctl status <servicename>

# To enable a service
sudo systemctl enable <servicename>

# To start a service
sudo systemctl start <servicename>

# To enable and start a service at the same time
sudo systemctl enable --now <servicename>

# To disable a service
sudo systemctl disable <servicename>

# To stop a service
sudo systemctl stop <servicename>

# To restart a service
sudo systemctl restart <servicename>
Issue the correct commands to make sure that the "libvirtd" service is both "active" (started) and "enabled" (will start automatically at boot)
 The behaviour of the libvirtd service on Debian Linux is for the service to stop when not in use and restart when required.
In order to manage VMs your user account needs to be added to the "libvirt" group
sudo usermod -aG libvirt <username>
Restart your debhost. If you fail to do this, you may experience virtualization network problems and issues loading Virtual Machine Manager.
Once you've restarted, confirm your changes took affect by running the following as your regular user (don't use sudo):
systemctl status libvirtdid
The libvirtd daemon should be running, and the id command should show that your user is part of the libvirt group.
- Start the graphical
virt-managertool by clicking "Activities " and searching for "virt-manager". - Right click on the icon and "Pin to dash" and then run the application or by typing the command
virt-manager(without sudo!)
Investigation 2: Install Virtual Machines (KVM)
In order to simplify running the lab checking scripts in future labs, using the same root password for ALL machines (debhost and virtual machines). Also use the same username and passwords for all of your machines (debhost and virtual machines).
Part 1: Setting up the Virtual Network
Once we have installed our 3 VM's we will want to configure them to be able to communicate on the same network. KVM has setup a default virtual network for us to use but it is not configured to start automatically. We will also need to make sure the correct firewall and routing rules are added so that everything works. Lets start by gathering information
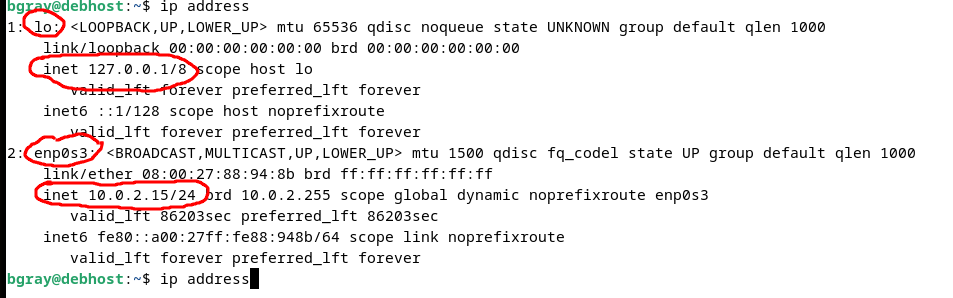
- Open a terminal window in debhost and run the following command to display the networks that debhost is connected to.
# List the networks connected and our IP address for each network interface
ip address
- Run the following command to list the current firewall/routing rules. (Note: Running iptables as a regular user without sudo will make it look like the command doesn't exist. It's there.)
# List the iptables rules
sudo iptables -L

- Open virt-manager
- Select the QEMU/KVM connection and then click on Edit --> Connection Details
- Select the Virtual Networks tab
- Check the "Autostart: On Boot" and then click Apply
- Close virt-manager and reboot. You can use the command
sudo rebootor the graphical option. - Open a terminal window and rerun the previous commands to list network addresses and iptables rules
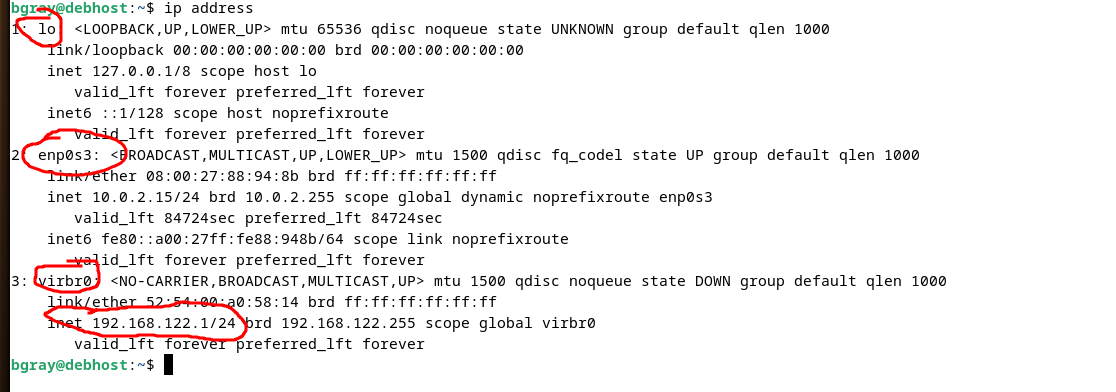
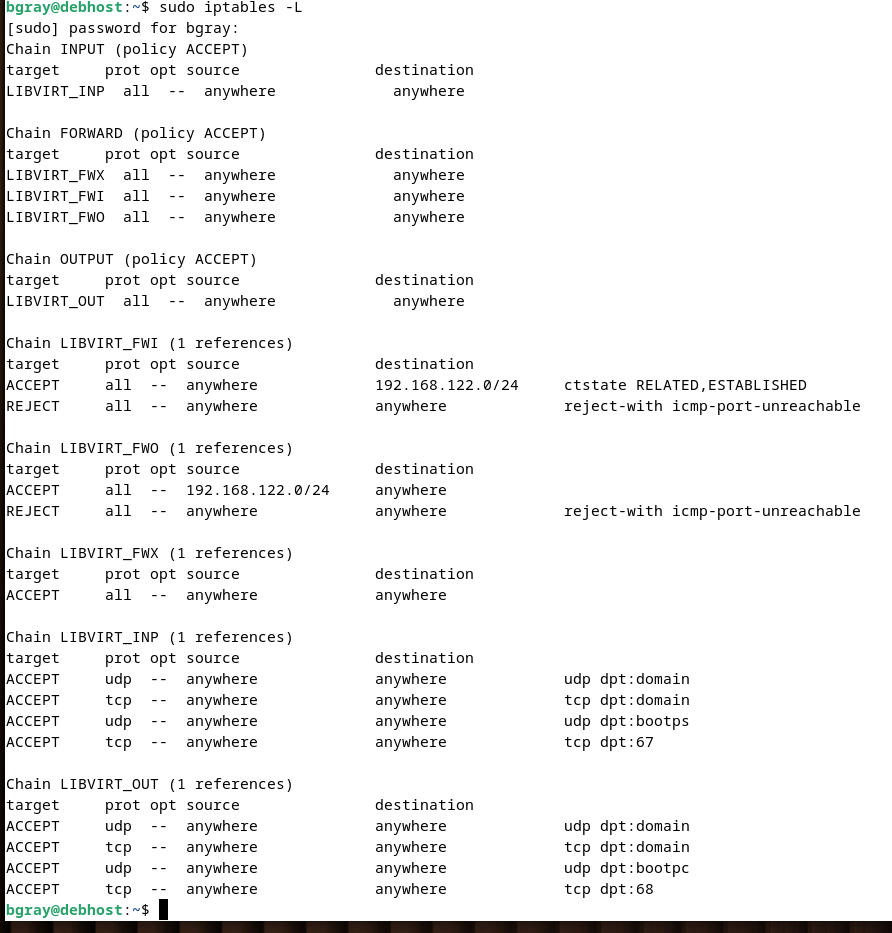 You can see that debhost has connected to the virtual network and iptables rules have been added to configure access to that network.
Part 2 Installing deb1
VM Details:
- VM Name (and hostname): deb1
- Debian Network Install with Graphical Desktop Environment:
- VM Image Pathname: /var/lib/libvirt/images/deb1.qcow2
- Memory: 2048MB
- Disk space: 15GB
- CPUs: 2
Perform the following steps:
- Launch
virt-manager. - Click the Create a new VM icon located near the top left-corner of the application window.
- Select the Local install media option and click Forward.
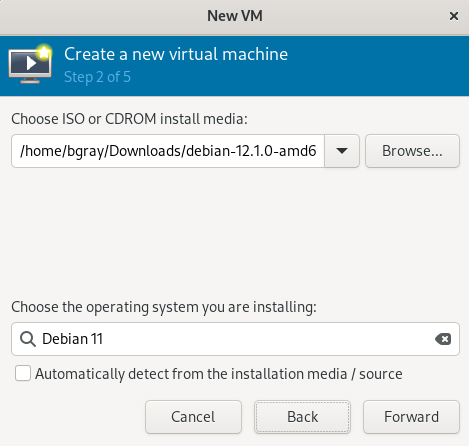
- Browse to the location of your ISO image. (probably ~/Downloads) and select the iso image
- If the Operating System is not auto detected, uncheck the "Automatically detect from the installation media" and Choose Debian 11, and click Forward.
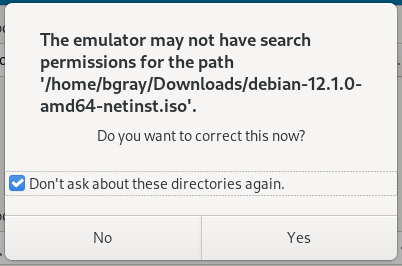
- If a "search permissions" dialog box opens, Check "Don't ask about these directories again" and click yes
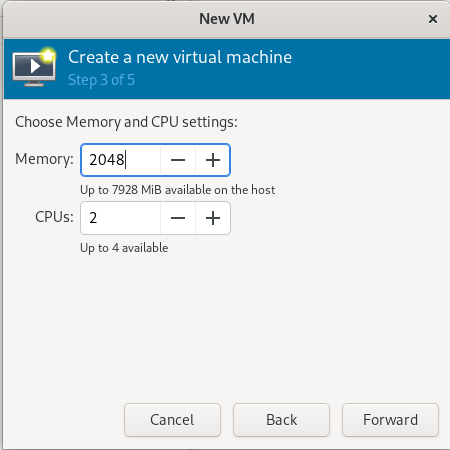
Set Memory: size to 2048 MB and CPUs to 2, then click Forward.
Set Hard Disk size to 15 GB and click Forward.
Enter the Name: deb1, AND then select the option: Customize configuration before install, and click Finish.
Another dialog will appear. Click CPUs (or "processors") and on right-side under Configuration select Copy Host CPU Configuration, click Apply, and then click Begin Installation at the top left-hand side.
When the installer starts select ""Graphical Install" and press enter
NOTES
- To have the VM "capture" the keyboard and mouse input click on the viewer window
- To release the keyboard and mouse from the VM use left-ctrl+left-alt
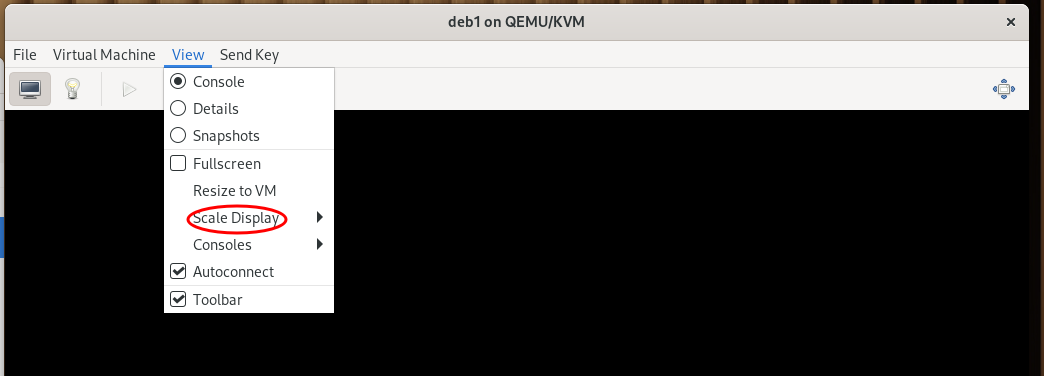
- To make the VM easier to display, click on View --> Scale Display --> Always >
Select English as the language
Select Canada as the location
Select American English as the keyboard
Enter a Hostname of deb1
Leave the Domain name: blank
Do NOT set a root password
> Remember to user the same username and password on all of your VM'sEnter your Full name
Enter your Username
Enter your password twice.
Select the Eastern time zone
When asked for Partitioning method: choose Guided - use entire disk and setup LVM
Select Virtual disk 1(vda)
Select All files in one partititon
Select yes to Write the changes to disk and configure LVM
Accept the default Amount of volume group to use for guided partitioning
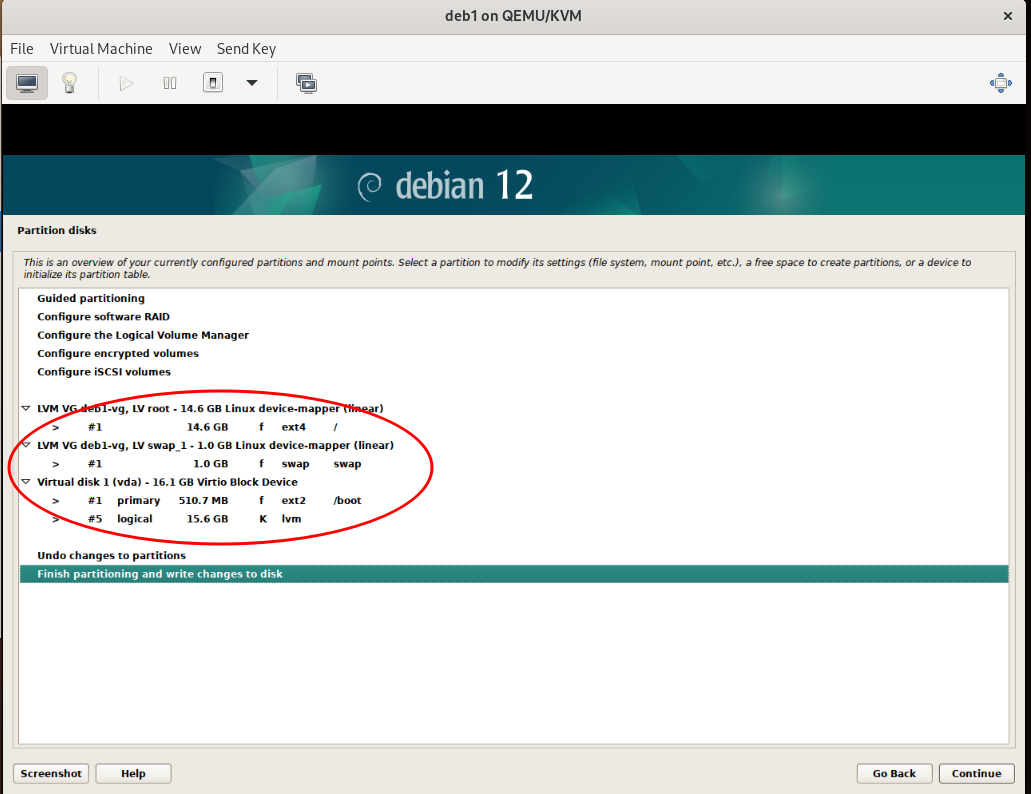
Your storage should be configured as shown above. Select Finish partitioning and write changes to disk
Select Yes to Write the changes to disks
Select No to Scan extra installation media
Select Canada as your Debian archive mirror country
Select deb.debian.org as your Debian archive mirror:
Leave HTTP proxy information as blank
Select No to Participate in the package survey
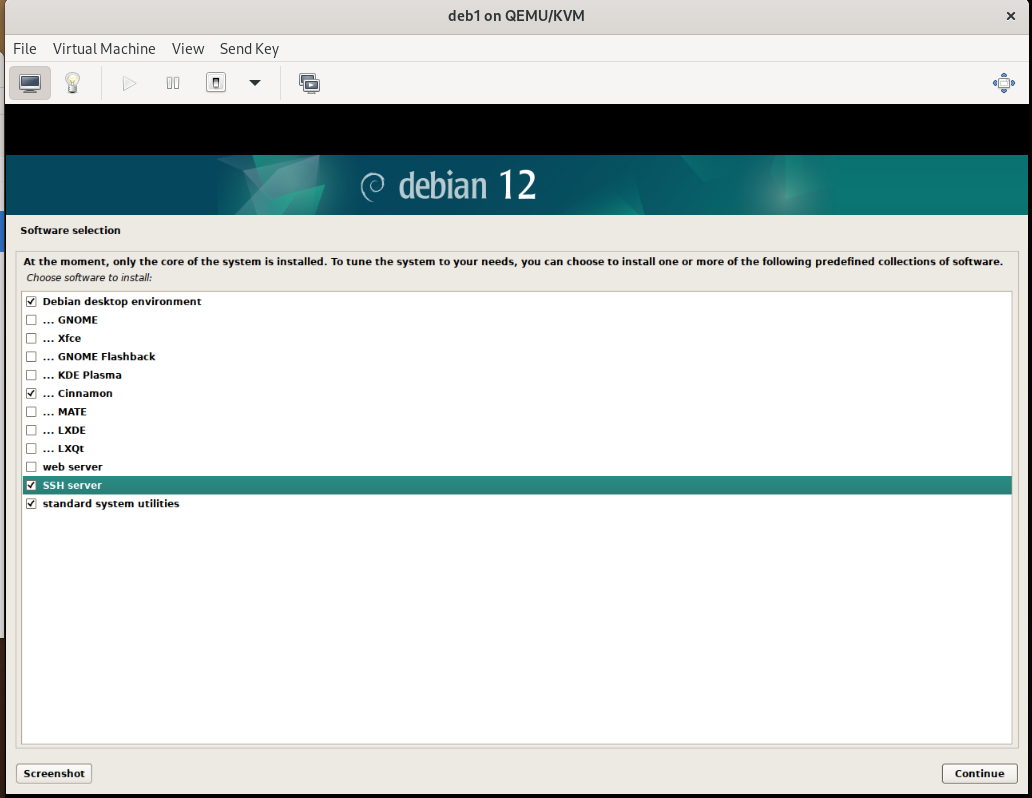
On the Software Selection Screen uncheck Gnome and select Cinnamon instead. Also select SSH Server
Select Yes to Install the GRUB boot loader
Select /dev/vda as the Device for boot loader installation
When the installation is complete Reboot
You may need to go into the VM details and remove the media from the CDROM device
Post Installation Tasks
- Repeat the steps as you did in Lab 1 to set the root account password, perform a system update, and disable AppArmor.
- Issue the following command to obtain the IPv4 address for your deb1 VM to record in your Lab 2 logbook:
ip address show
- Explore the Cinnamon Desktop Environment.
Part 3: Installing deb2 (Non-Graphical Install)
VM Details:
- VM Name (and hostname): deb2
- Debian Network Install with TTY (command line) Interface only:
- VM Image Pathname: /var/lib/libvirt/images/deb2.qcow2
- Memory: 2048MB
- Disk space: 20GB
- CPUs: 1
Perform the following steps:
Create the VM (called deb2) as you did with the deb1 VM.
Launch
virt-manager.Click the Create a new VM icon located near the top left-corner of the application window.
Select the Local install media option and click Forward.
Browse to the location of your ISO image. (probably ~/Downloads) and select the iso image
If the Operating System is not auto detected, uncheck the "Automatically detect from the installation media" and Choose Debian 11, and click Forward.
Set Memory: size to 2048 MB and CPUs to 1, then click Forward.
Set Hard Disk size to 20 GB and click Forward.
Enter the Name: deb2, AND then select the option: Customize configuration before install, and click Finish.
Another dialog will appear. Click CPUs (or "processors") and on right-side under Configuration select Copy Host CPU Configuration, click Apply, and then click Begin Installation at the top left-hand side.
When the installer starts select ""Graphical Install" and press enter
Select English as the language
Select Canada as the location
Select American English as the keyboard
Enter a Hostname of deb2
Leave the Domain name: blank
Do NOT set a root password
> Remember to user the same username and password on all of your VM'sEnter your Full name
Enter your Username
Enter your password twice.
Select the Eastern time zone
When asked for Partitioning method: choose Guided - use entire disk and setup LVM
Select Virtual disk 1(vda)
Select Separate /home partition
Select yes to Write the changes to disk and configure LVM
Accept the default Amount of volume group to use for guided partitioning
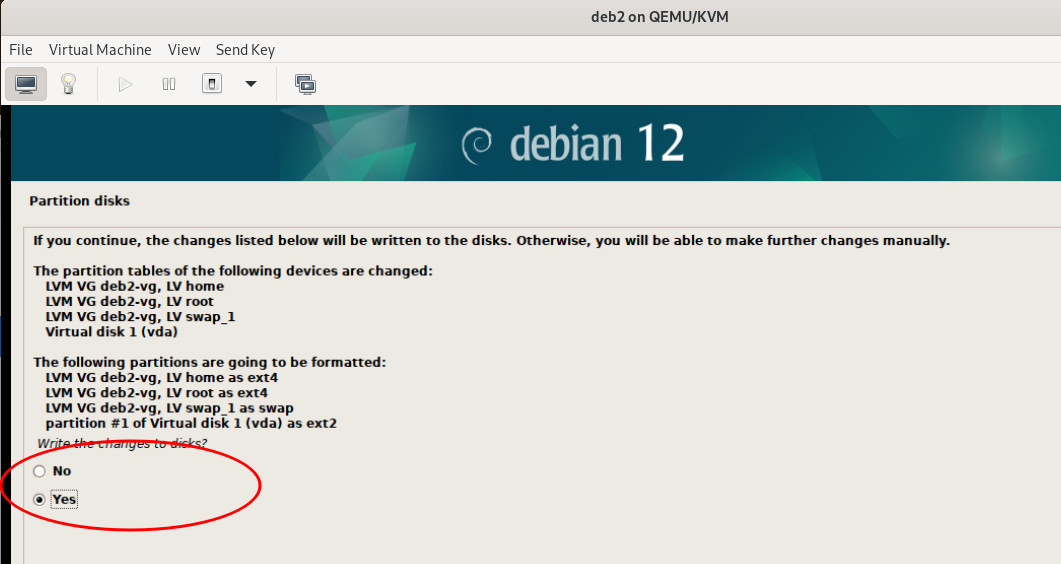
Select Yes to Write the changes to disks
Select No to Scan extra installation media
Select No to Participate in the package survey
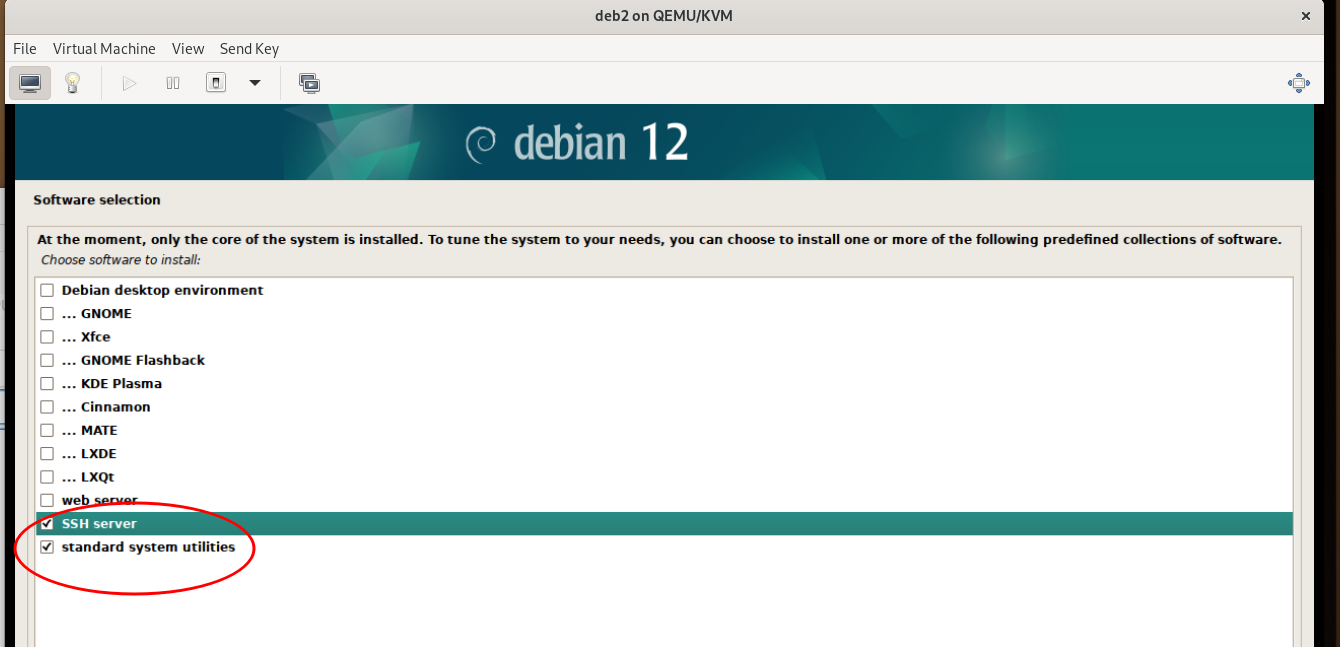
On the Software Selection Screen uncheck Debian desktop environment and Gnome. Also add the selection SSH Server
Select Yes to Install the GRUB boot loader
Select /dev/vda as the Device for boot loader installation
When the installation is complete Reboot
You may need to go into the VM details and remove the media from the CDROM device
Post Installation Tasks
- First change the tty display font.
# Reconfigure the console font
sudo dpkg-reconfigure console-setup

- Select UTF-8
- Select Latin1
- Select Terminus
- Select 11x22
You can experiment with different settings for Font and Font size.
- Repeat the steps as you did in Lab 1 to set the root account password, perform a system update, and disable AppArmor.
- Issue the following command to obtain the IPv4 address for your deb2 VM to record in your Lab 2 logbook:
ip address show
Part 4: Installing deb3 using a preseed file
VM Details:
- VM Name (and hostname): deb3
- Debian Automated Install with preseed file (command line) Interface only:
- VM Image Pathname: /var/lib/libvirt/images/deb3.qcow2
- Preseed URL: https://raw.githubusercontent.com/OPS245/debian-labs/main/deb3-preseed.cfg
- Memory: 2048MB
- Disk space: 15GB
- CPUs: 1
Preseed Installations
- READ the first 6 sections of the following Debian wiki Document
Preseed files can be be quite complex and difficult to create from scratch. Debian provides an example preseed file that documents the default settings.
We are going to use this preseed file to install our deb3 VM.
- Read the preseed file and answer the following questions
- What locale will be chosen?
- What mirror will be used?
- Will the root account be enabled?
- What is the regular user account "Full Name"?
- What is the regular user account name?
- what is the regular user's password?
- Will the account have access to
sudo? - What time zone will be selected?
- Will the ssh server be installed?
- What will the hostname be?
- What partitions or LVM volumes will be created?
Perform the following steps:
- Create the VM (called deb3) as you did with the deb2 VM.
- Launch
virt-manager. - Click the Create a new VM icon located near the top left-corner of the application window.
- Select the Local install media option and click Forward.
- Browse to the location of your ISO image. (probably ~/Downloads) and select the iso image
- If the Operating System is not auto detected, uncheck the "Automatically detect from the installation media" and Choose Debian 11, and click Forward.
- Set Memory: size to 2048 MB and CPUs to 1, then click Forward.
- Set Hard Disk size to 15 GB and click Forward.
- Enter the Name: deb3, AND then select the option: Customize configuration before install, and click Finish.
- Another dialog will appear. Click CPUs (or "processors") and on right-side under Configuration select Copy Host CPU Configuration, click Apply, and then click Begin Installation at the top left-hand side.
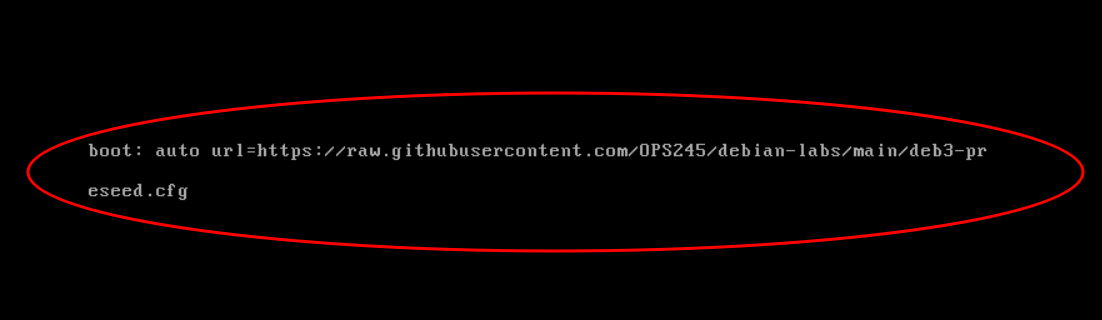
- When the installer starts hit the ESC key to access the boot: prompt
- At the boot: prompt enter the following and type enter
auto url=https://raw.githubusercontent.com/OPS245/debian-labs/main/deb3-preseed.cfg
The installer should start and will perform an auto install using the information in the preseed file. When deb3 reboots login to the tty as the user ops245.
Post Installation Tasks
- Follow the same procedure to set the TTY(console) font to your preference.
- Create a new regular user account and password that matches your other VM's (We will learn more about these commands in a future lab)
# Create the user
sudo useradd -m -s /bin/bash -c "Full Name" <username>

# Set the users password
sudo passwd <username>

# Add the user to the sudo group
sudo usermod -aG sudo <username>
- Type
exitto logout and then login as the new user - Test sudo access using the command
sudo whoami - Follow the same process as you did for previous VM's to enable the root account, perform an update, and disable the apparmor service
Answer INVESTIGATION 2 observations / questions in your lab log book.
Investigation 3: Managing Virtual Machines (KVM)
Root Privileges
As part of this investigation you will learn how to switch over to the root account in order to run several privileged commands in sequence. It can be tempting to just use this technique all the time, and never have to worry about sudo, but do not do so. It undermines the security of your system. Use it only when you need it.
Part 1: Backing Up Virtual Machines
This allows us to recover in case something bad occurs during a Lab!
Failure to take the time to make and confirm backups can result in loss of lab work for the student!
There are three general steps to back up your Virtual Machines:
- Shutdown the VM
- Create a compressed copy of your Disk Images using the gzip command.
- Backup the VM xml configuration using the virsh shell command.
The virsh command is a command line tool/shell for managing VM's
We use it to connect to the hypervisor and then interact with our VM's
In order to use the virsh command as a regular user to connect to our VM's we must configure an ENVIRONMENT variable.
- Edit the file
~/.bashrcas your regular user ondebhost - Add the following to the file
# virsh connection variable
export LIBVIRT_DEFAULT_URI='qemu:///system'
- Logout and login again to
debhost
The following example virsh commands will be useful
# List all running (active) VM's
virsh list

# List all inactive VM's
virsh list --inactive

# List all VM's (active or not)
virsh list --all

# Start a VM
virsh start <vmname>

# Shutdown a VM
virsh shutdown <vmname>

# Force off a VM (if shutdown fails)
virsh destroy <vmname>

# Display the xml data that defines the VM configuration
virsh dumpxml <vmname>
To view the VM in a window without launching virt-manager
# Open VM in viewer window
virt-viewer <vmname> &
Shut down your deb1, deb2, and deb3 VMs. (Use the
virshcommand)
You can shutdown the VM's from the user interface, (For deb2 and deb3, which are CLI-only, you can issue the following command to shutdown: sudo poweroff, or you can use thevirshcommand. Please be patient, the VMs will shut down!Create a directory for your backups.
mkdir ~/backupsEnter the command
virsh dumpxml deb1This command will output the xml data that is used to define (create) this VM If we save this output we could use that xml data to recreate the VM
Enter the command
virsh dumpxml deb1 > ~/backups/deb1.xmlto save a copy of the output.Enter 2 more commands to save the xml data for
deb2anddeb3Backing up the xml data only has to be done when the VM is created, or if the configuration is modified.
We will need to use elevated privileges to backup our disk image files from the default location of
/var/lib/libvirt/images/Use the command
sudo -iand enter your password if prompted.
sudo -iwill start a new shell as the root user, you can run a number of commands and then typeexitto return to your previous shell.
Change to the images directory:
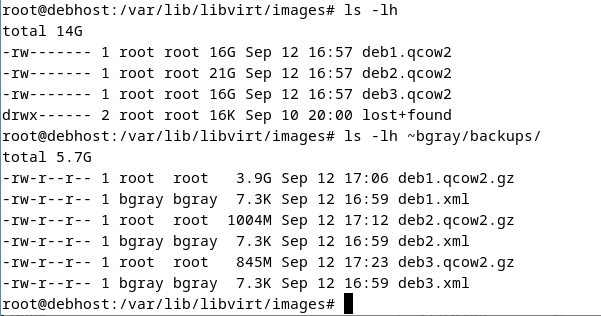
cd /var/lib/libvirt/images/. Note that you did not need to use sudo, as you are already using elevated permissions.Type
ls -lhto see the contentsTo make a compressed copy of your deb1.qcow2, deb2.qcow2, and deb3.qcow2 files we will use the
gzipcommand.The
gzipcommand will compress the file in place and rename the file with a.gzextension. However, this will make the file unusable and doesn't create a copy. We will use STDIN and STDOUT redirection to overcome this.Issue the commands:
gzip < deb1.qcow2 > ~YourRegularUsername/backups/deb1.qcow2.gz

gzip < deb2.qcow2 > ~YourRegularUsername/backups/deb2.qcow2.gz

gzip < deb3.qcow2 > ~YourRegularUsername/backups/deb3.qcow2.gz
NOTE: Make certain to use the redirection signs "<" and ">" properly in the command!
It may look like the command prompt is stuck but it could take a while for gzip to compress an entire operating system.
NOTE: Do NOT press
<ctrl>cto cancel this process. If you do, your archive will become incomplete and your recovery will be corrupt.
- Compare the size of the compressed and original files (hint: use
ls -lh). If file is very large (like 15GB), you didn't compress it and you need to remove that file and perform the previous step until you get it right! - Once you are sure you have all three VM disk images backed up, use the
exitcommand to revert back to your normal user.
Part 2: Testing the backup
Start the deb3 VM and login.
THIS WILL DESTROY YOUR SYSTEMMake certain that you are in your
deb3VM and not indebhost!Type this command inside the deb3 virtual machine:
sudo rm -rf /*(ignore error messages).Type the command
sudo poweroff, try other commands.Force the VM to poweroff and restart
When the machine restarts it will not boot since all system files have been removed!
Use the Force Off option to turn deb3 back off.
Run
virt-managerright click on thedeb3VM and select Delete make sure that Delete associated storage file is selected and Deletedeb3is now completely gone. Time to test the backup!To restore the VM configuration:
# List all VM's
virsh list --all

# Define a VM from xml data
virsh define ~/backups/deb3.xml

# List all VM's
virsh list --all
- To restore the
deb3disk image file:
# Start a sudo shell
sudo -i

# Change to images directory
cd /var/lib/libvirt/images

# Restore file
gunzip < ~YourRegularUserName/backups/deb3.qcow2.gz > deb3.qcow2

# Return to previous shell
exit
- Start the
deb3VM and login to make sure it was successfully restored
If you shut down your host system while virtual machines are running, they will be suspended, and will resume the next time you boot your host system. Note that it is better to shut down the VMs prior to shutting down the host
- For the remainder of these labs, it is assumed that you will backup both the images and XML configuration files for all Virtual machines, when asked to backup your virtual machines. It is also highly recommended to backup these files to an external storage device (eg. USB key) in case the host machine gets "wiped" and you need to rebuild your HOST machine and then restore your Virtual Machines...
- Answer this question in your log book:
- In order to fully back up a virtual machine, what information should be saved in addition to the virtual machine image?
Answer INVESTIGATION 3 observations / questions in your lab log book.
Investigation 4: Using Shell Scripts for VM Backup & Management
You will continue our use of Bash Shell scripting by first creating a Bash Shell script that will allow the Linux sysadmin to select their created VMs for backup. Afterwards you will download, view and run a couple of Bash Shell scripts that use the virsh command to start and stop your virtual machines.
Please check out these Bash Shell Scripting Tips first before continuing with the following steps
Perform the following steps:
- Start the deb1 virtual machine, and stop the deb2 and deb3 virtual machines.
- Switch to the debhost machine, and open a shell terminal.
- Enter these admin commands into your debhost machine and note the result:
virsh list
virsh list --all
virsh list --inactive
- Now, shut-down your deb1 VM normally, and close the deb1 VM window.
- Switch to your terminal and issue the command:
virsh start deb1
- Using the appropriate command check to see if your deb1 VM is now running.
- There are other commands that can be used (such as suspend, or shutdown). The "shutdown" command may not always work since it relies on the guest handling a particular ACPI event. Why do you think it is useful to have commands to manipulate VMs?
- Since this is a text-based version of Linux, you do not need to turn off the screen-saver.
Virtual Machine Does not Shutdown from Command
If the Virtual machine fails to shutdown from the virsh shutdown command, then you can go to the Virtual Machine manager and halt or shutdown within the VM itself, then you can click the PowerOff button in the VM window. You'll want to avoid a forced shutdown since those are equivalent to yanking the power cord out of the wall on a physical machine!
- Open a Bash shell terminal.
- Using 'sudo' open a text editor (such as
vimorviornano) to create a Bash Shell script called:~/bin/backupVM.bash - Enter the following text content into your file:
#!/bin/bash


# backupVM.bash
# Purpose: Backup VM images
#
# USAGE: ./backupVM.bash
#
# Author: *** INSERT YOUR NAME ***
# Date: *** CURRENT DATE ***

user=$(whoami)
if [ $user != "root" ] # only runs if using sudo or root
then
 echo "You must run this script with root privileges. Please use sudo" >&2
 exit 1
fi
- Save your editing session, but remain in the text editor.
- This shell script is designed particularly for your deb1, deb2, and deb3 VMS.
- The code displayed below will prompt the user if they wish for all VMs to be backed-up; otherwise, allow the user the option of specifying which VMs to be backed-up. Add the following code.
Make sure you edit the code with the correct username!
# Set variables for source path and backup path
img_path="/var/lib/libvirt/images/"
backup_path="/home/username/backups/"

# prompt if all VMs to be backed-up
read -p "Backup all VMs? (y|n):" answer

# Backup all VMs if answer is yes
if [ "$answer" = "y" ]
then
 for num in 1 2 3 # Determinant loop for 3 arguments: 1, 2, and 3
 do
  vm="deb${num}"
  echo "Backing up VM ${vm}"
  gzip < ${img_path}${vm}.qcow2 > ${backup_path}${vm}.qcow2.gz
  echo "${vm} BACKUP DONE"
 done

# Prompt for VM is answer is no
elif [ "$answer" = "n" ]
then
 read -p "Which VM should be backed up? (1|2|3): " numanswer
 until echo $numanswer | grep "^[123]$" >> /dev/null # Look for match of single digit: 1,2, or 3
 do
  read -p "Invalid Selection. Select 1, 2, or 3: " numanswer
 done
 vm="deb${numanswer}"
 echo "Backing up VM ${vm}"
 gzip < ${img_path}${vm}.qcow2 > ${backup_path}${vm}.qcow2.gz
 echo "${vm} BACKUP DONE"
else
 echo "Invalid Selection... Aborting program"
 exit 2
fi
- Save, set the permissions, and then run that shell script to backup deb1. Confirm that this script did backup this image to ~/backups
- What happens if you enter an invalid answer to any of the prompts?
- You have completed lab2. Proceed to Completing The Lab, and follow the instructions for "lab sign-off".
Answer INVESTIGATION 4 observations / questions in your lab log book.
Lab 2 Sign-Off (Show Instructor)
Follow the submission instructions that your Professor provides.
Backup ALL of your VMs!
If you have successfully completed this lab, make a new backup of all of your virtual machines onto your USB Key.
Perform the Following Steps:
- Use the virsh start command to launch all the VMs (deb1, deb2, and deb3).
- Inside each virtual machine, run
ip aon the command line. Open a Terminal window in deb1 to do so. You'll need the IP address of each machine for the next steps. - Switch to your debhost VM, open a terminal, and change directory to ~/bin.
- Issue the command:
wget https://raw.githubusercontent.com/OPS245/debian-labs/main/lab2-check.bash
- Give the lab2-check.bash execute permissions for the file owner.
- Run the shell script and if there are any warnings, make fixes and re-run shell script until you receive the "Congratulations" message.
- Follow the submission instructions of your Professor:
Practice For Quizzes, Tests, Midterm & Final Exam
- How do you start and stop virtual machines?
- What is the purpose of the virsh command?
- List the steps to correctly backup your VM's xml data
- List the steps to correctly backup your VM's disk images
- List the steps to correctly restore your VMs
- How can you prompt the user for data and store into a variable?
- Show a few examples of bash loops that can be used to error-check user input.
- What does the command apt update do and why is it important?
- What does the command apt upgrade do and why is it important?