Lab 3: Troubleshooting, Archiving, and Packages
Lab Preparation
Purpose and Objectives of Lab 3
In this lab, you are going to identify potential problems such as running out of space to run a GUI, or forgetting your root password. You will also learn to conserve hard disk space by learning how to compress and decompress files that are stored on your computer server. In addition, you will learn alternative methods of how to install applications (i.e. programs).
Learning how to conserve disk space is essential for the efficient operation of a Linux computer system. You will learn how to manipulate the size of Linux file-system sizes (via LVM) in Lab 5.
You will download and compile the game called lbreakout2 which is only available as compressed source code.
Main Objectives
Learn to boot your Debian VM into Single User mode for rescue purposes
Create and extract archive files (tar and tar.gz)
Install applications using various methods:
- Download and decompress an archive file from the Internet, then compile source code in order to install an application.
- Use the apt utility to install software from local source programs
- Use apt utility to install software from online repositories
- Learn how to add 3rd party repositories to install less common applications.
- Enable the flatpak universal package management system with access to flathub and install an application
Demonstrate the use of Bash Shell scripts to automate routine tasks (generate a customized software report)
Minimum Required Materials
- Solid State Drive
- USB key (for backups)
- Lab3 Log Book
Linux Command Reference
Archiving / Compiling
Software Management
Miscellaneous
| ls | more | wget | chmod | vi |
|---|
Matrix On-line Tutorials:
- Shell Scripting Basics - Part 4 (The sed Utility): /home/ops235/scripting-4
Investigation 1: Troubleshooting Common Booting, and Forgotten Root Password Issues
Part 1: Common Booting Issues
There are a few "classic problems" that students can encounter with their virtual machines and their host machine after performing lab2. Although all OPS245 students may not encounter these problems, it is good to be aware of what a potential problem may look like, and know how to solve that problem.
A few common problems are:
- I Can't boot into Graphical Mode on my debhost machine
- I Forgot My Regular User Password
- I Forgot My root Password
- I Can't Start My Virtual Machine
Troubleshooting skills take time to develop. Your approach should be methodical. Consider the following elements:
- Gathering Information
- Asking questions like "What was changed recently"
- Examining Log files
- Reading documentation and searching the Internet
- Eliminating what the problem IS NOT
- Testing possible solutions one at a time
- Documenting the problem
Part 2: Booting into Single-User Mode
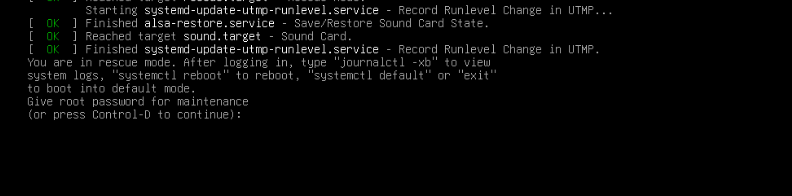
If you cannot login graphically to your machine (first two common problems), there is an option to boot your system into single-user mode. (Sometimes called rescue mode)
This "mode" puts the OS into a state that does not provide networking, graphics, or the ability to login in as other regular users. You can only login to a TTY (text interface) as the user root.
Perform the following steps:
- Boot up your debhost.
- Login as as a regular user.
- Boot-up your deb1 VM. When the Grub Boot menu appears, press the letter
e(for "edit").
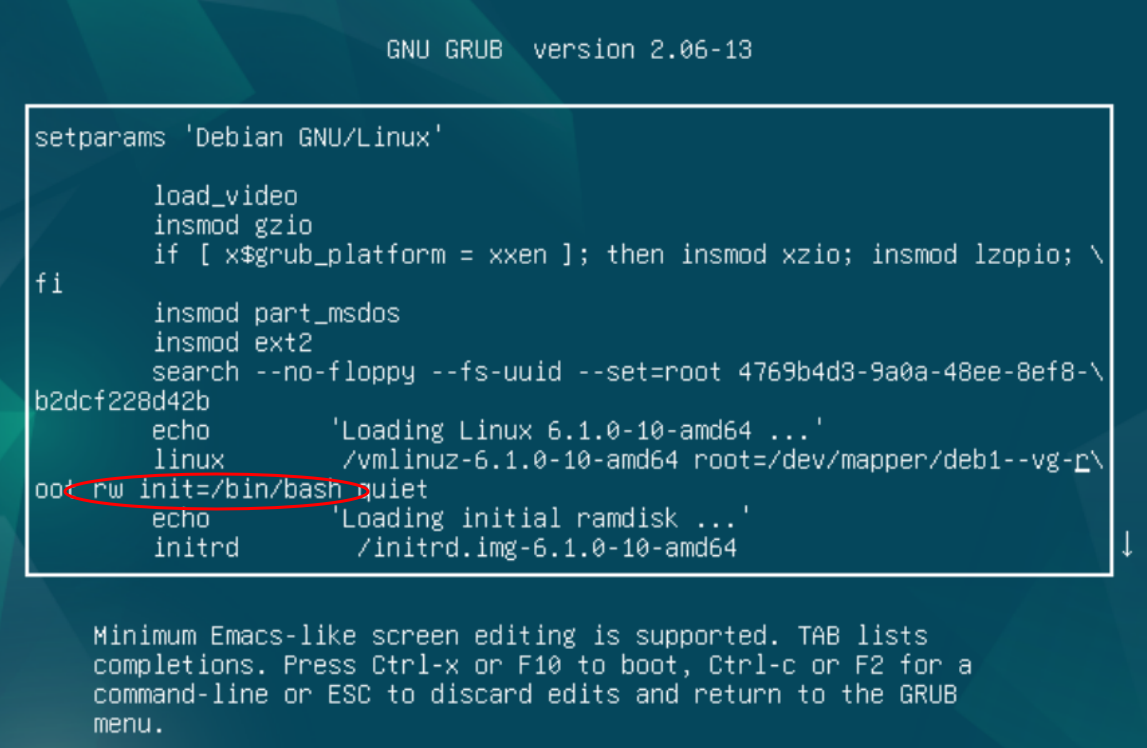
- Using your arrow keys, scroll down to the line that starts with
linuxadd the wordsingleas an argument after quiet (see diagram below for reference) and then pressctrl-xto boot.
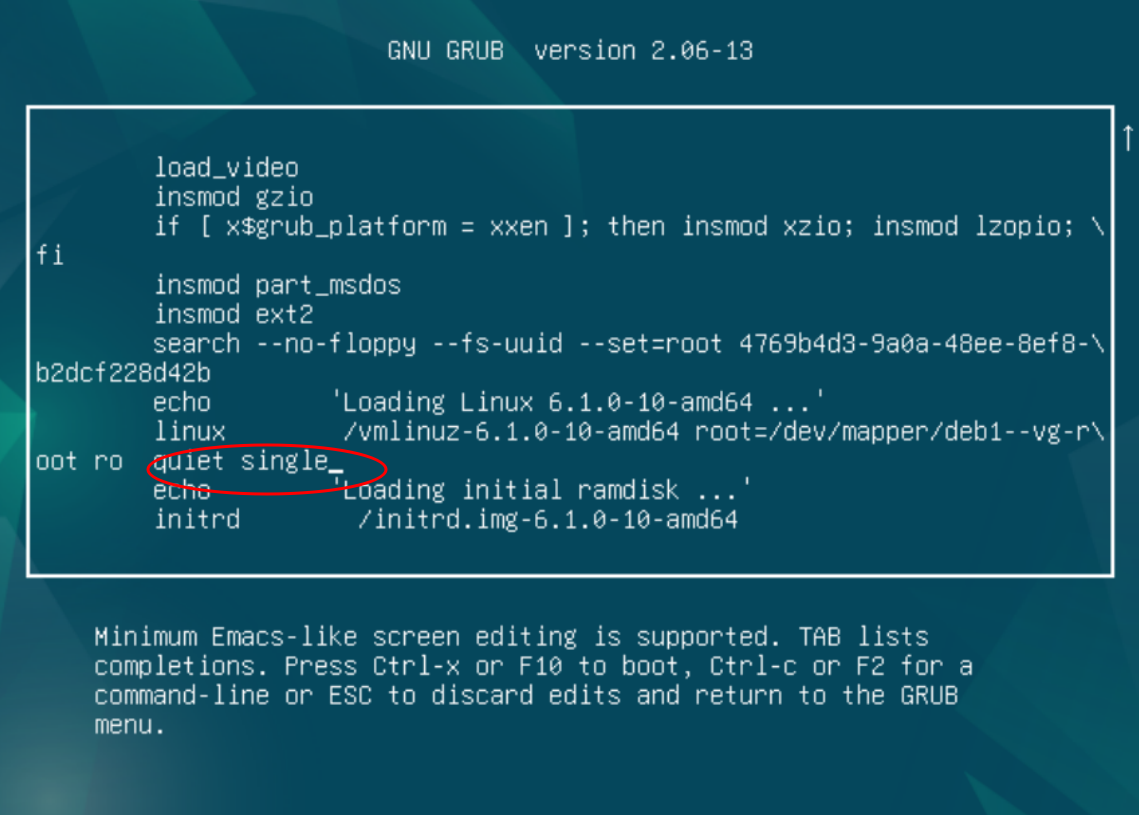
- The system should boot into a text-based interface. Enter your root password.
 One thing that can cause the graphical interface to not function is lack of disk space. All graphical interfaces need to write to temporary files on disk.
If your disk is full it will fail.
One thing that can cause the graphical interface to not function is lack of disk space. All graphical interfaces need to write to temporary files on disk.
If your disk is full it will fail. - To look at storage utilization. Issue the command:
df -h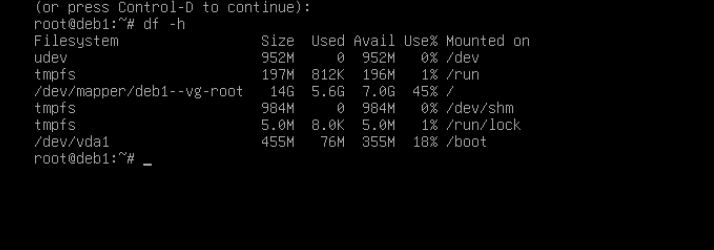
Temporary files are written to the
/tmpdirectory, so in the image above that would be on the storage device mounted on/If you have problems with disk space in this course it is likely because you have not been backing up your VM's correctly. Do NOT remove the image in /var/lib/libvirt/images directory!
If you are unable to login to the graphical environment because you have forgotten your password you can use the passwd command as root to reset it.
# Change a users password
passwd <username>
- To restart in graphical mode, simply enter the command
reboot.
Part 3: Resetting Forgotten Root Password
Unfortunately, booting into Single-User Mode does not work if you have forgotten/lost your root password, since the procedure in the previous part requires that you enter your root password.
In order to reset your lost root password, you need to perform a different procedure.
This will involve interrupting the boot process by starting a root shell as the initial process instead of starting the usual systemd.
As systemd is not started, none of our typical services are started, including network access. But we do have access to our basic commands and we have read/write access to the / filesystem
Perform the following steps:
- Shutdown
deb1 - Start your
deb1VM and presseat the Grub boot menu. - Using your arrow keys, scroll down to the line that starts with
linuxand replace the argumentrowith the argumentrw init=/bin/bash(see image below for reference) and then pressctrl-xto boot.
- The system should boot directly into a bash shell as the user root without prompting for root's password.
2 Things to consider:
- Without physical security our servers are not secure.
- GRUB itself can be password protected which would provide an additional layer of protection.
- Issue the command
ps -ef | headto list the first 10 processes running.
Note that PID 1 is your bash shell, on a normal boot systemd would be PID 1
Issue the command:
passwdin order to change your root password (press ctrl-c if you wish to abort - i.e. not change password).To restart normally, booting into graphical mode, the command
rebootwill not work as it communicates with systemdFrom debhost use the command
virsh destroy deb1to force the shutdown of deb1
Catastrophic Boot Problems
Not being able to start your debhost due to Kernel Panic or some sort of catastrophic disk failure is not as easy to fix. You might be able to boot from a LIVE Linux ISO, open a terminal and mount the partition via command line and look for possible problems (setup files like /etc/fstab). Lab5 will discuss more about mounting and the /etc/fstab file. The "worst-case scenario" would be to purchase a new hard disk, perform lab1 completely, perform lab2 to install and set-up virtualisation software, then restore your VM image and xml file backups (e.g. decompressing images, issuing virsh define commands for .xml files). That is why consistently performing backups of ALL of your VMS at the end of each lab is absolutely essential! You have been warned!
Answer INVESTIGATION 1 observations / questions in your lab log book.
Investigation 2: Archiving and Restoring Files
Part 1: Creating a File Archive
One method to help prevent running out of hard disk space is to compress or archive files so they take up less space on your computer system. Archiving files is also a popular method to bundle files together into one smaller file for fast transfers to other computer servers and distribution .
An archive file is essentially a file that contains other files. We use the tar command to create/extract archive files. Originally the tar command would archive files to an attached tape device, primarily this was done to preserve disk space at a time when disk storage was very expensive.
Perform the following steps:
- Boot up your deb3 VM.
- Change your working directory to /usr/share/doc/sudo
- Use the tar (tape archiver) command to create an archive file named archive1.tar in your home directory that contains the contents of this directory.
# Archive contents of pwd
tar cvf ~/archive1.tar .
Don't miss the
.at the end of thetarcommand (where indicated). It specifies what should be added into the archive. (the contents of the current directory).
- Examine the man page for tar, (
man tar) What do the options c, v, and f mean? - Record the archive file size.
- The archive file can now be compressed in place using gzip by issuing the command:
# Compress file in place
gzip ~/archive1.tar
- Record the archive file size after compression.
We can also create the archive file and compress it at the same time. tar has options to compress archive files using a variety of compression methods, including gzip compression with the z option.
- Make sure you're still in /usr/share/doc/sudo and then create a compressed archive by issuing the following command:
# Create a compressed archive file
tar cvzf ~/archive2.tar.gz .
- What does the z option do?
- Compare the sizes of archive1.tar.gz and archive2.tar.gz. Why are they so close in size?
- Check the man page for the tar command. What other types of compression does tar support?
Part 2: Restoring Files From an Archive
Perform the following steps:
- Remain in your deb3 VM.
- Create the directory ~/extract1
- Change to the ~/extract1 directory.
- Move the file archive1.tar.gz to extract1.
- Uncompress the first archive you created by issuing the command:
# Uncompress file in place
gunzip archive1.tar.gz
- Extract the files from the first archive by issuing the command:
# Extract files from an archive file (tarball)
tar xvf archive1.tar
- Are all the files there?
- Compare ~/extract1/README.md and /usr/share/doc/sudo/README.md. Are they exactly the same? Why?
- Create the directory ~/extract2
- Move the file archive2.tar.gz to the extract2 directory.
- Change to the extract2 directory and extract the files from the second archive by issuing the following command:
# Extract and uncompress contents of an archive file (tarball)
tar xvzf archive2.tar.gz
- Note that this time a separate
gunzipcommand was not needed. Why? - Repeat the previous command, leaving out the option z. Does it work? Why?
- Compare the README.md file in this directory with the original file. Are they exactly the same?
Answer Investigation 2 observations / questions in your lab log book.
Investigation 3: Managing Software Packages
Part 1: Managing Software and Repositories with apt
We will learn how to install software packages with the apt utility. This command is useful for installing software since it automatically resolves software dependencies prior to installing the software. Upon your Debian install, links to software repositories are automatically made to allow for easy software updates and installs from online repositories.
In order for the apt command to work you require a connection to the Internet.
Common apt Commands
# Remember apt usually requires sudo

# Update the list of available packages in the repositories
apt update

# Upgrade all installed packages to the newest versions
apt upgrade

# Search for a given package
apt search <package>

# Show information for a package
apt show <package>

# Install a package
apt install <package>

# Uninstall a package
apt remove <package>

# List all installed packages
apt list --installed

# Show configured repositories
sudo less /etc/apt/sources.list
Unfortunately, there is no guarantee that a particular software package is contained on the default repository. In order to overcome this problem, you can add other repositories that may contain the application that you wish to install.
Perform the following steps:
- Make certain that you are in your debhost.
- Search for the package elinks and then show its information
sudo apt search elinks
sudo apt show elinks
What type of software is elinks?
- Now issue the command:
sudo apt install elinks
- How can you tell if the elinks package has been installed?
- Test that elinks works
elinks https://debian.org
- Type
qto exit elinks - To remove the elinks package issue the command:
sudo apt remove elinks
- Verify that the elinks package has been removed. Also verify that the application called: hexchat is not installed.
- Open Firefox on debhost to http://ftp.ca.debian.org/debian/pool/main/h/hexchat
- Download the file hexchat_x.xx.x-x_amd64.deb (The version numbers in the filename don't matter)
- Open a terminal and change to your ~/Downloads directory.
- In order to install a package from a local package file (.deb) we can also use
apt
# Install local package file by providing path to .deb file
sudo apt install ./hexchat*.deb
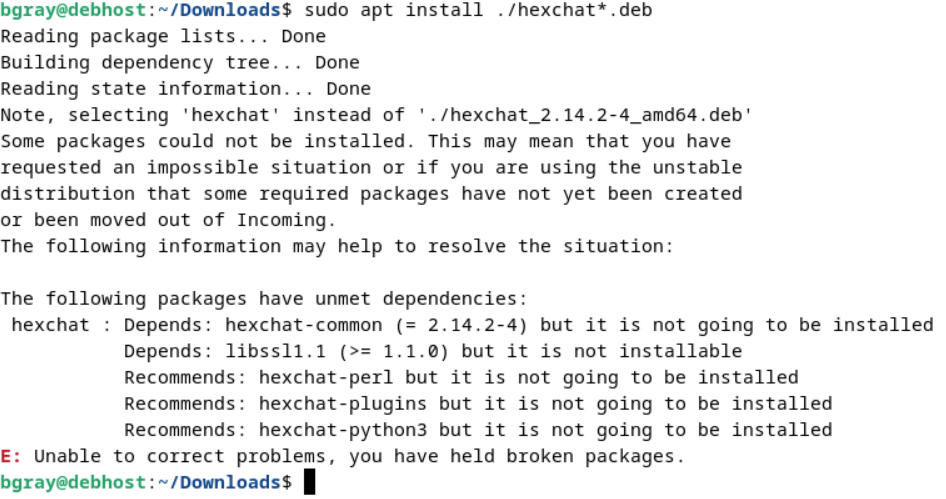 Was the command successful?
While it is possible to install a package directly from a package file, it does present some difficulties.
- Resolving dependencies, when using
aptwith the repositories it will automatically resolve dependencies- Compatibility, if the package file is not built specifically for this particular Distribution/Architecture/Version then compatibility problems can certainly occur
- Conflicts, if you install an alternate package from an outside source as well as the same software from the repo then they can conflict with each other.
That doesn't mean we can't install software not included in the repos. We should just try to avoid unofficial .deb packages.
- Install hexchat normally from the repositories
Part 2: Installing flatpak Applications
While we should mostly be using software provided by our official repos, there are certainly circumstances when software we want is not available. One alternative is using one of the "Universal Packaging" systems to find newer or 3rd party software.
Popular "Universal Package" options include
- snaps (developed and promoted by Ubuntu)
- flatpaks
- Appimages
All of these offer "containerization" or "sandboxing" as a way of resolving the issues discussed above, and also to provide additional security.
This Youtube video explains the different systems.
- Open Firefox on debhost and open (https://flathub.org) and click on the Setup Flathub link.
- Click on the Debian icon.
- Follow the instructions to install the flatpak command and configure the Flathub Repo
- After rebooting, open a terminal and use apt to search for a package called obs-studio
- What version of OBS-Studio is available in the Debian repo?
- Open Firefox on debhost and open (https://flathub.org)
- Search Flathub for "OBS".
- Click on "OBS Studio"
- What version is available on Flathub?
Flatpaks are a great way of adding software that is either not available or not as up to date as the Debian repos.
We have installed "Debian Stable" and the word "Stable" is very important. Especially on important servers!! While our packages will receive updates, specifically security updates and bug fixes, they are unlikely to receive upgrades that add new features. This is mostly an issue with desktop applications.
- Install "OBS Studio" with the command:
# Install a flatpak
sudo flatpak install flathub com.obsproject.Studio
- Answer
yto accept the required runtime library and proceed with the changes. - After the installation, reboot your VM and then confirm that the application runs.
- To uninstall OBS try the following commands:
# List installed flatpaks
sudo flatpak list

# Make note of the Application ID for "OBS Studio"

# Uninstall "OBS Studio""
sudo flatpak uninstall com.obsproject.Studio
Part 3: Compiling Source Code from a Downloaded Archived File
Sometimes, software may not be available in the Debian repositories or even in alternate packaging format. Maybe you want to test a development build of an application that has not been released to the public. They may be available from various web-pages to download, and compile from source code. These wouldn't be the same as pre compiled binary packages, but rather software that you will build yourself.
Now that you know how to create and decompress "gzipped tarball archives", we will demonstrate how to install applications from websites containing these types of archives. Although this method is not as "user-friendly" as using the apt package manager, this method is useful if the application is NOT contained in regular software repositories...
In order to build software from source code, you must have the appropriate software development tools (such as make and gcc) and libraries (such as GTK) installed. The required tools will vary depending on the computer languages used in the software being built.
Installing Development Tools and Libraries
- Show the information for the build-essential package
- Read the Description
- Install the build-essential package
- This package will install a lot of packages as dependencies that are the "essentials" of building and compiling software
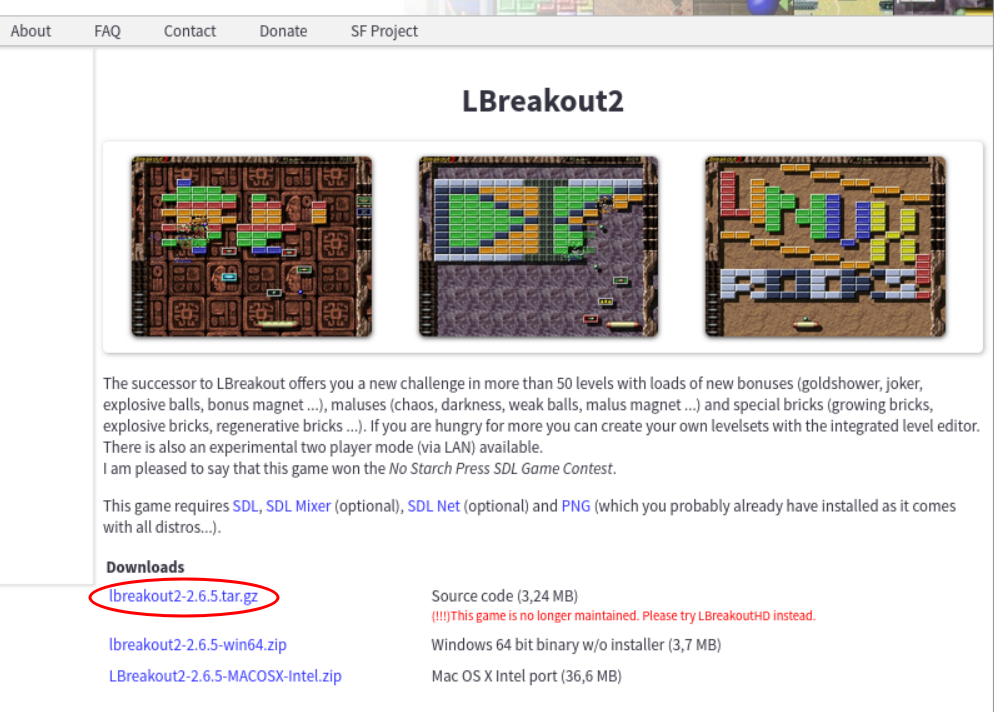
- Open Firefox on debhost and search for "lbreakout2"
- The first link should direct you the website for that project on Sourceforge
- Download the source code file. (.tar.gz extension)
- Open a terminal and change to your ~/Downloads directory
- Extract the archive file using
tar - Once extracted you will have a new directory that contains the source code for this game. Change to that directory.
- List the contents
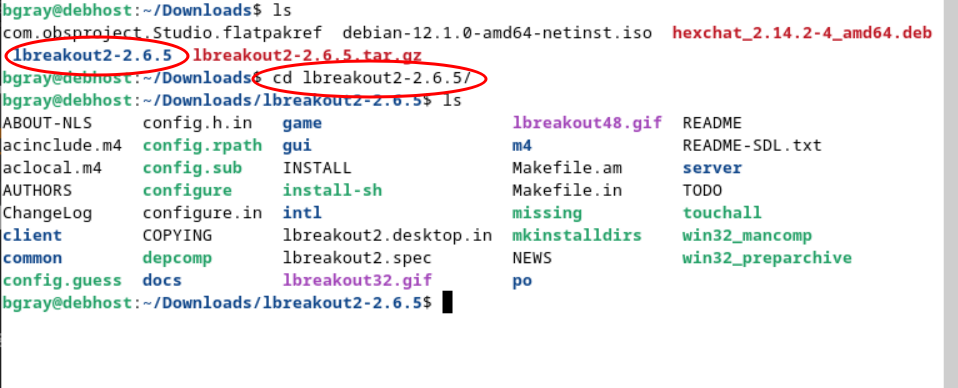
There are a number of files of significance:
- README, & INSTALL are both text files that are probably worth reading.
- configure is a script that will check a number of dependencies and configure the source code for your system
- Makefile* are files that contain the necessary commands to compile and install the software
- View the INSTALL file and read the "Basic Installation" instructions
- Run the configure script.
Make sure you run configure from the current directory by adding the leading ./
# Run the configure script from the current directory
./configure
- Were there any error messages?
- There is a missing library for libz as well as others
- Use apt to install zlib1g-dev libpng-dev and libsdl1.2-dev
- Rerun the configure script
- If there are no errors we can move onto compiling and installing
Compiling and Installing the Software
Compiling any sort of complex application often involves many steps and source code files. Fortunately the developer has provided a "makefile" which is basically a list of steps to compile and install the software. All we need to do is run the make command in the source directory to do all of the compile steps.
- Compile the software
# Run make in the source directory
make
- When the compile is complete the next step is to install all of the files to the correct directories on the system.
./configureandmakedo not require root privileges. Installing all of the compiled files to the correct locations on the system does require root privileges
# Install the compiled software
sudo make install
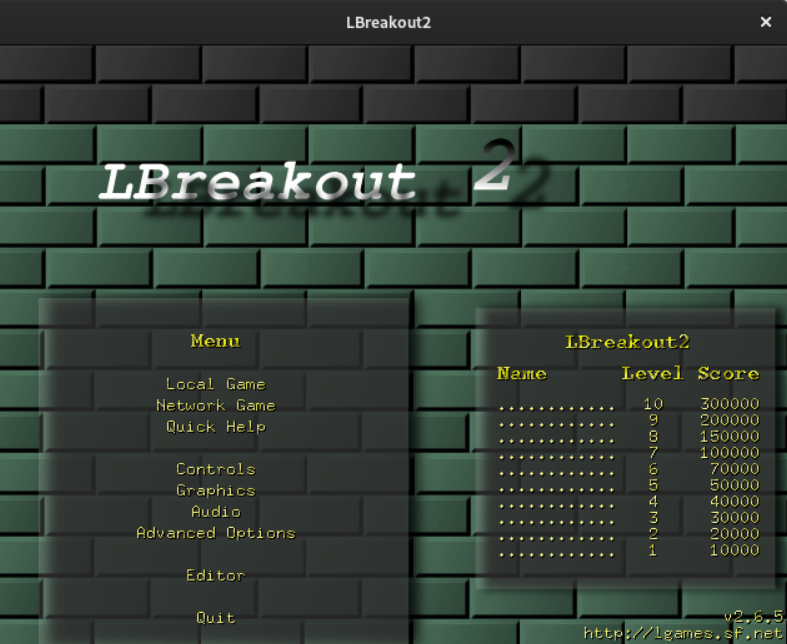
- Run lbreakout2
# Run lbreakout2
lbreakout2 &
Using && and || Conditional Statements
A very useful trick when running several commands in sequence is to use conditional statements.
- The && conditional will run the subsequent command only if the previous command returns a true (0) exit status, for example:
# Run configure and then if successful run make
./configure && make
The || conditional will run the subsequent command only if the previous command returns a false (non-zero) exit status, for example:
# Run configure and then if it fails tell Houston
./configure || echo "Houston, we have a problem"
These conditional can be combined, for example:
# If configure runs, run make, if make fails run echo
# If configure fails, don't run make, run echo
# If configure runs, run make, if make runs, don't run echo
./configure && make || echo "Houston, we have a problem"
Part 4: Using sed to Filter Output from Commands
We will continue with using commands to create a Software Information Report that manipulates output generated by the apt command. The sed and awk commands are very useful tools in shell scripting to manipulate text. In this lab, we will be using sed to allow the user to select certain portions from the dpkg-query command.
Please see the Bash Shell Tips for this part of the lab before proceeding with the steps below
Perform the following steps:
- Use your debhost for this section.
- Open a terminal and run the command:
# Display status information about select packages
dpkg-query -s tar wget gnome
- Notice that using the -s option with dpkg-query displays status information about installed packages.
- Examine the output of this command, lets imagine that we only wish to see the package name and a list of its dependencies.
- Lets use sed to make this output more useful by filtering for lines that start with "Package:" or "Depends:"
# Use sed to filter for only package name and dependencies
dpkg-query -s tar wget gnome | sed -n -e '/^Package:/ p' -e '/Depends:/ p'
- Try modifying that command to display only the package Name and Description.
Answer the Investigation 3 observations / questions in your lab log book.
Investigation 4: Generating Software Package Information with Shell Scripts
We will continue by using commands to create a Software Information Report that filters output generated by the dpkg-query command. The sed and awk commands are very useful tools in shell scripting to filter and process text. In this lab, we will be using sed to allow the user to select certain parts of the output from the dpkg-query command.
Please see the Bash Shell Scripting Tips for this part of the lab before proceeding with the steps below
Perform the following steps:
- Use your debhost for this section.
- Open a terminal and use a text editor create a bash script called: packageInfo.bash in the ~/bin directory.
- Enter the following text into your file:
#!/bin/bash

# packageInfo.bash
# Purpose: Generates a report to include specific package information
#
# USAGE: ./packageInfo.bash [package-name]
#
# Author: *** INSERT YOUR NAME ***
# Date: *** CURRENT DATE ***

# Test for sudo
user=$(whoami)
if [ $user != "root" ]
then
 echo "You must run this script with root privileges. Please use sudo" >&2
 exit 1
fi
- Save your file, but remain in the text editor.
This code will check that the script is being run with a single command argument. Which should be a package name.
It will also generate the report title and current date.
- Add the following code
# Test for argument
if [ $# -ne 1 ]
then
  echo "Your command must have a package-name as an argument" >&2
  echo "USAGE: $0 [package-name]" >&2
  exit 2
fi

# Create report title
# (echo with -e option allows newline \n character to be used)
reportPath="/home/YourRegularUserName/bin"
echo -e "SOFTWARE PACKAGE INFORMATION REPORT" > ${reportPath}/package-info.txt
echo -e "Date: $(date +'%A %B %d, %Y (%H:%M:%p)')\n\n " >> ${reportPath}/package-info.txt
- Save your file, but remain in the text editor.
The code below uses a bash technique called the "Here-Document" to redirect stdin from within the script itself.
It uses the << <LABEL> syntax to say, take the input from the text below as pre-formatted text until you find the LABEL.
The read command will store the different information report items as words (separated by a space).
The sed command is used to convert the spaces used as delimiters to pipes (|) and stored the text into another variable.
The 2nd sed command uses extended regular expressions to print the output elements that were selected.
- Add the following code
# Clear screen and use Here Document to display select on report items to read into variable
clear
cat <<+
Available Package Information Items:

Package
Status
Section
Maintainer
Version
Homepage
+
read -p "Enter word(s) shown above separated by spaces: " choice

# Convert spaces to pipe symbol (|)
processedChoice=$(echo $choice | sed 's/ /|/g')

# Use sed with extended regular expressions to only print those matching report elements
dpkg-query -s $1 | sed -r -n "/^($processedChoice)/ p" >> ${reportPath}/package-info.txt

cat <<+
File "${reportPath}/package-info.txt" has been created
+
- Save the file, set permissions, and then run that script for the package gnome.
- Did it create that report?
- Run the script without an argument - What did it do?
**You have completed lab3. Proceed to the instructions for "Lab Sign-Off".
Answer the Investigation 4 observations / questions in your lab log book.
Lab 3 Sign-Off (Show Instructor)
Follow the submission instructions for lab 3 on Blackboard.
Time for a new backup!
If you have successfully completed this lab, make a new backup of your virtual machines as well as your host machine.
Perform the Following Steps:
- Make certain that your debhost and deb3 VM is running.
- Switch to your debhost, open a shell terminal as a regular user, and change to the directory: ~/bin
- Download the Lab 3 check script:
wget https://raw.githubusercontent.com/OPS245/debian-labs/main/lab3-check.bash
- Give the lab3-check.bash file execute permissions (for the file owner).
- Run the shell script with
sudo, and if any warnings appear, fix the issues noted by the script and rerun the check until you receive the "Congratulations!" message. - Submit the lab according to your Professors instructions.
Practice For Quizzes, Tests, Midterm & Final Exam
- What is the purpose of booting into single-user mode?
- List the steps in order to boot into single-user mode.
- List the steps to reset a forgotten root password.
- What is the difference between a .tgz file and a .tar.gz file? What do these stand for?
- What is the purpose of a repository?
- What is source code?
- How do you build software from source code?
- What does apt do that compiled source code does not?
- Other than running an installed package, what commands can you issue to verify that the package was installed?
- List the steps to remove a package via the apt command.
- List the steps to install a package using the apt command.
- What is the command to list all repositories associated with the apt command?
- What is the Here-Document, and how can it be used in bash scripting?