Lab 8: Setup and Configure a DHCP Server
Lab Preparation
DO NOT START THIS LAB BEFORE SUCCESSFULLY SUBMITTING LABS 1-7: This lab will change some system values that make previous lab checks fail. For best results, confirm with your professor before proceeding.
Overview
There are different ways in which computers can be networked together. Some computer networks (such as computer labs) configure their workstations for static IP addresses for security and to provide other interesting features such as WOL (Wake Up on Lan) which allows a signal from a computer system to remotely start all or specified workstations within the lab.
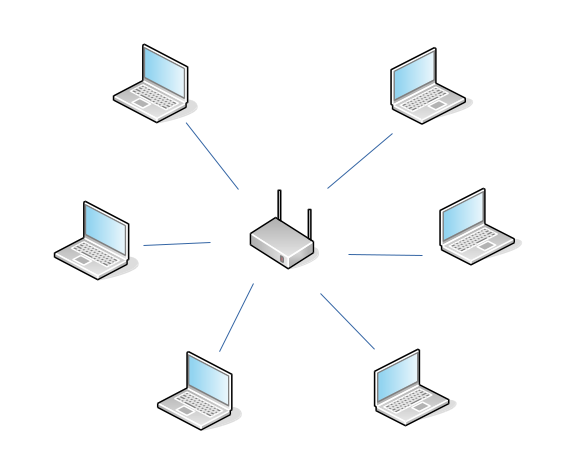
WiFi Hot-spots offer the ability for users to connect to the Internet (via DHCP) from their mobile devices (notebooks, netbooks, tablets, or smart phones). Finally, there are hybrid networks consisting of computers configured with static IP addresses, usually servers, and computers configured via DHCP usually desktop computers and mobile devices.
In lab6, you learned to connect your VMs to a network using a fixed IP Address. In this final lab, you will learn to set-up a DHCP server to automatically assign IP Addresses to our various VM's.
Main Objectives
- To install, configure, and test Internet Systems Consortium's (ISC's) DHCP Server.
- To obtain log information from DHCP server including lease address information.
- To lease the same IP address every-time from VM boot-up (instead of having DHCP server randomly assign IP address).
Note: The Internet Software Consortium has recently deprecated the ISC DHCP Server and provides the modern Kea DHCP Server as the suggested software to replace it. For now we will learn about the Legacy version as it remains widely deployed. You can expect that over time that the newer to become widely used.
Minimum Required Materials
- Solid State Drive
- USB key (for backups)
- Lab 8 Log Book
Linux Command Reference
Networking Utilities
Managing Services
Additional Utilities
Configuration Files
Investigation 1: Install And Configure A DHCP Server
This lab will have you configure a DHCP server. The term DHCP stands for Dynamic Host Configuration Protocol. DHCP allows computers (eg. workstations, notebooks, smart-phones) to be automatically configured to communicate over the TCP/IP network. This automatic configuration is absolutely required on any network with mobile devices. Other network devices such as Wireless Routers can provide dynamic configuration. This should be taken into account when designing your network. DHCP configuration allows for various setups including: Dynamic, Automatic, and Static allocation.
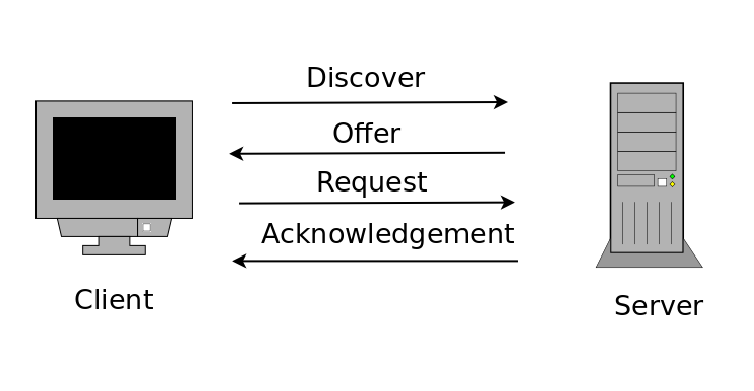
The term DORA best describes how DHCP Works:
| Term | Usage |
|---|---|
| Discovery | The client broadcasts a message (IP lease request) on a sub-network to discover available DHCP servers. |
| Offer | The DHCP server receives the request from the client, reserves an IP ADDRESS for the client and sends a DHCPOFFER to the client. |
| Request | After receiving a DHCPOFFER, the DHCP client broadcasts a message request for acceptance (DHCPREQUEST) to all DHCP servers and, in doing so, the DHCP client notifies all DHCP servers which DHCP server this DHCP client is requesting acceptance from. |
| Acknowledgement | The DHCP server identified in the DHCPREQUEST sends a message of acceptance to the client and the client then receives from that DHCP server a packet of information containing the lease duration and other configuration information. |
Part 1: Installation of the DHCP Server
VM Backups and System Updates
Before proceeding with this lab make certain that you have backed-up your VM's from lab7, and then perform a update on all VMs
Perform the following steps:
Boot up your debhost and launch your deb3 VM.
Switch to your deb3 VM and start a sudo shell.
- The version of DHCP server that comes with Debian is maintained and distributed by the Internet Software Consortium (https://www.isc.org/). The source package that you can download from ISC includes not only the DHCP server, but also a DHCP client and a DHCP relay agent. Debian separates it into two .deb packages: the isc-dhcp-client package and the isc-dhcp-server package. The client package is installed by default by the workstation installation.
To check if you have the packages installed:
# To check if you have the server package installed
dpkg -l isc-dhcp-server

# To check if you have the client package installed
dpkg -l isc-dhcp-client
- Install the dhcp server package:
# Install dhcp server
apt install isc-dhcp-server
The service will attempt to start right away but will fail because it is not configured properly.
- Find out what your network interface is called
# Display network interfaces
ip --brief link
- Edit the file /etc/default/isc-dhcp-server and add your interface
INTERFACESv4="enp1s0"
- List the files installed by the package
# List files installed from a package
dpkg -L isc-dhcp-server | less
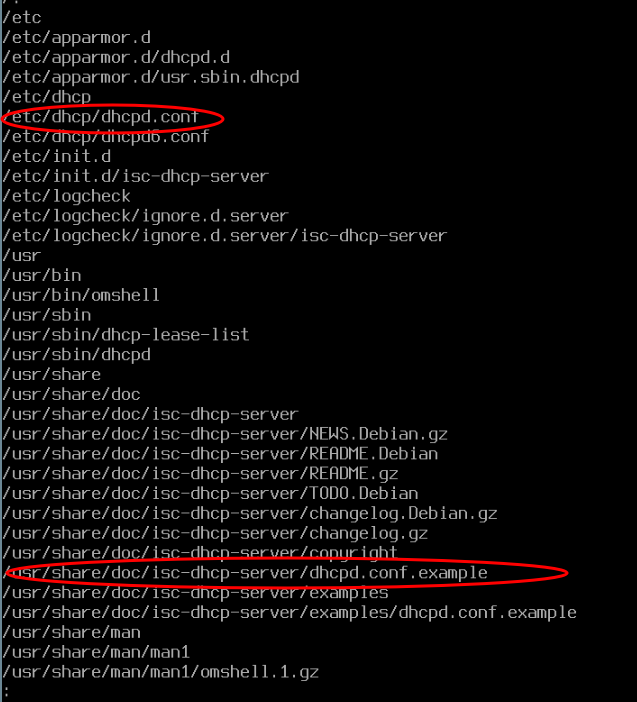
You can see the location of the IPv4 config file and you can also see that in the documentation directory there is an example file.
It is worthwhile to investigate the documentation directory of a package. They often contain useful information about the package including Debian specific information.
Part 2: Configuring the DHCP Server
Perform the following steps:
- Remain in your deb3 VM for this section.
- Click on the following link to access the online manual page for the dhcpd.conf file to gain an understanding of the parameters being modified
The dhcpd.conf file allows the Linux system administrator to customize the DCHP server. Generally, this file contains global settings (options that apply throughout the entire network) and subnet declarations (options that apply only to that subnet). Whenever changes are made to this file, the DCHP service will need to be reloaded to allow new settings to take effect.
NOTE: Any errors in this file (such as typos or missing semi-colons) can cause the DHCP server not to restart!
- Edit the /etc/dhcp/dhcpd.conf file and examine the top section of the file.
Change the existing global options with the newer values shown below, if the dhcpd.conf file is empty, add them manually:
# option definitions common to all supprted networks...
option domain-name "ops245.org";
option domain-name-servers 192.168.245.1;
default-lease-time 600;
max-lease-time 3600;
- Note: Any values for time are stated in seconds.
- Note: Carefully check for errors (check for missing semicolons).
Part 3: Configuring the DHCP Server to lease dynamic addresses to our network
Perform the following steps:
- Remain in your deb3 VM for this section. (and in a sudo shell)
- Edit /etc/dhcp/dhcpd.conf
- Review the file for example subnet declarations.
- Note the syntax and the directive for range, and the option for routers (gateway).

At a minimum, the subnet declaration must include:
  - Subnet address
  - Subnet Netmask
  - Default Gateway Address (option routers)
  - A range of valid addresses that can be leased to DHCP clients
NOTE: When declaring ranges of addresses it is important to consider that often there are multiple DHCP servers on the network. Each should be configured with unique ranges. In other words the ranges cannot overlap or you could have 2 clients recieve the same address.

Subnet declarations can also supply additional options or override global parameters and options
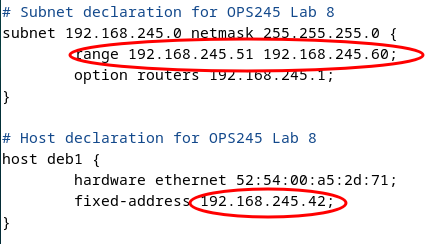
Now, add a new subnet declaration for your virtual network:
- The network address/netmask is: 192.168.245.0/24
- The range of available host addresses should be from: 51 to 60
- The Default Gateway (routers) for the virtual network is: 192.168.245.1
Save your editing session, and exit the text editor.
Before attempting to start the service, in another terminal, monitor the system journal, displaying entries as they are added in real time.
If there are any errors in the dhcp.conf file when you start the service they will be recorded in the system journal.
- Open another terminal window (Tip: ssh into your deb3 VM from your debhost and start a sudo shell) and issue the following command:
# Monitor system journal in real time
journalctl -f -u isc-dhcp-server
- This will show you the last entries for the unit isc-dhcp-server and continue to display new entries as they are added to the journal for confirmation and troubleshooting.
- In your deb3 terminal, attempt to start the isc-dhcp-server service.
- You should see new lines being added to the journal.

- If the service starts successfully you should see success messages in the journal.
- If the service fails to start any error messages will be added to the journal.
Troubleshooting Tip:
Troubleshooting produces the best results when you are methodical in your approach.
Often a single error can generate multiple error messages as the configuration file is parsed:
- Troubleshoot the first error message before working on subsequent errors.
- When you think you have fixed the first error try to start your service and if it fails again check the journal for the next error message.
- Fix one error at a time and try again until all errors are resolved.
- If your service failed, read the errors and attempt to fix your configuration file.
- If your service starts successfully, try to generate errors by editing the configuration file and introduce an error by removing a semicolon and closing curly bracket.
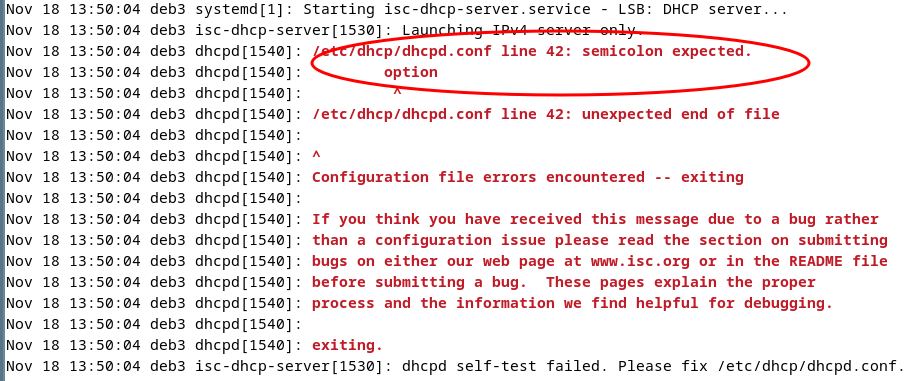
Note: When a line number is identified as the source of the error, it doesn't mean that the error is actually on that line. This is the line it was parsing when it decided that there was an error. The error could be on a preceding line. So start at the line and read up when searching for the error.
- Restart your service and observe the error messages generated. This is good practice to learn how to trouble-shoot and solve errors.
- Make certain that you have corrected all errors, and that your service starts properly.
- Reboot deb3 and start a sudo shell
- Confirm that the service successfully started at boot time.

The process that actually is running is called dhcpd
- Check the status of your network ports to see which port is being used by the dhcpd process.
# Show active tcp/udp ports
ss -atunp

Part 4: Testing the DHCP server
Identifying DHCP Lease Transaction Information
Recall that the initial DHCP lease transaction consists of 4 broadcast packets, DISCOVER, OFFER, REQUEST and ACKNOWLEDGE. A DHCP lease renewal transaction consists of just 2 unicast packets, REQUEST and ACKNOWLEDGE. You can monitor the system journal for evidence of these transactions.
Perform the following steps:
- Use your deb1 and deb3 VMs for this section.
- Connect to deb3 via ssh from debhost and monitor the journal
# Monitor journal for dhcp entries
sudo journalctl -f -u isc-dhcp-server
- On your deb1 VM, Graphically change the configuration of your network interface to receive dynamic address configuration and Apply
- Logout and restart your deb1 VM.
- Observe the messages that get added to the journal deb1 VM starts. You should see output similar to the following:

- On your deb1 VM, open a terminal, and confirm the IP address assignment using
ip address show
- Has the IP Address changed? If so, how has the IP Address been assigned according to the dhcpd.conf file settings?
- Because the setting for default-lease-time was set to 600 seconds. (10 minutes) address renewal should occur every 5 minutes (50% of lease time)
- Continue to monitor the journal until you see the REQUEST and ACK message of a renewal.

Part 5: Configuring the DHCP server to continually lease the same IP Address to the client
Reserving IP Addresses with DHCP
Devices on a DHCP network will often be configured with different leased IP addresses. Especially mobile devices. Sometimes however it is better to configure a host with an address that does not change. Allowing for DNS registrations for example.
Even though DHCP gives out IP address dynamically, it also has the ability to reserve an IP address for a certain computer. In this sense it's almost as if the client computer has a static IP even though it uses DHCP to get it. This is useful if you want to be able to put entries in your /etc/hosts file and not have to worry about the entry becoming invalid over time. In Linux we refer to this as supplying a fixed address to a host. Microsoft calls it a reservation.
Perform the following steps:
- Remain in your deb1 and deb3 VMs for this section.
- On the deb3 VM in a sudo shell edit the /etc/dhcp/dhcpd.conf file
- Examine the file and look for the examples of a host declaration

DHCP host declarations allow individual DHCP client devices on the network to receive configuration settings that are specific to that device. For example, a reserved IP address, but also other settings.
When a DHCP client requests an address from DHCP server part of the request packet includes the clients Hardware or MAC address as an identifying value. This allows a DHCP server to deliver specific configurations to specific devices.
- Get the hardware (MAC) address of deb1
# Show network interfaces
ip --brief link

Create a host declaration with the name: deb1
- Set the hardware ethernet option for the MAC address of your deb1 VM.
- Set the fixed-address option to the ip address: 192.168.245.42
Note: When supplying fixed-address it is important that the address assigned is exclusive of any ranges that have been declared. Otherwise it may be possible for 2 different hosts to receive the same address.
- Restart the isc-dhcp-server service
- Test the address assignment by disconnecting and reconnecting your interface on deb1 using the following commands:
# Bring the interface down
sudo ip link set enp1s0 down

# Bring the interface up
sudo ip link set enp1s0 up

# Show IP address
ip --brief address

Answer INVESTIGATION 1 observations / questions in your lab log book.
Investigation 2: Obtaining Lease Records on the Server and Client
Part 1: Obtaining Leased Address Information on the server
Purpose of dhcpd.leases File
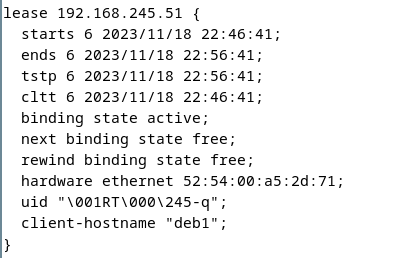
The dhcpd process records address leases records in the file /var/lib/dhcp/dhcpd.leases. If the service is restarted it reads in the file contents to know which addresses are currently leased and for how long.
Perform the following steps:
- Remain in your deb1 and deb3 VMs for this section.
- If your deb3 DHCP server successfully issued the proper IP address configuration values to deb1, check the file called: /var/lib/dhcp/dhcpd.leases in your deb3 VM. You should get the similar contents:
Part 2: Obtaining Leased Address Information on the client
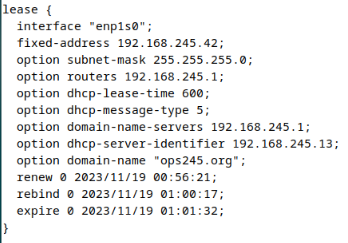
On the client deb1 check the contents of the /var/lib/dhcp directory. The dhclient.leases file in this directory is where the dhclient stores its record of leases.
- NOTE: If there are no files, then in a shell in your deb1 VM issue the command:
sudo dhclient enp1s0 - Then check to see if there is file containing lease information in that directory. You should get the similar contents:
- NOTE: If there are no files, then in a shell in your deb1 VM issue the command:
Answer INVESTIGATION 2 observations / questions in your lab log book.
Lab 8 Sign-Off (Show Instructor)
Follow the submission instructions from your Professor for lab 8 on Blackboard.
Time for a new backup!
If you have successfully completed this lab, make a new backup of your virtual machines as well as your host machine.
Perform the Following Steps:
- Make certain ALL of your deb1 and deb3 VMs are running.
- Switch to your debhost and change to your user's bin directory.
- Issue the Linux command:
wget https://raw.githubusercontent.com/OPS245/debian-labs/main/lab8-check.bash
- Give the lab8-check.bash file execute permissions (for the file owner).
- Run the shell script and if any warnings, make fixes and re-run shell script until you receive "congratulations" message.
- Follow your Professors instructions for submitting the lab.
Practice For Quizzes, Tests, Midterm, and Final Exam
- What protocol and port does dhcp use?
- What file is used to configure dhcpd?
- Can a dhcp server also be a dhcp client?
- What is the difference between max-lease-time and default-lease-time?
- What unit of measurement does default-lease-time require?
- What dhcp option is used for configuring a default gateway?
- What is the parameter range in the DHCP server configuration file used for?
- What is the purpose of a dhcp relay agent?
- Why might a dhcp relay agent be required?