Lab 5: Monitoring and Managing Hard Disk Space, Using LVM, and Scripting
Lab Preparation
Purpose and Objectives of Lab 5
The purpose of this lab is to demonstrate how a Linux system administrator can monitor hard disk space availability, and to manage file system size via the Logical Volume Manager (LVM) application. This lab will also demonstrate how to manually mount (i.e. connect) and unmount (disconnect) partitions to file system directories, and demonstrate how to have partitions automatically mounted to directories upon Linux system startup.

Monitoring Disk Space can fix problems before they become a crisis (like running low on hard disk space). We will use LVM to easily resize Linux file-systems.

Linux system administrators need to schedule Linux shell scripts and commands (via crontab) to automatically run in order to be more productive.
Main Objectives
- Monitoring Disk Space with utilities such as ssm list, df -h, and du -ah.
- Use the crontab utility to automatically schedule the execution of a shell script to "flag" low disk space.
- Use LVM to resize partitions via command-line utilities.
- Create, partition and format virtual hard disks to increase the size of file systems.
- Manually connect and disconnect directories (mount points) to existing partitions (mount, umount).
- Edit the /etc/fstab file to automatically mount partitions upon Linux server boot-up, and test the configuration prior to Linux server boot-up.
Minimum Required Materials
- Solid State Drive
- USB key (for backups)
- Lab5 Log Book
Linux Command Reference
LVM Information
| vgs | pvs | lvs | vgdisplay | pvdisplay | lvdisplay | ssm |
|---|
LVM Management
| lvextend | lvcreate | lvreduce | pvcreate | vgextend |
|---|
Miscellaneous
| mount | umount | df | du | awk | fdisk | mkfs | /etc/fstab | Using crontab |
|---|
Investigation 1: Monitoring Hard Disk Space
Part 1: Hard Disk Space Utilities
Another essential duty of a Linux system administrator is to anticipate problems and take preventative measures to avoid computer system problems before they occur. An example would be to periodically monitor hard disk space in order to make adjustments before it impacts on system performance.
Therefore, we are going to learn in this section how to monitor disk space activity to help take corrective action.
The df and du commands are useful tools for Linux system administrators to flag disk space issues and investigate their causes.
Perform the following steps:
- Boot up your debhost and launch your deb2 VM.
- Switch to your deb2 machine.
- Open a terminal.
- Issue the command:
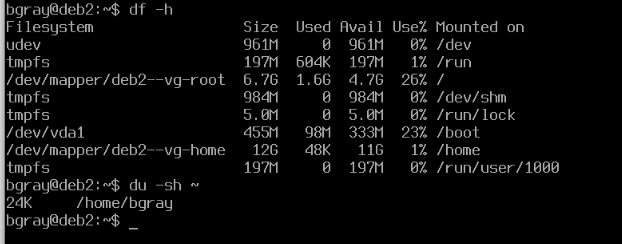
df -h
- Note the disk space usage for the / and /home partitions.
- If a partition is running out of available space, the Linux System Administrator can reallocate space among partitions or add another disk and grow the file system. The administrator can also investigate the cause of low disk space. Two examples immediately come to mind: excessive use of space from users, and potential penetration from hackers.
- To investigate excessive disk usage by regular users, the following commands would be useful, try these commands on both debhost and deb2:
# Display the total space used in each users home directories
du -sh /home/*

# Display the total space used by a directory
du -sh /home

# Display the largest files in a users home directory sorted by size
du -a ~<username> | sort -rn | head

# Display the files in a users home directory that are larger than 10M
find ~<username> -size +10M
- Read the man page for the
ducommand, make a note of the options-s -a -h - Read the man page for the
findcommand, make a note of the usage of the-sizeoption - If there is a recurring space usage problem with regular users, the Linux system administrator can impose quotas (caps on disk usage). This method is not taught in this course.
- There are a variety of methods to monitor potential penetration of a Linux system, and are taught in other courses. One method of monitoring potential penetration is use the find command (Note that find relies on the permissions of the user currently running it. Compare the results of running this command with and without sudo):
find / -size +100000k
- The next section will apply some of these tools we have discussed into a shell script and crontab entry to periodically monitor and contact the system administrator of potential disk space issues (before they become a serious problem).
Part 2: Using crontab to Automatically Alert System Administrator of Low Hard Disk Space
This section focuses on how to schedule shell scripts to run automatically without the Linux system administrator having to interact with the script. It would be highly unlikely to expect a system administrator to stay up late (eg. 2 a.m.) to manually run a script to terminate processes or to re-boot Linux servers. cron tables are used to schedule scripts to run automatically.
The cron daemon (service) is used to refer to these tables and to run the scheduled tasks. The term cron comes from the old word chronograph meaning a special type of watch (actually a stop-watch).
Please review these Bash Shell Scripting Tips before proceeding with the following steps
Perform the following steps:
- Perform this section in your debhost
- Change to your bin directory.
- Download the following shell script by issuing the following command:
wget https://raw.githubusercontent.com/OPS245/debian-labs/main/monitor-disk-space.bash
- Try to understand what this script does (refer to the man pages for the awk and cut commands).
- This script is supposed to email the root user if there are any potential partition size issues.
- We will need to install the bsd-mailx package:
sudo apt install bsd-mailx
- Add execute permissions to the script and run it as your regular user
Debian does not allow email to be delivered to root (unlike most distributions)
Instead mail to root will be redirected to the mail box of your regular user
- To check and read your local mail we will user the mail (mailx) command
# To run the local mail client
mail

# mail is an interactive tool
# Some mail commands you can enter at the & prompt:

# List mailbox
t

# Read message 1
1

# Delete message 3
d3

# Delete messages 2-5
d2-5

# Quit mail
q

# View help
help
Check to see if there are any mail messages. If there are mail messages, they do not relate to this script execution. Remove all mail messages by typing d immediately followed by a mail message number range (eg. to remove all messages. For example, if there are 5 messages, type d1-5 and then press ENTER and enter q to exit the mail application).
Edit the monitor-disk-space.bash script, and set the
alert=90value toalert=10. Then save your editing session, and re-run this script.Run the mail command. Do you have a mail message? Enter the mail message number to view the message. If there is a message, what is the purpose of this message?
Exit from the mail command.
The script as it is currently written will send the email to root. Change the
adminvariable in the script to your own username.Run the script again and make sure the email message gets delivered to your normal user.
In order to automatically run the script on a schedule, you can use the scheduler service in Linux called crontab. The term crontab stands for Chronograph Tables, where a chronograph is the old term for a timepiece (the forerunner of the modern stop-watch). You can run the crontab command to schedule commands and shell script to be run in a number of different ways.
- Quickly view the tutorial about the Using crontab file to understand the purpose of this file and how to basically set up a schedule to run a shell script.
- This particular script does not require root permissions so we can run it from our regular users crontab. Issue the following command to setup a crontab entry:
# Confirm the cron service is enabled and active
systemctl status cron

# Every user has their own cron table
# Edit the current users cron table
crontab -e
- Enter the following line in order to run at 6:00 on the first day of every month:
![]()
- Note: Make sure you put your own username in that entry.
- Save the crontab entry.
- Confirm that the entry was properly saved by issuing the following command:
crontab -l
Answer INVESTIGATION 1 observations / questions in your lab log book.
Investigation 2: Managing Hard Disk Space Using LVM
An technology called Logical Volume Management (LVM) is a very useful tool for Linux system administrators to easily manage the changing needs of disk storage, in some cases, even when the computer system is running!
LVM (Logical Volume Management) is used to manage disk storage for Linux and Unix systems. LVM provides more flexibility than traditional disk partitioning.
Volume Groups are pools of storage space provided by one or more Physical Volumes (i.e. hard disks, disk partitions, or other forms of storage devices).
Logical Volumes are then created from available space in a Volume Group, formatted with a filesystem (ie ext4), and then mounted on a particular directory in our filesystem hierarchy.
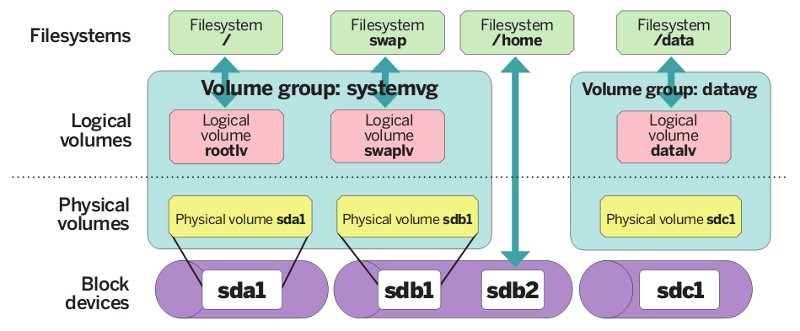
LVM allows more flexibility and growth potential for Linux systems (for example, having Logical volumes span multiple hard disks). We chose to configure our Debian VM's with LVM by during installation. Other Linux distributions may provide the capacity to install LVM.
Part 1: Managing File System Size with Existing Hard Drive
We will now use LVM in order to grow and reduce our file system, using extra unallocated space on our existing (default) virtual hard disk for our deb2 VM.
There are a variety of tools both graphical and CLI based for managing LVM storage, we will focus on the traditional LVM command line tools such as:
# List Logical Volumes
lvs

# List Physical Volumes
pvs

# List Volume Groups
vgs

# More detailed information
lvdisplay
pvdisplay
vgdisplay

# Partition a physical disk
fdisk

# Format a device with a filesystem
mkfs

# Some commands for making LVM changes
pvcreate
vgcreate
vgextend
vgreduce
lvcreate
lvextend
lvreduce
Perform the following steps:
- Remain in your deb2 VM for this section.
- Launch an interactive sudo shell:
# List the virtual disk devices
ls /dev/vd*

# List the LV's
lvs

# List the VG's
vgs

# List the PV's
pvs

# List the mounted storage devices
df -h

You can see that we have a single virtual disk (vda) which has 3 partitions (vda1, vda2, vda5)
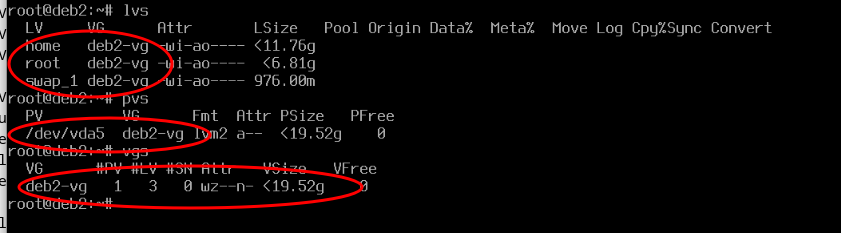
You can see we have 3 LV's (home, root, swap_1) that come from the same VG (deb2-vg).
You can see we have a single PV (/dev/vda5) that has been added to the deb2-vg VG.
You can see we have a single VG (deb2-vg) that has a single PV and 3 LV's
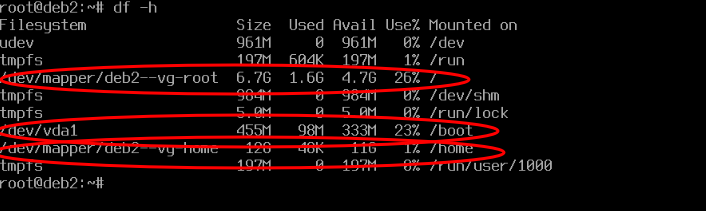
You can see that the home and root LV's are mounted on /home and / directories. Make note of the filenames and path of the LV devices
You can also see that the partition /dev/vda1 is mounted on /boot
The /boot directory contains all of the files required to boot the operating system. These files must be stored on a traditional partition because the LVM devices are unavailable until after the system boots
- Check to see if there is any remaining space on your existing hard disk. Can you see any?
# List partitions on /dev/vda
fdisk -l /dev/vda
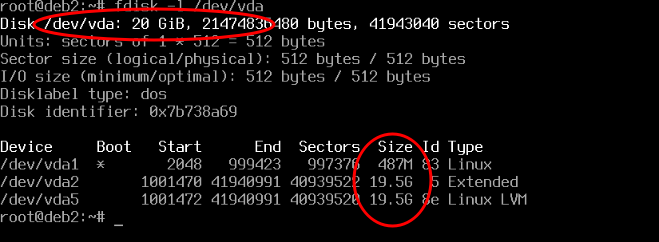
You can see that all of the space has been allocated to existing partitions, so we will add a 2nd Virtual Disk to the VM.
- Click on the View menu in the virt-viewer and select Details...
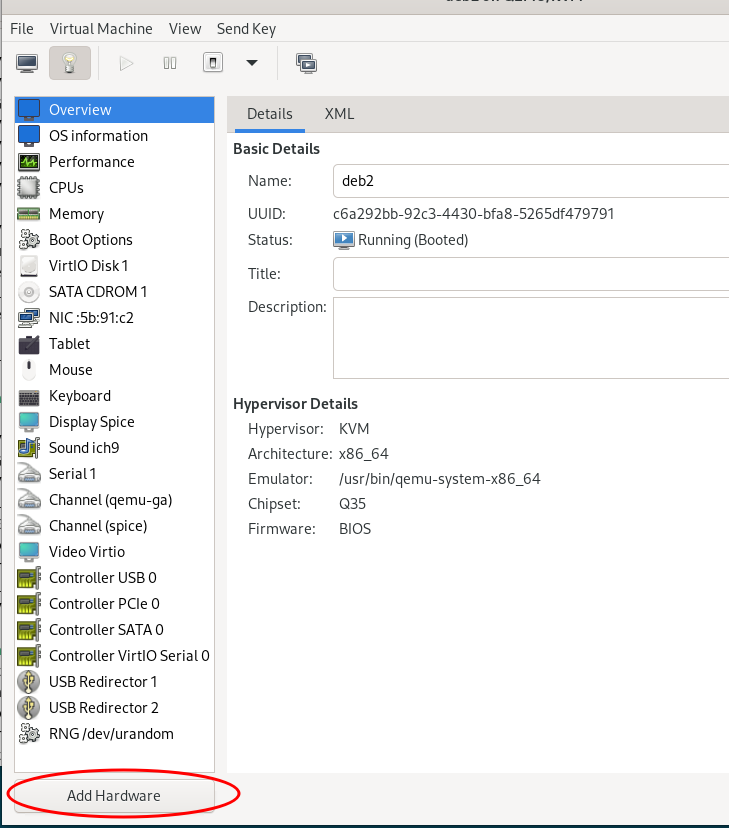
- Add a 3G Storage disk image
- Switch back to Console view
- List the virtual disk devices in /dev
# List virtual disk devices
ls /dev/vd*

You can see a new device /dev/vdb.
- Create two new partitions on /dev/vdb using fdisk:
fdisk /dev/vdb
In fdisk, create your first new partition:
- Type n to create a new partition
- Type p for primary
- Type 1 for partition number
- Hit enter for the default First sector
- Type +2G for Last sector
- Type p to display the partition table and check your work so far.
In fdisk, create your second new partition:
- Type n to create a new partition
- Type p for primary
- Type 2 for partition number
- Hit enter for the default First sector
- Hit enter for the default Last sector
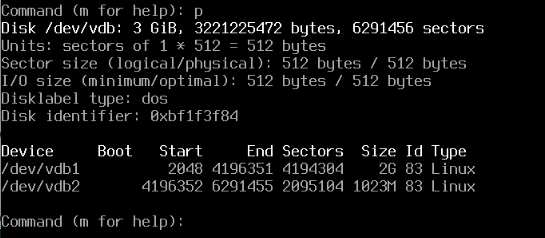
- Type p to display the partition table to check your work and confirm it matches the attached screenshot.
- Type w to save the changes to the partition table.
You should now have 2 new partitions on /dev/vdb

- Now label /dev/vdb1 as a Physical Volume and add it to the existing Volume Group (deb2-vg)
# Label /dev/vdb1 as a PV
pvcreate /dev/vdb1

# Add /dev/vdb1 to the deb2-vg VG
vgextend deb2-vg /dev/vdb1
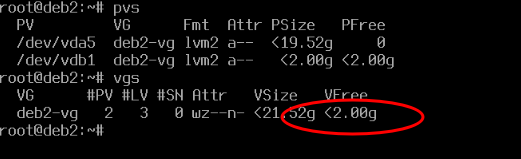
- Now there should be an additional 2G of space available in the VG. Confirm the changes using the commands above
- Check the man page for the lvcreate command, make note of the -L and -n options
- Create a new logical volume by issuing the following command:
# Create new LV archive
lvcreate -L 1G -n archive deb2-vg
NOTE: Logical volumes are represented by a couple of different filenames below /dev which are themselves symlinks to a more obscsure name
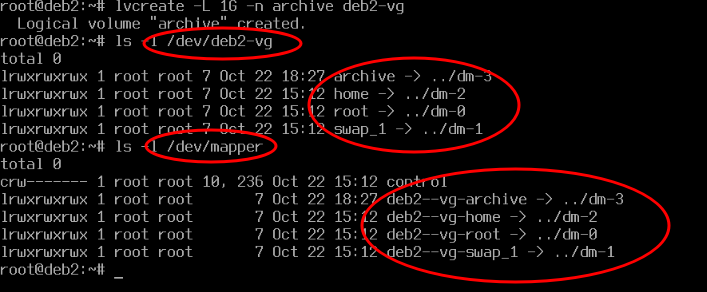
- Check the output of lvs, pvs, and vgs commands. You can see that your deb2-vg still has 1G of space free.
- Format your newly-created LV as ext4 by issuing the command:
mkfs -t ext4 /dev/deb2-vg/archive
- Read the man page for lvreduce and check for the -L option. What is the significance of prefixing the size with "+" or "-"?
Note: lvextend and lvreduce can make relative changes to an LV's size by adding to or subtracting from the current size. Omitting these prefixes will set the LV size to what you specified.
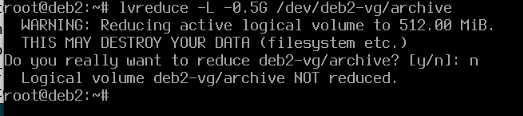
- Attempt to reduce the archive LV size by issuing the command: DO NOT SAY 'y' to confirm the command!!
lvreduce -L -0.5G deb2-vg/archive
The 1G archive LV contains an ext4 filesystem that is also 1G in size to fill the device. When the LV size is reduced, the filesystem format on it also needs to be resized, or it will be corrupted.
Also if an LV is increased in size with lvextend the filesystem on it also needs to extended to make the new space usable.
Both the lvextend and lvreduce commands have a -r option which causes the filesystem format to also be resized
- Reduce the archive LV with the command:
lvreduce -r -L -0.5G deb2-vg/archive
Issue commands to confirm the change
Now increase the size of the archive LV with the command:
lvextend -r -L +1G deb2-vg/archive
- Confirm the change
One of the benefits of using LVM for storage is that often changes can be made to storage even while the system is running and in use. Currently the home LV is mounted on /home and in use but we can increase its size anyway. You still have 0.5G of space free in the deb2-vg.
Imagine you have received an email from the monitor-disk-space.bash informing you that the home LV is almost out of space. We can quickly add additional space to the LV
- Check the current usage of /home with the
df -hcommand - Increase the size of the home LV by adding all of the available space with the command:
lvextend -r -l +100%FREE deb2-vg/home
When you set a size using the -L option you are using standard storage units. (Gigabytes, Terabytes, etc) that is recalculated to the closest number of extents. Extents are a lower level unit of measurement for storage.
-l +100%FREE, using a lowercase -l changes the size by extents. In this case it will add all of the free extents remaining in the VG to the home LV
- Exit your sudo shell
Part 2: Manually & Automatically Mount Partitions
We take for granted that when our system boots, all of the storage volumes will be successfully mounted on to the filesystem. During installation when we configured the storage devices they were added to the table of automatic filesystem mounts (/etc/fstab) by the installer. Now that we have added a new LV (archive), we need to mount it to make use of its space. We will also configure the system to mount it automatically at boot time. We will do this by editing the file system table (/etc/fstab). This file contains entries to mount various file systems automatically upon start-up of the Linux system.
The Linux system administrator also has the ability to manually mount (connect) and un-mount (disconnect) partitions in order to perform maintenance on the file system (for example, un-mounting the /home partition to install software and prevent users from logging in during that process).
To mount a storage volume we need to provide the device name, the filesystem format, and the mount point.
A mount point is just a directory in the filesystem hierarchy. The directory SHOULD be empty. If a storage volume is mounted on a directory that is not empty, then the original contents of the directory will be inaccessible until the device is unmounted.
Perform the following steps to mount the archive LV
- Perform this part in your deb2 VM.
- Start an interactive sudo shell
- Create the "mount point", which is just a directory.
mkdir /archive
Note: The mount point name does not have to match the LV name, but it can make it easier to remember how they are associated. 4. For demonstration purposes only, create a couple of empty files in /archive.
# You should remember the touch command
touch /archive/file1 /archive/file2

ls -l /archive
- Use the mount command to mount the archive LV:
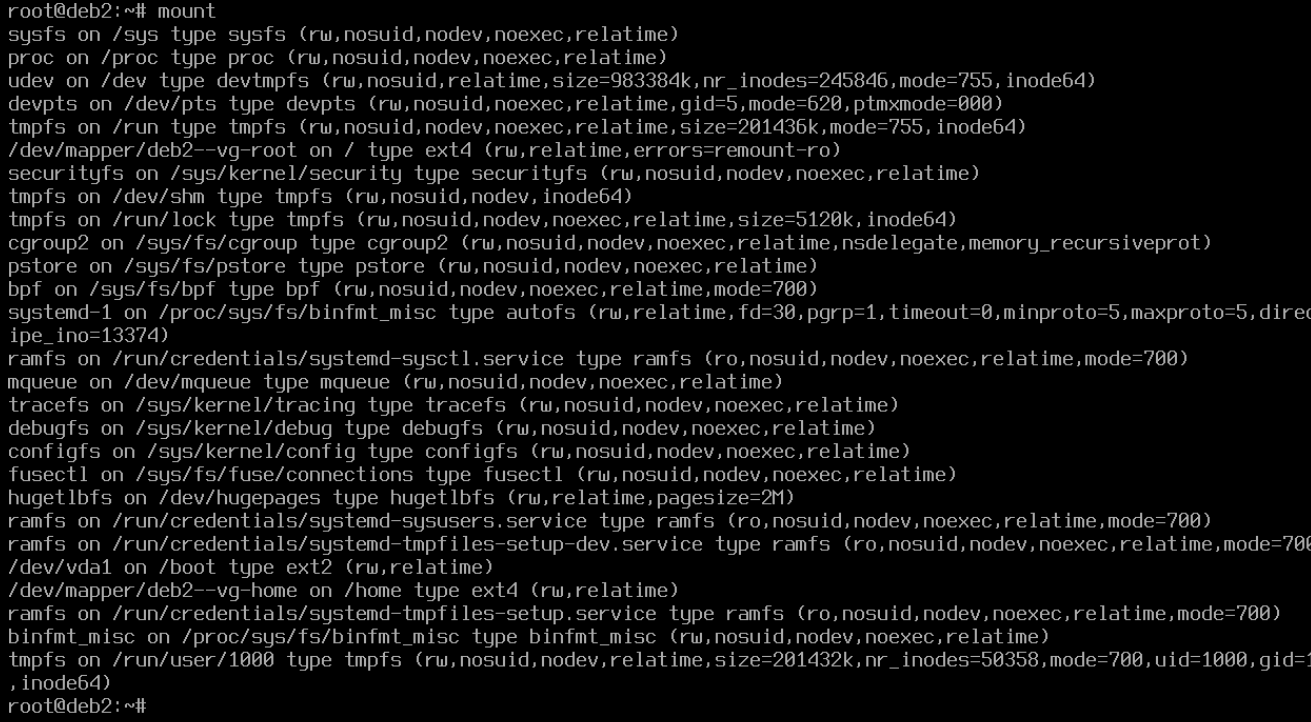
# View the currently mounted filesystems
mount

# Mount the archive LV as an ext4 filesystem on the directory /archive
mount -t ext4 /dev/deb2-vg/archive /archive

# You can use either pathname for the device
# This command would also work
mount -t ext4 /dev/mapper/deb2--vg-archive /archive

# Confirm the device is mounted
mount

# Also verify with df
df -h
- Now that the device is mounted, what happened to the contents of /archive?
- List the contents of /archive
- Are the empty files listed?
The files have not been deleted or damaged. Instead they have been "covered up" by the contents of the archive LV. They are no longer visible or accessible.
- Now manually unmount the archive LV using the umount command. (Note the spelling of the umount command)
# Unmount using device name
umount /dev/mapper/deb2--vg-archive

# OR

# Unmount using mount point name
umount /archive

# Confirm with mount or df
- List the contents of the /archive directory. What do you see?
The empty files are now visible once again. Reminding us that mount points should be empty directories.
In order to have the archive LV mounted automatically when the system boots, the filesystem table (/etc/fstab) must be edited. The mount command reads and works with the contents of /etc/fstab to determine what devices are automatically at system boot-up
- View the contents of the file-system table /etc/fstab by issuing the following command:
cat /etc/fstab
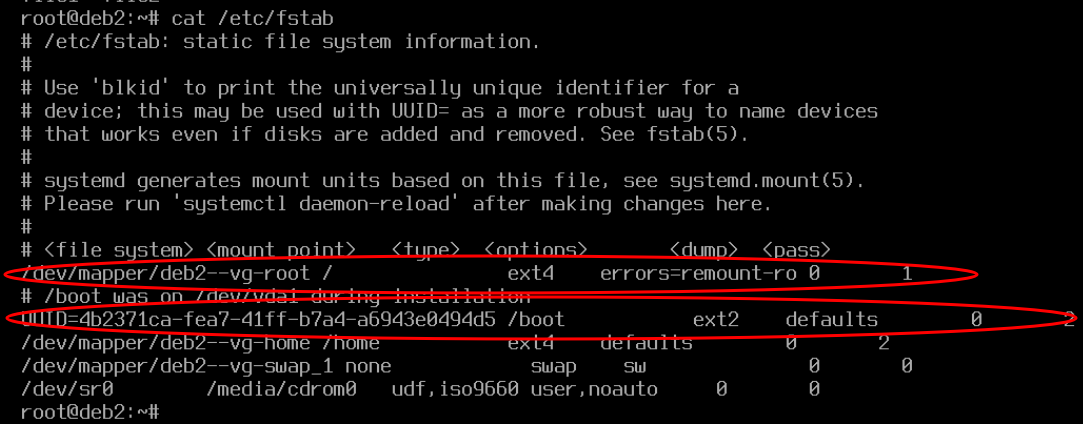
Notice that the entries in the table include fields for device name, mount point, and format type, followed by other options.
You can also see 2 different methods of identifying devices. Either by pathname under /dev/ or by UUID. (Universally Unique ID)
Other useful commands for working with storage:
# List all block (storage) devices
lsblk

# List the UUID information for storage devices
blkid
- Edit the /etc/fstab file to add an entry to automatically mount the /archive directory upon booting:
Errors in the /etc/fstab file can cause your system to fail to boot!
Edit this file VERY CAREFULLY!
- Add the following line to the /etc/fstab file
/dev/deb2-vg/archive /archive ext4 defaults 1 2
Note: do not alter any of the other lines that are already in that file.
- Before rebooting we should test the new entry with the command:
# Mount all automount devices in /etc/fstab
mount -a
- The filesystem table file /etc/fstab is read by systemd at boot time. After changing the file, systemd needs to be reloaded:
# Reload systemd
systemctl daemon-reload

# Mount all automount devices in /etc/fstab
mount -a
If there are any errors you must correct them before rebooting deb2.
- Reboot deb2 and confirm that the archive is correctly mounted.
- Perform a system update on deb2 and shutdown
Answer the INVESTIGATION 2 observations / questions in your lab log book.
Both the configuration of the deb2 VM and the contents of the disk image have changed. Remember to backup both the XML and disk image of deb2
Lab 5 Sign-Off (Show Instructor)
Perform the Following Steps:
- Make certain that your deb2 VM is running.
- Switch to your debhost machine.
- Open a shell terminal, change to your user's bin directory.
- Issue the Linux command:
wget https://raw.githubusercontent.com/OPS245/debian-labs/main/lab5-check.bash
- Give the lab5-check.bash file execute permissions (for the file owner).
- Run the shell script (with elevated permissions) and if there are any warnings, make fixes and re-run shell script until you receive "congratulations" message.
- Follow the submission instructions of your Professor.
Practice For Quizzes, Tests, Midterm & Final Exam
- What is a VG? PV? LV?
- What is the total size of the "deb2-vg" VG on your system?
- How do you create an LV?
- How do resize an LV?
- How would you add the disk partition /dev/sdb7 to your volume group "deb2-vg"?
- How would you increase the size of the root filesystem by 50 MB?
- How can you determine if a partition has been mounted onto a system?
- How can you unmount an existing partition from the file-system?
- How can you temporarily mount a partition on a file-system?
- How can you permanently mount a partition on a file-system upon boot-up?
- What are the separate elements (fields) of the /etc/fstab file?
- Describe the tools that a Linux system administrator have to monitor disk space usage.