Lab 6: Virtual Networks
Lab Preparation
Purpose and Objectives of Lab 6
In this lab, you will learn the basics of networking by using your Virtual Machines. You will first set up a virtual network among those machines. In addition, you will learn to set up local hostname resolution (/etc/hosts), service/port number resolution for troubleshooting purposes, and use shell scripts with arrays to store network configuration data.
Setting up networks is an essential operation for a system administrator. Maintaining network connectivity and securing the network are also essential operations. In this lab, we will configure a private virtual network using static IP addresses. We will learn how to setup a DHCP network in lab 8.
Main Objectives
- Configure a private virtual network for your VMs and your debhost
- Configure network interfaces for your Virtual Machines using both graphical and command-line utilities.
- Use local hostname resolution to resolve hostnames to the corresponding IP addresses
- Use common networking utilities to associate network services with port numbers for troubleshooting purposes
Minimum Required Materials
- Solid State Drive
- USB key (for backups)
- Lab6 Log Book
Linux Command Reference
Networking Utilities
Networking Configuration Files
Additional Utilities
Investigation 1: Configuring A Virtual Network
For the remainder of this course, we will focus on configuring our VM's to communicate across a (Virtual) network. This lab will focus on setting up a virtual network, connecting our VMs and debhost to the network, and configuring local hostname resolution to make it more convenient to use, troubleshoot, and protect. Lab 7 will focus on configuring SSH and making access to the virtual network more secure. Finally, lab 8 will focus on configuring a DHCP server to automatically assign an IP addresses and other configuration details to DHCP clients.
Part 1: Configuring a Private Network (Via Virtual Machine Manager)
If we are going to setup a private virtual network, there are a number of steps to perform: First, define a new private network in the Virtual Machine Manager application; and second, configure each of our VMs to connect to this new private network. In Part 1, we will be perform the first operation. In part 2, we will be performing the second operation for all VMS (graphical and command-line).
Before configuring our network, we want to turn off dynamic network configuration for our Virtual Machines by turning off the "default" virtual network. We will then define our private network.
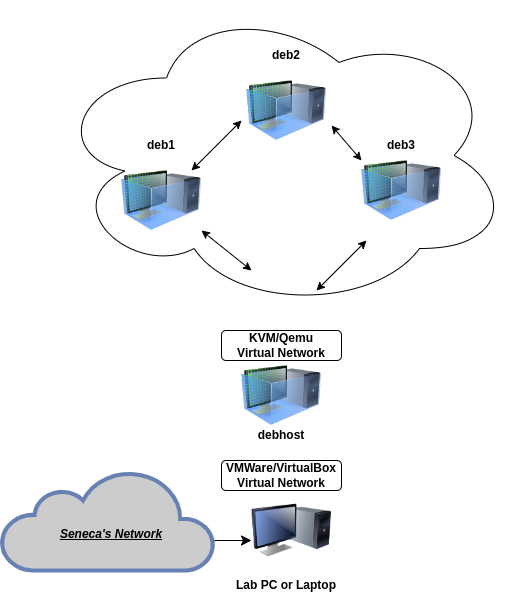
This diagram shows the current network configuration of your debhost in relation to your Virtual Machines. In this section, you will be learning to change the default network settings for both your debhost and VMs to belong to a virtual network using fixed IP Addresses.
Perform the following steps:
- Boot up your debhost and start the Virtual Machine Manager.
- Make certain that the deb1, deb2, and deb3 virtual machines are powered off.
- In the Virtual Machine Manager dialog box, select Edit-> Connection Details.
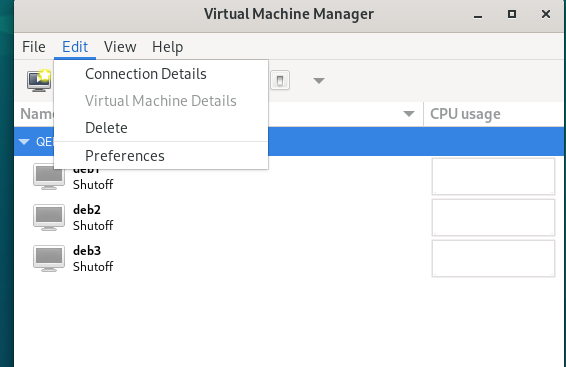
- In the Connection Details dialog box, select the Virtual Networks tab
- Click to de-select the Autostart (on boot) check-box options and click the Apply button.
- Stop the default network by clicking on the stop button at the bottom left-side of the dialog box.
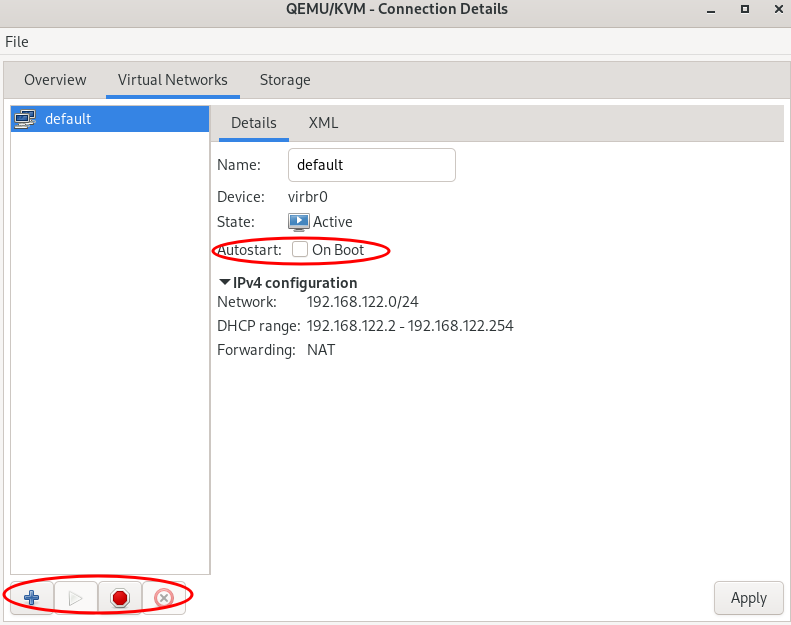
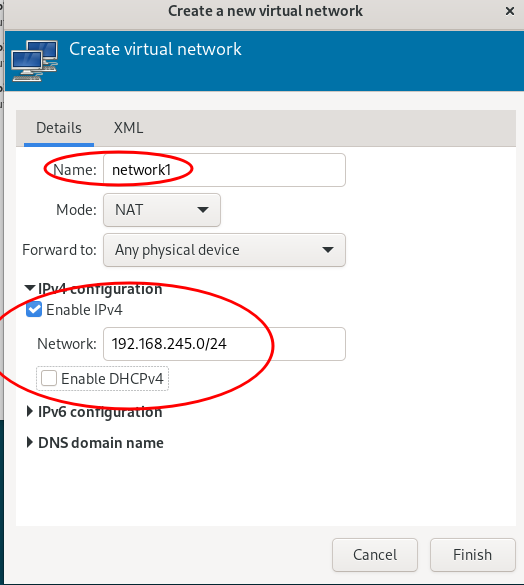
- Click the add button (the button resembles a "plus sign") to add a new network configuration.
- Type the network name called: network1.
- Click on IPv4 configuration, change the Network: address to 192.168.245.0/24
- Uncheck the Enable DHCPv4 checkbox and click the Finish button.
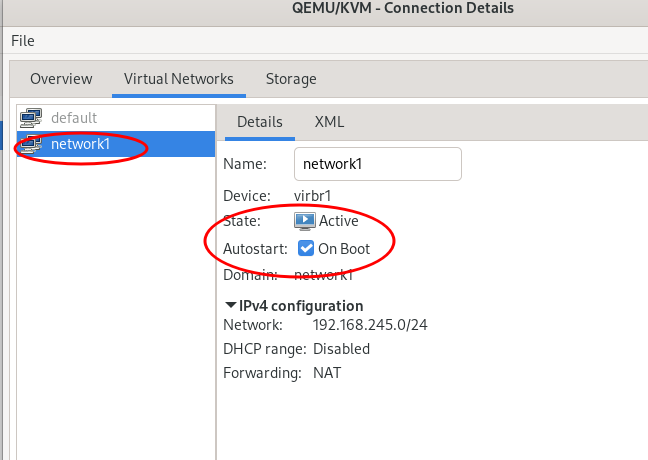
- Select network1 and make sure the State: is Active and Autostart: On Boot is enabled.
- Close the Connection Details window and open a terminal on debhost
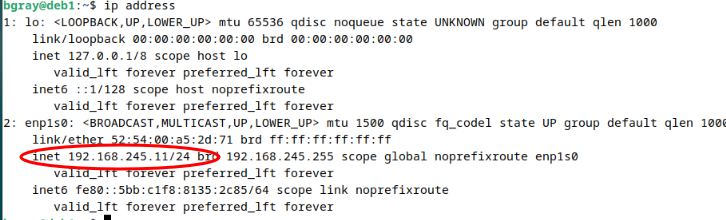
- Confirm that debhost is connected to network1 and gather network information with the following commands:
# Show network interfaces including host IPv4 address
ip address

# Show IPv4 routes including default gateway
ip route
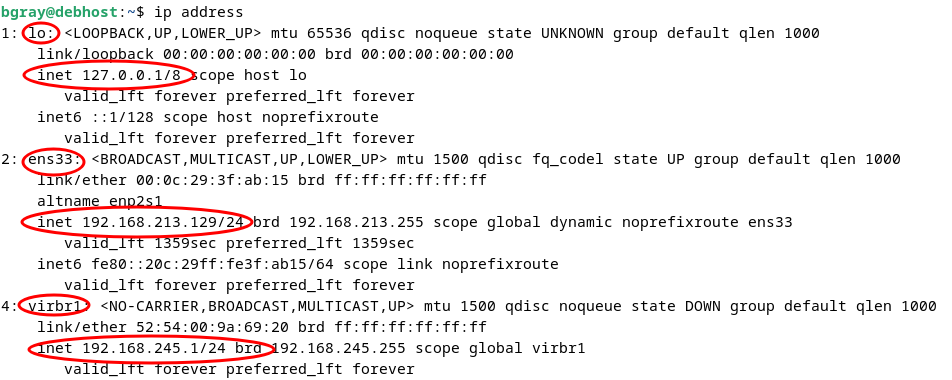
You can see that debhost has 3 network interfaces:
- lo The "loopback" interface with the reserved loopback IPv4 address of 127.0.0.1/8
- ens33 (The name will be different if you are using VirtualBox) The interface connected to the VMWare or VirtualBox virtual network.
- virbr1 The interface connected to network1 with the IPv4 address of 192.168.245.1/24
- Make a note of the IPv4 address for virbr1

You can see that debhost is configured with a default gateway (default route) that is the IPv4 address of either the lab PC or your laptop.
debhost is also connected to 2 networks. The VMWare/VirtualBox virtual network, and the KVM/Qemu virtual network network1 via the interface virbr1
We will now reconfigure each of our VMs to use our new virtual network network1
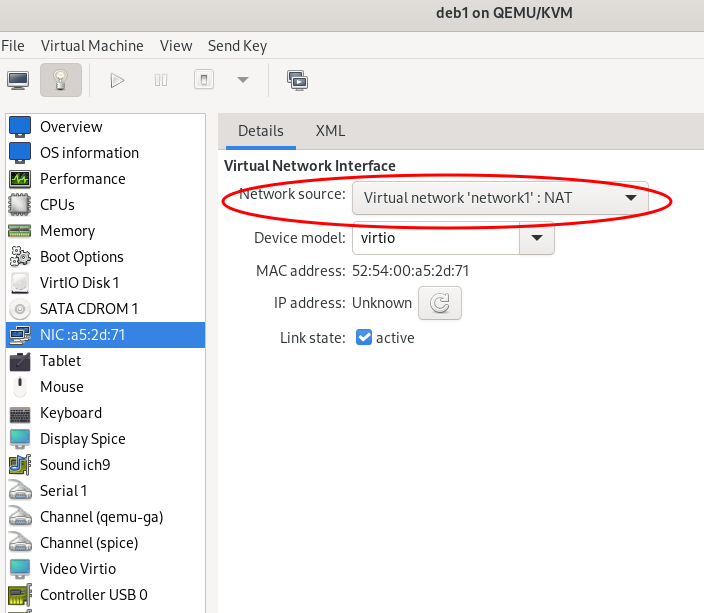
- Start with the deb1 VM. Double-click on your deb1 VM, but instead of starting the VM, click on the View menu, and select: Details
- In the left pane of the Virtual Machine window, select NIC: and note that this NIC is connected to the Network source: 'default'
- Change it to Virtual Network network1: NAT (i.e. the network that you just created) and click the Apply button.
Part 2: Configuring deb1 with a static address on 'network1'
In this section, we will be using the Gnome Settings graphical tool to connect our deb1 VM to network1.
Although the private virtual network has been setup via Virtual Machine Manager, each virtual machine has to have its interface configured with a valid static address (either graphically or by command line).
Perform the following steps:
- On your debhost, run
ip addressand make note of the IP address assigned to the virbr1 (i.e. "Virtual Bridge) interface. This will be the default gateway and DNS server for your other VMs. - Select the Console view (instead of Details), start your deb1 VM, and login.
- Within your deb1 VM, open a terminal and show the network interfaces with the command
ip address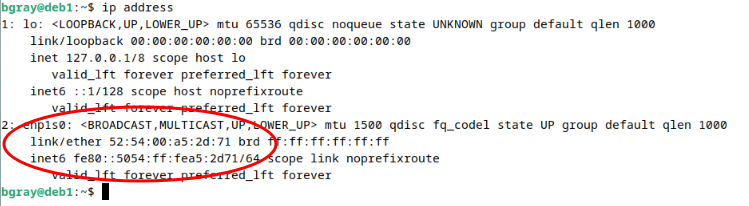
You can see the network interface does not have a IPv4 address. DHCP is not available for the network so a static address must be configured
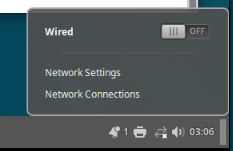
- Click on the network icon located on the status bar at the lower left corner of the desktop.
- Choose Network Connections
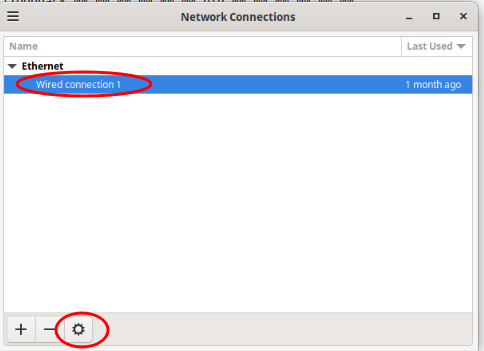
- Select Wired Connection 1 and click on the settings icon
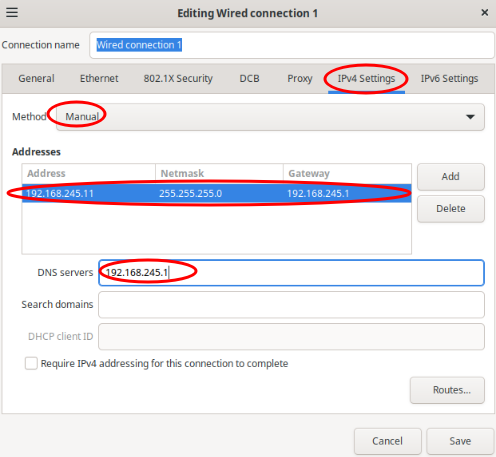
- Click on the IPv4 Settings tab
- Change the Method to Manual and Add the Address 192.168.245.11, Netmask 255.255.255.0
- The Gateway address should be the IP address of debhost (192.168.245.1)
- Add the same debhost address as the DNS server and click on Save. deb1 should connect to the network
- Open a terminal and display the network interfaces and route table to confirm the IP address and default gateway.

- To check the DNS server and test connectivity try the following commands:
# To check the DNS server address
nslookup
> server
# To resolve the Debian web server to IP address
> www.debian.org
# To resolve google to IP address
> www.google.com
# Exit nslookup
> exit
# Test IP connectivity to debhost
ping 192.168.245.1
# Test IP connectivity to the Internet
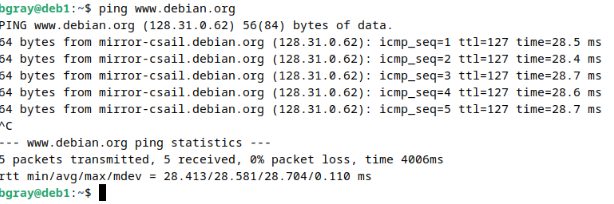
ping www.debian.org
Part 3: Configure the static network connection using command line tools (deb2 and deb3)
The deb2 and deb3 VMs are text-based only systems, we cannot use a graphical tool to configure the connection to our network. We will learn how to perform this task by editing text files and command-line tools.
Although you can use the ip command to temporarily create a static IP address connection to a network, you need to add the network settings to the /etc/network/interfaces file to automatically connect to the network upon system boot-up.
Perform the following steps:
- Just as you did with deb1 Configure your deb3 VM (in the View -> Details menu of Virtual Machine Manager) to configure the NIC interface to connect to network1, click Apply, and switch your deb3 VM view from details to console.
- Start your deb3 VM, login, and use ip address show to check the current address.
- The
ipcommand can be used to display information about the interfaces, addresses, and routes configured in the system. It can also be used to control those configurations. Try the following commands on deb3:
# Display links (interfaces on a network) and the MAC address of those interfdaces
ip link
ip -brief link

# Display configured IP addresses assigned to interfaces
ip address
ip -brief address

# Display routes and default gateway
ip route
- At this time you should see no configured routes and no IPv4 address assigned to the interface
- To add a static address and default gateway to the interface use the following commands:
# Add a static IPv4 address (you may have a different interface name)
sudo ip address add 192.168.245.13/24 dev enp1s0

# Add a default gateway address
sudo ip route add default via 192.168.245.1 dev enp1s0

# Make an interface down/up
ip link set enp1s0 down
ip link set enp1s0 up
- Confirm the effect of these commands.
- Make sure your link is in an UP state with the static address and default gateway

- Confirm your connection by pinging the addresses of debhost and deb1
- Test the connection to the Internet by pinging www.debian.org
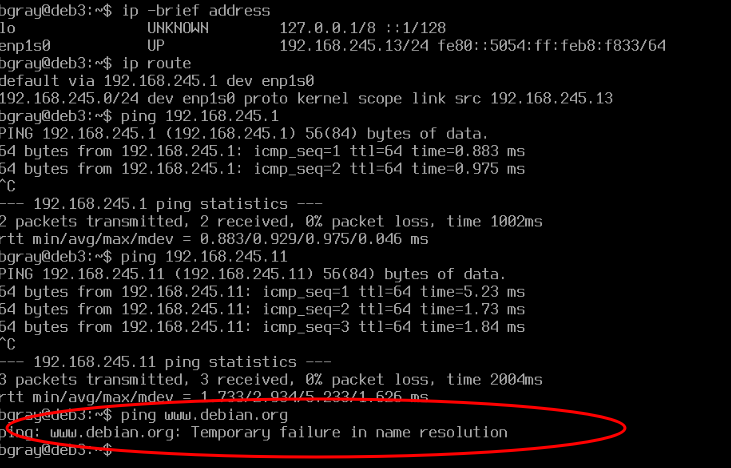
Hostname resolution via a DNS Server has not been configured
- Using
sudoedit the file/etc/resolv.confand modify the nameserver setting to the address of debhost
nameserver 192.168.245.1
- Test the connection to the Internet by pinging www.debian.org
- If everything is working, reboot deb3
- Login to deb3 and test your connection with
pingand display your configuration withip - All of the settings have been lost. They need to be made persistent by editing the /etc/network/interfaces file
- Edit the file and make the following changes to the "primary network interface" (Your interface name may be different)
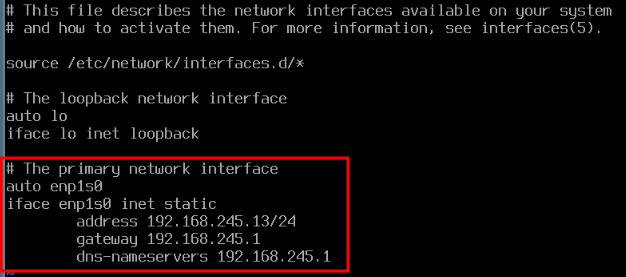
- Test the settings by bringing the interface down and then up using the commands:
# Bring down the interface
sudo ifdown enp1s0

# Bring up the interface
sudo ifup enp1s0
- Test your connection by pinging www.debian.org
- If the test is successful reboot deb3 and test again
- Now configure your deb2 VM for a persistent static network connection as well using the IPv4 address of 192.168.245.12. Don't forget to:
- configure the VM to connect to network1
- configure the interfaces file
- edit /etc/resolv.conf
- test connectivity after a reboot.
You should now be able to ping all of your VM's by address and any named host on the Internet from each of your VM's
Answer INVESTIGATION 1 observations / questions in your lab log book.
Investigation 2: Managing Your New Network
Creating private networks are an important task, but a system administrator also needs to manage the network to make it convenient to use, and troubleshoot network connectivity problems.
This investigation will expose you to useful "tools" and utilities to help accomplish this task. Lab 7 requires that you understand these concepts and have a good general understanding how to use troubleshooting utilities (like ss).
Part 1: Using /etc/hosts File for Local Hostname Resolution
It is possible to connect to other hosts on the Internet by their domain name using DNS to resolve names to addresses.
However your 4 VM's are not registered as hosts with a DNS server so are only accessible by IP address.
It can be hard to try to remember more than a couple of IP addresses. In this section, we will setup your network to use local hostname resolution so that we can connect by hostname.
Hosts files vs. the Domain Name System
On large public networks like the Internet or even large private networks we use a network service called Domain Name System (DNS) to resolve the human friendly hostnames like www.debian.org to the numeric addresses used by the IP protocol. On smaller networks we can use the /etc/hosts on each system to resolve names to addresses.
Perform the following steps:
- Complete this investigation on all of your VMs and on debhost.
- Use the
hostnameandipcommands on your debhost and all of your 3 VM's to gather the information needed to configure the /etc/hosts file on all of your Linux systems. - Edit the /etc/hosts file for the debhost, deb1, deb2 and deb3 VMs. Add the following contents to the bottom of the /etc/hosts file:
192.168.245.1 debhost
192.168.245.11 deb1
192.168.245.12 deb2
192.168.245.13 deb3
- Verify that you can now ping all of your VMs from all of your VMs by the hostname instead of the IP address.
Part 2: Network Connectivity and Network Service Troubleshooting Utilities
Troubleshooting network problems is an extremely important and frequent task for a Linux/Unix system administrator. Since network services (such as file-server, print-servers, web-servers, and email-servers) depend on network connectivity, as Linux/Unix sysadmin must be able to quickly and effectively pin-point sources of network problems in order to resolve them.
Network service problems may not be entirely related to a "broken" network connection, but a service that is not running or not running correctly. The following table lists the most common listing of utilities to assist with detection of network connectivity or network service problems to help correct the problem.
Common Network Troubleshooting Tools
| Purpose | Command(s) |
|---|---|
| Network Connectivity | ping, arp, ip (replaces deprecated ifconfig) |
| Network Service Status | ss (replaces deprecated netstat) |
Read the first four sections of this blogpost about using the arp command to examine the arp cache.
Perform the following steps:
- Switch to your debhost and start a sudo shell.
- Install the
net-toolspackage. - Issue the ping command to test connectivity to your deb1, deb2, and deb3 VMs.
- Examine the contents of the ARP cache by using the command:
arpWhat is the purpose of ARP? - Check the contents of the cache again by using the command:
arp -nWhat was the difference in output? - How did the system resolve the IP address to hostname?
An important task of any System Administrator is to monitor and control the type of connections that can be received by your host. Network applications that connect to (or talk to), Servers/Daemons/Services over a TCP/IP network send requests to a particular TCP or UDP port that is open and accepting requests.
- From debhost open 2 more terminals, use the
sshcommand to connect to deb2 and deb3 - Switch to your deb1 VM, open a terminal and use
sshto connect to debhost - Switch to your deb2 VM, login and use
sshto connect to debhost - Switch back to debhost
Try out the Issue the following commands:
# Show all active UDP ports
ss -au

# Show all active TCP ports
ss -at

# Show both
ss -aut

# Show all active TCP ports and the process that opened it
ss -atp

# Show all active TCP ports numerically
ss -atn

# Show all incoming ssh connections
ss -t src :22

# Show all outgoing ssh connections
ss -t dst :22
- TCP is a connection oriented protocol that uses a 3-way handshake to establish a connection. Those ports that show a state of LISTEN are waiting for connection requests to a particular service. For example you should see the ssh service in a LISTEN state as it is waiting for connections.
- UDP is a connectionless protocol that relies on application layer protocols to handle reliability of traffic.
- From deb2 exit your ssh connection into debhost and rerun the command on the
ss -at. Instead of ESTABLISHED it should now show a state of CLOSE_WAIT. Indicating that the TCP connection is being closed. - On your debhost, try the command:
ss -atnHow is this output different? Without the -n option ss attempts to resolve IP addresses to host names (using /etc/hosts) and port numbers to service names (using /etc/services) - Examine the /etc/services file and find which ports are used for the services: ssh, sftp, http
Answer INVESTIGATION 2 observations / questions in your lab log book.
Investigation 3: Using a bash script to test connectivity to all hosts on the local network
In this investigation you will create a bash script that will ping the hosts on our local network to test if they are connected to the network.
- Create a script Write a script called ~/bin/pingtest.bash that will contains the following code:
#!/bin/bash

# ./pingtest.bash
# Script to test ping to all hosts on local network

while read line
do
    if echo $line | grep "^192.168.245" >> /dev/null
    then
        addr=$(echo $line | cut -f1 -d' ')
        host=$(echo $line | cut -f2 -d' ')
        if ping -c1 $addr > /dev/null
        then
            echo "$host online"
        else
            echo "$host offline"
        fi
    fi
done < /etc/hosts
- Read the script. Try to predict exactly what the script will do.
- Make the script executable
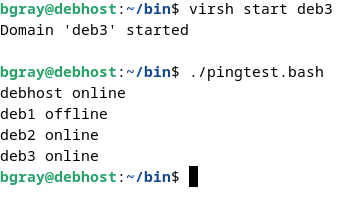
- To test the script make sure deb1 is shutdown and deb2 & deb3 are running.
- Run the script
- Using the example of the monitor-disk-space.bash script, modify this script to email your account if the host is offline, instead of sending output to the screen.
- Modify your crontab to run this script everyday at 6:00 AM
- Run the modified script and take a screenshot of the email you receive.
Submitting your Lab
Follow the submission instructions for Llab 6 on Blackboard.
Time for a new backup!
If you have successfully completed this lab, make a new backup of your virtual machines as well as your host machine.
Perform the Following Steps:
- Make certain that ALL of your VMs are running.
- Switch to your debhost.
- Change to your user's bin directory.
- Issue the Linux command:
wget https://raw.githubusercontent.com/OPS245/debian-labs/main/lab6-check.bash
- Give the lab6-check.bash file execute permissions (for the file owner).
- Run the shell script using sudo and if there are any warnings, make fixes and re-run shell script until you receive "congratulations" message.
- Upload screenshots of, the results of lab6-check.bash, and your email message from your pingtest.bash script, to Blackboard.
Practice For Quizzes, Tests, Midterm & Final Exam
- What is a port?
- What command will set your IP configuration to 192.168.55.22/24 ?
- What is the difference between UDP and TCP?
- What port number is used for DHCP servers?
- What is the function of the file
/etc/hosts? - What tool is used to show you a list of current TCP connections?