Lab 7: Setup and Configure SSH
Lab Preparation
Purpose and Objectives of Lab 7
Setting up a computer network is very important, but often the Linux system administrator must also perform networking maintenance which includes trouble-shooting, repairing network connection issues and maintaining network security. System administrators need to protect or "harden" their computer networks from "penetration" from unauthorized computer users. Hardening a computer system can range from running an IDS (Intrusion Detection System) to monitoring and flagging suspicious activity to implementing security policies which could range from running firewalls to setting locked screen savers on workstations.
In this lab, you will learn how to configure the SSH service in Debian to allow users to securely access and share data between authorized personnel. In addition. Topics such as, using Public Key Authentication, setting up an SSH tunnel in order to securely run graphical applications safely among computers in the network, and disabling root login into a Linux machine. You will also learn how to configure firewall rules to control the flow of packets in and out of your computer.

Preventing unauthorized access is one of the many day-to-day operations for a Linux system administrator and/or security specialist
Main Objectives
To use the ssh and scp commands to access and copy data between Linux servers in a secure manner
Configure, and start the Secure Shell Service (ssh)
- To refuse root login from remote Linux servers or limit users that are permitted to ssh into Linux servers
Generate Public/Private keypairs to enable secure authentication to Linux servers
Use ssh to tunnel Xwindow applications
Configure the firewall to set a default policy and add exceptions to the policy chains
Minimum Required Materials
- Solid State Drive
- USB key (for backups)
- Lab7 Log Book
Linux Command Reference
Networking Utilities
| ssh | ssh-keygen | ssh-copy-id | scp | sftp | ss | ip | ping | arp | iptables |
|---|
Additional Utilities
Managing Services
Configuration Files
SSH Reference
Investigation 1: Installing And Maintaining An SSH Server
So far, you have learned to use the ssh utility to establish a secure connection to a remote host in order to perform Linux administration tasks. You have issued the ssh command, which is actually the client application for ssh. In order to connect to a remote server (like your VMs, Matrix, etc) it needs to run the SSH service (aka sshd).
In this section, you will learn how to configure an SSH server and restart the ssh service for an existing VM. You will also learn how to configure, restart, and use SSH in order to create secure connections between your Linux machines (host as well as VMs).
Part 1: Confirming sshd service is Running on VMs
Perform the following steps:
Some tasks in this part of the investigation require you to be connected to Seneca's VPN.
- Install the package openconnect
- Run the following command as root (or with sudo):
openconnect --protocol=gp studentvpn.senecapolytechnic.ca -b - This should prompt you for your username and password (you could also put the user name in the command with -p)
- You'll know it is working if you check your ip address and see something in the 10.0.0.0/8 range.
- To disconnect, as root (or with sudo):
killall openconnect
Once you have connected to the VPN with either method you may continue
- Launch your deb1 and deb3 VMs.
- Switch to your debhost.
- Create a file in your current directory of your debhost with some text in it called: myfile.txt
- Issue the following command (using your Matrix login id):
# Copy file to remote host
scp myfile.txt yourmatrixid@matrix.senecapolytechnic.ca:/home/yourmatrixid
- (followed by your Matrix password)
- What did this command do?
- Issue the following single command (arguments are separated by a space - use your Matrix login id):
# Connect to remote host to execute a single command to confirm copy
ssh yourmatrixid@matrix.senecapolytechnic.ca ls /home/yourmatrixid/myfile.txt
- (followed by your Matrix password)
- What did this command do?
- Issue the following Linux command:
# Connect to remote host and display the contents of the file
ssh yourmatrixid@matrix.senecapolytechnic.ca cat /home/yourmatrixid/myfile.txt
- How do these commands differ from using issuing the ssh command without the ls or cat command? How is this useful?
- The client ssh application contains the utilities: ssh, scp and sftp (introduced in ULI101) to connect to remote Linux hosts in order to issue commands or transfer files between the Linux hosts. You can install the SSH service on your Linux server, although this has already been performed upon installation. We will now confirm that the ssh service is running on all of your VMs.
- OpenSSH should have been installed by default. Let's confirm this by issuing the command:
# List installed packages filtering for ssh
dpkg -l | grep ssh
- You should see a number of packages installed including openssh-client and openssh-server
- The openssh-server package installs a service called ssh.
- Confirm that this service is running by issuing the command:
# Check status of a service
systemctl status ssh
Note: Debian's service is called ssh but the process is called sshd.
You can use either name to refer to the service
- Now that you know the service is running, investigate what port number and protocol sshd uses by issuing the command:
# List active TCP and UDP ports with numeric output including "process"
# ss -p Requires sudo
sudo ss -atunp
- What protocol and port is the sshd process using? What is the state of the port?
- Reissue the
sscommand without the -n option. What is the difference?

- You can refer to the /etc/services file in order to determine a port number for a service. Issue the following command to confirm that port 22 is associated with ssh:
# Search for ssh port number
grep ssh /etc/services
- Make sure all of your VM's are started and confirm that the ssh service is running on all 3 of your VM's
Part 2: SSH Server Security Configuration
Any time that you configure your computer to allow logins from the network you are leaving yourself vulnerable to potential unauthorized access by penetration testers or even hackers. Running the ssh service is a fairly common practice but care must be taken to make things more difficult for those individuals that attempt to use brute force attacks to gain access to your system. Hackers use their knowledge of your system and can use password guessing programs help to gain access. They know which port is likely open to attack (TCP:22), and the name of the administrative account name (root).
Read this Securing SSH tutorial.
The Linux system administrator can configure the SSH server in order to make the SSH server less vulnerable to attacks. Examples include not permitting root login, and changing the default port number for the ssh service.
Perform the following steps using your debhost and deb1 VM:
- Change to your deb1 VM and open a terminal and start a sudo shell.
- Read the man page for the
sshd_configfile. Search for thePermitRootLoginoption and read about the possible settings. - Edit the file /etc/ssh/sshd_config and look for the option
PermitRootLogin. - Un-comment the option and change the option value to
no.

NOTE: Now any hacking attempt also has to guess an account name as well as the password. If you need root access on the host, you ssh to the host as a regular user and then use sudo to access root privileges, just like on the local system.
- As well as disabling ssh access as root, it is possible to restrict access to just the specific users that require it.
- Read the man page for the
sshd_configfile. Search for and read about theAllowUsersandAllowGroupsoptions. - Edit the file /etc/ssh/sshd_config and add a new option of
AllowUsers yourAccountName(where "yourAccountName" is your regular user account for your deb1 VM)

- In order for these changes to take affect, you need to restart the ssh service:
# Restart ssh
systemctl restart ssh
- Try using ssh from your debhost to your deb1 VM as root. Where you successful?
- Try using ssh from your debhost to your deb1 VM as your regular user account. Did it work?
- Create another user on deb1 called other, include the options to create a home directory and set the shell to /bin/bash
- Set the password for the newly-created user called other
- Try using ssh from your debhost to your deb1 VM as the account called other. Why didn't it work?
- On deb1 add the user other to the supplemental group sudo.
- Edit the file /etc/ssh/sshd_config and add a new option of
AllowGroups sudo - Comment out the
AllowUsersoption, save the file, and restart ssh - Try using ssh from your debhost to your deb1 VM as the user account called other. Did it work this time?
Monitoring access
An important task of a System Administrator is to monitor for attempts at unauthorized remote access. All ssh connection attempts are recorded in the systemd log/journal. The journalctl command can be used to view the journal messages
# View all journal entries
sudo journalctl

# View the journal entries concerning the ssh unit
sudo journalctl -u ssh

# View the journal entries concerning the ssh unit for today
sudo journalctl -u ssh --since today

# View sudo related entries since yesterday.
sudo journalctl --since yesterday | grep sudo
Note: systemd services and targets are 2 types of systemd "units"
- Check the journal entries on deb1. Try to find the entries showing the other user and the root user being denied access.
- Try to find examples of entries reporting the use of sudo
Answer INVESTIGATION 1 observations / questions in your lab log book.
Investigation 2: Additional Methods To Secure Your SSH Server
Part 1: Generating Private and Public Keys (Public Key Infrastructure)
As a method of authentication, using account passwords as the sole authentication factor is deeply flawed. Users have terrible password habits like using the same password for multiple systems/websites, using uncomplicated passwords, writing passwords down, and not changing the password. Practises such as forced frequent password changes have not greatly improved the problem. Increasingly you are seeing multi-factor authentication systems being used to improve the reliability of authentication.
We can configure ssh public/private keys to be used as a method of authentication instead. This will allow users to generate a pair of matching public/private keys, adding the public key to their account on the remote host. The private key remains on the local host. When the user attempts to connect to the remote host, ssh will use the private key to digitally sign the request. On the remote host ssh uses the matching public key to verify the signature.
Public/Private key authentication is secure and convenient, and it does eliminate many of the problems created by user behavior with passwords.
However, key files, especially Private keys must be properly taken care of. Imagine that the private key can be used to unlock a vault that contains millions of dollars.
- If you lose the key, you can't open the vault.
- If you leave the key in an insecure location, it can be copied or stolen. Somebody could steal your money.
- If you make copies of the key you are increasing the chances of it being exposed.
- If you suspect that your key has been compromised you should change the locks on the vault. (Generate new keys)

Therefore, understanding the generation and management of public/private keys is important to the security of our system.
Storing Fingerprints
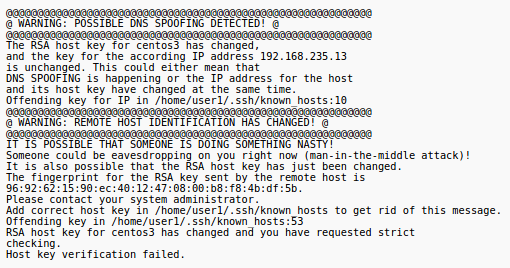
When a user connects to a host using ssh, the host sends a "fingerprint" or digital signature to the client to establish its identity. The first time a connection is established the identity must be stored for comparison during subsequent connections. The fingerprints are stored separately for each user in a file called ~/.ssh/known_hosts .

From now on when you connect to that host the client will compare the received fingerprint against the list of known hosts before connecting. If the fingerprint does not match it could indicate somebody had setup a system to impersonate the computer you wish to connect.
If you ever receive a message like the one displayed below, it means the fingerprint you received from the server does not match the fingerprint you have stored for that remote host in the file ~/.ssh/known_hosts.
You should investigate why it is happening as it could indicate a serious security issue, or it could just mean that something on the remote host has changed (i.e. the OS was reinstalled)
Perform the following steps:
- Login to your deb3 VM as your regular user account (login via the VM viewer, NOT using ssh)
- Run the following command to check the state of any possible ssh connections. What is the state (i.e. LISTENING or ESTABLISHED)?
# Display the status of ssh ports
sudo ss -atnp | grep ssh
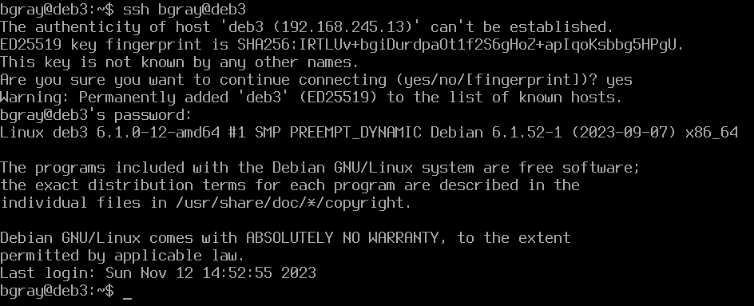
- While in your deb3 VM, issue the following command to connect to your same VM via ssh:
ssh username@deb3
- Enter yes at the prompt, and enter your password. The output should appear similar as what is shown below:
- Re-run the same ss. Is there any change to the connection status?

Note: Because we have used ssh to connect from deb3 to deb3 we can see the ports from both the client and server point of view.
- Log-out of your ssh connection by typing
exit. - Run that same ss command again. If you are fast enough you may see the port status is being closed.
- Wait a few minutes and then check again. Record your observations.
KeyPair Authentication
So far, you have learned to establish an ssh connection to another host using a password to authenticate your identity. But passwords are not the only or even the best way of authenticating your identity. We can also use Public/Private key encryption.
Public Key authentication is a method of establishing identity using a pair of encryption keys that are designed to work together. One key is known as your private key (which as the name suggests should remain private and protected) and the other is known as the public key (which as the name suggests can be freely distributed) The keys are designed to work together to encrypt data asymmetrically, that is to say that when we encrypt data with one of the keys it can only be decrypted with the other key from the pair.
If a message is encrypted using the Private key on the local host, and the server on the remote host can decrypt the message successfully using the matching Public key, then the server knows the message could only have come from the local host. The message itself is not secure because potentially any body with a copy of the Public key could read it. But the fact that it could only have come from the host with the Private key proves the identity of the client.
- Switch to your deb2 VM. Login as your regular user account
- Confirm you are in your deb2 VM by entering the command:
hostname - Consider the following commands:
# Generate a keypair
ssh-keygen

# Copy the public key to your account on the remote host
ssh-copy-id username@hostname

# Copy a specific key to your account on the remote host
ssh-copy-id -i ~/.ssh/mykey.pub username@hostname
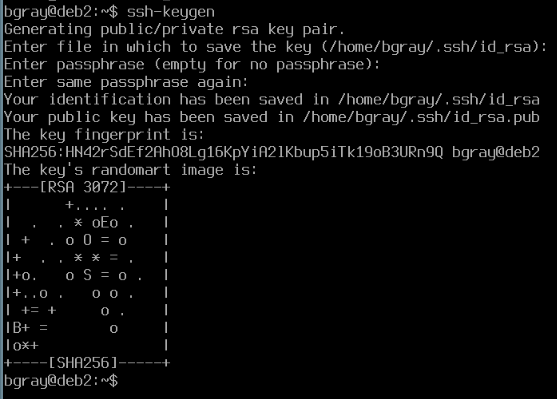
- To generate a keypair (public/private keys), issue the following command:
ssh-keygen -t rsa -b 4096
Note Without the "-t" option that allows us to specify the "rsa" type, Debian 13 will default to a new encryption format (ed25519) . The -b option allows us to set the length of the encription in bits.
After generating the keys it prompts you for the location to save the keys. The default is ~/.ssh Your private key will be saved as id_rsa and your public key will be saved as id_rsa.pub by default.
- Press ENTER to accept the default.
- You will then be prompted for a pass-phrase. The pass-phrase must be entered in order to "unlock" your private key. Pass-phrases are more secure than passwords and should be lengthy, hard to guess and easy to remember. For example one pass-phrase that meets this criteria might be "seneca students like to dance at 4:00am". Avoid famous phrases such as "to be or not to be" as they are easy to guess. It is possible to leave the pass-phrase blank but this is dangerous. It means that if a hacker was able to get into your account, they could then use your private key to access the other systems you use.
- Enter a lengthy passphrase you will remember
The output should appear similar to what is shown below:
- Now issue the command to copy your public key to your account on deb3
# Copy public key to deb3
ssh-copy-id -i ~/.ssh/id_rsa.pub username@deb3
- When prompted enter your password

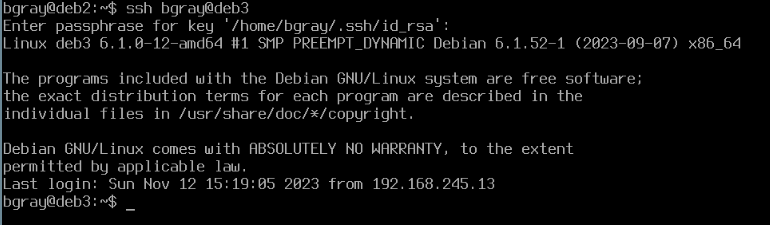
- Try using ssh to now log into your deb3 VM from your deb2 VM. What happens? Were you required to use your pass-phrase?
- Where was the Public key copied to? What file is it in?
# Display the authorized SSH keys
cat ~/.ssh/authorized_keys
This file contains the public keys that have been copied to your account

- So now you can login to deb3 from our account on deb2 without needing a password.
Note: While you still do need to enter our passphrase to unlock the key, if you had left the passphrase blank then that wouldn't have needed it. There are other tools available to help users manage and unlock keys.
Part 2: Securely Running Graphical Applications Between Linux Servers
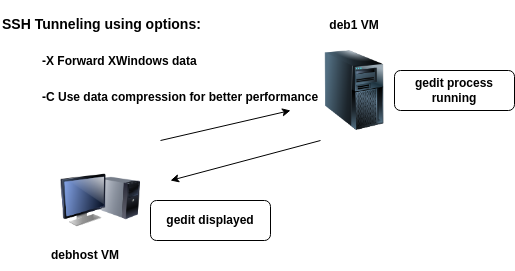
You can also use ssh to tunnel GUI applications (Window and bitmap information), allowing us to login to a remote desktop host and run a Xwindows application such as gedit or Firefox and the application will run on the remote host but be displayed on the local host.
Xorg (Xwindows, X11) is the longtime Graphical Server that has been used on Linux systems for many years. Regardless of the Desktop Environment you chose to install and use, (Gnome, KDE etc ) they all worked with XWindows.
A new graphical server has been developed that is starting to replace Xwindows called Wayland. Many Linux distributions and some Desktop Environments now default to using Wayland as the Graphical Server.
Expect things to change quite quickly.
You can use an SSH tunnel with options to allow running of applications on remote Linux servers.
Perform the following steps:
- For this section, you will be using your debhost and deb1 VM.
- Switch to your debhost, open a terminal and remain logged in as a regular user.
- Issue the following command to connect to your deb1 VM:
ssh -X -C username@deb1
- (The -X option enables the forwarding of X window information, and the -C option enables compression for better performance).
- Once the connection is properly established, run the command
gedit - The gedit window will display on your debhost, but in reality, this application is running on your deb1 VM!
- Enter some text and save the file as testfile
- Exit the gedit application.
- On which host was the file saved? debhost or deb1 What does that tell you about the use of tunneling for this section?
- Logout of your ssh connection to deb1
- Connect again and run the gedit application by issuing only one Linux command:
ssh -X -C username@deb1 gedit
- Note: ignore warning messages.
- Exit the gedit application.
- Experiment with running other GUI applications via ssh (They have to be applications installed on deb1).
Answer INVESTIGATION 2 observations / questions in your lab log book.
Investigation 3: Managing Firewalls For Protection and Troubleshooting
Linux Firewall (iptables) Concepts
Since Linux servers can be connected to the Internet, it is very important to run a firewall to control what packets are allowed to enter and exit from the system. Also what packets might be forwarded to another computer or network. You will use the utility called iptables to set the firewall rules on a Linux server.
The firewall software itself is in-kernel. It is called nftables.
nftables replaces the older iptables and can be configured using the nft utility. Debian implements the iptables utility as a "wrapper" for nft. This allows users and organizations with considerable investment in iptables configurations and knowledge to continue to use iptables syntax to configure nftables.
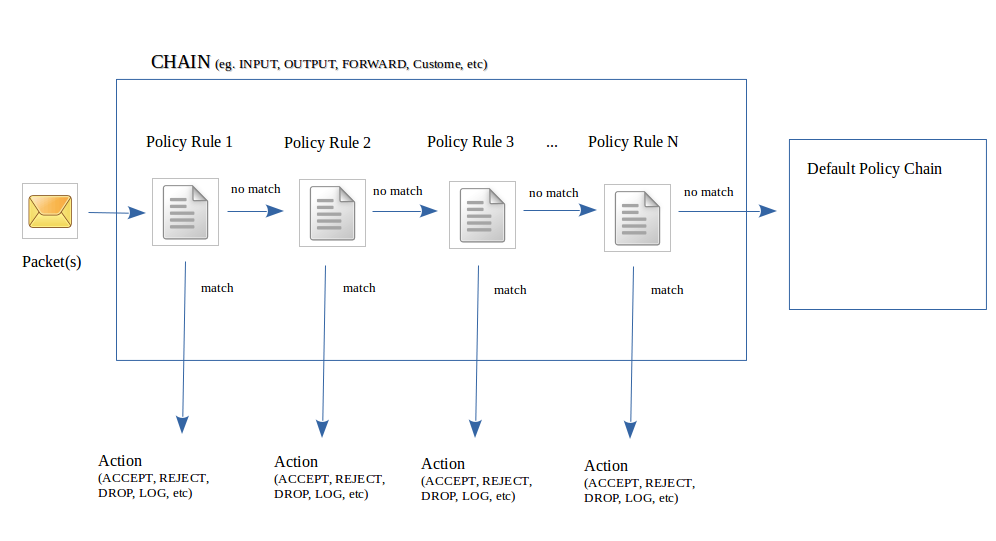
iptables configurations consist of chains of policy rules that a packet must pass-through in order to either enter, leave, or be forwarded by the firewall. If a packet matches a rule, then an action is taken (some examples include: ACCEPT, DROP, REJECT, or LOG). If the packet passes through the chain of rules without a match, then the packet is directed to the chains default policy. (for example: ACCEPT, REJECT, or DROP).
You can create your own customized chains of rules but to keep thing simple, we only deal with 3 common predefined chains:
- INPUT: Packets coming into current Linux server
- OUTPUT: Packets leaving current Linux server
- FORWARD: Packets being routed between Linux servers
Part 1: Listing and Clearing Existing iptables Rules
Let's get some practice using the iptables command such as listing CHAIN rules, and clearing the CHAIN rules:
Perform the following steps:
- For the remainder of this section, use your debhost.
- As working with the firewall requires elevated privileges start a sudo shell
- Issue the following command to list the existing iptables policy rules:
# List all rules for all chains
iptables -L
You should see all kinds of rules organized into a number of chains. This is quite overwhelming but most of these rules were added when the libvirtd service was started during boot. libvirtd has to add rules that allow our VM's to communicate over a virtual network.
For now we will shutoff our VM's and disable libvirtd to simplify everything.
- Shutdown the deb1, deb2, and deb3 VM's
- On debhost disable the libvirtd service and reboot
- After rebooting open a terminal and start a sudo shell
- Use the command above to list the iptables rules
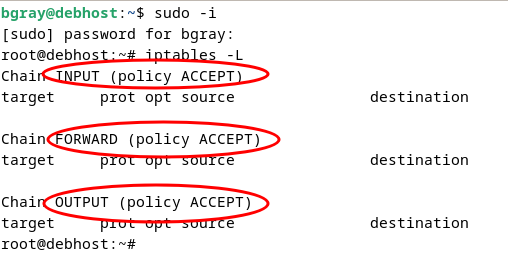
Notice that you have 3 default chains, INPUT, FORWARD, and OUTPUT
- INPUT is the chain of rules for incoming packets
- OUTPUT is the chain of rules for outgoing packets
- FORWARD is the chain of rules for packets that are being routed to other hosts/networks by our host.
Each of the chains has no current rules but they do have a default policy of ACCEPT Which means that if none of the rules in the chain rejected the packet then it would be accepted.
A default policy of DROP would mean that if none of the rules accepted the packet then it would be dropped.
Listing iptables Rules:
# List rules for all chains in the default table (filter)
iptables -L

# List rules for the INPUT chain
iptables -L INPUT

# List rules for the OUTPUT chain verbosely
iptables -v -L OUTPUT
- Issue the iptables commands separately to display the rules for the OUTPUT chain and for the FORWARD chain.
Clearing (Flushing) iptables Rules:
Sometimes it may be useful to completely clear the rules for all of a particular chain. Note the options that can be used to clear (or flush) the iptables rules,
# Flush the rules of all chains
iptables -F

# Flush the rules of the OUTPUT chain
iptables -F OUTPUT
You will have a chance to flush some rules later.
Part 2: Setting a Default Policy and Setting Policy Exceptions (iptables)
You will now change the default policy of the INPUT chain to DROP. This means you will have add rules that allow specific types of packets in. A good way to think about setting policies is to have a "safety-net" to take some sort of action to prevent un-handled packets from passing through the firewall by mistake. After the default policy is set-up, then specific exceptions to the default policy can be added to control specific network traffic.
An example would be to set a default policy for incoming network traffic (INPUT chain) to DROP everything, and then set an exception certain exceptions (like ssh connections). Note the following table below for policy setting examples.
Policy Setting Examples:
# Drops all incoming packets regardless of protocol/ports/address
iptables -P INPUT DROP

# Accepts all outgoing packets regardless of protocol/ports/address
iptables -P OUTPUT ACCEPT
| iptables -P INPUT DROP | Drops all incoming packets regardless of protocol (eg. tcp, udp, icmp), port numbers (eg. 22, 80) or source or destination IP Addresses. Setting a default rule to DROP all incoming traffic would make it easier to specify a few exceptions. |
|---|---|
| iptables -P INPUT ACCEPT | Accepts all incoming packets regardless of protocol (eg. tcp, udp, icmp), port numbers (eg. 22, 80) or source or destination IP Addresses. It would seem that setting a default rule to ACCEPT all incoming traffic would require A LOT of exceptions to help "lock-down" the server for protection! The better practice is to use DROP as the default action, and only ACCEPT the traffic you actually want. |
Perform the following steps:
- Make certain you are in your debhost.
- Issue the following Linux command:
iptables -P INPUT DROP
- Issue the iptables -L command. Can you see the policy to DROP all incoming connections?
- Open Firefox on debhost and attempt to connect to the internet. Although you have set a default policy to DROP all incoming connections, there is a problem: now, you cannot browse the Internet.
In order to fix that problem, you can make an exception(rule) to allow incoming web-based traffic (requested via port 80). The iptables commands to create rules need to consider:
- What order are the rules in the chain? (order can be important)
- Which protocol(s) are affected (eg. tcp, udp, icmp)
- What source or destination IP Addresses are affected?
- What port numbers are affected?
- What action(target) to take if all of the above conditions are met? (eg. ACCEPT, REJECT, DROP, or LOG)
iptables Command Structure for setting rules
Examples:
# Append a rule to the INPUT chain allowing incoming ssh traffic from the local network only
iptables -A INPUT -p tcp --dport 22 -s 192.168.245.0/24 -j ACCEPT

# Append a rule to the INPUT chain allowing all incoming packets to the loopback interface
iptables -A INPUT -i lo -p all -j ACCEPT

# Insert a rule into 2nd position of the INPUT chain to allow incoming traffic related to established connections
iptables -I INPUT 2 -m state --state RELATED,ESTABLISHED -j ACCEPT

# Insert a rule into 1st postition of the INPUT chain to allow incoming pings (icmp) from the local network only
iptables -I INPUT 1 -p icmp -s 192.168.245.0/24 -j ACCEPT
| Placement in Chain | Chain Name | Specify Protocol | Source/Destination | Target |
|---|---|---|---|---|
| -A (add / Append to bottom of chain) | INPUT | -p tcp (tcp packets) | -s IPADDR (source host or network address) | -j DROP |
| -I INPUT 2 (insert into 2nd position) | OUTPUT | -p udp (udp packets) | -d IPADDR (destination host or network address) | -j ACCEPT |
| -R OUTPUT 2 (replace the 2nd rule) | FORWARD | -p icmp | -i ens33 (interface name) | -j LOG (accept packet but record in logs) |
| -D FORWARD 3 (delete rule 3) | -p all | --dport 22 (destination port number) | -j REJECT (reject with error) | |
| -p tcp,udp,icmp (combined) | --sport 53 (source port numner) | |||
| (refer to /etc/protocols ) | (refer to /etc/services) |
- Issue the following Linux command to ensure the loopback interface is not affected by these rules. The computer needs to be able to communicate with itself with any state and protocol:
iptables -A INPUT -i lo -p all -j ACCEPT
- Issue the following Linux command to ensure the system can get responses to traffic it sends out:
iptables -A INPUT -m state --state RELATED,ESTABLISHED -j ACCEPT
Use Firefox on debhost to connect to the Internet your other web-browser to confirm that you can now browse the Internet. Because the incoming traffic is a response related to my established connection it is accepted.
Determine the external facing ip address of debhost
Have a classmate try to ping that external facing address. Were they successful?
Issue the following iptables command to allow incoming ping packets (icmp) from your classmate's IP address. (You will have to use your their external facing IP address on their debhost)
iptables -A INPUT -p icmp -s 192.168.213.1 -j ACCEPT
- Repeat pinging your debhost's external facing IP Address. What happened? Why?

- Have your classmate try to SSH into YOUR debhost. Were they Successful?
- Issue the following Linux command to append a rule to the INPUT chain to allow incoming ssh traffic (ie. port 22):
iptables -A INPUT -p tcp --dport 22 -j ACCEPT
- Issue an iptables command to confirm that there is a rule to handle incoming tcp packets using port 22.
- Try to SSH into your debhost (at least to get a password prompt). Were you Successful? If so, why?
- Note that the rule we entered would allow anyone who can reach your debhost to try to log in with ssh. This is not a good idea. What would you have to change about that rule to only allow the one machine you are connecting from?
- Reboot debhost open a terminal and start a sudo shell.
- List the iptables rules for the INPUT chain. What happened to your iptables rules for the INPUT chain?
- Proceed to the next part to learn how to learn how to make your iptables rules persistent.
Part 3: Making iptables Policies Persistent
Any changes to your iptables rules will be lost when you restart your Linux server, unless you make your iptables rules persistent. Failure to perform the following steps after setting up your firewall rules can cause confusion and wasted time.
Don't save copies of rules that libvirtd will auto-add every boot.
When the libvirtd service starts on debhost it adds some rules to iptables to allow the machines in your virtual network communicate with each other and the outside world. We don't want to include these rules in our configuration because it will cause the rules to be loaded twice. This won't actually break anything, but it does clutter up your iptables and make them harder to read. Before you continue with this investigation, confirm that there are no rules currently loaded.
Perform the following steps:
- Make sure that no rules are currently loaded
- Set the default policy for both the INPUT and FORWARD chains to DROP
- Append rules to the INPUT chain that allow SSH traffic from the 192.168.245.0/24 network.
- Append rules to the INPUT chain that allow SSH traffic from your debhost external facing nic.
- Append a rule to the INPUT chain to allow icmp traffic from your 192.168.245.0/24 network.
- Append a rule to the INPUT chain to allow all traffic to the lo (loopback) interface.
- Append a rule to the INPUT chain to allow all traffic that is RELATED/ESTABLISHED.
- List the INPUT chain. It should look similar to this:

- Test your rules by doing the following:
- ssh from your classmate's debhost to the external ip address of debhost
- Open Firefox on debhost and connect to a website on the Internet
- On debhost ping the loopback address 127.0.0.1
You can't test the traffic from 192.168.245.0/24 until libvirtd starts. Before you start libvirtd you should save your current rules to make them persistent.
- Save the current ruleset using the command:
# Save iptables rules in memory to a file in the correct format
iptables-save -f /etc/iptables.rules
- Verify that the file /etc/iptables.rules exists.
- Create a new script file /etc/network/if-pre-up.d/iptables
- Add the following to the file
#!/bin/bash

/sbin/iptables-restore /etc/iptables.rules
- Make the script executable
chmod u+x /etc/network/if-pre-up.d/iptables - Reboot debhost and check that the rules are restored during boot.
- Start the libvirtd service, and note the rules it adds to your iptables. It will do this automatically every time it starts.
- Enable the libvirtd service so that it starts during boot.
- After rebooting open a terminal and start a sudo shell
- List your iptables rules. If everything there?
- Start your deb1, deb2, and deb3 VM's
- Confirm that you can ping debhost and that you can connect to debhost using ssh, from each of your VM's
Answer INVESTIGATION 3 observations / questions in your lab log book.
Lab 7 Sign-Off (Show Instructor)
Follow the submission instructions for lab 7 on Blackboard.
Time for a new backup and system updates!
If you have successfully completed this lab, make a new backup of your virtual machines as well as your host machine.
Perform the Following Steps:
- Make certain ALL of your VMs are running.
- Make sure you are connected to Seneca's VPN.
- Switch to your debhost and change to your user's bin directory.
- Issue the Linux command:
wget https://raw.githubusercontent.com/OPS245/debian-labs/main/lab7-check.bash
- Give the lab7-check.bash file execute permissions (for the file owner).
- Run the shell script and if there are any warnings, make fixes and re-run shell script until you receive "Congratulations" message.
- Upload a screenshot of proof from the previous step to Blackboard, as per your Professor's instructions.
Practice For Quizzes, Tests, Midterm, and Final Exam
- What port does sshd use by defaults?
- What file is used to configure sshd?
- What kind of files are stored in the "~/.ssh/" directory?
- How do you determine whether the ssh service is running on your system or not?
- What is the purpose of the ~/.ssh/known_hosts file?
- What is the purpose of the ~/.ssh/authorized_keys file?
- How do you stop the ssh service?
- How do you tunnel XWindows applications?
- What port is the default ssh port?
- What port(s) is/are used by httpd service?