Lab 10: Advanced Shell Scripting
Main Objectives
- Explain how to configure and use Linux start-up files.
- Use arrays and associative arrays in a shell script.
- Use a for loop control using a list with command substitution and arrays.
- Use a while loop in a shell script.
- Use getopts to parse command line options.
- Use if statements for error checking in a shell script.
- Use the exit statement in a shell script.
- Create a bash shell script to generate multiple user accounts from a comma separated value (.csv) file.
- Add users to the system using a bash shell script.
Lab Reference Material
Course Slides:
- Week 12 Lecture 1 Notes: Web
Startup Files:
Control Flow Statements:
Additional Statements:
Key Concepts
Start-Up Files
Shell configuration (start-up) files are scripts that are run when you log in, log out, or start a new shell. The start-up files can be used, for example, to set the prompt and screen display, create local variables, or create temporary Linux commands (aliases)
The /etc/profile file belongs to the root user and is the first start-up file that executes when you log in, regardless of shell.
User-specific config start-up files are in the user's home directory:
- ~/.profile runs when you log in, regardless of your default shell (ie not Bash).
- ~/.bash_profile runs when you log in using a Bash shell.
- The ~/.bashrc runs when you start an interactive Bash shell.
Logout Files
There is a file that resets or restores the shell environment (including shut-down of programs running in the shell) when the user logs out of their shell. User-specific logout start-up files are in the user's home directory: ~/.bash_logout
if-elif-else Statement
The elif statement can be used to perform additional conditional tests of the previous test condition tests FALSE. This statement is used to make your logic control-flow statement to be more adaptable.
How it Works:
If the test condition returns a TRUE value, then the Linux Commands between then and else statements are executed.
If the test returns a FALSE value, then a new condition is tested again, and action is taken if the result is TRUE, then the Linux Commands between then and else statements are executed. Additional elif statements can be used if additional conditional testing is required . Eventually, an action will be taken when the final test condition is FALSE.
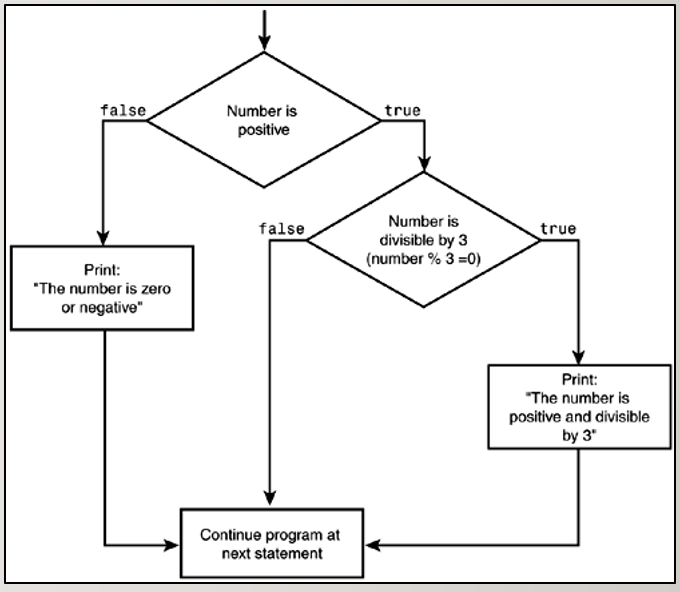
Example of how an if-elif-else statement works. (Image licensed under cc)
Example:
#!/bin/bash
num1=5
num2=10
if [[ $num1 –lt $num2 ]]; then
  echo “Less Than”
elif [[ $num1 –gt $num2 ]]; then
  echo “Greater Than”
else
  echo “Equal to”
fi
For Loop Using Command Substitution
Let’s issue the for loop with a list using command substitution. In the example below, we will use command substitution to issue the ls command and have that output (filenames) become arguments for the for loop.
Example:
for x in $(ls); do
   echo “The item is: $x”
done
While Loop
The while loop is useful to loop based on the result from a test condition or command result. This type of loop is very useful for error-checking.
How it Works:
The condition/expression is evaluated, and if the condition/expression is TRUE, the code within … the block is executed. This repeats until the condition/expression becomes FALSE. Reference: https://en.wikipedia.org/wiki/While_loop
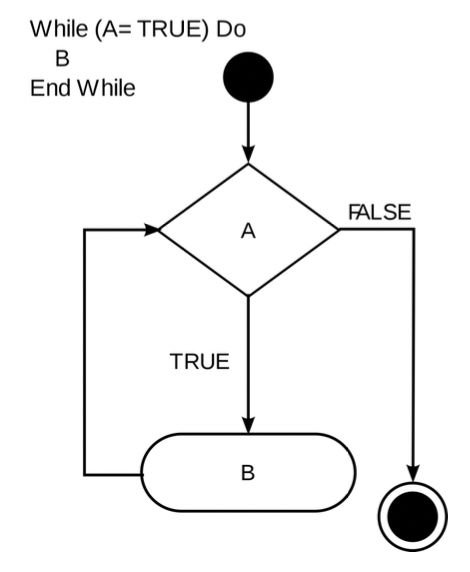
Example of how a while loop works. (Image licensed under cc)
Example 1:
#!/bin/bash
answer=10
read -p "pick a number between 1 and 10: " guess
while [[ $guess != $answer ]]; do
    read -p "Try again: " guess
done
echo "You are correct"
Example 2:
#!/bin/bash
value=1
while [[ $value -le 5 ]]; do
  echo "$value"
  ((value=value+1)) # could also use ((value++))
done
Output:
$ ./while2.bash
1
2
3
4
5
Arrays
In Lab 6 you learned about User-created variables. Variables are used to store single values. Arrays store multiple values into a single variable. Arrays in Bash are 0 indexed, which means the first element of the array is 0. The following will populate the array users with usernames:
# Populate the array users with usernames
users=("tstark" "bbanner" "thor" "srogers" "nromanoff")
To print out the elements of the array individually you can use the array name and index number:
# Access the elements
echo "${users[0]}" # Will print tstark
echo "${users[1]}" # Will print bbanner
echo "${users[2]}" # Will print thor
echo "${users[3]}" # Will print srogers
echo "${users[4]}" # Will print nromanoff
While you can print out individual elements of an array (as demonstrated above), more commonly you use a for loop to loop through an array. The following code will print each of the users on a new line using a for loop.
# Print out each element of the array using a for loop
for user in "${users[@]}"; do
  echo $user
done
Associative arrays
Associative arrays are a type of array that allows you to use arbitrary strings as keys instead of just indexed numbers. This feature is available in Bash version 4.0 and later. Associative arrays are declared using the declare -A syntax. You can add, retrieve, and delete elements using the keys. They are particularly useful for creating mappings or dictionaries where you need to associate specific keys with corresponding values, like a list of users and their information. To use an associative array you must first declare it.
# Declare the associative array userInfo
declare -A userInfo
Next you can populate the associative array with keys and values. You can do this manually, as demonstrated below. Alternatively you can read the information in from a file. This is what you will do later in the lab.
# Populate the associative array usersInfo using the username as the key, user's full name and email address as the values
declare -A usersInfo
usersInfo["tstark"]="Tony Stark,ironman@avengers.org"
usersInfo["bbanner"]="Bruce Banner,hulk@avengers.org"
usersInfo["thor"]="Thor Odinson,thor@avengers.org"
usersInfo["srogers"]="Steve Rogers,captainamerica@avengers.org"
usersInfo["nromanoff"]="Natasha Romanoff,blackwidow@avengers.org"
Exit Statements
exit Statement
The exit statement is used to terminate a shell script. This statement is very useful when combined with logic in a shell script. The exit command can contain an argument to provide the exit status of your shell script.
Example:
if [[ $# -ne 1 ]]; then
  echo "USAGE: $0 [arg]"
  exit 1
fi
Investigation 1: Using Start-Up Files
ATTENTION: This lab must be graded by the end of your classes in Week 13 to obtain a grade of 2% towards this course.
In this investigation, you will learn how to customize your Bash Linux shell environment by creating and testing a start-up file.
Perform the Following Steps:
- Launch your Ubuntu VM.
- Open the terminal application.
- Issue a Linux command to change to your home directory.
- Issue a Linux command to confirm you are located in the home directory.
- Install the curl utility:
sudo apt -y install curl
Use the more command to view the contents of the default start-up file called /etc/profile
- This file contains the default settings when you open your Bourne shell (eg. if issuing the command sh).
Use the more command to view the contents of the start-up file called /etc/bash.bashrc
- This file contains the default settings when you open your Bash shell (eg. if issuing the command bash).
- Since we are using the Bash shell by default, let's create a customized Bash start-up file.
- This startup file is located in your home directory using the name ".bashrc"
- Let's copy your .bashrc file to prevent accidental overwrite.
Issue the following linux command:
cp ~/.bashrc ~/.bashrc.bk
Use a text editor like vi or nano to create the text file called ~/.bashrc (eg.
nano ~/.bashrc)- If you are using the vi text editor, refer to notes on text editing in a previous week in the course schedule.
Add the following lines to the bottom of ~/.bashrc (the symbol "[" is the open square bracket symbol):
echo -e -n "\e[0;34m"
echo "Login information:"
echo
echo "ip: $(curl -s https://ipinfo.io/ip)"
curl -s https://ipinfo.io | egrep -e "city" -e "region" -e "country" -e "timezone" | sed -e 's/"//g' -e 's/,$//g'
echo
echo -e -n "\e[m"

echo "The following packages can be upgraded:"
apt list --upgradable
alias clearfile="cat /dev/null >"
- NOTE: You will notice there is NO she-bang line since this is a start-up file.
- Save your editing session and exit the text editor (eg. with vi: press ESC, then type :x followed by ENTER).
- You can test run the startup file without exiting and re-entering your Bash shell environment. Issue the following:
. ~/.bashrc
- What do you notice?
- Issue the alias command. Does your clearfile alias exist?
- Exit your current termninal.
- Open a new terminal session and issue the alias command. Does your clearfile alias exist? Why or why not?
- Did your start-up file customize your Bash shell environment with colours?
- NOTE: This is where you can make your Linux shell environment values persistent (i.e. saved regardless of exit and login to your Bash Shell such as aliases, umask, commands you want run on login, etc.).
- How could you make default settings in .bashrc apply to all users on the system? (hint: Look back to lab 9 Investigation 1 Part 2).
If you ever want to restore your profile to it's previous settings, you could do so by copying the backup you created file to ~/.profile by issuing the following command: mv ~/.bashrc.bk ~/.bashrc. You do not need to do this.
Logout of your Ubuntu VM and Login again.
Open a terminal session.
- What did you notice this time?
Issue the alias command. Does your clearfile alias exist?
Answer INVESTIGATION 1 observations / questions in your lab log book.
Investigation 2: Additional Looping Statements
In this investigation, you will learn additional loop statements to allow your shell scripts to be more efficient.
Perform the Following Steps:
- Login to your Ubuntu VM and open a terminal, and issue a Linux command to confirm you are located in your home directory.
- Issue a command to confirm you are located in your home directory.
Creating your Github Repo for your Labs
Use the following link to set up your lab 10 repository, and open it in GitHub Codespaces. Refer to Lab 4 for instructions. You will be using this for the BASH scripting in lab 10.
Cloning your GitHub repository in your Ubuntu VM
Issue the following command to clone your GitHub repository into your home directory.
Important: Be sure to replace
usernamein the following command with YOUR GitHub username.
git clone git@github.com:OSL645/lab-10-username
- Issue a command to confirm the repository has been cloned on your Ubuntu VM.
- Issue a command to change into your lab-10-username directory.
Confirm the contents have been written to your lab-10-username directory. You should see the following files:
- LICENSE
- README.md
- convert.bash
- createusers.bash
- createusers_test.py
- githublogo.jpg
- tux.jpg
- ubuntu.jpg
- userinfo.csv
- users1.bash
- users1_test.py
- users2.bash
- users2_test.py
- users3.bash
- users3_test.py
Writing users1.bash
You are going write a bash script to define an array of usernames, and print the usernames one at a time.
- In GitHub Codespaces, open the template for the Bash shell script called users1.bash
- Edit users1.bash file to contain the following:
#!/bin/bash
# Author:
# Date:
# Purpose: To print a list of users (from an array) one user at a time.
# Usage: ./users1.bash
#

# Populate the array users with usernames
users=("tstark" "bbanner" "thor" "srogers" "nromanoff")

# For each username in the array users
for user in "${users[@]}"; do

    # Use echo to display the username
    echo $user

# End for
done
Issue the chmod command to add execute permission for the user the users1.bash file.
Save your editing changes, stage and commit your changes to GitHub.
Using the terminal in Codespaces issue the following to run the users1.bash:
./users1.bash
- What did you notice?
> ./users1.bash
tstark
bbanner
thor
srogers
nromanoff
- Run the Python check script in GitHub Codespaces to check your work before you commit it.
./users1_test.py
- Check the exit status code. If it shows 0, it is successful.
echo $?
- Save your changes. Stage and commit your changes to GitHub.
On your Ubuntu VM, open a terminal and confirm you are in your home directory.
- Issue the following Linux command to change to the local clone of your GitHub repository.
cd lab-10-username
- Pull your changes into your Ubuntu VM
git pull
- Run your script and observe the output.
./users1.bash
- Did it work? Is the output the same as it was from the Codespaces terminal?
Writing users2.bash
You are going write a bash script to populate an array of usernames from a csv file using command substitution, and print the usernames one at a time.
- In GitHub Codespaces, open the template for the Bash shell script called users2.bash
- Edit users2.bash file to contain the following:
#!/bin/bash
# Author:
# Date:
# Purpose: To populate the array users from the file userinfo.csv, and print a list of users, one user at a time.
# Usage: ./users2.bash
#

# Populate the array users with usernames from the file userinfo.csv
users=($(cut -d"," -f1 userinfo.csv))

# Print a heading
echo "Usernames:"

# For each username in the array users
for user in "${users[@]}"; do

    # Use echo to display the username
    echo "$user"

# End for
done
Issue the chmod command to add execute permission for the user the users1.bash file.
Save your editing changes, stage and commit your changes to GitHub.
Using the terminal in Codespaces issue the following to run the users1.bash:
./users2.bash
- What did you notice?
> ./users2.bash
Usernames:
tstark
bbanner
thor
srogers
nromanoff
- Run the Python check script in GitHub Codespaces to check your work before you commit it.
./users2_test.py
- Check the exit status code. If it shows 0, it is successful.
echo $?
- Save your changes. Stage and commit your changes to GitHub.
On your Ubuntu VM, open a terminal and confirm you are in your home directory.
- Issue the following Linux command to change to the local clone of your GitHub repository.
cd lab-10-username
- Pull your changes into your Ubuntu VM
git pull
- Run your script and observe the output.
./users2.bash
Did it work? Is the output the same as it was from the Codespaces terminal?
On your Ubuntu VM change to the lab-10-username repo directory:
cd lab-10-username
- Issue the following to run a checking script:
lab10-check-1
- If you encounter errors, make corrections and re-run the checking script until you receive a congratulations message, then you can proceed.
In the next investigation, you will learn more about the for loop, while loop and error-checking.
Answer INVESTIGATION 2 observations / questions in your lab log book.
Investigation 3: Logic Within Loops and exit statements
In this investigation, you will learn more about the for loop and error-checking.
The exit statement is used to terminate a shell script. This statement is very useful when combined with logic in a shell script to display an error message if the command was improperly executed and terminate the running of the shell script.
The exit command can contain return a value to provide the exit status of your shell script (i.e. TRUE or FALSE value).
Writing users3.bash
You are going write a bash script to populate an associative array of usernames from a csv file which has been provided by the user as a command line argument. You will then print the usernames, full name and email one at a time separated into columns with appropriate headings.
- In GitHub Codespaces, open the template for the Bash shell script called users3.bash
- Edit users3.bash file to contain the following:
#!/bin/bash
# Author:
# Date:
# Purpose: To populate the array users from a file specified by the user as a command line argument, and print a list of users, one user at a time.
# Usage: ./users3.bash <filename>
#
# Error Codes:
#   1 - Incorrect number of command line arguments
#   2 - File does not exist

# If the number of command line arguments is not equal to 1
if [[ $# -ne 1 ]]; then

    # Use echo to display a message indicating the correct usage of the script
    echo "Usage: ./users3.bash <filename>"

    # Exit the script with an exit status of 1
    exit 1

# End if
fi

# If the file specified does not exist
if [[ ! -f $1 ]]; then

    # Use echo to display a message indicating that the file does not exist
    echo "The file $1 does not exist."

    # Exit the script with an exit status of 2
    exit 2

# End if
fi

# Declare associative array userInfo
declare -A userInfo

# Read the file line by line and populate the associative array userInfo
while IFS=, read -r user name email; do
    userInfo["$user,name"]="$name"
    userInfo["$user,email"]="$email"
done < "$1"

# Print a heading
printf "%-9s\t%-20s%-10s\n" "Username" "Full Name" "Email"

# For each user in the associative array, print the username, full name, and email
for key in "${!userInfo[@]}"; do

    # If the key contains ",name", then
    if [[ $key == *",name" ]]; then
        user=${key%,*}

        # Use printf to display the username, full name, and email separated by a tab
        printf "%-9s\t%-20s%-10s\n" "$user" "${userInfo[$user,name]}" "${userInfo[$user,email]}"

    # End if
    fi

# End for
done
Issue the chmod command to add execute permission for the user the users3.bash file.
Save your editing changes, stage and commit your changes to GitHub.
Using the terminal in Codespaces issue the following to run the users3.bash (without arguments):
./users3.bash
- What did you notice?
- Since there are no arguments, the test within the running shell script returns FALSE, then an error message with feedback of how to properly issue the shell script with an argument and then terminates the Bash shell script.
- Notice that the $0 positional parameter displays the name of the currently running shell script in the USAGE message. This is useful in case you decide to change the name of the shell script at a later time.
- The symbol >&2 redirects standard output from the USAGE message to standard error making like a real error message.
- This "neat redirection trick" will NOT be considered for evaluation for this coverage.
- Issue the following Linux command:
echo $?
- What does this exit status from the previously issued command indicate?
- Issue the following command (with two arguments and redirecting stderr to a file):
./users3.bash users.csv 2> error.txt
- What did you notice this time?
- Issue the following Linux command:
echo $?
- Issue the following Linux command to confirm that stderr was redirected to a file:
cat error.txt
- Using the terminal in Codespaces issue the following to run the users3.bash:
./users3.bash userinfo.csv
- What did you notice?
> ./users3.bash userinfo.csv
Username      Full Name           Email
tstark        Tony Stark          ironman@avengers.org
bbanner       Bruce Banner        hulk@avengers.org
thor          Thor Odinson        thor@avengers.org
srogers       Steve Rogers        captainamerica@avengers.org
nromanoff     Natasha Romanoff    blackwidow@avengers.org
- Run the Python check script in GitHub Codespaces to check your work before you commit it.
./users3_test.py
- Check the exit status code. If it shows 0, it is successful.
echo $?
- Save your changes. Stage and commit your changes to GitHub.
On your Ubuntu VM, open a terminal and confirm you are in your home directory.
- Issue the following Linux command to change to the local clone of your GitHub repository.
cd lab-10-username
- Pull your changes into your Ubuntu VM
git pull
- Run your script and observe the output.
./users3.bash userinfo.csv
Did it work? Is the output the same as it was from the Codespaces terminal?
Issue the following to run a checking script:
lab10-check-2
- If you encounter errors, make corrections and re-run the checking script until you receive a congratulations message, then you can proceed.
Answer INVESTIGATION 3 observations / questions in your lab log book.
Investigation 4: Converting images from the command line with a script
The convert command is a powerful tool in the Linux command line that allows you to convert images from one format to another with ease. This command is part of the ImageMagick suite, which provides a robust set of tools for image manipulation. The basic syntax for converting an image is:
convert sourcefilename.bmp destinationfilename.jpg
For example, to convert an image from PNG to JPG format, you would use:
convert example.png example.jpg
This command can handle a wide variety of image formats, including PNG, JPG, BMP, and many others. By leveraging the convert command, you can efficiently manage and transform your image files directly from the command line.
convert sourcefilename.bmp destinationfilename.jpg
Writing convert.bash
You are going write a bash script that:
- Populates an array of image filenames using command substitution
- Loops through the array using a for loop
- Converts each image from a .jpg to a .png
Using a bash script with an array and a for loop to convert images offers several benefits:
- Efficiency: By storing directory contents in an array and using a for loop, you can convert all images in a directory with a single script execution.
- Flexibility: The
convertcommand supports various image file types (e.g., .png, .jpg, .bmp). You can easily modify the script to handle different file extensions. - Simplicity: The script simplifies the conversion process, making it easy to manage and execute, regardless of the number of files in the directory.
- In GitHub Codespaces, open the template for the Bash shell script called convert.bash
- Edit convert.bash file to contain the following:
#!/bin/bash
# Author:
# Date:
# Purpose: To convert all .jpg files in the current directory to .png.
# Usage: ./convert.bash
#

# Populate the array images with all the filenames of all .jpg files in the current directory (without their extension).
images=($(ls | grep "jpg$" | sed 's/\.jpg/ /'))

# For each filename in the array images
for file in "${images[@]}"; do

    # Convert the .jpg file to a .png file
    convert $file.jpg $file.png

    # Remove the .jpg file
    rm $file.jpg

# End for
done

# Indicate that the conversion is complete
echo "Image conversion completed."
Issue the chmod command to add execute permission for the user the users3.bash file.
Save your editing changes, stage and commit your changes to GitHub.
Since the convert command isn't available in Codespaces, we can neither test this script from the command line or run a check script in Codespaces to check the script. On your Ubuntu VM, open a terminal and confirm you are in your home directory.
- Install the convert command from the imagemagick suite.
sudo apt -y install imagemagick
- Issue the following Linux command to change to the local clone of your GitHub repository.
cd lab-10-username
- Pull your changes into your Ubuntu VM
git pull
Issue the
lscommand and note the images are currently jpgs.Issue the file command on each of the jpgs in your directory. Note the output.
Run your script and observe the output.
./convert.bash
Issue the
lscommand to confirm all the images in your directory were converted to pngs.Issue the
filecommand on each of the pngs in your directory.Did the script work?
Issue the following to run a checking script:
lab10-check-3
In the next investigation, you will learn to use the exit statement to terminate the execution of a shell script if not run with the properly number of arguments, parse command line options using getopts and a case statement; and write a Bash script to automate adding users to the system.
Answer INVESTIGATION 4 observations / questions in your lab log book.
Investigation 5: User Management with bash scripting
Properly documenting your script
We will now use shell scripting to help automate the task for a Linux administrator to create regular user accounts.
Perform the following steps:
- In GitHub Codespaces, open the template for the Bash shell script called createusers.bash
- Edit the comment block in createusers.bash to contain your name, email and today's date.
#!/bin/bash
# Author:
# Date:
# Purpose: To populate the array users from a file specified by the user as a command line argument, and print a list of users, one user at a time.
# Usage: ./createusers.bash <filename>
#
# Error Codes:
#   1 - Script must be run as root
#   2 - Incorrect number of command line arguments
#   3 - Invalid option provided
#   4 - File does not exist
- Review the list of error codes in the comment block. This is an example of how to document your script properly.
Checking to ensure the script can be successfully run
You are going to use conditional logic (if statements) to test for each of the conditions listed in the comment block. Your script will exit with the indicated error code if the condition is not met.
- Enter the following code to test if the script has been run using root privileges (sudo). You will provide an error message to the user and exit with an exit status of 1 if the script has not been called with root privileges.
# If the user is not root, then
if [[ $(whoami) != root ]]; then

    # Print the error message "You must run this script with root privileges."
    echo "You must run this script with root privileges."

    # Exit the script with the error code 1
    exit 1

# End if
fi
- Since the sample usage declared in the above comment block indicates the script should be called as
./createusers.bash -i <filename>, then the script requires a minimum of 2 arguments.
Enter the following code to check if number of command line arguments is not equal to two.
# If the number of command line arguments is not equal to 2
if [[ $# -ne 2 ]]; then

    # Use echo to display a message indicating the correct usage of the script
    echo "Usage: ./createusers.bash -i <filename>"

    # Exit the script with an exit status of 2
    exit 2

# End if
fi
Using getopts Function & case statement
Now that you have added logic to ensure the script can be successfully run, you need to parse command line options. You could do this using positional parameters and if statements, which you have previously learned about. However, there is a simpler way involving less code: getopts.
Getopts is a built-in shell utility for parsing command line arguments. Getopts uses a while loop, with the arguments you want your script accept in double quotes. Any argument that accepts an additional argument (such as a file), you put a : behind. You can use the option \? as a catch all to provide an error for invalid options. Getopts uses a case statement which is like a block of if statements, except a little cleaner to read and faster to execute.
Enter the following code to parse the command line options using getopts. Note the additional error checking while parsing our command line options. It is important to exit indicating an error if the user provides an option the script does not support.
# Use getopts to parse the options
while getopts "i:" opt; do

   # Use a case statement to check the value of opt
   case $opt in

       # If the value of opt is i, then
       i)

           # Set the variable filename to the value of OPTARG
           filename=$OPTARG
           ;;

       # Else
       \?)

           # Print the error message "Invalid option: -$OPTARG"
           echo "Invalid option: -$OPTARG"

           # Exit the script with the error code 3
           exit 3
           ;;

   # End case
   esac

# End while
done
Checking if the provided file name exists
Any time you accept input from a user you need to validate it. Even if that user is you. That is because users can make mistakes. Your script should provide an appropriate error message and exit accordingly. Add the following code to exit indicating an error if the file doesn't exist.
# If the file specified does not exist
if [[ ! -f $filename ]]; then

    # Use echo to display a message indicating that the file does not exist
    echo "The file $filename does not exist."

    # Exit the script with an exit status of 4
    exit 4

# End if
fi
Populating an associative array from a file
The file userinfo.csv is a csv (comma separated value) file containing a list of usernames, their full name and email. You can use a while loop to read the data into your script and an associative array to store it for processing later in the script. By using an associative array, the code can efficiently store and retrieve user information based on unique user identifiers, making it easier to manage and access user data. Add the following code to declare the associative array userInfo and populate it with the data found in the userinfo.csv file, which was provided to your script as a command line argument.
# Declare associative array userInfo
declare -A userInfo

# Read the file line by line and populate the associative array userInfo
while IFS=, read -r user name email; do
    userInfo["$user,name"]="$name"
    userInfo["$user,email"]="$email"
done < "$filename"
Adding users to the system using a for loop
Now that the script has read in the data from the provided csv file and stored it in an associative array, you need to loop through the array. You will use a for loop to loop through the array and:
- Generate a unique password for each user
- Add the user to the system
- Display the users information on the screen
Once the users have been added, print a message on the screen indicating the operation has been completed. Add the following code to achieve this.
# For each user in the associative array, generate a random password, add the user and print the user's information on the screen
for key in "${!userInfo[@]}"; do

    # If the key contains ",name", then
    if [[ $key == *",name" ]]; then
        user=${key%,*}

        # Generate a random password
        password=$(openssl rand -base64 12)

        # Create the user
        useradd -c "${userInfo[$user,name]}" -m $user -p $password

        # Print the username, full name, email, and password using a here document
        cat << EOF
        Account Information:
            Username: $user
            Full Name: ${userInfo[$user,name]}
            Email: ${userInfo[$user,email]}
            Password: $password

EOF
    # End if
    fi

# End for
done

# Display a completion message indicating the accounts have been created
echo "Accounts have been created."
Issue the chmod command to add execute permission for the user the createusers.bash file.
Save your editing changes, stage and commit your changes to GitHub.
Using the terminal in Codespaces issue the following to run the createusers.bash script (without arguments):
./createusers.bash
- Did your error checking work?
- Re-issue the command with the proper arguments:
./createusers.bash -i userinfo.csv
- Did your error checking work?
- Re-issue the command with the proper arguments and privileges:
sudo ./createusers.bash -i userinfo.csv
- What happened?
- Were the users added in Codespaces?
- Issue the following commands:
ls -l /hometail -5 /etc/passwd
What does the output indicate?
- Save your changes. Stage and commit your changes to GitHub.
On your Ubuntu VM, open a terminal and confirm you are in your home directory.
- Issue the following Linux command to change to the local clone of your GitHub repository.
cd lab-10-username
- Pull your changes into your Ubuntu VM
git pull
- Run your script and observe the output.
sudo ./createusers.bash -i userinfo.csv
Did it work? Is the output the same as it was from the Codespaces terminal?
Issue Linux commands to verify the users have been created (like you did in Codespaces).
Issue the following to run a checking script:
lab10-check-4
- If you encounter errors, make corrections and re-run the checking script until you receive a congratulations message, then you can proceed.
Answer INVESTIGATION 5 observations / questions in your lab log book.
Further Study
I hope this series of tutorials have been helpful in teaching you basic Linux OS skills.
In order to get efficient in working in the Linux environment requires practice and applying what you have learned to perform Linux operating system administration including: user management, installing and removing applications, network services and network security.
Although you are NOT required to perform Linux administration for this course, there are useful course notes and TUTORIALS for advanced Linux server administration that have been created for the Networking / Computer Support Specialist stream:
Take care and good luck in your future endeavours :)
Murray Saul
Linux Practice Questions
The purpose of this section is to obtain extra practice to help with quizzes, your midterm, and your final exam.
Your instructor may take-up these questions during class. It is up to the student to attend classes in order to obtain the answers to the following questions. Your instructor will NOT provide these answers in any other form (eg. e-mail, etc).
Review Questions:
- What is the purpose of the /etc/profile startup file?
- What is the purpose of the /etc/bashrc startup file?
- What is the purpose of the ~/.bashrc startup file?
- What is the purpose of the ~/.bash_profile file?
- What is the purpose of the ~/.bash_logout file?
- Write code for the ~/.bash_profile file below to clear the screen, welcome the user by their username, and display a list of all users currently logged in. Insert blank lines between each of those elements.
- Write a command to run the recently created ~/.bash_profile startup file from the previous question without exiting and re-logging in or relaunching your terminal.
- What is the difference between an array and an associative array?
- How do you exit a bash script indicating an error?
- What is getopts used for?
Authors: Murray Saul & Jason Carman
License: LGPL version 3 Link: https://www.gnu.org/licenses/lgpl.html