Lab 1A: Installing and Using Linux
Main Objectives
- Learn how to install Linux (Ubuntu) as a Virtual Machine using Oracle VirtualBox.
- Understand the Linux command structure and how to get help with Linux command usage.
- Become efficient with Linux command line editing by using short-cut keys.
- Issue a checking program (i.e. Shell Script) to confirm that you installed your virtual machine.
- Perform LINUX PRACTICE QUESTIONS for additional practice.
Lab Reference Material
Lecture Slides:
Software:
Ubuntu Resources:
Account Access:
Command Line Editing:
General Linux Commands:
| pwd | cd | ls | cal | date | who , w | whoami, who am i | clear, <ctrl><l> | sudo | ping | apt |
|---|
Key Concepts
Installing Linux
Having a Linux system on your home computer provides access to a large selection of open source software.
Installing your own version of Linux on your notebook or desktop computer also can make it easier to practice working in the Linux environment and learn how to perform routine Linux OS administration tasks.
A Linux distribution (often abbreviated as distro) is an operating system made from a software collection that is based upon the Linux kernel and, often, a package management system. Linux users usually obtain their operating system by downloading one of the Linux distributions, which are available for a wide variety of systems...
Reference: https://en.wikipedia.org/wiki/Linux_distribution

Steps in the Linux Installation Process:
- Select a Linux Distribution to download (ISO image file or VM file).
- Create VM and install Linux Distribution or run VM file.
Virtualization
Virtualization is the process of running a virtual instance of a computer system in a layer abstracted from the actual hardware. Reference: https://opensource.com/resources/virtualization
The virtualized OS is installed and run in a window under another OS. Special software is used to manage the entire process, referred to as the hypervisor. There are many reasons to use a virtual machine, such as testing & modifying a system's configuration without effecting a production system.
Advantages of Virtualization:
- You can run VM from an ISO image file or a VM file.
- One or more virtual machines can be run at the same time.
- The guest OS shares hardware with the host OS and possibly other virtualized systems.
- The guest systems have network access through the host.
Installation Tips:
Virtualization requires a compatible processor: not all processors support that feature.
Your BIOS should be set to enable Virtualization.
Popular VM software for Windows, Apple and Linux OS include:
- VMware (Paid - though free to you through Seneca)
- Oracle Virtual Box (Free and Open Source)
- Hyper-V (Microsoft native virtualization. Closed Source.)
- KVM (Linux native virtualization. Open Source.)
You will be using Oracle Virtual Box.
Command History
The filename ~/.bash_history stores recently executed command lines
Examples of commands that use command history:
| up arrow or down arrow | move to previous command or next command within Bash shell prompt |
|---|---|
| fc -l | display last 16 commands |
| history | more | display all stored commands |
| !num | re-execute an issued command number by command number (determined from history command) |
| !xxx | re-run a most recent previously-issued command beginning with string "xxx" |
Investigation 1: Downloading and Installing Linux
In this section, you will learn how to access your Matrix Linux account by two different methods:
- From your home computer
- From a workstation in a Seneca Polytechnic lab via MyApps
ATTENTION: This lab must be graded by the end of your classes in Week 8 to obtain a grade of 2% towards this course.
It is essential that you complete these labs fully and on time. These are your major learning tool in the course. There are no late marks.
Download the Ubuntu 24.04 iso if you have not already. Make sure you download Ubuntu Desktop, not server.
If you are working on your home PC, you will need to download and install Oracle VirtualBox before continuing. If you are working on a college PC, launch MyApps and search for VirtualBox. Launch the program.
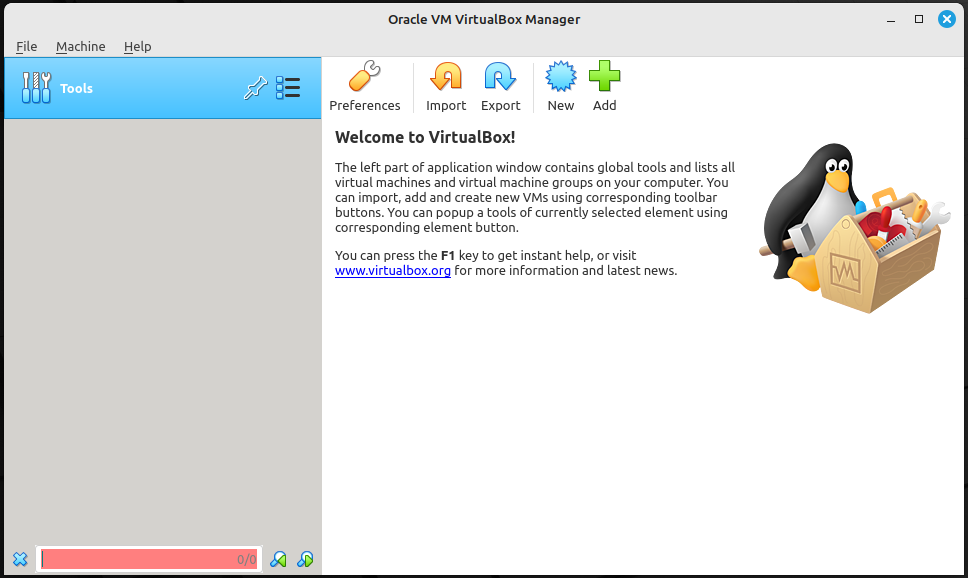
- Open VirtualBox. Your screen should look as follows:
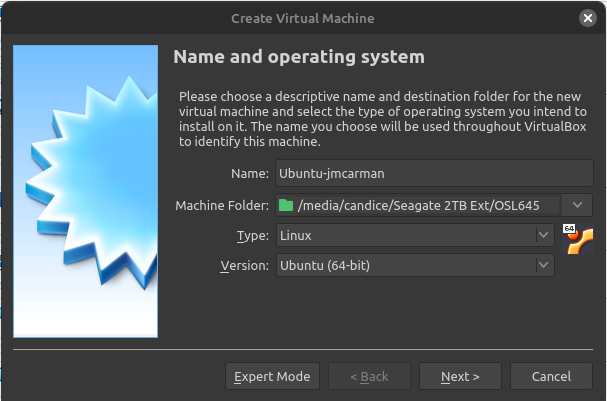
- Click on the New icon and Create a virtual machine, insert the following information and click Next.
- Name: Ubuntu-yoursenecaid IE: Ubuntu-jmcarman
- Machine Folder: Browse to your SSD
- Type: Linux
- Version: Ubuntu (64-bit)
Assign it 8GB of ram (8192 MB) and click Next.
Select Create a virtual hard disk now and click Create.
Select VDI (VirtualBox Disk Image) as the Hard disk file type and click Next.
Select Dynamically allocated and click Next.
Set the Disk Size to 50.00 GB and click Create.
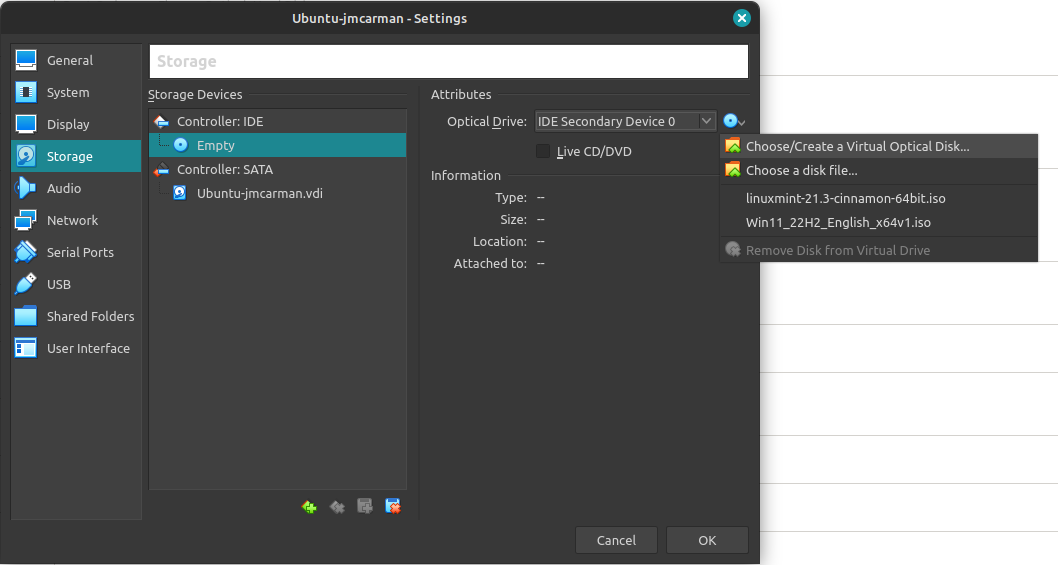
Click on Settings > Storage > Controller:IDE >> Choose a disk file (see the following screenshot). Browse to the ISO you downloaded and click Open.
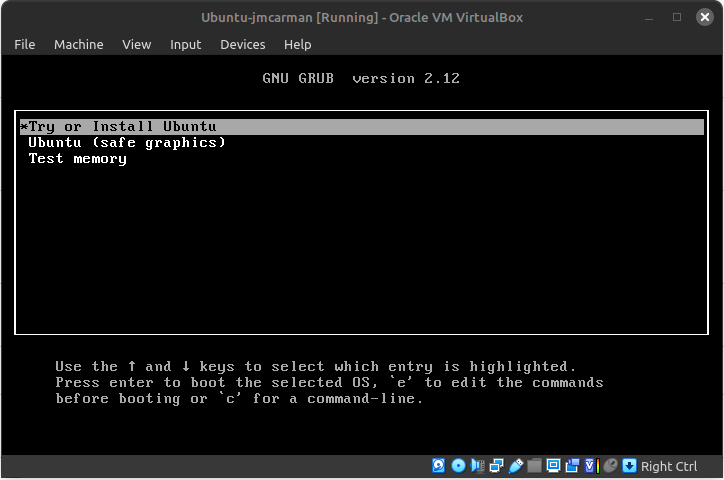
Click ok and power on the virtual machine.
Select Try or Install Ubuntu and press Enter.
Follow the installer and select the following settings:
- Language: English
- Accessibility: Customize if you wish or accept the defaults
- Keyboard Layout: English (US)
- Connect to the internet: Use wired connection (default)
- What do you want to do with Ubuntu?: Install Ubuntu
- How would you like to install Ubuntu?: Interactive installation
- What apps would you like to install to start with?: Default selection
- Install recommended proprietary software?: Select
- Install third-party software for graphics and Wi-Fi hardware
- Download and install support for additional media formats
- How do you want to install Ubuntu?: Erase disk and install Ubuntu (default)
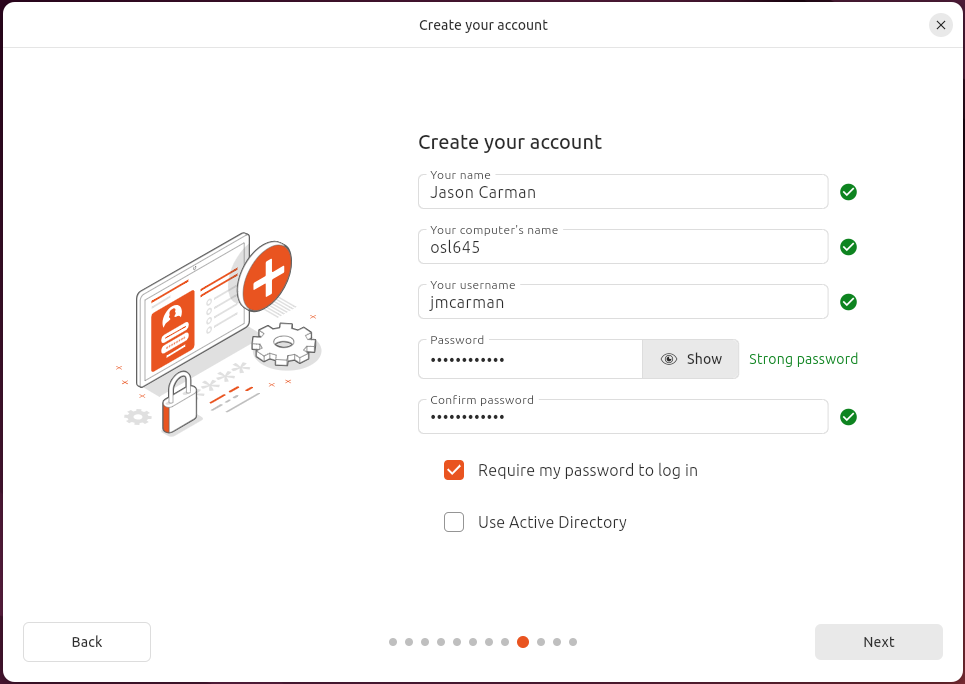
- Create your account:
- Your name: enter your name
- Your computer's name: ubuntu-senecausername IE ubuntu-jmcarman
- Your username: Your Seneca username
- Create a secure password that you will remember
- Confirm your configuration using the following screenshot before clicking Next
- Select your timezone: Toronto
- Click Install and be prepared to wait patiently for a while.
- When it is done, click Restart now.
- When prompted to remove the installation media, press Enter.
Login with your user.
- On the welcome screen, click Next
- Enable Ubuntu Pro: select Skip for now and click Next
- Help improve Ubuntu: select an option and click Next
- Click Finish
Click Show Apps (Logo in the bottom left corner, similar to the Windows start menu) and launch the Terminal application. Proceed to Investigation 2.
Answer INVESTIGATION 1 observations / questions in your lab log book.
Investigation 2: Post Installation Tasks
One of the first things you do on a new system is install software and update the system. Your first step to installing software should always be to test your Internet connectivity, as without a working connection you cannot resolve anything. To do this we can use the tool ping, which is commonly used to troubleshoot network connectivity issues.
Useful addresses to ping to verify network connectivity are the following:
If that fails, you could try pinging:
8.8.8.8, or 8.8.4.4
Your default gateway
8.8.8.8 and 8.8.4.4 are two publicly available DNS servers Google provides for free use. You can use these to test external network connectivity. For example, if pinging www.google.com fails, but pinging 8.8.8.8 succeeds it is likely you have an issue with DNS resolution.
If pinging 8.8.8.8 also fails, the problem is likely on your local network. You could try pinging your default gateway to confirm whether it is reachable or not. Common issues are:
- Wrong default gateway configured
- Default gateway is down
- Unplugged or broken network cable
Since you are dealing with a virtual machine, unplugged or broken cables aren't an issue. The other two are still possible.
Ping www.google.ca. Proceed to the next step only if it is successful.
ping www.google.ca
Next, verify your IP address configuration.
ip a
Notice you have two NICs (Network Interface Cards).
- lo which is your loopback, and is assigned the IP address 127.0.0.1/8 by default
- ens?? where ?? represents two digits: ie ens33. This is the NIC connected to the virtual network, which allows communication between your VM and the Internet through your Host PC.
Now, lets look at your routing table. Your routing table tells you what networks your VM knows about, as well as the default route. The default route is where packets are sent when they don't match any other entry in your routing table.
ip route
Viewing your IP address configuration and routing table can be useful tools for troubleshooting network connectivity issues. Ping and traceroute are useful tools for verifying a particular destination is reachable. Traceroute has the added benefit of showing you where the packets are failing.
Now that you have confirmed your Internet connection it's time to access elevated privileges to install software. In Linux you use the sudo command to execute any command with elevated (root) privileges), provided your user sudo access. Your user was given this access when you created it in the installation. It's time to use this new power wisely. Update the system using apt:
sudo apt -y update
Once that has completed, install the following packages with the command sudo apt install followed by the package names (separated by a space):
- ncal
- tldr
sudo apt install ncal tldr
Answer INVESTIGATION 2 observations / questions in your lab log book.
Investigation 3: Using The Linux Shell
In this investigation, you will learn how to use the Linux Shell. Topics in the section include:
- Learn the basic Linux command structure (arguments and options)
- Learn how to get help for Linux commands via the online manual (i.e. man command).
- Perform Basic Shell Editing
- Issue a program to confirm that you connected to your Matrix account
Linux Command Structure
The Bash shell allows you to interact with Linux by typing commands.
The basic Linux command structure is as follows:
command argument1 argument2 ...
Some Linux commands can be used as-is (e.g. pwd, date, ls, cal), but many Linux commands can also be issued with arguments (e.g. cal 2002, cd /bin, ls -l -a /bin).
What is an argument?
An argument is used to change the default behaviour of a command. Arguments come in three major forms:
- A command option.
- Example:
-l
- Example:
- A file pathname.
- Example:
/etc
- Example:
- A series of characters (i.e. text) that the command can use.
- Example:
"Hello, world."
- Example:
An argument must be separated from a command (and from other arguments) by whitespace (a SPACE, MULTIPLE SPACES or a TAB).
Perform the Following Steps:
- Confirm that you are logged into your Ubuntu virtual machine and have the Terminal open.
- Issue the following Linux command:
pwd
- Explanation: The output from this Linux command shows your current location on the Matrix server (otherwise known as your Present Working Directory). This represents a directory pathname to your home directory. We will discuss pathnames later in this course.
- Issue the following Linux command:
ls
- Question: What do you notice?
- Answer: If there are any files in your home directory, only their file names are displayed.
- Change your directory location by issuing the following command:
cd /etc
- Issue the following Linux command to confirm your changed current location:
pwd
- Result: Your Linux session should display /etc/ when running this command. If your output is different, retrace your steps to make sure you haven't skipped anything or had a typo in a command.
- Issue the following Linux command again:
ls
- Question: What do you notice? How is this different from the last time you ran it?
- Re-run the ls command using an option:
ls -l
- Question: What do you notice?
- Answer: The -l option combined with the ls command displays a detailed ("long") listing of the same files, providing you with more information about each file. This is called metadata (data about data), and includes information such as last modified date, file size, ownership and permissions.
- Return to your home directory:
cd
- Now confirm you've changed back to your home directory:
pwd
- Result: The shell should display
/home/yourusername
- Issue the following Linux command:
ls /bin
- Issue the following Linux command to confirm your current location:
pwd
- Question: What do you notice?
- Question: What makes this command with that argument useful if you are currently located in your home directory?
- Issue the following Linux command:
clear
- Question: What do you notice? Why is this command helpful?
- Tip: The shortcut keys to clear the screen for the Bash shell are:
ctrl-l
- Issue the following Linux command:
who
- Question: What information does this command show?
- Answer: This command lists users that are logged into the same Linux server as yourself.
- NOTE: Remember that the Matrix Linux cluster contains several servers (or nodes). It won't display all users logged into the cluster, only the ones on the same node as you.
- Issue the following Linux command:
whoami
- Question: What does this command display?
- Question: What do you think is the purpose of this command?
- Issue the following Linux command:
cal
- Question: What does this command do?
- Issue the following Linux command:
cal 2035
- Question: How and why is the output different?
- Issue the following Linux command:
cal 2 2035
- Question: What do each of these numbers do?
- Question: What do you think would happen if you reversed the order of those arguments? (i.e. cal 2035 2)
- Issue the following Linux command:
history | grep "ls"
- What do you notice?
Type an exclamation mark ! followed by the number by one of those commands listed in the history list and press
ENTER- What happened?
Type the following:
!lsand pressENTER- What happened?
Issue the following Linux command:
history | grep "cal"
- What happened?
Getting Help with Linux Commands
With the Linux OS containing over 2500 commands and utilities, it's important for Linux users and Linux system administrators (sysadmin) to learn how to use commands “on-the-fly”.
The man utility is an interactive collection of manual pages that provides information on how to use a given command (i.e. command usage, acceptable command arguments, command options, examples).
For an example, issue the following command for the manual page about the manual utility:
man man- You may notice that the online manual categories commands into sections or numbered volumes.
Press the SPACE key to move to the next screen.
- Question: How many volume numbers are contained in the man pages (like executable commands, games, or system administrator commands)?
You can use the following shortcut keys within the man command to help navigate throughout this utility to get help with the ls command (refer to table below):
| Keyboard Shortcut | Purpose |
|---|---|
| ENTER | Move down one line |
| SPACEBAR | Move one screen down |
| <ctrl><b> | Move one screen up |
| /pattern/ | Search for Pattern |
| q | quit man utility |
- If you are connected to Matrix through a terminal application, you can also use your mouse's scroll wheel.
- Press the
qkey to exit the man command. - Use the man utility to get help with the ls command:
man ls
Navigate through the ls manual page and write down the option letters that correspond to the following descriptions:
- "use a long listing format"
- "do not ignore entries starting with ." (i.e. hidden files)
- "sort by file size"
- "append indicator (one of */=>&|) to entries" (i.e. type of file)
Exit the man utility.
Issue the
lscommand using each of those option letters you noted in step 5 to see how the command's output changes with each option.- NOTE: The man utility can be used with the -k option to help list Linux commands that match a text pattern that is contained within the help screen for a Linux command.
Pipeline commands can be used to filter-out unnecessary output. In the next command that you will be issuing, the output from the man -k command, is sent into the grep command to filter (i.e. trap) only output that matches the pattern "8" (The number "8" refers to the category of type of command - in this case, administration commands). We will learn more about pipeline commands later in this course.
Issue the following Linux pipeline command:
man -k user | grep 8
- Question: How does this pipeline command make it easier to obtain information regarding man command?
- Issue the following Linux command:
tldr ls
What is similar between man and tldr. What is different?
- If you wish to change your password you can by issuing the command:
passwd
WARNING: Do NOT run the passwd command if you do not wish to change your password!
- Question: What option for the passwd command can be used to change user info (such as name)?
- Hint: use the man command for passwd.
- Press the
qkey to exit the man command.
You will now learn how to perform command line editing to correct syntax errors while typing Linux commands PRIOR to pressing the ENTER key.
Command Line Editing
Learning shortcut keys in any OS terminal will allow you to be more productive as a Linux user or Linux System Administrator (commonly referred to as: Linux sysadmin).
| Shortcut Key(s) | Purpose |
|---|---|
| <ctrl><l> | Clear Screen |
| <ctrl><u> | Clear Command Line |
| <Up Arrow>, <Down Arrow> | Scroll Up / Down Command History |
| <backspace>, <ctrl><backspace>, <ctrl><h> | Delete character before cursor |
| <ctrl><w> | Delete word before the cursor |
| <ctrl><a> | Move word before the cursor |
| <ctrl><e> | Move cursor to end of command line |
| <alt>f / <alt>b (Mac: OPTION+Right/Left-Arrow) | Move Forward/Backward one word |
Command Line Editing Shortcut Keys.
Let's learn a few common Bash Shell keyboard shortcut keys and find out where you can access online help for additional shortcuts (if required).
Perform the Following Steps:
- Type the following Linux command, but DON’T press the ENTER key:
cd /bin
Press the
ctrl-akey combination. What happens?- NOTE: To make alt-f key work when use the GRAPHICAL Windows SSH Client application, select Edit -> Settings -> Keyboard, and select the checkbox Use ALT as Meta key (and Escape).
.")
Press the
alt-fkey combination two times- (OPTION+right-arrow for Mac OSx).
Press the
alt-bkey combination one time.- (OPTION+left-arrow for Mac OSx).

- alt-b moves one word backwards for Windows OS
- Press the
ctrl-wshortcut key.
- What happens?

- ctrl-w deletes a word to left of the cursor.
- Type the following command:
ls

- After command is deleted, then type new command and press ctrl-e to move to end of the command line.
Press the
ctrl-ekey combination- What happens?
Press the
ENTERkey to execute the command.Press the
up arrowkey. What happens?Press the
ctrl-ukey combination. What happens?Press the
up arrowkey combination, and see what happens when you pressBACKSPACE,<ctrl><BACKSPACE>and<ctrl><h>.- Why is it important to know those series of key combinations?
Press the
ctrl-ukey combination to clear the line.Press the
ctrl-l keycombination. What happens? What is the advantage of using ctrl-u as opposed to ctrl-l?
The Bash shortcut keys that you just learned are sufficient to perform Bash Shell editing. Although you are NOT required to learn other short-cut keys, here is a link to a listing in case you are interested: https://ostechnix.com/list-useful-bash-keyboard-shortcuts/
Answer INVESTIGATION 3 observations / questions in your lab log book.
Lab Submission
Running a Shell Script to Check Lab Completion
You are required successfully perform these labs for marks (within a deadline). In order to confirm that you successfully performed a lab, you will be required to run a program (or in later labs, several programs) to prove that you successfully completed tasks in a lab and get marks.
These programs (known as Shell Scripts) will check your work and offer feedback if you made mistakes, so you can make corrections. Making corrections (i.e. troubleshooting) and re-running these checking programs until you are successful will help students gain "hands-on" experience as well as "trouble-shooting experience.
If you have correctly completed the required tasks, the user can proceed.

If the checking shell script detects an error, then it will provide feedback to allow the student to fix that problem so they can re-run the checking shell scripts until they have successfully completed a task.

Perform the Following Steps:
- Install Git by issuing the following Linux command:
sudo apt -y install git
- Create the bin directory in your home directory by entering the following Linux command:
mkdir ~/bin
- Clone the lab check script repository from GitHub into your ~/bin directory:
git clone https://github.com/OSL645/labs ~/bin
- Make certain that your current directory is your home directory by entering the following Linux command:
cd
- Issue the following command to run a checking script:
sudo ~/bin/lab1-check-1
- Note: The beginning character "~" is called tilde. You get this character by pressing SHIFT + ` (which is the key to the left of the number 1 on your keyboard).
Open your lab check log files and call your professor over to record your grade.
To shut your system down, issue the following Linux command:
poweroff
Note: if you ever wish to reboot your system, you can do so with the following Linux command:
reboot
Linux Practice Questions
The purpose of this section is to obtain extra practice to help with your practical test, and your theory test.
Your instructor may take-up these questions during class. It is up to the student to attend classes in order to obtain the answers to the following questions. Your instructor will NOT provide these answers in any other form (eg. e-mail, etc).
Review Questions:
- Define the term Linux Distribution.
- List and explain two advantages of installing a Linux distribution on your home computer or laptop as either the host operating system or as a virtual machine.
- List and explain two things to consider prior to installing a Linux distribution on your home computer.
- Explain why installing Multi-boot for Linux is useful for computer troubleshooting.
- Define the term Virtualization.
- List the steps to install software or update your Ubuntu system.
- Define the term 'repo. What are repos (repositories) used for? What one did you add to your VM?
- What is sudo?
- List 3 unique ways to log-out of your Ubuntu system (not including closing the Terminal window or application).
- How do you shutdown your Ubuntu system?
- What is the difference between a Linux command and an argument?
- What is the purpose of a Linux command option?
- What character(s) are used to separate commands and arguments?
- Create a table listing each Linux command, useful options that were mentioned in this lab for the following Linux commands:
pwd,cd,ls,cal,date,who,w,whoami,who am I,clear - What two commands can you use to access help from the Linux command line?
Authors: Murray Saul & Jason Carman
License: LGPL version 3 Link: https://www.gnu.org/licenses/lgpl.html