Lab 4: Numbering Conversion, File Permissions and Introduction to Shell Scripting
Main Objectives
- Understand how digital computers store data (i.e. data representation)
- Define binary and octal numbers
- Manually perform numbering conversions between the binary and octal numbering systems (without the use of a computer or calculator)
- Explain the purpose of file permissions
- Explain how permissions work differently for directories as opposed for regular files
- Change file permissions with the chmod command (both symbolic and absolute methods)
- Use the umask command to automatically assign permissions for newly created directories and regular files
- Plan and create a Shell Script
- Explain the purpose of the she-bang line contained at the top of a shell script.
- Set permissions and execute shell scripts.
- Use environment variables
Lab Reference Material
Course Slides:
Numbering Conversion and Data Representation Definitions:
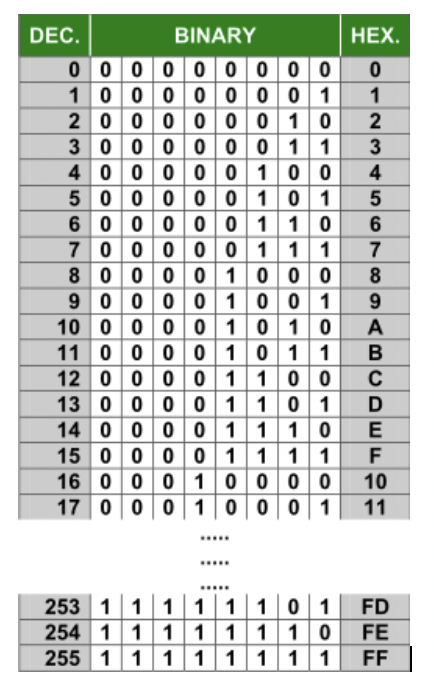
| Data Representation | Binary Numbers | Octal Numbers |
|---|
File Permission Concepts:
File Permission Commands:
Shell Scripting:
Variables:
Commands / Techniques:
Key Concepts
Data Representation
Digital computers are electronic devices that contain a series of circuits and voltage levels that can store / represent data.
Binary numbers can represent those series of circuits with voltage levels. Those binary numbers are combined in a sequence to form a byte. Bytes are used to represent numbers or characters.
IT professionals may need to perform numbering conversion to use with programming functions or OS commands to perform common operations on a computer system.
IT Professionals that use data representation:
- Network Specialists: Building Large Networks via Sub-netting
- Programmers: Sending information over networks, files
- Web Developers: Setting color codes for webpage background or text
- Unix/Linux System Administrators: Setting permissions for files and directories
Numbering Conversion Methods
Octal to Binary and Binary to Octal
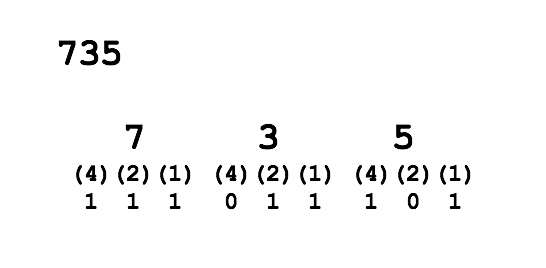
Binary to Octal
- One octal number represents 3 binary numbers, so starting from right-side, group binary digits into groups of 3 (add leading zeros if necessary).
- Write (4)(2)(1) under each group of 3 binary numbers.
- Multiply the value or "placeholder" (i.e. 0's and 1's) by the corresponding (4)(2)(1) for each group to obtain the octal number (refer to diagram of binary to octal conversion below).

Octal to Binary
- One octal number represents 3 binary numbers, so space-out the octal numbers to make space for a binary number.
- Write (4)(2)(1) under each octal number.
- Write 0's or 1's for each group of binary numbers to add up to the corresponding octal number (refer to diagram of octal to binary conversion below).
File Permissions
Since Unix / Linux operating file systems allow for multiple user accounts it is essential to have a system to share or limit access to directories and files contained within the file system.

Detailed directory listing showing permissions for a directory and a regular file.
When directories and regular files are created, they are assigned to an owner (typically the username which is the creator). To allow or limit access to those files and directories, those files and directories are assigned to an initial group referred to as a "primary group".
Users that own those directories and regular files are referred to as users, users that belong within the same group are referred to as same group members, and those users that do NOT belong to a particular group are referred to as other group members.
NOTE: In this course, you will learn how to manage users and groups in Lab 10. For now, you can change which user, same group members or other group members can access or NOT access a directory or regular file.
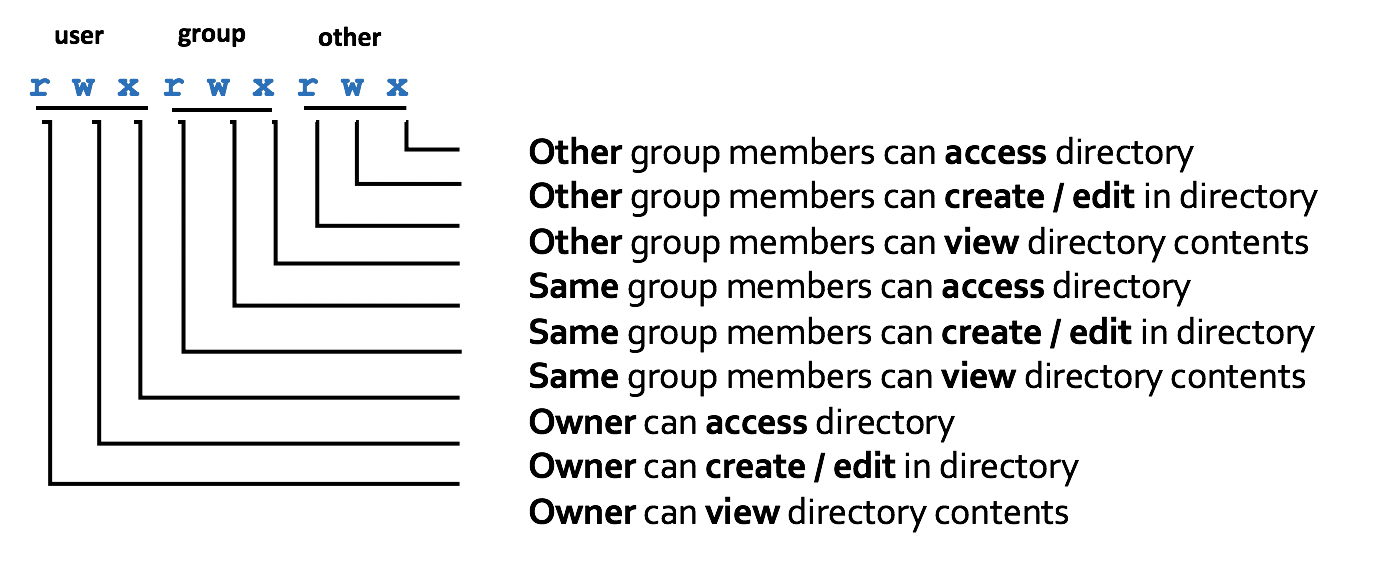
File Permissions consist of two-layers:
First, the permissions of a directory that contains regular files, and second, permissions of the subdirectories and/or regular files within that directory. Refer to the diagram below to see the explanation of permissions of a directory.
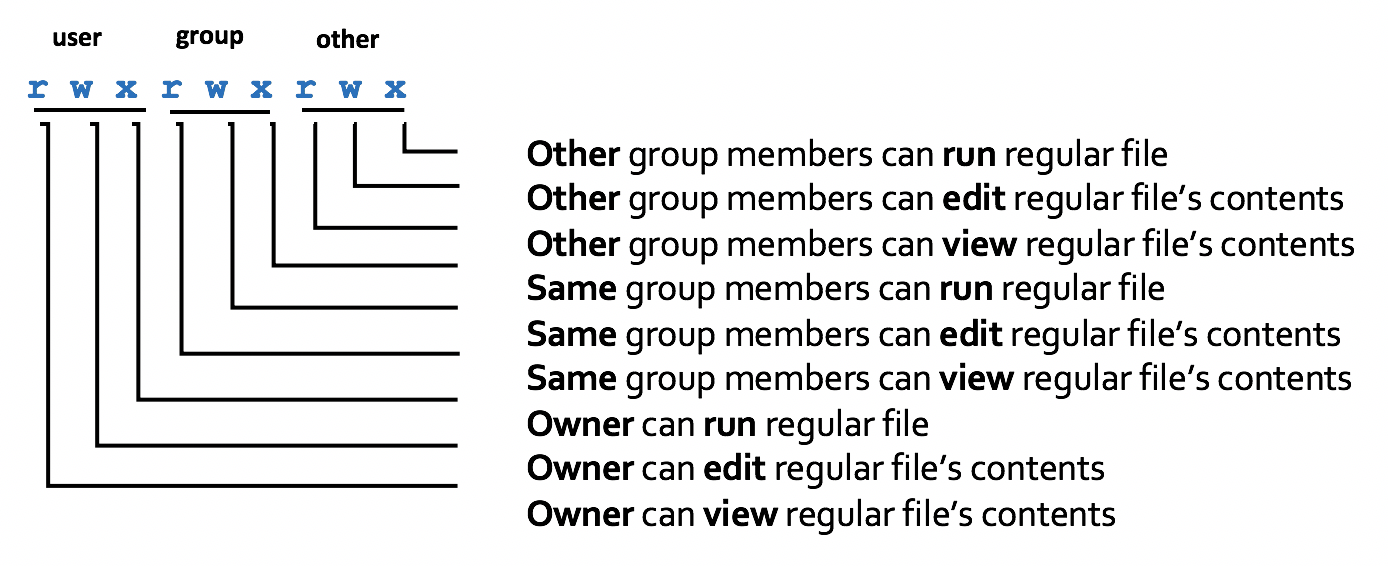
Permissions for directories have a different meaning than permissions for regular files. Refer to the diagram below to see the explanation of permissions of a regular file.
A symbol dash "-" indicates that the permission has NOT been granted.
The permissions of newly-created directories and regular files are automatically assigned via a user mask (we will discuss this shortly). In order to change permissions for directories and regular files, you would use the chmod command.
Changing File Permissions - chmod
Symbolic Method
The chmod can use symbols to add, remove, and set rwx permissions for the user, same group members, and/or other group members for a directory or reqular file.
| Command | Description |
|---|---|
chmod ugo+x script.bash | Add execute permissions to the file script.bash so it can be run |
chmod u=rwx,go=x ~ | Set "pass-thru" permissions of your home directory for same group members and other group members to navigate to other subdirectories (that may have access / view permissions) |
chmod go-w ~/shared | Remove write permissions for same group members and other group members and other group members for the directory ~/shared |
chmod a=rx myfile.txt | Set read and execute permissions for the file myfile.txt |
Octal (Absolute) Method
You can also use octal numbers to set permissions. This method is a short-cut and may require less typing than using the symbolic method. You can only use this method to set file permissions (as opposed to add or remove permissions.
Since 1 octal digit represents 3 binary digits, one octal digit can represent the rwx permission granted or NOT granted. The permissions rwx are be in the form of 3 binary digits (1 represents the permission granted and 0 represents the permission NOT granted).

NOTE: You can use the -R option to set permissions for directory, subdirectory and directory contents recursively.
Setting Permissions for Newly-Created Directories and Regular Files - umask
The umask command is used to set the permissions of newly-created directories and regular files.
Issuing the umask command without arguments will display the current umask value. Refer to the diagrams below to set the umask value for directories and regular files. Setting the umask value (for example umask 022) only takes effect for the current shell session unless the umask command is contained in a start-up file (e.g. .profile, .bash_profile, or .bashrc).

Setting umask for newly-created directories ^.
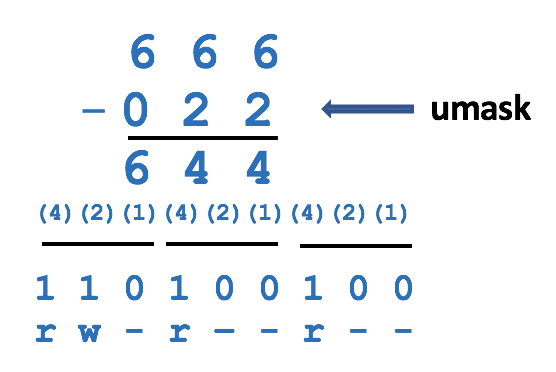
Setting umask for newly-created regular files ^
A shell script is a file that contains Unix/Linux commands and reserved words to help automatic common tasks.
Creating & Executing Shell Scripts
It is recommended to plan out on a piece of paper the purpose of the shell script. Once you have planned your shell script by listing the sequence of steps (commands), you need to create a file (using a text editor) that will contain your Linux commands.
NOTE: Avoid using filenames of already existing Linux Commands to avoid confusion. It is recommended to include a file extension that describes the type of shell for the shell script.
Using a Shebang Line
Since Linux shells have evolved over a period of time, using a she-bang line forces the shell script to run in a specific shell, which could prevent errors in case an older shell does not recognize newer features from more recent shells.
The she-bang line is a special comment at top of your shell script to run your shell script in a specific shell.
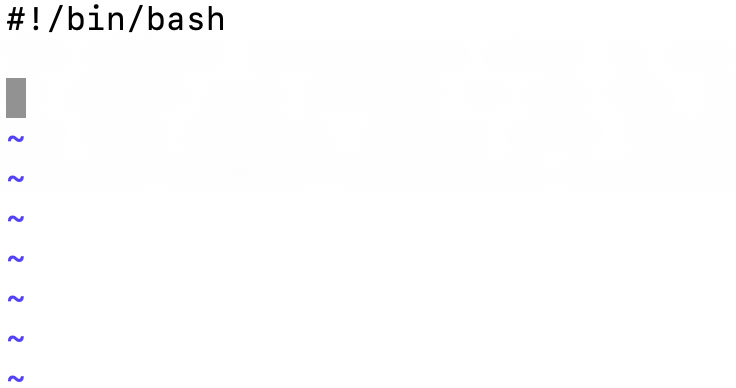
#!/bin/bash
NOTE: The shebang line must appear on the first line and at the beginning of the shell script, otherwise, it will be treated as a regular comment and ignored.
Setting Permissions / Running Shell Scripts
To run your shell script by name, you need to assign execute permissions for the user. To run the shell script, you can execute the shell script using a relative, absolute, or relative-to-home pathname
Examples:
chmod u+x myscript.bash
./myscript.bash
/home/username/myscript.bash
~/myscript.bash
Variables
Environment Variables
Shell environment variables shape the working environment whenever you are logged in Common shell. Some of these variables are displayed via Linux commands in the diagram displayed below.
You can issue the pipeline command set | more to view all variables.
Placing a dollar sign "$" prior to the variable name will cause the variable to expand to the value contained in the variable.
echo $PWD
/home/murray.saul
echo $PATH
/urs/local/bin:/usr/bin:/usr/local/sbin:/usr/sbin:/home/murray.saul/bin
echo $USER
murray.saul
set | head -5
ABRT_DEBUG_LOG=/dev/null
BASH=/bin/bash
BASHOPTS=checkwinsize:cmdhist:expand_aliases:extglob:extquote:
BASH_ALIASES=()
BASH_ARGC=()
echo $name
name="Murray Saul"
echo $name
Murray Saul
name=echo $name
read -p "Enter full name: " name
Enter full name: Murray Saul
echo $name
Murray Saul
Examples of using Environment and User Defined variables.
User Defined Variables
User-defined variables are variables that can be used in the shell script for customized purposes.
Data can be stored and removed within a variable using an equal sign (no spaces on either side of equal sign).
The read command can be used to prompt the user to enter data into a variable. The readonly command will prevent the current value of the variable for the remainder of the execution of a shell script.
Investigation 1: Numbering Conversions
ATTENTION: This lab must be graded by the end of your classes in Week 8 to obtain a grade of 2% towards this course.
For this investigation, we will NOT be logged into our Ubuntu VM, but it is recommended to have an MS Word document or Document or Text File open to manually perform numbering conversions.
NOTE: It is essential that you learn how to manually perform numbering conversions since you will NOT be permitted to perform quizzes, midterm, or your final exam with a computer or a calculator. Learning to quickly perform manual numbering conversions will make IT professional more productive such as setting permissions, designing computer networks, or selecting complex colors when developing webpages.
You will now get practice performing numbering conversions.
Perform the Following Steps:
Perform a manual conversion of the octal number 461 to a binary number.
- What method (displayed above) will you use? Use a calculator to check your work.
Perform a manual conversion of the binary number 11110001 to a octal number.
- What method (displayed above) will you use? Use a calculator to check your work.
Perform a manual conversion of the octal number 755 to a binary number.
- What method (displayed above) will you use? Use a calculator to check your work.
Perform a manual conversion of the binary number 10101111 to an octal number.
- What method (displayed above) will you use? Use a calculator to check your work.
Perform a manual conversion of the same binary number 10101101 to an octal number.
- What method (displayed above) will you use? Use a calculator to check your work.
Perform a manual conversion of the octal number 5636 to a binary number.
- What method (displayed above) will you use? Use a calculator to check your work.
Perform a manual conversion of the binary number 101110001 to an octal number.
- What method (displayed above) will you use? Use a calculator to check your work.
When you have performed all of the numbering conversions above, then you can proceed to the next INVESTIGATION.
Investigation 2: File Permissions
In this investigation, you will get experience using the chmod command to change permissions for existing files and the using umask command to automatically set permissions for newly-created files.
Part 1: Changing Directory Permissions
Perform the Following Steps:
- Start your Ubuntu VM, login. Launch a terminal and issue a command to confirm you are located in your home directory.
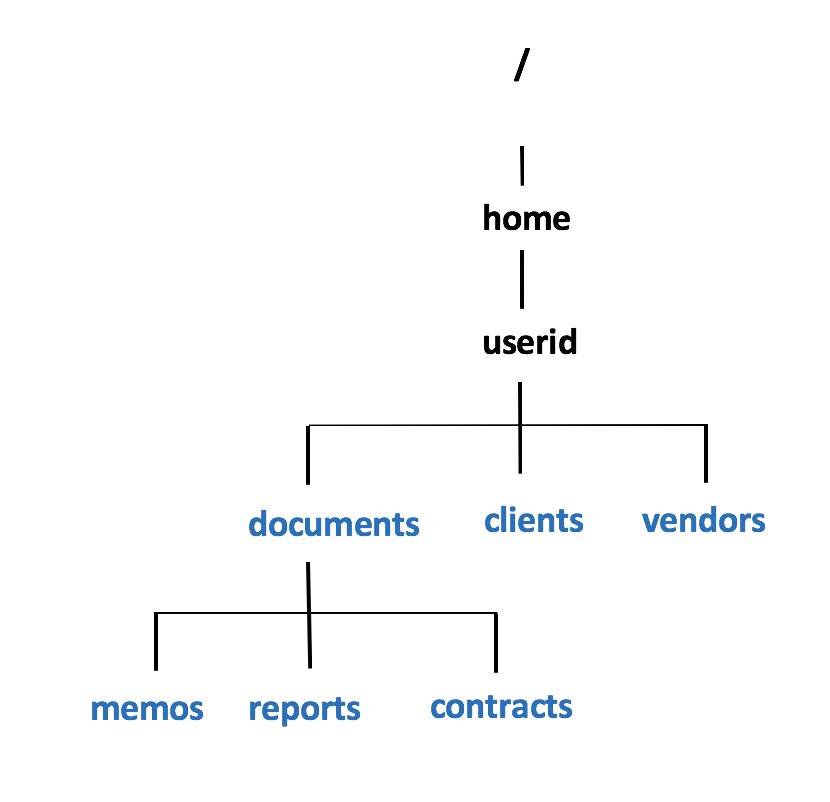
- Issue a single Linux command to create the following directory structure displayed in the diagram below.
- NOTE: You will now run a shell script to confirm that you properly created that directory structure.
- Issue the following Linux command to run a checking script:
~/bin/lab4-check-1
- If you encounter errors, make corrections and re-run the checking script until you receive a congratulations message, then you can proceed.
- Issue Linux commands to create empty files for each of those newly created directories as shown in diagram below:

- NOTE: You will now run another shell script to confirm that you properly created those empty files within those specified directories.
- Issue the following Linux command to run a checking script:
~/bin/lab4-check-2
If you encounter errors, make corrections and re-run the checking script until you receive a congratulations message, then continue the remaining steps.
- Let's get practice viewing permissions, changing permissions, and automatically setting permissions for newly created files.
Issue the following Linux commands:
ls -ld ~/documents ~/clients ~/vendors
ls -lR ~/documents ~/clients ~/vendors
- NOTE: You should see permissions already set for those newly created directories and regular files. What do these permissions mean for same group member and other group member access to those directory and regular files?
- Let's limit access to the clients and vendors directories to only yourself and same group members. Issue the following Linux command:
chmod 750 ~/clients ~/vendors
Issue the ls -ld and ls -lR commands (as you did in step #8) to confirm that the permissions for those directories have been changed.
- NOTE: The -R option for the chmod command can change the file permissions recursively within a directory structure.
Issue the following Linux command:
chmod 750 -R ~/documents
- Issue the ls -ld command to confirm the permissions for the ~/documents, ~/document/memos , ~/documents/reports, and ~/documents/contracts directories.
- Issue the following Linux command:
ls -lR ~/documents
- What do you noticed happened to the permissions for the regular files contained in those directories. Did those regular file permissions change?
Part 2: Changing File Permissions
We will now change permissions for regular text file contained in subdirectories of the documents directory to: r w - r - - - - -
- Issue the following Linux commands:
chmod 640 ~/documents/memos/memo*.txt
chmod 640 ~/documents/reports/report*.txt
chmod 640 ~/documents/contracts/contract*.txt
Issue the ls -lR command for the ~/documents directory to confirm that those regular file permission have changed.
- Let's run a checking script to make certain you correctly set permissions for those directories and files.
Issue the following:
~/bin/lab4-check-3
If you encounter errors, make corrections and then re-run the checking script until you receive a congratulations message and then continue with this lab.
- Let's get some practice setting permissions to allow users to make editing changes to regular files.
Issue the following Linux command:
chmod ugo-w ~/documents/memos/memo*.txt
Use the ls command to verify that those regular file's permissions have changed.
Using the nano or vi text editor, open the regular file ~/documents/memos/memo1.txt and type in some text and try to save your editing changes.
- What happened?
To abort your editing session in vi: type
:q!and press ENTER.- To abort your editing changes in nano: type
ctrl-x - type
nand then press ENTER when prompted to save editing changes.
- To abort your editing changes in nano: type
Issue the following Linux command to add write permissions for all files in the memos directory for yourself (i.e. user):
chmod u+w ~/documents/memos/*
Repeat steps to edit the file ~/documents/memos/memo1.txt (as you did in step #20).
- Were you able to edit the file and save your editing changes?
Issue a Linux command to view the contents of the ~/documents/memos/memo1.txt text file that you were able to edit.
Part 3: Working with umask
- Issue the following Linux command to view permissions for your home directory:
ls -ld ~
- What does execute permissions mean for same group members and other group members in terms of your home directory?
- Issue the following Linux command to create a new subdirectory:
mkdir ~/shared
- Issue the following Linux command:
ls -ld ~/shared
- What are the permissions for this newly-created directory?
- Can other users access the directory pathname ~youruserid/shared ?
- Issue the following Linux command (without an argument):
umask
- NOTE: You should see a four-digit octal number. Drop the leading zero on the left to obtain the default umask value.
Perform a mathematical calculation by taking the octal number 777 and subtracting the default umask value you determined in the previous step. What is the result?
Convert that octal number result to a binary number. What does that represent as newly created directory permissions? Does that correspond to the permissions for the newly created ~/shared directory?
Repeat the calculation (like in step #4) but with a umask setting of 077 to see how this new umask setting would affect permissions of newly-created directories.
Issue the following Linux command:
umask 077
- Issue the following Linux command (without arguments):
umask
- NOTE: You should notice the value 0077. By dropping the leading zero to the left, that would provide the default umask value of 077.
- Issue the following Linux command:
mkdir ~/shared2
- Issue the following Linux command:
ls -ld ~/shared2
- Do the permissions for this newly created directory match the predicted permissions that you calculated in step #30?
- Issue the following Linux command to create an empty regular file called myfile.txt in the ~/shared2 directory:
touch ~/shared2/myfile.txt
Use the ls -l command to view the permissions for this newly created regular file.
- What do you notice about those permissions?
- Let's run a checking script to make certain you correctly set permissions for those recently-created directories and files.
Issue the following:
~/bin/lab4-check-4
- If you encounter errors, make corrections and then re-run the checking script until you receive a congratulations message and then continue with this lab.
- Issue the following Linux command (without arguments):
umask
- What happened? Referring to your notes, what do you need to do to make that umask value persistent?
WARNING: You should be extremely aware of your permissions since you on a server this can be a sensitive issue.
You should NOT set permissions to share your work with same group or other group members (unless given specific permissions instructions from your course professors). If students can have access to your directories and project files, they could copy your work and thus make yourself and other student(s) that copied your work to be charged with an Academic Integrity Violation.
Investigation 3: Creating A Shell Script
In this investigation, you will learn how to create and run a Bash Shell script.
Perform the Following Steps:
Start to your Ubuntu VM and launch a terminal (if you have not already).
Issue a command to confirm you are located in your home directory.
- We want to create a Bash Shell script to welcome the user by their username.
- Let's first look at selecting an appropriate filename for your shell script.
Issue the following linux command to check if the filename called hello already exists as a command:
which hello
- The output from this command should indicate that the shell did NOT find any directories that contained this filename that could represent a command; therefore, this shell script name CAN be used.
- Use a text editor like vi or nano to create the text file called hello
- Enter the following three lines in your shell script:
echo
echo "Hello $USER"
echo
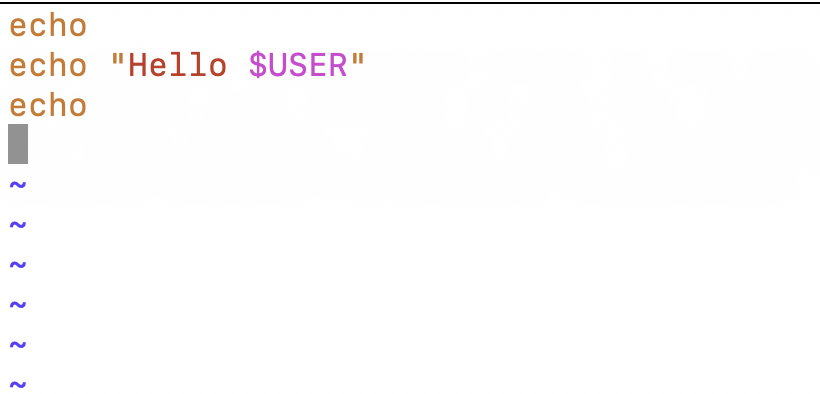
- NOTE: The variable called USER is an environment variable that contains the current user's login name. If you wanted to share your shell script with other users, when they run the shell script, they will greeted by their username. Environment variables make your shell script adaptable by ALL users.
Save your editing session and exit the text editor.
- Instead of issuing the bash command followed by your shell script pathname as an argument, let's simply run it by its filename. This is the most common method of running shell scripts.
Issue the following linux command to run your shell script in your current directory:
./hello
> ./hello
-bash: ./hello: Permission denied
>
- You should notice an ERROR message indicating you don't have permissions to run the file. To fix this, you need to add execute permissions prior to running the shell script.
> ./hello
Hello YourUserID
>
- Issue the following linux command to add execute permissions for your shell script:
chmod u+x hello
- Issue the following to run your shell script:
./hello
- Did your shell script run?
- Issue the following Linux command to run a checking script:
~/bin/lab4-check-5
If you encounter errors, make corrections and re-run the checking script until you receive a congratulations message, then you can proceed.
- In the next investigation, you will learn to create and run shell scripts that use environment variables. You will also learn how to add a she-bang line at the top of a shell script to force it to run in a specified shell.
Proceed to the next investigation.
Investigation 4: Git, GitHub, GitHub Classroom and GitHub Codespaces
In this investigation, you will learn how to use modern tools commonly used in industry to write, maintain and deploy a Bash shell script. You will be using the following tools:
Git: Git is a distributed version control system designed to handle everything from small to very large projects with speed and efficiency. It allows multiple developers to work on a project simultaneously without interfering with each other's changes, providing features like branching, merging, and version tracking. Git was created by Linus Torvalds and released in 2005.
GitHub: GitHub is a web-based platform used for version control and collaborative software development. It leverages Git, a distributed version control system, to track changes in source code during software development. Here are some key features and concepts:
- Repositories: Centralized storage locations for projects, where all files and their revision histories are stored.
- Branches: Parallel versions of a repository, allowing multiple development lines. The
mainbranch is typically the default. - Commits: Snapshots of changes made to the repository, with messages describing the changes.
- Pull Requests: Proposals to merge changes from one branch to another, often used for code review and collaboration.
- Issues: Tracking system for bugs, enhancements, and other project tasks.
- Actions: Automation workflows for continuous integration and deployment (CI/CD).
GitHub integrates with various tools and services, enhancing project management, code quality, and team collaboration.
GitHub Classroom: GitHub Classroom is a tool provided by GitHub that helps educators manage and streamline the process of assigning, collecting, and grading coding assignments. It integrates with GitHub repositories to create a seamless workflow for both teachers and students. This tool is particularly useful in programming courses where version control and collaborative coding are essential skills.
GitHub Codespaces: GitHub Codespaces is a cloud-based development environment that allows you to code directly in the cloud using Visual Studio Code or a web-based editor. It provides a fully configured development environment with all the necessary tools and dependencies pre-installed, which can be customized to suit your project's needs. This enables you to start coding immediately without worrying about setting up your local development environment. Codespaces can be particularly useful for collaborative projects, as it ensures that all team members are working in a consistent environment. Codespaces allows you to access your development environment via a web browser, from anywhere in the world. The only thing you need is an Internet connection.
Perform the Following Steps
Creating a GitHub account
Navigate to github.com and create an account (if you don't already have one) using your college email address. You may also wish to add your personal email address as a secondary one. You can change this to your primary email address at any time; which might be useful post graduation.
In the next steps you will be accessing GitHub classroom. You will also be using git with Visual Studio Code to push your code (web pages) to github.com, where you will then pull them into your Apache web server. These tools are all free, open source, and commonly used in web development.
Introduction to Git & GitHub
Use the following link to set up your access to the Introduction to Git & GitHub materials (provided by GitHub Classroom). Read through everything before you continue. The purpose of this exercise is to familiarize yourself with Git & GitHub. To submit this, edit the instructions (README.md) by clicking on the pencil in the top right corner. You may wish to complete any of the additional items under Optional next steps. If you want to access the Student Developer Pack, you are required to add your name and a short bio. The Student Developer Pack comes with free access to a ton of useful industry tools and services. While you will not be using it in this course, you may want to take advantage of some of the offers.
Additionally, you may want to install the GitHub mobile app. It allows you access to your GitHub profile and repos from the comfort of your smart phone. It also allows you to secure your GitHub.com account with two-factor authentication if you wish to. You can install it for Android or iOS.
Creating your Github Repo for your Labs
Use the following link to set up your lab 4 repository. You will be using this for the Bash scripting in lab 4.
Next, follow the sections for setup on a Shared Computer by Accessing GitHub Codespaces or on your Personal Computer. While you can install Visual Studio Code (VSCode) locally, I recommend using Codespaces for this course.
Shared Computer (ie College PC) or Personal Computer: Accessing GitHub Codespaces
Once you have set up your Lab 4 repository by following the link above (go back and do that if you missed it), you can access GitHub Codespaces from any browser on any device (PC, tablet, smart phone). Codespaces gives you access to Visual Studio Code, with direct access to your repository (without having to clone) from anywhere. It's perfect for a portable development environment. Login to GitHub (if you haven't already) and proceed.
You may have noticed in the link above you can click Open in GitHub Codespaces. Feel free to do so now. If you have already clicked past that window the next few steps will show you how to access it again (which is useful for future access attempts anyway). Click on Code and create a new codespace. Once you have created it, you can access it by clicking on the named link.
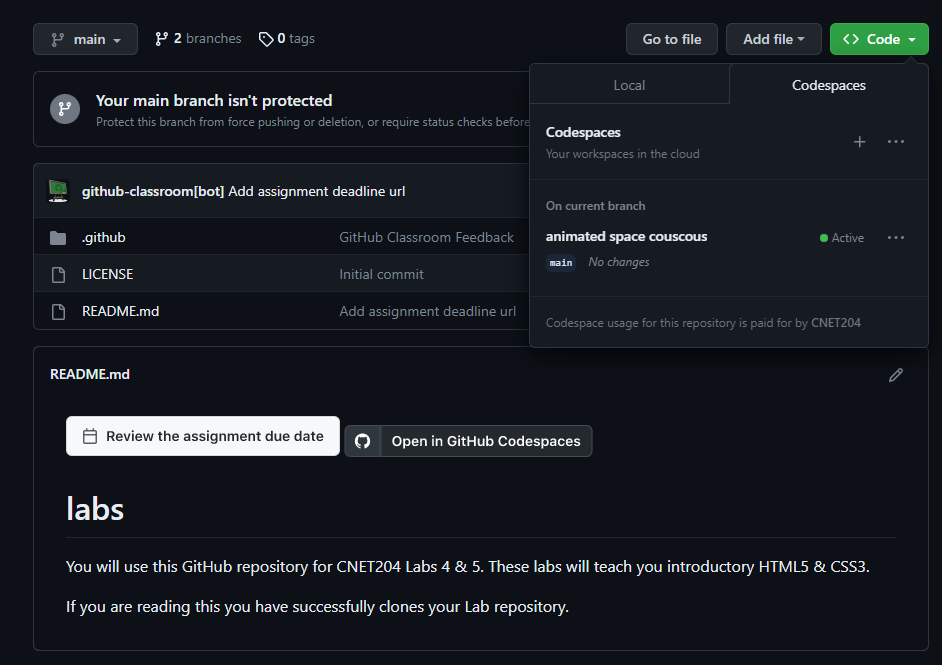
It may take a couple seconds to create your Codespace, but once it launches it is exactly like the interface in Visual Studio Code. That is because it is Visual Studio Code, running in an Ubuntu container in the cloud through GitHub. You get access to this completely free through GitHub Classroom. You will notice you have been provided a template called hello.bash. In codespaces, double click on it in the filebrowser to the left and proceed to Creating Your Bash Shell Script.
Creating Your Bash Shell Script
You will add a she-bang line at the top of your shell script to force the shell script to run in a specified shell when executed. You will learn how to use Environment Variables in Linux.
Perform the Following Steps:
Notice you have a terminal in the bottom of pane of the screen. This is a Bash shell, since Codespaces runs using an Ubuntu Linux container in Microsoft Azure. Issue the PWD command to confirm your default directory.
- Let's run shell scripts with and without a she-bang line at the top of your shell script to demonstrate why using a she-bang line should be included in a shell script to force the shell script to be run in a specific shell.
Use Codespaces to edit the hello shell script that was provided to you in the template. This is identical to the shell script you created in the previous investigation.
Add the following line under the appropriate comment (copy and paste to prevent errors):
# Use the echo command to print the current shell
echo "The current shell you are using is: $(ps -o cmd= -p $$|cut -d' ' -f1)"
- FYI: This command displays the name of the shell that the shell script is running in. The command within $( ) uses a technique known as command substitution.
- Issue the following Linux command to change to an older shell called the Bourne Shell:
sh
- You should notice your shell prompt changed which indicates that you are in a different shell.
- Issue the following Linux command to run your shell script in the Bourne Shell:
./hello.bash
- You should see that you are currently running the shell script "sh" which represents the Bourne shell.
> sh
sh-4.2$ ./hello.bash

Hello codespace

The current shell you are using is: sh
- NOTE: Due to the fact that shells (and their features) have evolved over a period of time, an error may occur if you include a NEWER shell feature (e.g. Bash Shell) but run it in an OLDER shell (For example: the Bourne Shell).
- You can add a special comment called a she-bang line at the BEGINNING of the FIRST line of your shell script to force it to run in the shell you want (for example: the Bash shell).
- Edit your hello.bash shell script in Codespaces.
- Insert the following line at the beginning of the first line of your hello file:
#!/bin/bash
- This is referred to as a she-bang line. It forces this script to be run in the Bash Shell.
- When your Bash Shell script finishes execution, you are returned to your current shell that you are using (which in our case is still the Bash shell).
- Save your editing changes and exit your text editor.
- While in the Bourne shell, issue the following Linux command:
./hello.bash
- You should notice that the shell name is running in the Bash shell (i.e. /bin/bash).
> sh
sh-4.2$ ./hello

Hello codespace

The current shell you are using is: /bin/bash
- Enter the following Linux command to exit the Bourne shell and return to your Bash shell:
exit
- Environment variables are used to set the environment of the shell or shell scripts Let's include some ENVIRONMENT variables in our Bash Shell script.
- Use Codespaces to edit the shell script called hello.bash
- Add the following lines under the appropriate headings in your hello.bash file:
# Use the echo command to print a blank line
echo

# Use the echo command to print the current directory location
echo "The current directory location is: $PWD"

# Use the echo command to print the current user home directory
echo "The current user home directory is: $HOME"

# Use the echo command to print a blank line
echo
- In your terminal (in Codespaces), run your modified Bash shell script by issuing:
./hello.bash
- Take time to view the output and the values of the environment variables.
> ./hello.bash

Hello codespace

The current shell you are using is: /bin/bash

The current directory location is: /workspaces/lab-4-username
The current user home directory is: /home/codespace
NOTE: If you give a script execute permissions (ie chmod u+x scriptname) in Codespaces before you push your changes to GitHub, the script will inherit those permissions on whatever system you clone/pull it into!
Running a check script in Codespaces to check your script
The ability to autograde your work has been built into GitHub (via GitHub classroom) using Python scripts. You can run these to check your work before committing your changes to GitHub and testing them in your virtual machine. To run the check script for hello.bash issue the following command:
./hello_test.py
If it is successful you will notice there is no output on the screen. That is because in Linux, a zero status or exit code represents success. To check to see if the check ran correctly issue the following command. You should see a 0 if your script was successful (IE did not contain errors). If you see any other value, double check your script against the lab instructions and fix the errors.
echo $?
Note: it is important that no other commands are issued between running ./hello_test.py and echo $?
Making your first commit
Congratulations! You have created your Bash script using Codespaces. You can now commit it to your GitHub repository. To do this:
- Click on Source Control (on the left side of the screen).
- Click the three dots at the top of the pane.
- Click Changes and select Stage All Changes.
- Then click Commit.
- Enter a commit message (a short message describing what you have changed) and click on the check mark in the upper right corner.
- Click Save when prompted.
- Click Sync Changes at the top of your Source Control pane, and agree to any prompts.
You've made your first commit! You will be doing this many times over the course of the semester. It will get easier with repetition.
Investigation 5: Generating RSA keys, Cloning your GitHub repository and modifying your PATH variable
Configuring SSH keys in your Ubuntu Virtual Machine & GitHub
You're going to want to configure secure remote access between your GitHub repository and your Ubuntu Virtual Machine. Fortunately, you have the perfect tool available at your fingertips: SSH key pairs.
Start your ubuntu virtual machine if it is not already running. Login, launch a terminal and issue the following command to generate a 4096 bit RSA keypair for your GitHub account's email address (replace username@email.com with your email address).
ssh-keygen -t rsa -b 4096 -C username@email.com
Accept the defaults and provide a secure passphrase (twice). Your keypair will be generated, with the public key saved as id_rsa.pub in .ssh (a hidden directory) in your home directory.
Before copying this into your GitHub account settings, you'll want to test it. Issue the following command to test it:
ssh -T git@github.com
This should fail, because you haven't added your ssh key to GitHub.
You should see the following output:

Issue the following command to view your public key.
cat .ssh/id_rsa.pub
- With your mouse, select the contents of the
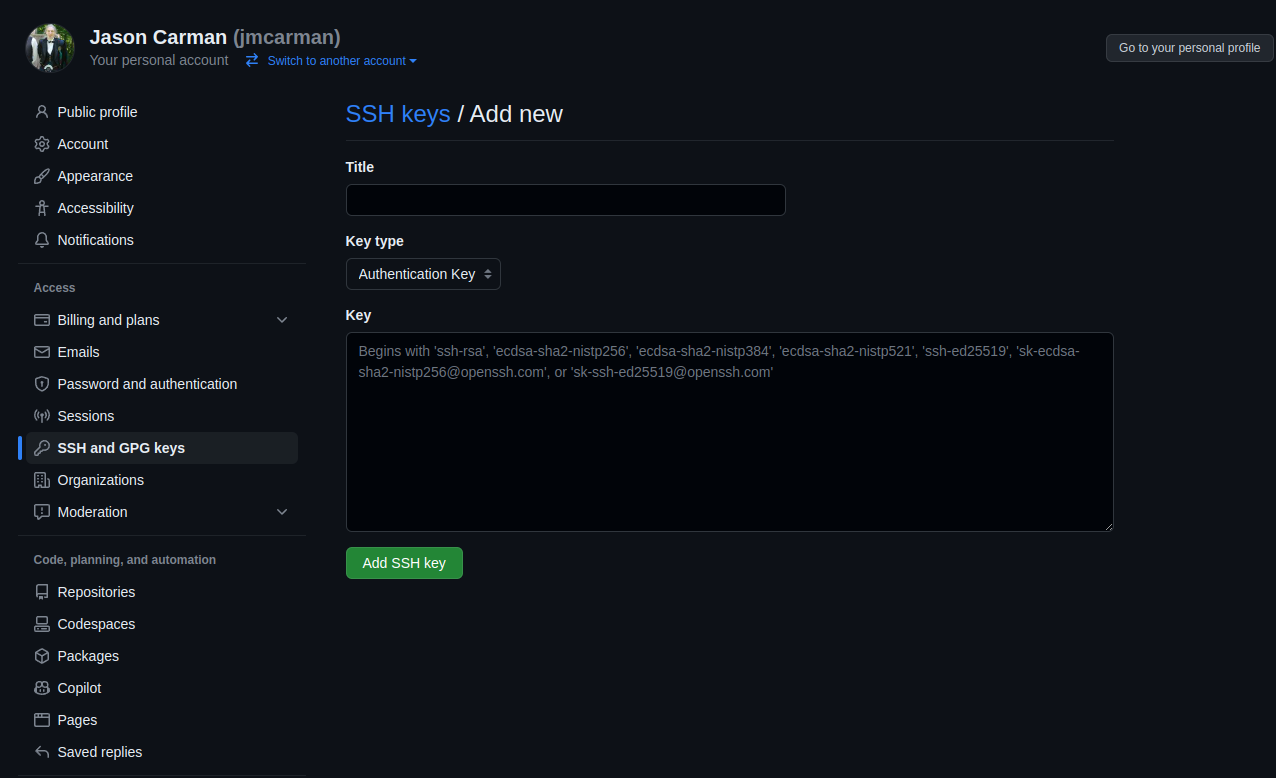
catcommand (beginning withssh-rsaand ending withusername@email.com) and copy it. - Access the SSH and GPG keys settings in github.com (you will be prompted to login if you haven't already).
- Click New SSH key, give it an appropriate title and paste in your public key (see following screenshot).
Try issuing the following command again. It should work now.
ssh -T git@github.com
Cloning your GitHub repository in your Ubuntu VM
Issue the following command to clone your GitHub repository into your home directory.
Important: Be sure to replace
usernamein the following command with YOUR GitHub username.
git clone git@github.com:OSL645/lab-4-username
- Issue a command to confirm the repository has been cloned on your Ubuntu VM.
- Issue a command to change into your lab-4-username directory.
Confirm the contents have been written to your lab-4-username directory. You should see the following files:
- LICENSE
- README.md
- hello.bash
- hello_test.py
Viewing and Modifying your PATH
The PATH variable defines where Linux looks for commands when you issue them. You can modify the PATH variable to include the current directory (i.e. ".") so you can run the command by just script filename (eg. hello.bash as opposed to ./hello.bash)
- Issue the following Linux command to view your PATH environment variable. Note the output.
echo $PATH
- Issue the following Linux command to temporarily add your current directory to the PATH environment variable:
PATH=$PATH:.
- Issue the following Linux command to confirm that the current directory "." has been added to the end of the PATH environment variable:
echo $PATH
- Issue the following to run your Bash shell script just by name:
hello.bash
- Did your Bash shell script run?
> PATH=$PATH:.
> hello.bash

Hello murray.saul

The current shell you are using is: /bin/bash

The current directory location is: /home/murray.saul
The current user home directory is: /home/murray.saul
- Close your terminal and launch a new one.
- Re-run the hello.bash shell script by just using the name.
- What did you notice?
- The setting of the PATH environment variable only worked in the current session only.
- If you exit the current session, then the recently changed settings for environment variables will be lost.
- You will in a future lab how to set environment variables in start-up files.
- Issue the following Linux command to run a checking script:
~/bin/lab4-check-6 | more
- If you encounter errors, make corrections and re-run the checking script until you receive a congratulations message, then you can proceed.
Complete the Linux Practice Questions sections to get additional practice.
Linux Practice Questions
The purpose of this section is to obtain extra practice to help with your practical test, and your theory test.
Your instructor may take-up these questions during class. It is up to the student to attend classes in order to obtain the answers to the following questions. Your instructor will NOT provide these answers in any other form (eg. e-mail, etc).
Review Questions:
- How many binary digits does 1 octal digit represent?
- Use manual numbering conversion to complete the table displayed below.
| Octal | Binary |
|---|---|
| 640 | |
| 110100100 | |
| 145 | |
| 111010100 | |
| 755 | |
| 110100100 |
Write the chmod command (using the symbolic method) to set “pass-through” permissions (eg. r w x - - x - - x) for your home directory using an absolute pathname.
- Write a Linux command to verify that permissions where set.
Perform a binary to octal numbering conversion for the permissions: r w x - - x - - x
- Write single Linux command to set “pass-through” permissions for your home directory, using the absolute method (i.e. octal numbers).
Write a single Linux command to add read permissions for same group members for the ~/tests directory.
Write a single Linux command to remove write permissions for same group members and other group members for the ~/projects directory. Use the symbolic method.
Write a single Linux command to set the permissions for the ~/assignments directory to the following using the absolute method (i.e. octal numbers): r w x r - x - - x Show your work to perform a binary to octal conversion.
- Write the command below using octal numbers and using a relative-to-home pathname.
Assume that you just issued the command:
chmod u=rwx,go=x ~/linux/content
- What would be the new permissions for the “content” directory?
- Assume that you just issued the commands:
umask 077
mkdir mydir
touch mydir/myfile.txt
- What would be the permissions for the newly created directory and regular file? (show your work)
Scripting: Write Bash Shell Script Code
Write a Bash shell script that clears the screen and displays the text Hello World on the screen.
- What permissions are required to run this Bash shell script?
- What are the different methods that you can run this Bash shell script from the command line?
Write a Bash shell script that clears the screen, prompts the user for their full name and then prompts the user for their age, then clears the screen again and welcomes the user by their name and tells them their age.
- What comments would you add to the above script’s contents to properly document this Bash shell script to be understood for those users that would read / edit this Bash shell script’s contents?
Authors: Murray Saul & Jason Carman
License: LGPL version 3 Link: https://www.gnu.org/licenses/lgpl.html