Lab 6: Process Management, Aliases and Shell Scripting
Main Objectives
- Define term process as it relates to the Unix/ Linux operating system
- Run and terminate processes in the foreground and background
- Display and manipulate background and foreground processes
- Use alias command in Unix/Linux
- Use user-defined variables in shell scripts.
- Use Command Substitution and Math Operations in shell scripts
- Explain the purpose of the $? exit status and the test command.
- Use if and if-else logic statements in shell scripts.
- Use a for loop statement with a list in shell scripts.
Lab Reference Material
Course Slides:
Managing Processes:
Linux Commands:
| ps | top | fg | bg | jobs | kill | sleep | alias , unalias |
|---|
Control Flow Statements:
| Purpose | test command | if statement | if-else statement | for loop |
|---|
Instructional Videos:
Key Concepts
Managing Processes
All commands/programs (tasks) that are running on a Unix/Linux computer system are referred to as processes.
Characteristics of Processes:
- Each process has an owner
- Each process has a unique ID (PID)
- Processes keep their PID for their entire life.
- Usually a parent sleeps (suspends) when a child is running (the exception is when the child process is running in the background)
- UNIX / Linux processes are hierarchical. The process structure can have child processes, great grandchild processes, etc.
Users can manage processes to become more productive while working in the Unix / Linux Command-line environment. Processes that run in the terminal are known as foreground processes. You can run or send processes currently running in the foreground to the background to free-up your terminal (e.g. issue other Linux commands).
Below are a listing of common Linux commands and keyboard shortcuts to manage foreground and background processes:
| Linux Command / Key Combination | Purpose |
|---|---|
| ps | Displays snapshot information about processes. Examples: ps , ps -l , ps -ef , ps -u , ps aux |
| top | The top command provides a realtime status of running processes. NOTE: You can press ctrl-c to exit |
| ctrl-c | Terminates a process running in the foreground |
| ctrl-z | Sends a process running in the foreground into the background. |
| fg | Moves a background job from the current environment into the foreground. Example: fg %job-number |
| bg | Runs (starts) the most recent process that was placed into the background. Example: bg %job-number |
| jobs | The jobs utility displays the status of jobs that were started in the current shell environment. Example: jobs [1]+ Stopped vim a <-- Job #1 (+ most recent process / background) [2] Running sleep 200 & <-- Job #2 [3] Running sleep 300 & <-- Job #3 [4]- Running sleep 400 & <-- Job #4 (- second recent process / background) |
| kill | The kill command sends the specified signal to the specified processes or process groups. If no signal is specified, the TERM signal is sent. The default action for this signal is to terminate the process. Examples: kill PID , kill -9 PID , kill %job-number , kill -9 %job-number |
Aliases
An alias is a nickname to an existing command or group of commands.
An alias existing in system memory and will be lost when your current Linux session ends, unless the alias is set in a start-up file (e.g. ~/.bashrc. You will learn about using start-up files later in this course.
Examples:
alias
(Alias command without an argument will display all the aliases currently set)
alias dir=ls
alias ls='ls -al'
alias clearfile='cat /dev/null >'
unalias alias-name
(removes alias from memory)
Positional Parameters
A positional parameter is a variable within a shell program; its value is set from arguments contained in a shell script or using the set command.
Positional parameters are numbered and their values are accessed by using a preceding "$" (eg. $1, $2, $3, etc.). The positional parameter $0 refers to either the name of shell where command was issued, or filename of shell script being executed. If using positional parameters greater than 9, then you need to include number within braces.
Examples: echo ${10}, ls ${23}
The shift command can be used with positional parameters to shift positional parameters to the left by one or more positions.
There are a couple of ways to assign values as positional parameters:
- Use the set command with the values as argument after the set command
- Run a shell script containing arguments
There are a group of special parameters that can be used for shell scripting. A few of these special parameters and their purpose are displayed below: $* , “$*” , "$@" , $# , $?
set 10 9 8 7 6 5 4 3 2 1
echo $1
10
echo $2
9
echo $10
100
echo ${10}
1
echo $#
10
shift
echo $#
9
echo $*
9 8 7 6 5 4 3 2 1
shift 5
echo $#
4
echo $*
4 3 2 1
Examples of using positional and special parameters. ^
Command Substitution
Command substitution is a facility that allows a command to be run and its output to be pasted back on the command line as arguments to another command. Reference: https://en.wikipedia.org/wiki/Command_substitution
Usage:
command1 $(command2)
or
command1 command2
Examples:
file $(ls)
mail -s "message" $(cat email-list.txt) < message.txt
echo "The current directory is $(pwd)"
echo "The current hostname is $(hostname)"
echo "The date is: $(date +'%A %B %d, %Y')"
Example of how a for loop with command substitution works:
ls
file1 file2 file3 for-command-substitution.bash
cat for-command-substitution.bash
#!/bin/bash
for var in $(ls)
do
  echo "Filename is: $var"
done
./for-command-substitution.bash
Filename is: file1
Filename is: file2
Filename is: file3
Filename is: for-command-substitution.bash
Math Operations
In order to make math operations work, we need to convert numbers stored as text into binary numbers.
We can do this by using 2 pairs of round brackets (( )).
Examples:
num1=5;num2=10
echo “$(($num1 + $num2))”
15
echo “$((num1-num2))”
-5
((product=num1*num2))
echo “$product”
50
| Operator | Description |
|---|---|
| + | Addition |
| - | Subtraction |
| * | Multiplication |
| / | Division |
| % | Remainder |
| ** | Exponential |
| ++ | Increment (increase by 1) |
| -- | Decrement (decrease by 1) |
Control Flow Statements
Control Flow Statements are used to make your shell scripts more flexible and can adapt to changing situations.
In order to use control flow statements, you need to test a condition to get TRUE (zero value) or FALSE (non zero value). This can be done two ways:
- Run a command to get the exit status ($?)
- Use the test command
Refer to the shell script below to see how to use the test command.
num1=5
num2=10
test $num1 -eq $num2
echo $?
1
test $num1 -lt $num2
echo $?
0
test $num1 -ne $num2
echo $?
0
test $num1 -ge $num2
echo $?
1
Examples of simple comparisons using the test command. ^
mkdir mydir
test -d mydir
echo $?
0
touch myfile.txt
test -f myfile.txt
echo $?
0
test ! -f myfile.txt
echo $?
1
test -s myfile.txt
echo $?
1
test ! -s myfile.txt
echo $?
0
Examples of using additional comparisons using the test command. ^
You CANNOT use the < or > symbols when using the test command since these are redirection symbols. Instead, you need to use options when performing numerical comparisons. Refer to the diagrams to the right test options and their purposes.
Logic Statements
A logic statement is used to determine which Linux commands are executed basedon the result of a condition: TRUE (zero value) or FALSE (non-zero value).
There are several logic statements, but we will just concentrate on the if statement.
if test condition
  then
     command(s)
fi
Refer to the shell script below for using the if logic statement with the test command.
cat if.bash
#!/bin/bash

read -p "Enter First Number: " num1

read -p "Enter Second Number: " num2

if test $num1 -lt $num2
then
  echo "Less Than"
fi
./if.bash
Enter First Number: 5
Enter Second Number: 10
Less Than
./if.bash
Enter First Number: 10
Enter Second Number: 5
Example of using the if logic control-flow statement.
if-else statement:
Unlike using an if statement, an if-else statement take two different sets of actions based on the results of the test condition.
Example:
if test condition
  then
     command(s)
  else
     command(s)
fi
Example of how an if-else control-flow statement:
cat if-else.bash
#!/bin/bash

read -p "Enter First Number: " num1

read -p "Enter Second Number: " num2

if [ $num1 -lt $num2 ]
then
  echo "Less Than"
else
  echo "Greater Than or Equal To"
fi
./if.bash
Enter First Number: 3
Enter Second Number: 5
Less Than
./if.bash
Enter First Number: 5
Enter Second Number: 3
Greater Than or Equal To
Loop Statements
A loop statement is a series of steps or sequence of statements executed repeatedly zero or more times satisfying the given condition is satisfied. Reference: https://www.chegg.com/homework-help/definitions/loop-statement-3
There are several loops, but we will look at the for loop using a list.
for item in list
do
    command(s)
done
Refer to the shell script below for an example using the for loop with a list.
cat for.bash
#!/bin/bash

for x in apples oranges bananas
do
  echo "The item is: $x"
done
./for.bash
The item is: apples
The item is: oranges
The item is: bananas
Example of using the for looping control-flow statement.
In this investigation, you will learn how to manage processes on your Matrix server.
Investigation 1: Managing Processes
ATTENTION: This lab must be graded by the end of your classes in Week 13 to obtain a grade of 2% towards this course.
In this investigation, you will learn how to manage processes on a Unix / Linux server.
Perform the Following Steps:
Make certain that you are logged into your Matrix account.
Issue a Linux command to confirm that you are located in your home directory.
- The sleep command pauses for a specified number of seconds before returning to the shell prompt.
- In this tutorial, we will be using this command to simulate the management of "long-running" processes.
Issue the following Linux command:
sleep 700
- Notice that this process will run for 700 seconds, and is forcing the user to wait until this process finishes.
- A process that is running in the terminal is referred to as a foreground processes.
- The Unix/Linux system is designed to allow users to send preemptive signals to manage those processes.
- Press the following key combination to terminate the command running on the terminal:
ctrl-c
- You should notice that the process that was running in the foreground has been interrupted (i.e. terminated).
- NOTE: The ctrl-c key combination sends SIGINT (Signal Interrupt - which is signal #2) to terminate a process that is running on the terminal (i.e. a foreground process).
- Reissue the Linux command:
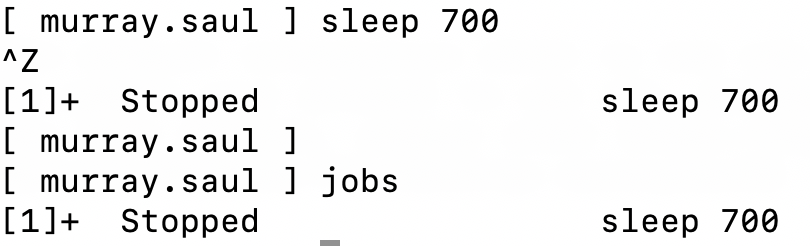
sleep 700
- Press the key combination:
ctrl-z - You should now see output similar to what is displayed below:
[1]+ Stopped sleep 700
- NOTE: This indicates that this process has been placed into the background.
- This is useful in order to "free-up" the terminal to run other Linux commands.
- Issue the following Linux command:
jobs
- You should see the following output similar that was displayed above:
[1]+ Stopped sleep 700
- This display indicates that this process (that is now in the background) has stopped.
- In other words, the sleep command is NOT counting-down to zero to terminate.
- NOTE: You need to use the bg command to run that process that was sent into the background.
- Issue the following Linux command:
bg
- NOTE: You can use the bg command WITHOUT arguments to run recent in the background. From the jobs command, the process that has a plus sign "+" indicates the most recent process placed into the background.
- Issue the following Linux command:
jobs
- You should see the following output similar that was displayed above:
[1]+ sleep 700 &
- This display indicates that this process in the background is running in the background (indicated by the ampersand character "&"). Now this command has resume pausing until 700 seconds.
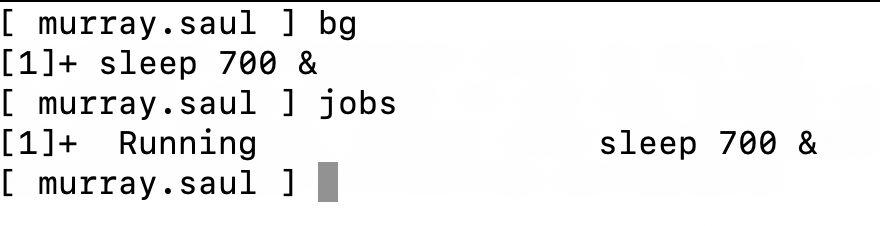
- Using the bg command to run recent process that was placed into background from using ctrl-z keys.
- Issue the following Linux command:
fg
- You should notice that the sleep command is now running in the foreground.
Press the key combination to terminate the process running in the foreground:
ctrl-c- You can issue Linux commands with ampersand "&" in your terminal to run processes automatically in the background without having to issue ctrl-z and bg short-cut keys.
Issue the following Linux commands:
sleep 500 & sleep 600 & sleep 700 &
Issue the jobs command. What do you notice?
- In the jobs command output, jobs that display a plus sign (+) indicates the most recent process placed in to the background, and a minus sign (-) indicates the second most recent process placed into the background.
- The kill command issued to terminate processes that are running in the foreground or background.
- Issuing the kill command without options would send the SIGTERM signal (eg. signal terminate - which is signal #15).
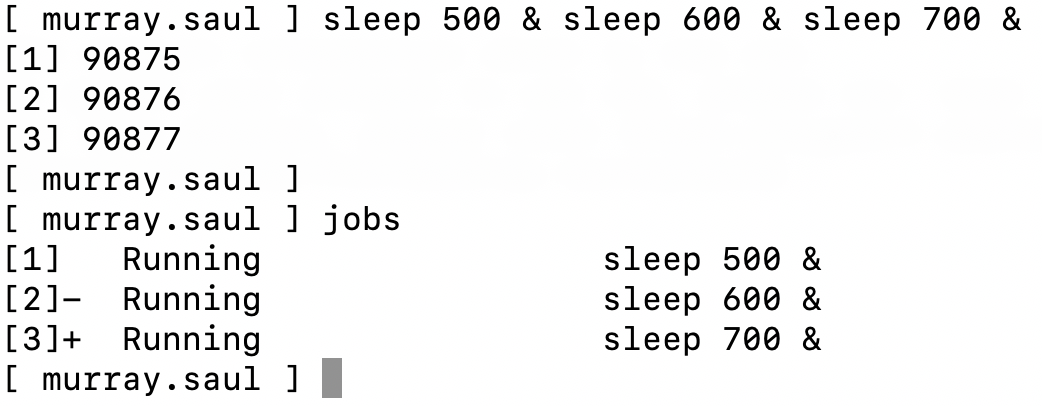
Using the ampersand character & to run a series of processes in the background.
- Issue the following Linux command to terminate the first job running in the background:
kill %1
- NOTE: You can specify job number preceded by percent % with the kill, bg, and fg commands to specify the processes' job number.
- Issue the jobs command. What do you notice?

- Using the kill %1 command to terminate job #1.
- Issue the following Linux commands:
kill %2
kill %3
Issue the jobs command (you may have to issue the jobs command several times to get final result).
- What do you notice?
Let's use grouping to run several commands in sequence within a single process.
Issue the following Linux command:
(sleep 400; sleep 500; sleep 600) &
- Issue the jobs command. What do you notice? You should notice all commands are run in a group as just one process.

- Using round brackets to group a series of commands to be run as one process.
- Issue the following Linux command to terminate the first job running in the background:
kill %1
- NOTE: If issuing the kill command does not work, then you would need to send a STRONGER signal to "kill" (not "SIGTERM - which is signal #15") the process. The SIGKILL signal (signal #9) would be required to do this by issuing the kill command with the option: -9.
Issue the jobs command and make certain there are no processes that are running in the background.
- You can also manipulate processes by their PID (process ID). Let's terminate our Matrix Bash shell process by using the kill command using that processes' PID.
Issue the following Linux command:
ps
- Note in the ps command output the PID of the process called bash.
- You will be using that PID when issuing the next Linux command.
- Issue the following Linux command (using the bash processes' PID number instead of "PID"):
kill PID
- What did you notice?
- FYI: If the command did NOT work, issue the following Linux command (using the bash processes' PID number instead of "PID"):
kill -9 PID
In the next investigation, you will learn how to create aliases.
Investigation 2: Aliases
In this investigation, you will learn how to manage aliases on your Ubuntu VM.
Perform the Following Steps:
- Make certain that you are logged into your Ubuntu VM.
- Issue a Linux command to confirm that you are located in your home directory.

- Issuing the alias command (without arguments) will display a list of existing aliases on your Unix / Linux system.
- Issue the following Linux command:
alias | more
- Observe those existing aliases that have previously been declared. Take a few moments to run those aliases to see what happens.
- Issue the following to create an alias:
alias lal='ls -al'
- Issue the following alias:
lal
- What do you notice?
- Issue the following to create another alias (lowercase l and h):
alias lh='ls --human-readable --size -1 -S --classify'
- Issue the following command to confirm that this newly-created alias is stored in memory:
alias | grep "lh"
- Issue the following alias:
lh
- What do you think this command does?
Type exit to close your current terminal and open a new terminal.
Reissue the lal alias. What happened?
Reissue the lh alias. What happened?
Issue the alias | grep lh command without any arguments to see if it is stored in memory.
Reissue the command to create the lh alias in step #6.
Run the lh alias to confirm that it is properly set in memory.
Issue the following Linux command to edit your ~/.bashrc startup file:
nano ~/.bashrc
- Add the following line at the bottom of this file:
alias lh='ls --human-readable --size -1 -S --classify'
Save your editing changes and exit your text editor.
Type exit to close your current terminal and open a new terminal.
Reissue the lh alias. What happened?
Issue the following Linux command: unalias lh
Run the lh alias to see what happens.
- What happenned?
Type exit to close your current terminal and open a new terminal.
Reissue the lh alias. What happened? Why?
Reissue the lal alias. Why didn't this alias work?
- The checking script below is designed to act as a filter with a pipeline command.
- This will allow to check if your lh alias exists when it is checked in this program.
Issue the following Linux pipeline command:
alias | ~/bin/lab6-check-1
- If you encounter errors, then view the feedback to make corrections, and then re-run the checking script.
- If you receive a congratulation message that there are no errors, then proceed with this tutorial.
Investigation 3: Variables and Positional Parameters
Creating your Github Repo for your Labs
Use the following link to set up your lab 6 repository, and open it in GitHub Codespaces. Refer to Lab 4 for instructions. You will be using this for the BASH scripting in lab 6.
Cloning your GitHub repository in your Ubuntu VM
Issue the following command to clone your GitHub repository into your home directory.
Important: Be sure to replace
usernamein the following command with YOUR GitHub username.
git clone git@github.com:OSL645/lab-6-username
- Issue a command to confirm the repository has been cloned on your Ubuntu VM.
- Issue a command to change into your lab-6-username directory.
Confirm the contents have been written to your lab-6-username directory. You should see the following files:
- LICENSE
- README.md
- command-substitution.bash
- command-substitution_test.py
- dog-years.bash
- dog-years_test.py
- for-1.bash
- for-1_test.py
- for-2.bash
- for-2_test.py
- if-1.bash
- if-1_test.py
- if-2.bash
- if-2_test.py
- if-3.bash
- if-3_test.py
- parameters.bash
- parameters_test.py
- user-variables.bash
- user-variables_test.py
Writing user-variables.bash
In Lab 4 you learned about Enviornment variables. Unlike Environment variables that are used to set the environment of the shell or shell scripts, User-created variables are "customized" that the user can set or allow a user to set the variables' values. Let's create a Bash shell script that contain user-created variables.
- In GitHub Codespaces, open the template for the Bash shell script called user-variables.bash
- Edit user-variables.bash file to contain the following:
#!/bin/bash
# Author: Your Name; youremail@myseneca.ca
# Date: Today's date
# Purpose: To demonstrate user variables.
# Usage: ./user-variables.bash
#

# Using the read command, prompt the user to enter their full name. Store the input in a variable called name
read -p "Enter your Full Name: " name

# Using the read command, prompt the user to enter their age. Store the input in a variable called age
read -p "Enter your age (in years): " age

# Use the echo command to display the following message: "Hello name - You are age years old."
echo "Hello $name - You are $age years old"
Issue the chmod command to add execute permission for the user the user-variables.bash file.
Save your editing changes, stage and commit your changes to GitHub.
Using the terminal in Codespaces issue the following to run the user-variables.bash Bash shell script (enter your Full name and your age when prompted):
./user-variables.bash
- What did you notice?
> ./user-variables.bash
Enter your Full Name: Murray Saul
Enter your age (in years): 57
Hello Murray Saul - You are 57 years old
Use Codespaces to modify your Bash shell script called user-variables.bash
Run the Python check script in GitHub Codespaces to check your work before you commit it.
./user-variables_test.py
- Check the exit status code. If it shows 0, it is successful.
echo $?
- Insert the following lines immediately below the comment block at the top of your script:
age=43
readonly age
Save your changes. Stage and commit your changes to GitHub.
Issue the following to run the user-variables.bash Bash shell script:
./user-variables.bash
- What do you notice when you try to change the age variable? Why?
> ./user-variables.bash
Enter your Full Name: Murray Saul
Enter your age (in years): 57
./user-variables.bash: line 5: age: readonly variable
Hello Murray Saul - You are 43 years old
On your Ubuntu VM, open a terminal and confirm you are in your home directory.
- Issue the following Linux command to change to the local clone of your GitHub repository.
cd lab-6-username
- Pull your changes into your Ubuntu VM
git pull
- Run your script and observe the output.
./user-variables.bash
- Did it work? Is the output the same as it was from the Codespaces terminal?
Writing parameters.bash
A positional parameter is a special variable within a shell program; its value is set from arguments contained in a shell script or using the set command. Let's use positional parameters and special parameters in a Bash shell script.
- In GitHub Codespaces, open the provided template called parameters.bash
- Edit parameters.bash file to contain the following:
#!/bin/bash
# Author: Your Name; youremail@myseneca.ca
# Date: Today's date
# Purpose: To demonstrate positional parameters.
# Usage: ./parameters.bash
#

# Use the echo command to display "\$0: $0"
echo \$0: $0

# Use the echo command to display "\$2: $2"
echo \$2: $2

# Use the echo command to display "\$3: $3"
echo \$3: $3

# Use the echo command to display "\$#: $#"
echo \$#: $#

# Use the echo command to display "\$*: $*"
echo \$*: $*

# Use the shift command to shift the positional parameters by two
shift 2

# Use the echo command to display "\$#: $#"
echo \$#: $#

# Use the echo command to display "\$*: $*"
echo \$*: $*
Issue the chmod command to add execute permissions for the user for the parameters.bash file.
Save your changes. Stage and commit your changes to GitHub.
- Notice how the quoting character "\" is used to display positional parameters like "$2" as opposed to the value stored in the second positional parameter.
Using the terminal in Codespaces, issue the following to run the parameters.bash Bash shell script:
./parameters.bash
- What happened? Your output should look like the following:
> ./parameters.bash
$0: ./parameters.bash
$2:
$3:
$#: 0
$*:
$#: 0
$*:
- The values for some of the positional parameters and special parameters may NOT be displayed properly since you did NOT provide any arguments when running your Bash shell script.
- Issue the following to run the user-variables.bash Bash shell script with arguments:
./parameters.bash 1 2 3 4 5 6 7 8
- What happened? Your output should look like the following:
> ./parameters.bash 1 2 3 4 5 6 7 8
$0: ./parameters.bash
$2: 2
$3: 3
$#: 8
$*: 1 2 3 4 5 6 7 8
$#: 6
$*: 3 4 5 6 7 8
- Take some time to view the results and how the parameters have changed when using the shift command.
- Run the Python check script in GitHub Codespaces to check your work before you commit it.
./parameters_test.py
- Check the exit status code. If it shows 0, it is successful.
echo $?
- Pull your changes into your Ubuntu VM
git pull
- Run your script and observe the output.
./parameters.bash 1 2 3 4 5 6 7 8
- Did it work? Is the output the same as it was from the Codespaces terminal?
In the next investigation, you will learn to use command substitution and math operations in your shell scripts.
Investigation 4: Command Substitution and Math Operations
In this investigation, you will learn how to use command substitution and math operations in your shell scripts.
Command Substitution
Command Substitution is a method of running a Linux command that provides stdout that is used as argument(s) for another Linux command.
For example:
echo "The current date and time is: $(date)"
Writing command-substitution.bash
Let's create a Bash shell script that uses command substitution that displays text and values of environment variables in a series of echo statements.
Perform the Following Steps:
- In GitHub Codespaces, open the provided template called command-substitution.bash
- Edit command-substitution.bash file to contain the following:
#!/bin/bash
# Author: Your Name; youremail@myseneca.ca
# Date: Today's date
# Purpose: To demonstrate command substitution.
# Usage: ./command-substitution.bash
#

# Use the echo command to display a blank line
echo

# Use the echo command to display "MY ACCOUNT INFORMATION"
echo "MY ACCOUNT INFORMATION:"

# Use the echo command to display a blank line
echo

# Use the echo command to display "Username: the output of the whoami command"
echo "Username: $(whoami)"

# Use the echo command to display a blank line
echo

# Use the echo command to display "Current Directory: the output of the pwd command"
echo "Current Directory: $(pwd)"

# Use the echo command to display a blank line
echo
Issue the chmod command to add execute permissions for the user for the command-substitution.bash file.
Save your changes. Stage and commit your changes to GitHub.
Using the terminal in Codespaces, issue the following to run the parameters.bash Bash shell script:
./command-substitution.bash
- Confirm that your shell script displays the following sample output.
> ./command-substitution.bash

MY ACCOUNT INFORMATION:

Username: codespace

Current Directory: /workspace/lab-6-username
- Run the Python check script in GitHub Codespaces to check your work before you commit it.
./command-substitution_test.py
- Check the exit status code. If it shows 0, it is successful.
echo $?
- Pull your changes into your Ubuntu VM
git pull
- Run your script and observe the output.
./command-substitution.bash
- Did it work? Is the output the same as it was from the Codespaces terminal? If not, how is it different?
Math Operations
Since you do NOT have to declare the data-type of a variable (as opposed to compiled program such as the C-programming language), numbers would be stored as text in variables. Therefore, it is important to use the construct (( )) to convert numbers (stored as text) into numbers.
We will now learn how to use this construct in order to perform math operations for shell scripts.
Perform the Following Steps:
Confirm that you are located in your home directory in your Ubuntu VM.
- Let's demonstrate that the Unix/Linux shell stores numbers as ascii text which can cause problems when performing math operations.
Issue the following Linux command from the shell:
echo "1 + 2"
- What did you notice?
- To demonstrate the need for the (( )) construct, issue the following Linux commands (using the math construct):
echo "$(( 1 + 2 ))"
- What did you notice?
- The (( )) construct converted values 1 and 2 from text to binary numbers.
- The $ in front of the construct expands the result of the calculation.
- Issue the following Linux commands demonstrating other types of math calculations:
echo "$(( 2 - 3 ))"
echo "$(( 2 * 3 ))"
echo "$(( 2 / 3 ))"
echo "$(( 2 ** 3 ))"
- NOTE: You may notice that dividing 2 by 3 shows a zero result. To perform decimal calculations would require the use the awk or bc Linux commands (we will NOT cover that method to work with decimal numbers in this course).
- You can use the math construct with variables as well.
- Issue the following Linux commands demonstrating using the math construct with variables:
num1=34
num2=12
echo "$(( num1 * num2 ))"
- What did you notice?
- You can create variables and assign them values in the math construct as well.
- Issue the following Linux commands demonstrating using the math construct with variables:
num1=5
num2=3
(( result = num1 ** num2 ))
echo "The result is: $result"
Writing dog-years.bash
In GitHub Codespaces, open the provided template called dog-years.bash
Edit dog-years.bash file to contain the following:
#!/bin/bash
# Author: Your Name; youremail@myseneca.ca
# Date: Today's date
# Purpose: To demonstrate math operations by converting your age in human years to dog years.
# Usage: ./dog-years.bash
#

# Use the echo command to display a blank line
echo

# Set the variable dogFactor to 7
dogFactor=7

# Prompt the user to enter their age in human years. Store the input in a variable called humanYears
read -p "Please enter your age (in years): " humanYears

# Calculate the user's age in dog years using the formula: dogYears = humanYears * dogFactor. Store the result in a variable called dogYears.
dogYears=$(( humanYears * dogFactor ))

# Use the echo command to display the following message: "Your age in dog-years is: dogYears"
echo "Your age in dog-years is: $dogYears"

# Use the echo command to display a blank line
echo
Issue the chmod command to add execute permissions for the user for the dog-years.bash file.
Save your changes. Stage and commit your changes to GitHub.
Using the terminal in Codespaces, issue the following to run the dog-years.bash Bash shell script:
./dog-years.bash
- Confirm that your shell script displays the following sample output.
> ./dog-years.bash

Please enter you age (in years): 57
Your age in dog-years is: 399
- Run the Python check script in GitHub Codespaces to check your work before you commit it.
./dog-years_test.py
- Check the exit status code. If it shows 0, it is successful.
echo $?
- Pull your changes into your Ubuntu VM
git pull
- Run your script and observe the output.
./dog-years.bash
Did it work? Is the output the same as it was from the Codespaces terminal? If not, how is it different?
Issue a Linux command to change to your home directory.
Issue the following to run a checking script:
~/bin/lab6-check-2 | more
- If you encounter errors, make corrections and re-run the checking script until you receive a congratulations message, then you can proceed.
In the next investigation, you will use control-flow statements to allow your shell scripts to perform differently under different situations.
Investigation 5: Control Flow Statements
In this investigation, you will learn how to use control-flow statements to make your shell script behave differently under different situations or conditions.
Perform the Following Steps:
- Confirm that you are located in your home directory in your Matrix account.
- Issue the following Linux commands at the Bash shell prompt to assign values to several variables:
course="OSL645"
number1=5
number2=10
- You can test conditions by issuing Linux commands / pipeline commands or by using the test command. We will demonstrate using the test command in this tutorial, and then we will demonstrate how to test by issuing a Linux command / pipeline command in a later tutorial.
- Issue the following Linux command to test a condition:
test $course = "OSL645"
- The $? variable is used to store an exit status of the previously-issued command (including the test command).
- If the exit status is zero, then it indicates a TRUE value and if the status is non-zero, then it indicates a FALSE value.
- Issue the following Linux command to view the exit status of the previously-issued test command:
echo $?
- Based on the exit status value, is the result TRUE or FALSE?
- Issue the following Linux command to test another condition:
test $course = "osl645"
- Issue the following Linux command to view the exit status of the previously-issued test command:
echo $?
- Based on the exit status value, is the result TRUE or FALSE?
- The value is non-zero (FALSE) since UPPERCASE characters are different than lowercase characters.
- Issue the following Linux command to test another condition:
test $course != "osl645"
Issue a linux command to display the value of $?
- What is the result? Why?
Issue the following Linux command to test a condition involving earlier assigned variables:
test $number1 > $number2
- Issue a Linux command to display the value of $?
- NOTE: You will notice that something is wrong.
- The exit status $? shows a zero (TRUE) value, but the number 5 is definitely NOT greater than 10.
- The problem is that the symbols < and > are interpreted as REDIRECTION symbols!
- To prove this, issue the following Linux command :
ls -l 10
- You should notice a file called "10". The incorrectly issued test command used redirection to create an empty file and assigning the exit status variable a TRUE value!
- To prevent problems when issuing the test command when comparing numbers, you can use the following test options: -lt (<), -le (<=), -gt (>), -ge (>=;), -eq (=), -ne (!=)
- Issue the correct Linux command to properly test both values:
test $number1 -gt $number2
Issue a Linux command to display the value of $?.
- You should notice that the exit status value is now FALSE which is the correct result.
The test command can be substituted by square brackets [[ ]] which contains the test condition within the square brackets. You need to have spaces between the brackets and the test condition; otherwise, you will get a test error.
Note: You can use either a single or double set of square brackets to represent the test condition. However:
[[...]] is a keyword rather than a command, so it is more efficient
conditions can be combined using && (and) and || (or)
will work correctly even if an unquoted variable is null
string comparisons can use > and <, they won't be confused with redirection
The following example will fail:
if [ $1 > $2 || $2 > $3 ]; then
  echo "Arguments are not in correct sort order"
  exit 1
fi- However, replace the single square brackets with double square brackets and it will work:
if [[ $1 > $2 || $2 > $3 ]]; then
  echo "Arguments are not in correct sort order"
  exit 1
fi
- To generate a test error, copy and paste the following test command:
[[$number1 -gt $number2]]
- The reason for the error was that you need spaces between the square brackets and the test condition.
- Copy and paste the following (correct) test command:
[[ $number1 -gt $number2 ]]
Issue a command to view the value of the exit status of the previously issued test command. You should notice that is works properly.
- Now that we have learned how to test conditions, let's learn about control-flow statements.
- LOGIC STATEMENTS are used to create different paths or directions that the shell script will take based on the result of the test condition. In this tutorial,we will only focus on the if and if-else logic statements.
Writing if-1.bash
In GitHub Codespaces, open the provided template called if-1.bash
Edit if-1.bash file to contain the following:
#!/bin/bash
# Author: Your Name; youremail@myseneca.ca
# Date: Today's date
# Purpose: To demonstrate if statements.
# Usage: ./if-1.bash
#

# Set the variable num1 to 5
num1=5

# Set the variable num2 to 10
num2=10

# Use the if statement to compare num1 and num2. If num1 is less than num2, display the following message: "num1 is less than num2"
if [[ $num1 -lt $num2 ]]; then
   echo "num1 is less than num2"
fi
Issue the chmod command to add execute permissions for the user for the if-1.bash file.
Save your changes. Stage and commit your changes to GitHub.
Using the terminal in Codespaces, issue the following to run the if-1.bash Bash shell script:
./if-1.bash
- Confirm that your shell script displays the following sample output.
> ./if-1.bash
num1 is less than num2
- Run the Python check script in GitHub Codespaces to check your work before you commit it.
./if-1_test.py
- Check the exit status code. If it shows 0, it is successful.
echo $?
- Pull your changes into your Ubuntu VM
git pull
- Run your script and observe the output.
./if-1.bash
- Did it work? Is the output the same as it was from the Codespaces terminal? If not, how is it different?
Writing if-2.bash
In GitHub Codespaces, open the provided template called if-2.bash
Edit if-2.bash file to contain the following:
#!/bin/bash
# Author: Your Name; youremail@myseneca.ca
# Date: Today's date
# Purpose: To demonstrate if statements.
# Usage: ./if-2.bash
#

# Prompt the user to enter a number. Store the output in the variable num1.
read -p "Enter the first number: " num1

# Prompt the user to enter a number. Store the output in the variable num2.
read -p "Enter the second number: " num2

# Use the if statement to compare num1 and num2. If num1 is greater than than num2, display the following message: "The first number is greater than the second number."
if [[ $num1 -gt $num2 ]]; then
   echo "The first number is greater than the second number."
fi
Issue the chmod command to add execute permissions for the user for the dog-years.bash file.
Save your changes. Stage and commit your changes to GitHub.
Using the terminal in Codespaces, issue the following to run the dog-years.bash Bash shell script:
./if-2.bash
- When prompted, make certain that the first number is greater than the second number. What happens?
- Confirm that your shell script displays the following sample output.
> ./if-2.bash
Enter the first number: 2
Enter the second number: 5
>
> ./if-2.bash
Enter the first number: 5
Enter the second number: 2
The first number is greater than the second number.
Run the ./if-2.bash Bash shell script again.
- When prompted, make certain that the first number is less than or equal to the second number. What happens?
- Let's use an if-else statement to provide an alternative if the first number is less than or equal to the second number.
> ./if-2.bash
Enter the first number: 2
Enter the second number: 5
>
> ./if-2.bash
Enter the first number: 5
Enter the second number: 2
The first number is greater than the second number.
- Run the Python check script in GitHub Codespaces to check your work before you commit it.
./if-2_test.py
- Check the exit status code. If it shows 0, it is successful.
echo $?
- Pull your changes into your Ubuntu VM
git pull
- Run your script and observe the output.
./if-2.bash
- Did it work? Is the output the same as it was from the Codespaces terminal? If not, how is it different?
Writing if-3.bash
In GitHub Codespaces, open the provided template called if-3.bash
Edit if-3.bash file to contain the following:
#!/bin/bash
# Author: Your Name; youremail@myseneca.ca
# Date: Today's date
# Purpose: To demonstrate if statements.
# Usage: ./if-3.bash
#

# Use the read command to prompt the user to enter a first number and store the number in the variable num1
read -p "Enter the first number: " num1

# Use the read command to prompt the user to enter a second number and store the number in the variable num2
read -p "Enter the second number: " num2

# Use the if statement to compare num1 and num2. If num1 is greater than than num2, display the following message: "The first number is greater than the second number."
if [[ $num1 -gt $num2 ]]; then
  echo "The first number is greater than the second number."

# Else, display the following message: "The first number is less than or equal to the second number."
else
  echo "The first number is less than or equal to the second number."

# End the if statement
fi
Issue the chmod command to add execute permissions for the user for the dog-years.bash file.
Save your changes. Stage and commit your changes to GitHub.
Using the terminal in Codespaces, issue the following to run the dog-years.bash Bash shell script:
./if-3.bash
- Try running the script several times with numbers different and equal to each other to confirm that the shell script works correctly.
- Confirm that your shell script displays the following sample output.
> ./if-3.bash
Enter the first number: 2
Enter the second number: 5
The first number is less than or equal to the second number.
>
> ./if-3.bash
Enter the first number: 5
Enter the second number: 2
The first number is greater than the second number.
>
> ./if-3.bash
Enter the first number: 2
Enter the second number: 2
The first number is less than or equal to the second number.
- Run the Python check script in GitHub Codespaces to check your work before you commit it.
./if-3_test.py
- Check the exit status code. If it shows 0, it is successful.
echo $?
- Pull your changes into your Ubuntu VM
git pull
- Run your script and observe the output.
./if-3.bash
- Did it work? Is the output the same as it was from the Codespaces terminal? If not, how is it different?
Writing for-1.bash
- LOOP STATEMENTS are a series of steps or sequence of statements executed repeatedly zero or more times satisfying the given condition is satisfied. Reference: https://www.chegg.com/homework-help/definitions/loop-statement-3
- There are several loops, but we will look at a for loop using a list.
In GitHub Codespaces, open the provided template called for-1.bash
Edit for-1.bash file to contain the following:
#!/bin/bash
# Author: Your Name; youremail@myseneca.ca
# Date: Today's date
# Purpose: To demonstrate for loops.
# Usage: ./for-1.bash
#

# Use the echo command to display a blank line
echo

# For x in 5 (counting backwards by 1); do
for x in 5 4 3 2 1; do

  # Echo the value of x
  echo $x

# Done
done

# Use the echo command to display the message "blast-off!"
echo "blast-off!"

# Use the echo command to display a blank line
echo
Issue the chmod command to add execute permissions for the user for the for-1.bash file.
Save your changes. Stage and commit your changes to GitHub.
Using the terminal in Codespaces, issue the following to run the for-1.bash Bash shell script:
./for-1.bash
> ./for-1.bash

5
4
3
2
1
blast-off!
- Run the Python check script in GitHub Codespaces to check your work before you commit it.
./for-1_test.py
- Check the exit status code. If it shows 0, it is successful.
echo $?
- Pull your changes into your Ubuntu VM
git pull
- Run your script and observe the output.
./for-1.bash
- Did it work? Is the output the same as it was from the Codespaces terminal? If not, how is it different?
Writing for-2.bash
In GitHub Codespaces, open the provided template called for-2.bash
Edit for-2.bash file to contain the following:
#!/bin/bash
# Author: Your Name; youremail@myseneca.ca
# Date: Today's date
# Purpose: To demonstrate for loops.
# Usage: ./for-2.bash
#

# Use the echo command to display a blank line
echo

# For x; do
for x; do

  # Echo the value of x
  echo $x

# Done
done

# Use the echo command to display the message "blast-off!"
echo "blast-off!"

# Use the echo command to display a blank line
echo
Issue the chmod command to add execute permissions for the user for the for-2.bash file.
Save your changes. Stage and commit your changes to GitHub.
Using the terminal in Codespaces, issue the following to run the for-2.bash Bash shell script. Confirm that your shell script displays the following sample output.
./for-2.bash 10 9 8 7 6 5 4 3 2 1

10
9
8
7
6
5
4
3
2
1
blast-off!
./for-2.bash

blast-off!
./for-2.bash 5 4 3 2 1

5
4
3
2
1
blast-off!
- How does this differ from the previous shell script?
- You will learn in a couple of weeks more examples of using loop statements.
- Run the Python check script in GitHub Codespaces to check your work before you commit it.
./for-2_test.py
- Check the exit status code. If it shows 0, it is successful.
echo $?
- Pull your changes into your Ubuntu VM
git pull
- Run your script and observe the output.
./for-2.bash
Did it work? Is the output the same as it was from the Codespaces terminal? If not, how is it different?
Issue the following Linux command to run a checking script:
~/bin/lab6-check-3 | more
- If you encounter errors, make corrections and re-run the checking script until you receive a congratulations message, then you can proceed.
Linux Practice Questions
The purpose of this section is to obtain extra practice to help with your practical test, and your theory test.
Your instructor may take-up these questions during class. It is up to the student to attend classes in order to obtain the answers to the following questions. Your instructor will NOT provide these answers in any other form (eg. e-mail, etc).
Review Questions: Process Management:*
Background / Foreground Processes:
- Write a single Linux command to run the program called ~/clean.sh in the background.
- Write a single Linux command to place the previously issued program in the foreground.
- Write a single Linux command to confirm that this program is running in the background.
- What key-combination would you issue to send that program again into the background?
- Write a single Linux command to have that process sent into the background to continue running?
Managing Background processes:
Use the following diagram to answer the accompanying questions. Each of the following questions will use the diagram below and are treated as independent situations.
[1]  Stopped vim a
[2]- Stopped vim b
[3]+ Stopped vim c
Write a single Linux command to bring the second-recently process placed in the background into the foreground.
Write a single Linux command to terminate job #3.
Write a single Linux command to display running processes in “real-time”.
Write a single Linux command to terminate a process that has the following PID: 22384
Aliases / History:
- Write a linux command to create an alias called ld that issues the command: ls -ld
- Write a linux command to unset the alias created in the previous question.
- Issue a Linux command to list history of commands that match the pattern called touch.
Create a table listing each Linux command, useful options and command purpose for the following Linux commands: ln , ps , top , fg , bg , jobs , kill , alias , unalias , history
Scripting:
Part A: Write Bash Shell Script Code
Write the answer to each question below the question in the space provided.
Write a Bash shell script that will first set the value of a read-only variable called dogFactor to 7. The script will then clear the screen and prompt the user to enter the age of a dog in human years (which will be stored into a variable called humanYears).
- The script will store in a variable called dogYears the value of humanYears x dogFactor
- The script will then clear the screen a second time and then display the age of the dog in “dog years”.
Write a Bash shell script that will clear the screen and then display all arguments that were entered after your Bash shell script when it was run. Also have the Bash shell script display the number of arguments that were entered after your Bash shell script.
Part B: Walk-Thrus
Write the expected output from running each of the following Bash shell scripts You can assume that these Bash shell script files have execute permissions. Show your work.
Walkthru #1:
cat walkthru1.bash
#!/usr/bin/bash
word1=”counter”
word2=”clockwise”
echo “The combined word is: $word2$word1”
WRITE ROUGH WORK AND OUTPUT FROM ISSUING:
./walkthru1.bash
ROUGH WORK:
OUTPUT:
Walkthru #2:
cat walkthru2.bash
#!/usr/bin/bash
echo “result1: $1”
echo “result2: $2”
echo “result3: $3”
echo “result 4:”
echo “$*”
WRITE ROUGH WORK AND OUTPUT FROM ISSUING:
./walkthru2.bash apple orange banana
ROUGH WORK:
OUTPUT:
Walkthru #3:
cat walkthru3.bash
#!/usr/bin/bash

for x in 1 2 3 4 5
do

  if [ $((x % 2)) -eq 0 ]
  then
    echo "this"
  else
    echo "that"
  fi

done
WRITE ROUGH WORK AND OUTPUT FROM ISSUING:
./walkthru3.bash
ROUGH WORK:
OUTPUT:
Authors: Murray Saul & Jason Carman
License: LGPL version 3 Link: https://www.gnu.org/licenses/lgpl.html