Lab 9: Users, Groups and Services
Main Objectives
- Administer (add, remove, modify) users on a Linux system.
- Save time while adding new users using a template of start-up files.
- Create and manage groups on a Linux system.
- Start, Restart and Stop services on a Linux system.
- Enable and Disable services on a Linux system.
- Display the status of running services on a Linux system.
Lab Reference Material
Course Slides:
- Week 11 Lecture 1 Notes: Web
Commands:
User Management
| useradd | userdel | usermod | groupadd | groupdel | chage |
|---|
Managing Services
Miscellaneous
| /etc/passwd | /etc/group | /etc/shadow | /etc/skel | init vs systemd |
|---|
KEY CONCEPTS
Investigation 1: User/Group Management
ATTENTION: This lab must be graded by the end of your classes in Week 13 to obtain a grade of 2% towards this course.
In lab 4, you learned how to change permissions for directories and files relating to user/owner, same group members, and other users. In this lab you will learn how to create or remove users and groups as well as change the ownership of directories and files! We will now learn to perform key user account management operations in this section.
Part 1: Studying the /etc/passwd file
The /etc/passwd file is a datafile that stores user account information, for both system accounts and regular users. Since we will be learning to create, modify and remove users on our Linux system, we should study this file in order to understand how the user account management commands will affect this file.
Perform the following steps:
- Launch your Ubuntu VM.
- Open the terminaln application.
- Use the
catcommand to view the/etc/passwdfile. - Make note of the contents of that file.
- Read about the file: /etc/passwd
- Note what information each field contains.
- Why do you think there are so many users?
- Look at the names of the users. What do you think these user names represent? Are they all people?
- What is the numeric user ID (UID) of the root user?
- What is the numeric user ID (UID) and default shell of the user mail?
- What is the UID, Comment, and default shell of your regular user account?
- UID 0 is reserved for the root user. In fact it is the UID that gives root its power. Not the account name.
- The user IDs of system accounts are below 1000. System accounts are used internally and are usually associated with services. The default shell of /usr/sbin/nologin means they can't be used to login interactively.
- Regular user accounts are assigned UID's above 1000 and are allowed to login interactively.
- When new regular user accounts they are by default assigned the next available UID above 1000.
- The Comment field typically holds the Full name of a regular user.

The /etc/passwd file contains records for users (system accounts and regular-user accounts). There are several fields including: Username, password link ("x" indicates hashed password stored in /etc/shadow file only accessible by root), user-id, primary group-id, comment (eg. Full Name), default home directory, and default shell.
Part 2: Adding, Removing, and Modifying Users
In this section, we will now learn how to properly add user accounts, remove user accounts, and modify existing user account information.
Perform the following steps:
- Remain in your Ubuntu VM for this section.
- Read the man page for the
useraddcommand. - Create a new user called osl645_1 by:
# Launch an interactive shell
sudo -i

# Create a user account using defaults
useradd osl645_1

# Check the contents of /etc/passwd
grep "osl645_1" /etc/passwd

# Check for a home directory
ls -l /home
- Was the account created?
- What were the values for the UID, GID, Comment, HOMEDIR, and SHELL?
- Was a home directory created?
- Check the man page for useradd, what are the options to force a home directory to be created, add a full name, and assign bash as the default shell?
- Create a new user called osl645_2 using those options:
# Create a user account using options
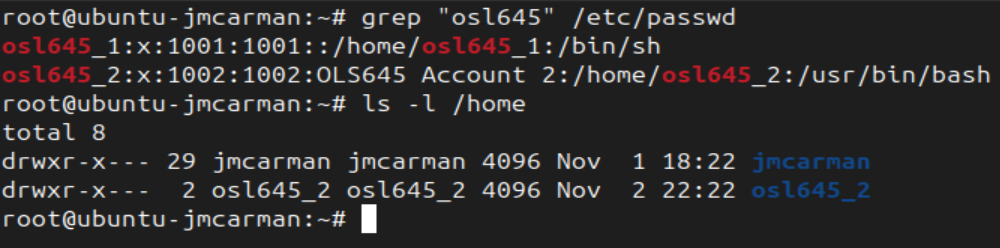
useradd -m -c "osl645 Account 2" -s "/usr/bin/bash" osl645_2
# Check the contents of /etc/passwd
grep "osl645" /etc/passwd
# Check for a home directory
ls -l /home
- What were the values for the UID, GID, Comment, HOMEDIR, and SHELL?
- Was a home directory created?
- Read the man page for useradd and scroll down to the FILES section
- What is the file you can edit to change your default values for account creation?
- Edit the file /etc/default/useradd, change the value of SHELL
SHELL=/usr/bin/bash
- Create a new user called osl645_3:
# Create a user account using options
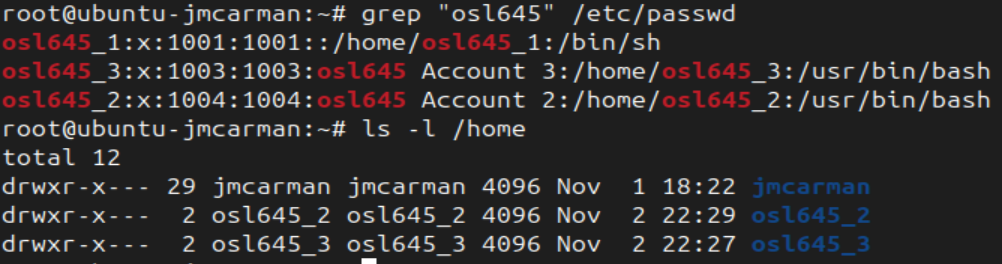
useradd -m -c "osl645 Account 3" osl645_3
# Check the contents of /etc/passwd
grep "osl645" /etc/passwd
# Check for a home directory
ls -l /home
- Was the home directory created?
- Was the shell set correctly?
We have not given the accounts passwords. The passwords are not stored in /etc/passwd. A long time ago with the Unix operating system, passwords were stored in /etc/passwd but they were removed from the file and put into the file /etc/shadow. That is because all users require read access to /etc/passwd for the purpose of logging in. Passwords even in hashed form should NOT be visible to all users. If look at the image above you can see an x in the old password field as a place holder.
- View the contents of /etc/shadow
- The format of the file is similar to /etc/passwd, one line per account with fields separated by : .
- Scroll to the bottom of the file to see the regular user accounts
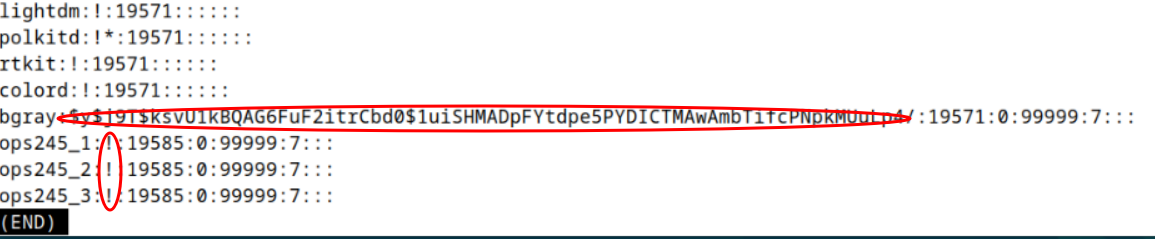
- You can see that your regular user account has a hashed password in the file, but your new osl645 accounts have only a ! . This means the password has not been set, and until it is this account can't be used to login interactively
- Set the password for the user osl645_1 and osl645_2 using the commands:
# Set a users password
passwd osl645_1
passwd osl645_2
- View the contents of /etc/shadow to see the changes.
We can also modify a user after the fact using the usermod command. Remember that the account osl645_1 was created with out a Full Name and the incorrect Shell
- View the man page for the usermod command
- You can see that the command options are pretty similar to the useradd command
- Modify the osl645_1 account using the following:
# Modify the user account
usermod -c "osl645 Account 1" -s "/usr/bin/bash" osl645_1
- Confirm the changes are made in /etc/passwd
When we created the osl645_1 account we didn't create a home directory. We should do that manually.
- List the contents of /home
ls -l /home
- You can see that each users home directory is owned by the user and the group assigned is the primary group of that user.
- You can also see that permissions have been given to that user. (our osl645 users home directory are visible to other users)
- Issue the following commands to create a home directory for osl645_1 and give ownership to the user
# Create a home directory
mkdir /home/osl645_1

# Change the owner and group
# Example chown user:group /home/dir
chown osl645_1:osl645_1 /home/osl645_1
- Confirm the creation of the home directory
- Set the permissions of the home directory so that only the owner has access
# Set permissions for osl645 users home directories
chmod 700 /home/osl645*
- List the entire contents of the home directories for osl645_1 and osl645_2, including hidden files
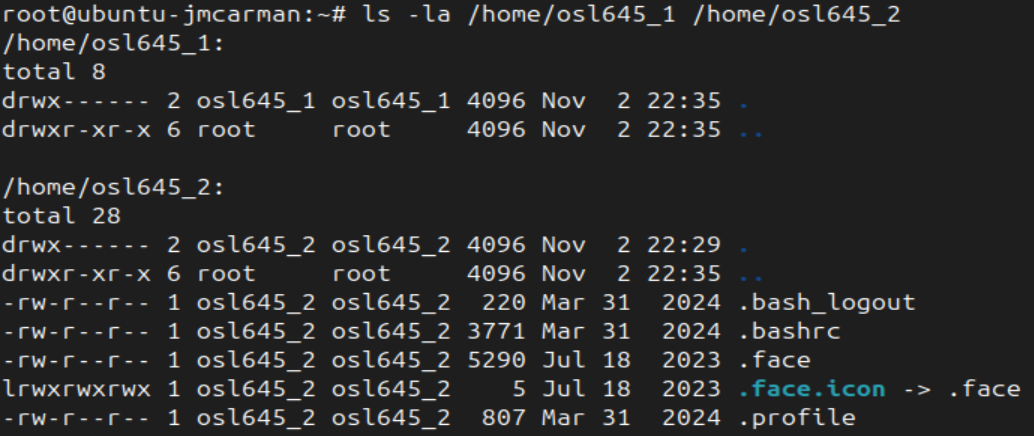
- You can see the osl645_2 home directory contains some files that osl645_1 does not have. Where do you think they come from?
- List the entire contents, including hidden files, of /etc/skel
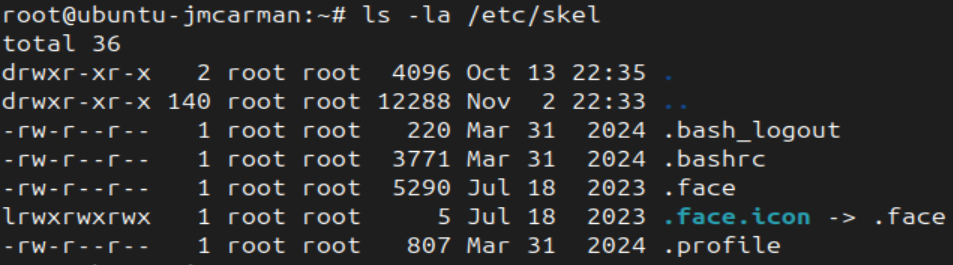
/etc/skel/ is a "template" for new home directories. Any files and directories in that directory will be copied into any new users home directory when they are created.
- Create a file called foobar.txt in /etc/skel
# Add a file to /etc/skel
echo "this is a test file" > /etc/skel/foobar.txt
- Create a new user called osl645_4 using the correct option to create a home directory and setting the shell to bash
- Check the contents of osl645_4's home directory. Did they receive the file foobar.txt
We should confirm that our accounts work. By testing a login to the Desktop Environment.
- Exit from the interactive sudo shell:
exit - Exit the terminal and logout of the desktop
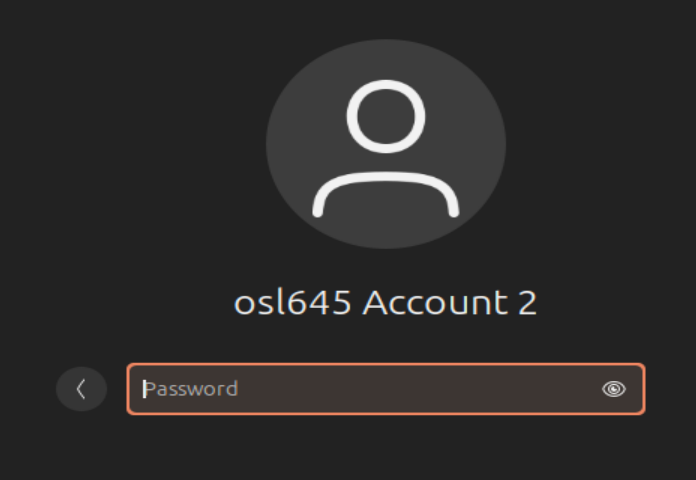
- Login to the desktop as the user osl645_2
- Logout and login back in as your regular user account
The next step is to remove a user account. Using the userdel command.
Considerations when removing accounts:
- Should the account be removed or just disabled?
- Should the home directory be deleted with all of the files?
Sometimes it is better to disable an account rather than delete it.
The files in home directory may need to be passed over to a new employee or retained for investigative purposes
- Read the man page for the userdel command
- What is the option to remove a users home directory?
- Use the following commands to remove the osl645_1 and osl645_4 accounts. Do not remove the osl645_4 home directory
# Start interactive sudo shell
sudo -i

# Remove osl645_1 account and home directory
userdel -r osl645_1

# Remove osl645_4 account
userdel osl645_4
- List the contents of /home including file ownership
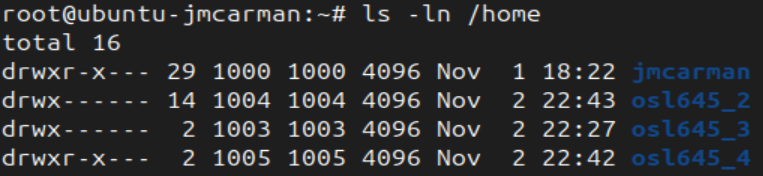
Notice the User and Group field for osl645_4 is shown numerically. That is because the filesystem records ownership using UID and GID numbers. When we are shown a listing it resolves those numeric values to names. As the user has been removed it can't be resolved.
Notice the -n option for ls shows ownership numerically.
Disabling an Account
There are 2 ways to disable an account, lock the accounts password, and expire the account.
- Read the man page for usermod
- Read about the "-L, --lock", "-U, --unlock", and "-e, --expiredate"" options
- Try the following commands, check the changes made to /etc/shadow after each command (account expiry is the 2nd last field)
# Lock the password for osl645_2
usermod -L osl645_2

# Unlock the password for osl645_2
usermod -U osl645_2

# Expire the osl645_2 account immediately
usermod -e 1 osl645_2

# Unexpire the osl645_2 account
usermod -e -1 osl645_2

# Expire the account of osl645_1 at the end of 2128
usermod -e 2128-12-31 osl645_2
- Exit the interactive sudo shell
Be sure to record your observations in your lab notes.
Part 3: Managing Groups
In this section, we will learn how to create, remove and modify groups in our Linux VM. In lab 4 you how to change permissions with the chmod command, but you didn't have admin privileges to create groups to allow directory and regular file sharing. Since you now have admin privileges with your VM, you can now create groups, and add users to this group to allow file-sharing among users.
Perform the following steps:
- Make certain that you are still in a terminal as your regular user account on the ubuntu VM.
- Type the command
groups - The output of this command is the list of your group memberships.
 Every user account is assigned a primary group. On most Linux distributions when a new user account is created a new group is also created with the same name, that group is then assigned as the primary group for that user. However, not all Linux systems are configured that way. On the host matrix.senecacollege.ca your user account is assigned to a primary group called users.
 - Close all application windows, and switch user accounts by clicking on the logout icon and clicking on the Switch User button, and then login as the user osl645_2**.
- Open a terminal.
- Create a file called information.txt in the home directory of that user.
- Issue the following commands:
# Create a file
touch information.txt

# List the details of the file
ls -l information.txt

# List the details numerically
ls -ln
- Who owns that file? What primary group does that file belong to?
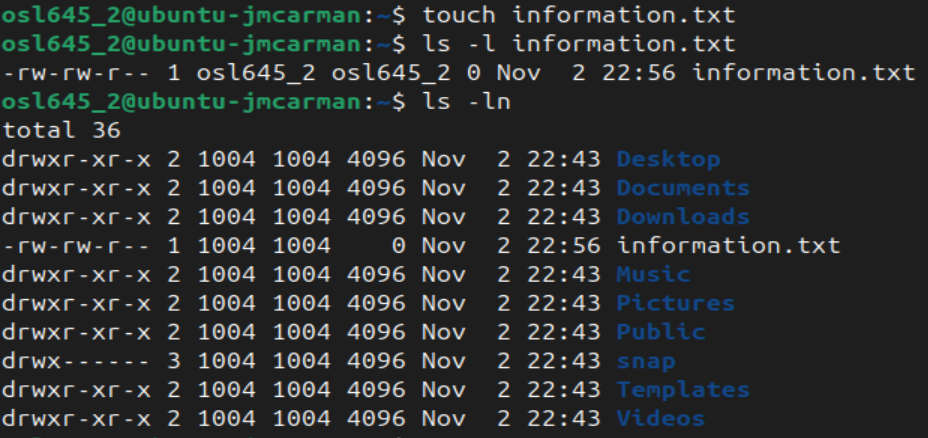
When a user creates a file or directory they are assigned as the owner of the file and the primary group of that user account is assigned as the group to the file
- Issue the following command to create a group called welcome:
# Create a group
sudo groupadd welcome
- You'll notice that sudo does not work for this user, because we haven't given them permissions to run any commands with elevated privileges.
- Log out, and log back in as your normal user.
- Now re-issue the command to create the welcome group. This time, sudo should work.
- Issue the commands:
# Show recent groups
tail -5 /etc/group

# Show recent users
tail -5 /etc/passwd
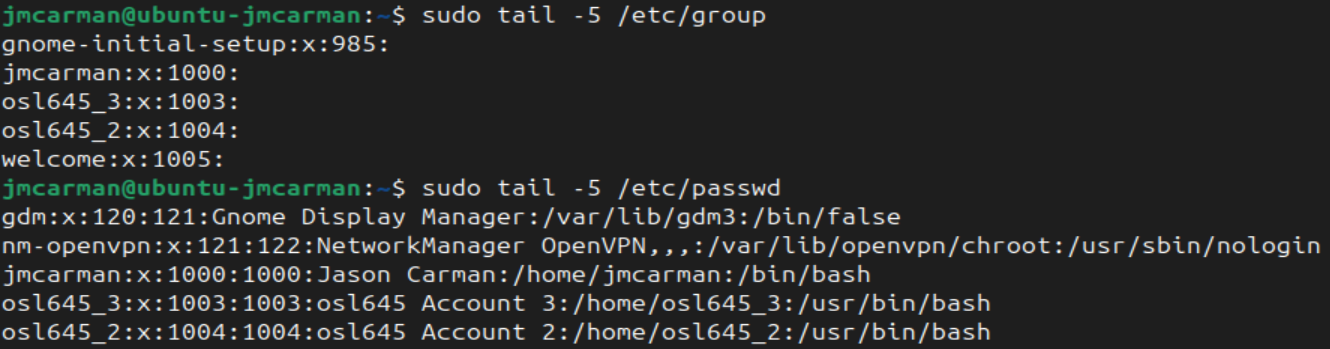
You can see that your account and the 2 osl645 accounts have been assigned a GID (4th field in /etc/passwd) that refers to the group in the /etc/group file. You can also see that the group welcome was created and given the next available GID number. Because future user accounts will have the UID and GID that are out of sync, we could change the GID of Welcome
- Read the man page for the groupmod command.
- Change the GID of the Welcome group:
# Modify the GID
sudo groupmod -g 1500 welcome
- Read the man page for usermod and look for the -a, --append, -g, --gid, and -G, --group options.
- What is the difference between the -g and -G options?
- Issue two separate usermod commands to add both osl645_2 and osl645_3 to the newly-created welcome group, as a supplemental group:
# Add users to the welcome group
sudo usermod -aG welcome osl645_2
sudo usermod -aG welcome osl645_3
- Verify that both osl645_2 and osl645_3 now belong to the welcome group.
When a file is created it is assigned an owner and a default (primary) group. The Linux system administrator can not only change a file's ownership, but also change the default group that a file belongs to. In addition, the sysadmin can also add other users to a supplementary group that they have created via the usermod command. This is useful in setting group permissions via the chmod command.
- We can use the chgrp command to change the group assigned to the file information.txt if you have root permissions
# Change group assigned to a file
sudo chgrp welcome ~osl645_2/information.txt

# List the file details
sudo ls -l ~osl645_2/information.txt
- Open a terminal and list the details for the information.txt file
Groups provide a method for us to assign permissions to multiple user accounts easily.
Practical Example
Management has sent you (the Linux sysadmin) that a "new" employee has been hired and will be on on probation for 3 months. As the Linux system administrator, they want you to perform the following steps:
- Use the useradd command to create a user account called: noobie to expire in 3 months from this date as part of the security policy of this organization (issue man useradd to determine correct option to set expiry date).
- Set an appropriate password for this user account.
- Add this newly-created user to the newly-created welcome group.
- Examine
/etc/groupto verify that you made the correct operations. - Use the usermod command to set the full name of the user account noobie to "Really Green". Examine the result of running that command in the
/etc/passwdfile. What has changed?
Unfortunately, you were later informed that this "noobie" employee was caught stealing from the company. They want you to perform the following operations:
- Remove this account, but keep "noobie's" home directory for police investigation purposes.
- Verify that you correctly issued the correct commands.
Answer INVESTIGATION 1 observations / questions in your lab log book.
Investigation 2: Controlling Sudo Elevated Privileges
When you installed Ubuntu, you didn't set a root password. This caused the installer to give your first regular user account the ability to use the sudo command to run commands with root privileges instead of enabling the root account. Which raises some questions.
- How would we allow other users to run commands with sudo?
- Can we control access to sudo by limiting the commands available?
sudo provides a system of giving elevated permissions to specific users and to specific commands. This allows us to distribute administrative workload amongst multiple employees without giving all of them full administrative access to the system. For example, we could allow Help Desk staff access to the passwd command so they can perform password resets.
Part 1: Finding out why Your First User can do Anything
You've already observed that your first user can use sudo to execute any command, but what about their account actually makes that possible?
- View (but do not edit) the contents of the sudo config file /etc/sudoers.
- Read the comments at the top of the file.
- Search the file for your user account name. You won't find it.
- Check the contents of /etc/passwd and /etc/group for entries with your account name.
# Check for username
grep "username" /etc/passwd /etc/group
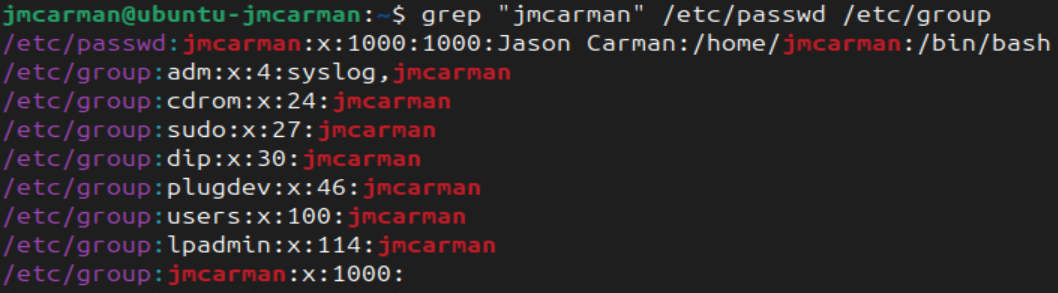
You can see that your account is a member of the sudo group
- View the file /etc/sudoers again.
- Look for the line that allows members of the sudo group to execute any command. (Read the comments)

This line allows any user who is part of that group can run any command, as any user. Effectively, they can use sudo to be root. So why not just give those admins the root password?
- Check the system journal (log files) for entries that mention sudo
# Show journal entries for sudo
sudo journalctl | grep "sudo"
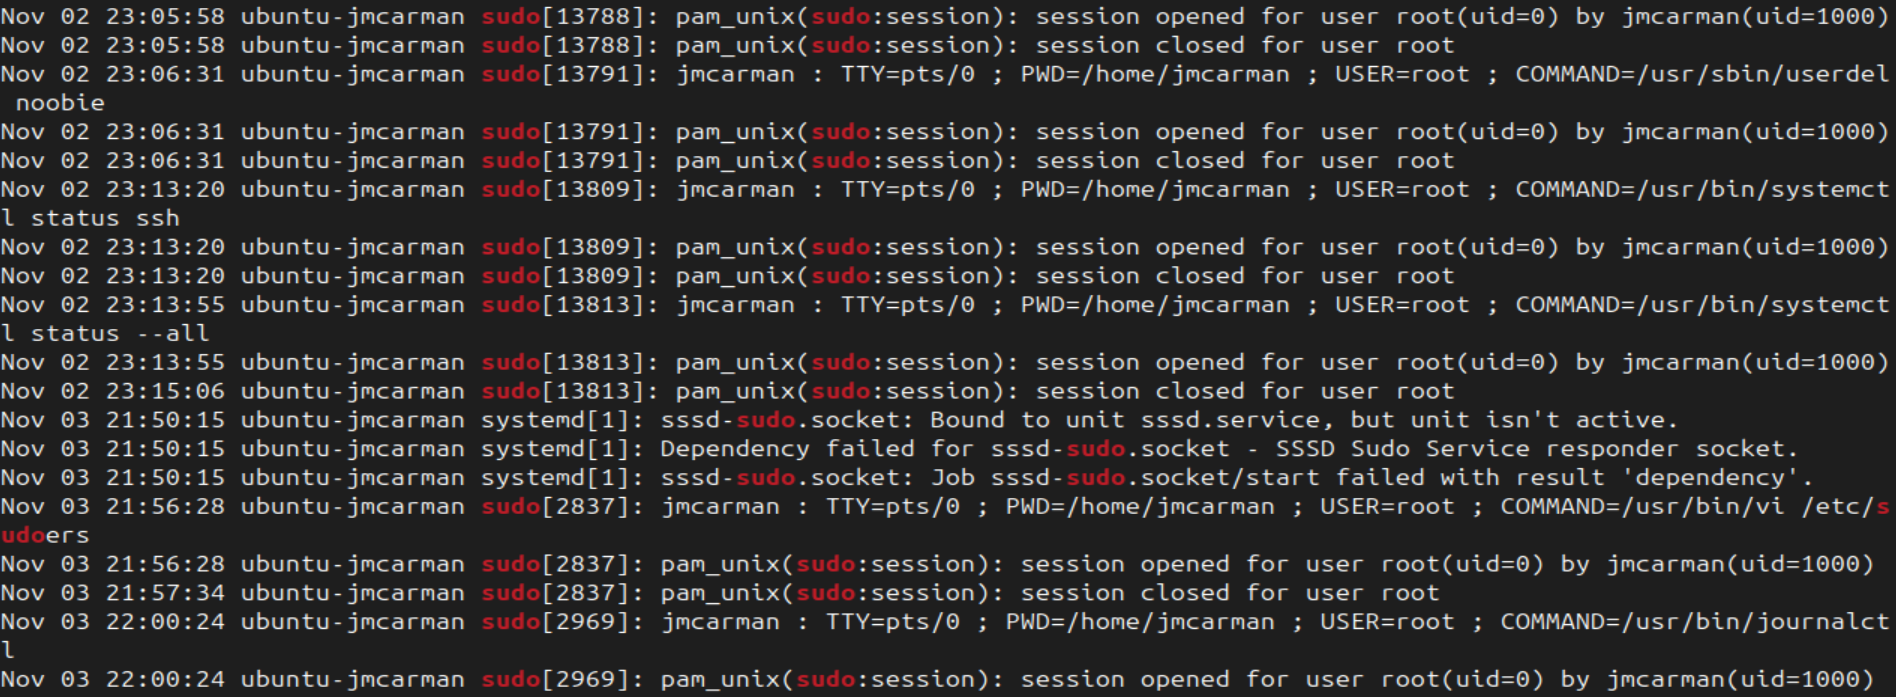
You can see that all sudo activity is recorded in the system log. Including:
- Unsuccessful attempts to use sudo
- When sudo was used
- Who used sudo
- What did they do with sudo
Requiring the use of sudo to access elevated permissions means that there is accountability built in to the system.
Not all Linux distributions use the same group name to configure sudo access. RedHat based distributions for example typically use a group called wheel
Part 2: Adding Limited Sudo Capabilities to Other Users
The sudo group is very useful for senior admins who should be able to run any command, but what about admins who haven't demonstrated the responsibility necessary to wield that power yet? We can use the sudo config files to give them privileges to run some commands, but not all. Note: While this could be done in the main /etc/sudoers file, the better practice is to create supplemental config files. Supplemental config files are stored in the /etc/sudoers.d directory.
- Install the ssh service daemon.
sudo apt install ssh
- Login as your osl645_2 account. Try to run the command
systemctl restart ssh
If successful, that command would restart the ssh service on that machine, but that user does not have permission to do that.
- Try running that command again, this time with sudo.
- It still won't work, because this user does not have permission to use sudo for anything.
- Log out from osl645_2 and log back in as your normal user.
- Use a text editor to create the file /etc/sudoers.d/10-osl645_users. You will require sudo for this to work. Add the following line to it:
osl645_2 ALL=(ALL) /usr/bin/systemctl
- This indicates this user can use sudo to run systemctl commands as if they were any account (root is the important one).
- It is important to notice that commands need to be added with an absolute path to the executable
- Log out from your normal user and log back in as osl645_2.
- Try restarting sshd again. This time it should work.
sudo systemctl restart ssh
sudo systemctl status ssh
Change to your osl645_3 account, and try restarting sshd (with and without sudo).
- That account still can't. Sudo entries only affect the users and groups listed.
We don't want osl645_3 to manage services, that's a job for osl645_2, but we do want them to manage user accounts. So log back in as your regular user and create a sudoers file for osl645_3 called 11-acct_mgmt (like you did above in step 6) and add entries to it so osl645_3 can run the useradd, usermod, userdel, groupadd, groupmod, and groupdel commands with sudo.
osl645_3 ALL=(ALL) /usr/sbin/useradd
osl645_3 ALL=(ALL) /usr/sbin/usermod
osl645_3 ALL=(ALL) /usr/sbin/userdel
osl645_3 ALL=(ALL) /usr/sbin/groupadd
osl645_3 ALL=(ALL) /usr/sbin/groupmod
osl645_3 ALL=(ALL) /usr/sbin/groupdel
- Test the commands as osl645_3 to make sure it works.
Investigation 3: Managing System Services and Targets (Run-levels)
Part 1: How do we Manage System Services?
At the beginning of this lab we mentioned that running unneeded packages can be a security risk due to the unnecessary increase in the complexity of your system. Similarly, it is also unnecessarily hazardous, and even more so, to leave unneeded services running. In this investigation, we will learn how to control services, and turn off those services that we think are not necessary, to help reduce security risks.
On most Linux distributions the first process started (PID #1) is called systemd. The systemd process is responsible for managing, stopping, and starting system services. (As well as other important tasks). The command ps -ef | head -4 will show the first few processes currently running.

In the output above we see that the PID 1 process is called init not systemd

But if we examine the listing for /sbin/init we can see that it is a symbolic link to systemd.
Note: this yet another example of how there are differences between different Linux Distributions. When researching about Linux on the Internet, make sure your searches are Distribution specific.
In order to control systemd we will use the systemctl command.
Although there is a command called: service that may appear to manage services on your Linux system, it is considered deprecated (i.e. "obsolete"). It has been replaced by with the systemctl command.
Perform the following steps:
- Remain in your Ubuntu VM for this section.
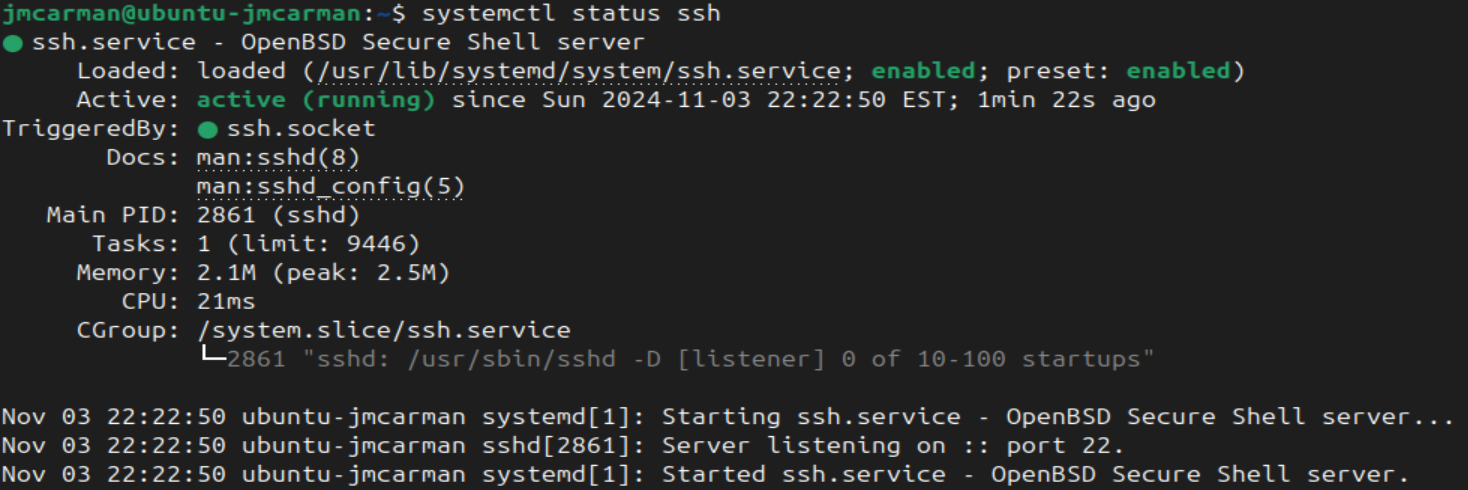
- To verify the status of your ssh service, issue the following command:
# Show status of a service (sudo not required)
systemctl status ssh
Note: The ssh service should show as inactive (dead) and disabled. This means it is not running, and is not configured to start on boot.
Note: There is a major difference between stopping a service and disabling a service: If a service is stopped but enabled, the service will start upon reboot. Therefore to prevent it being started upon boot-up, the service will need to be disabled as well!
- Issue the following commands to start and enable the ssh service, and verify that it is started and enabled.
# Start the ssh service
sudo systemctl start ssh

# Configure the ssh service to start automatically on boot
sudo systemctl enable ssh
Issue the command to verify the status of your ssh service that you used in step 2.
- Note: If you performed the commands correctly, the ssh service should be running, and will automatically run upon your Linux machine start-up.
It is important for a Linux system administrator to be able to start/stop, enable/disable and check the status of services on their Linux server. Students will be commonly performing these operations in their OSL745 course when configuring and troubleshooting network services.
Part 2: How do we Manage Targets (formerly known as runlevels)?
Running Linux servers in graphical mode can make the server vulnerable to penetration (i.e. a potential break-in to the server from unauthorized intruders). The X-windows framework can be vulnerable to attacks when these servers are connected to the Internet. This is why when you install Linux servers, they only permit remote terminal connections (via ssh ) or local tty logins. Which are both text-based interfaces only. Desktop versions of Linux are typically installed on workstations with one of a number graphical desktop environments.
A systemd "target" is essentially a predefined state of the system that the we can "boot" or "switch" the system to. They are similar to an older concept called a "runlevel". The term "runlevel" is specific to the older SystemV init system.
List of Common Targets and Equivalent Runlevels |Systemd Target|SystemV Runlevel| |--------------|----------------| |poweroff.target| 0 | |rescue.target| 1 | |multi-user.target| 3 | |graphical.target| 5 | |reboot.target| 6 |
The Linux sysadmin can also change the default target of a Linux system so that we control the target (or state) the system boots to.
Consider the following commands:
# Display the default target (boot target)
systemctl get-default

# Change the default target to text based only
sudo systemctl set-default multi-user.target

# Change the default target to graphical
sudo systemctl set-default graphical.target

# Change the current target to support only text based interfaces
sudo systemctl isolate multi-user.target

# Reboot the system
sudo systemctl isolate reboot.target

# Shutdown the system
sudo systemctl isolate poweroff.target

# Switch to single user or rescue mode
sudo systemctl isolate rescue.target
The purpose of Linux servers is to run or provide network-based services (i.e. they "serve" the users that operating in that Linux/Unix system). It is common that Linux servers are separated, for security purposes, based on the services they are providing. Generally Linux Servers do not have graphical desktops installed so they are available in Command-Line mode only (multi-user.target). Running these Linux/Unix servers with a Graphical Mode will make them more vulnerable to penetration from hackers, etc. Therefore, it is common that the Linux servers are CLI only, but the Workstations that connect to them within the network are GUI. Therefore, it is important that a Linux/Unix system administrator understand to switch to these different "targets".
Perform the following steps:
- Open a terminal (if you do not already have one)
- Issue the following Linux command:
systemctl get-default
- Note: The output should read graphical.target
- You can use the systemctl isolate command to change the current target. See a list of targets here.
- Change the current target to multi-user.target. You will need to login again.
- What did you notice?
- Login as your regular user and reboot your deb1 VM. It should return to the graphical login screen.
You should notice at this point that the command systemctl isolate did not change the default target the system will boot to. It just changed or switched the current target.
- Issue the command to change the default target to multi-user.target, then reboot. What do you notice?
sudo systemctl set-default multi-user.target
reboot
- Login and change the current run-level to graphical.target
sudo systemctl isolate graphical.target
- Set the default target back to graphical.target before continuing.
sudo systemctl get-default
sudo systemctl set-default graphical.target
- Issue the following command to run a checking script. Note sudo is required:
sudo ~/bin/lab9-check-1
Answer INVESTIGATION 3 observations / questions in your lab log book.
Linux Practice Questions
The purpose of this section is to obtain extra practice to help with your practical test, and your theory test.
Your instructor may take-up these questions during class. It is up to the student to attend classes in order to obtain the answers to the following questions. Your instructor will NOT provide these answers in any other form (eg. e-mail, etc).
Review Questions:
- Describe all of the fields in
/etc/passwd - What is the command to create a user? What option to create a home directory for that user?
- What is the command to change the full name of an already-created user?
- What is the command to delete a user account? What option allows for the user's home directory to be removed as well?
- What is the command to create a group? What is the command (or steps) to include a user in a newly-created group?
- What is the purpose of
/etc/shadow? - What is the purpose of
/etc/skel? - What does the term target mean?
- How to set the target of a Linux system to text-based only? How to set to graphical mode?
- What is the command to view the status of running services?
- What is the command to start a service (like httpd, or sshd)?
- What is the command to stop a service (like httpd, or sshd)?
- What is the difference between starting a service and enabling a service?
- Can a service be stopped and started by issuing just one command?
Authors: Murray Saul, Brian Gray & Jason Carman
License: LGPL version 3 Link: https://www.gnu.org/licenses/lgpl.html