Lab 1: Installing Ubuntu
Lab Preparation
Purpose of Lab 1
In this course, you will learn to install, manage, and connect Linux machines using a combination of local installations, Virtual Machines and the Cloud.
- Lab 1: Create a Ubuntu Host install (called ubuhost) on your Solid State External Drive (SSD) which will be bootable on your lab class computers.
- Lab 2: Install a Virtualization program package on your Ubuntu host called KVM which will be used to create 2 Virtual Machines (VMs) that you will use to learn about Linux system administration for the remainder of this course.
The virtualization software will allow you to create and administer 2 different virtual machines (VMs) on your Ubuntu host (ubuhost) computer system.

It is ESSENTIAL to have a Solid State Drive (SSD) with a minimum storage capacity of 240 GB or 240 GB available on your own computer for you to perform the lab work and provide storage for your Ubuntu host and VMs that you will create in Lab 2. Due to space requirements, you are NOT permitted to share this SSD drive with any other course material than our OSL745 course.
NOTE: It is feasible to use a notebook computer with sufficient hard disk capacity to perform these labs (as you would for an SSD drive). It would require that your notebook computer can connect to the Internet (including in Seneca's computer labs). You would be required to follow the same instructions for this lab (SSD). If you are planning to do these labs on your own personal laptop, please see your professor before you start the installation process to ensure you have appropriate hardware.
Main Objectives
- Create a bootable USB drive of Ubuntu using Rufus.
- Correctly install Ubuntu (ubuhost) on your SSD and check that it boots correctly.
- Note common Linux commands and record them in your lab logbook.
- Use scripts to generate a post-install report for your Ubuntu host.
- Disable Linux Kernel security enhancements to allow for more experimentation.
Minimum Required Materials
- Solid State Drive Minimum Size: 240GB
- SATA-to-USB Connector to connect your SSD to the Seneca Lab computer
- USB Flash drive to install Ubuntu installation image
- Ubuntu ISO
- Lab Logbook (Click Here to Download)
Linux Command Reference
Package Management
System Information
Networking
Miscellaneous
| grep | wc | pwd | ls | more | file | wget | chmod | vi |
|---|
Matrix on-line tutorials
- Linux Basics: /home/ops235/linux-basics
- Using the vi Text Editor: /home/ops235/vi-tutorial
- Shell Scripting - Part I (Scripting Basics): /home/ops235/scripting-1
In this lab, you will learn how to install Ubuntu to your SSD for use in the Seneca boot labs. Please note that at this time the Seneca boot labs are in C2030, C2034, and C2036. You will only be able to boot to your SSDs in these labs.
ubuhost system details:
Name: ubuhost
Boot media / Installation: Bootable USB flash drive with Ubuntu image on it
Disk space: 240GB minimum
The Ubuntu Web Site
Open up Ubuntu in your browser. To get the latest copy of the Ubuntu ISO click on the "Download" button. While you are on the site lets explore...
One of the most important skills you should graduate with is the ability to teach yourself something new. You will not always have the luxury of attending a training course to learn something new, so we must be prepared to learn independently. This often means reading official documentation. Official documentation is also one of the primary sources of information you should use when troubleshooting or configuring a system. Along with user forums and wiki's. Google searches can often produce results that are not specific to your Linux distribution or version, so they can produce inaccurate results.
Reading documentation, like any skill, requires practice. Reading man pages for example is often very confusing for new users as it hard to understand all of the terminology. However, the more time you spend reading the documentation the easier it will become.
Click on the Support link. Take a look at some of the support options available. Find the links to the documentation and forums. Take a look around. Bookmark the page.
Investigation 1: Create a bootable installation drive using Rufus and the latest Ubuntu image
Note: The steps in investigation 1 to create your install drive must be completed on your own personal computer and should be completed prior to class
- Download the Ubuntu image from the Ubuntu
- Download Rufus from the Rufus Website
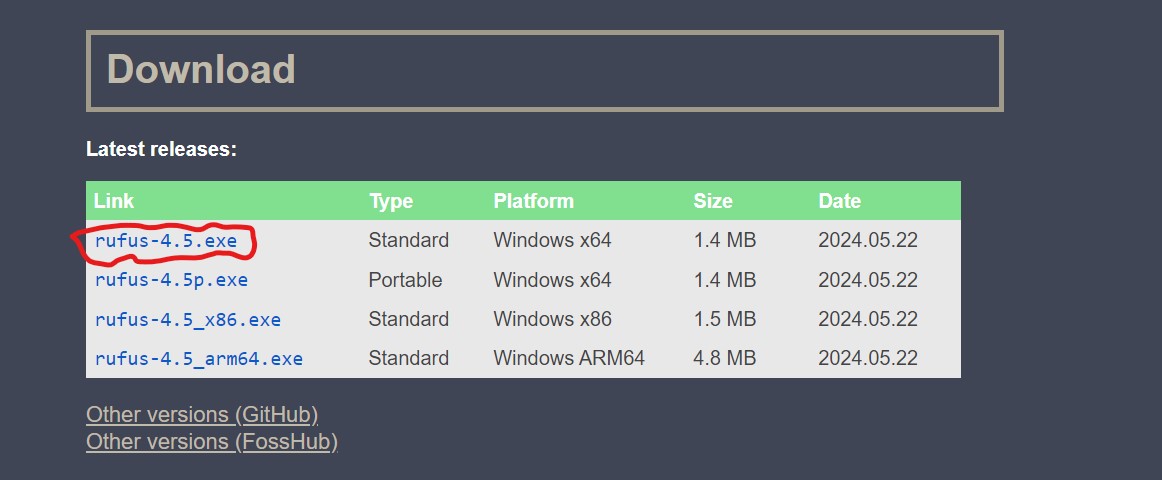
- You should now have both the Rufus executable and the Ubuntu image on your personal computer

- Run Rufus and you will see the Rufus dialogue box appear.
- Select the Ubuntu image as your boot selection

- Double check that your flash drive is selected for the "Device" field, your Ubuntu image has been selected for the boot selection, and that all other settings are the same as the image below.
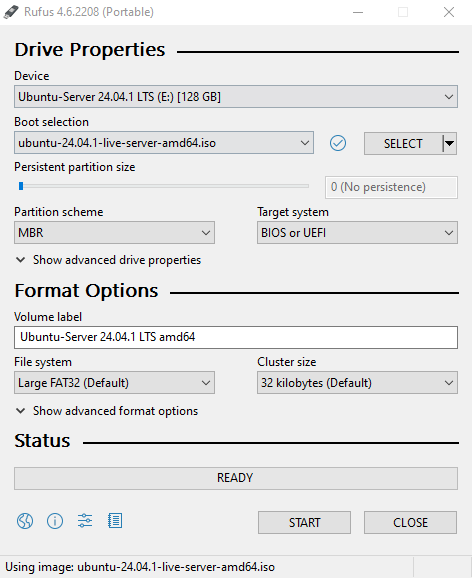
- Click "START" and Rufus will begin to create your installation image on your flash drive
- Note: If Rufus asks you to select the mode that you wish to use to write the image, select "Write in ISO image mode".
- Once the process has completed you will have your installation flash drive ready.
Investigation 2: Install Your host Ubuntu system onto your external SSD (ubuhost)
Note: From this step onward, you will be completing these tasks on the Seneca Lab computer. It is highly recommended that you complete this in the first lab class of the semester.
- Plug your installation USB flash drive and your SSD external hard drive into the Seneca lab computer
- Turn on the Seneca lab computer. You will need to hit the F12 key as soon as you turn it on until you see the following screen:
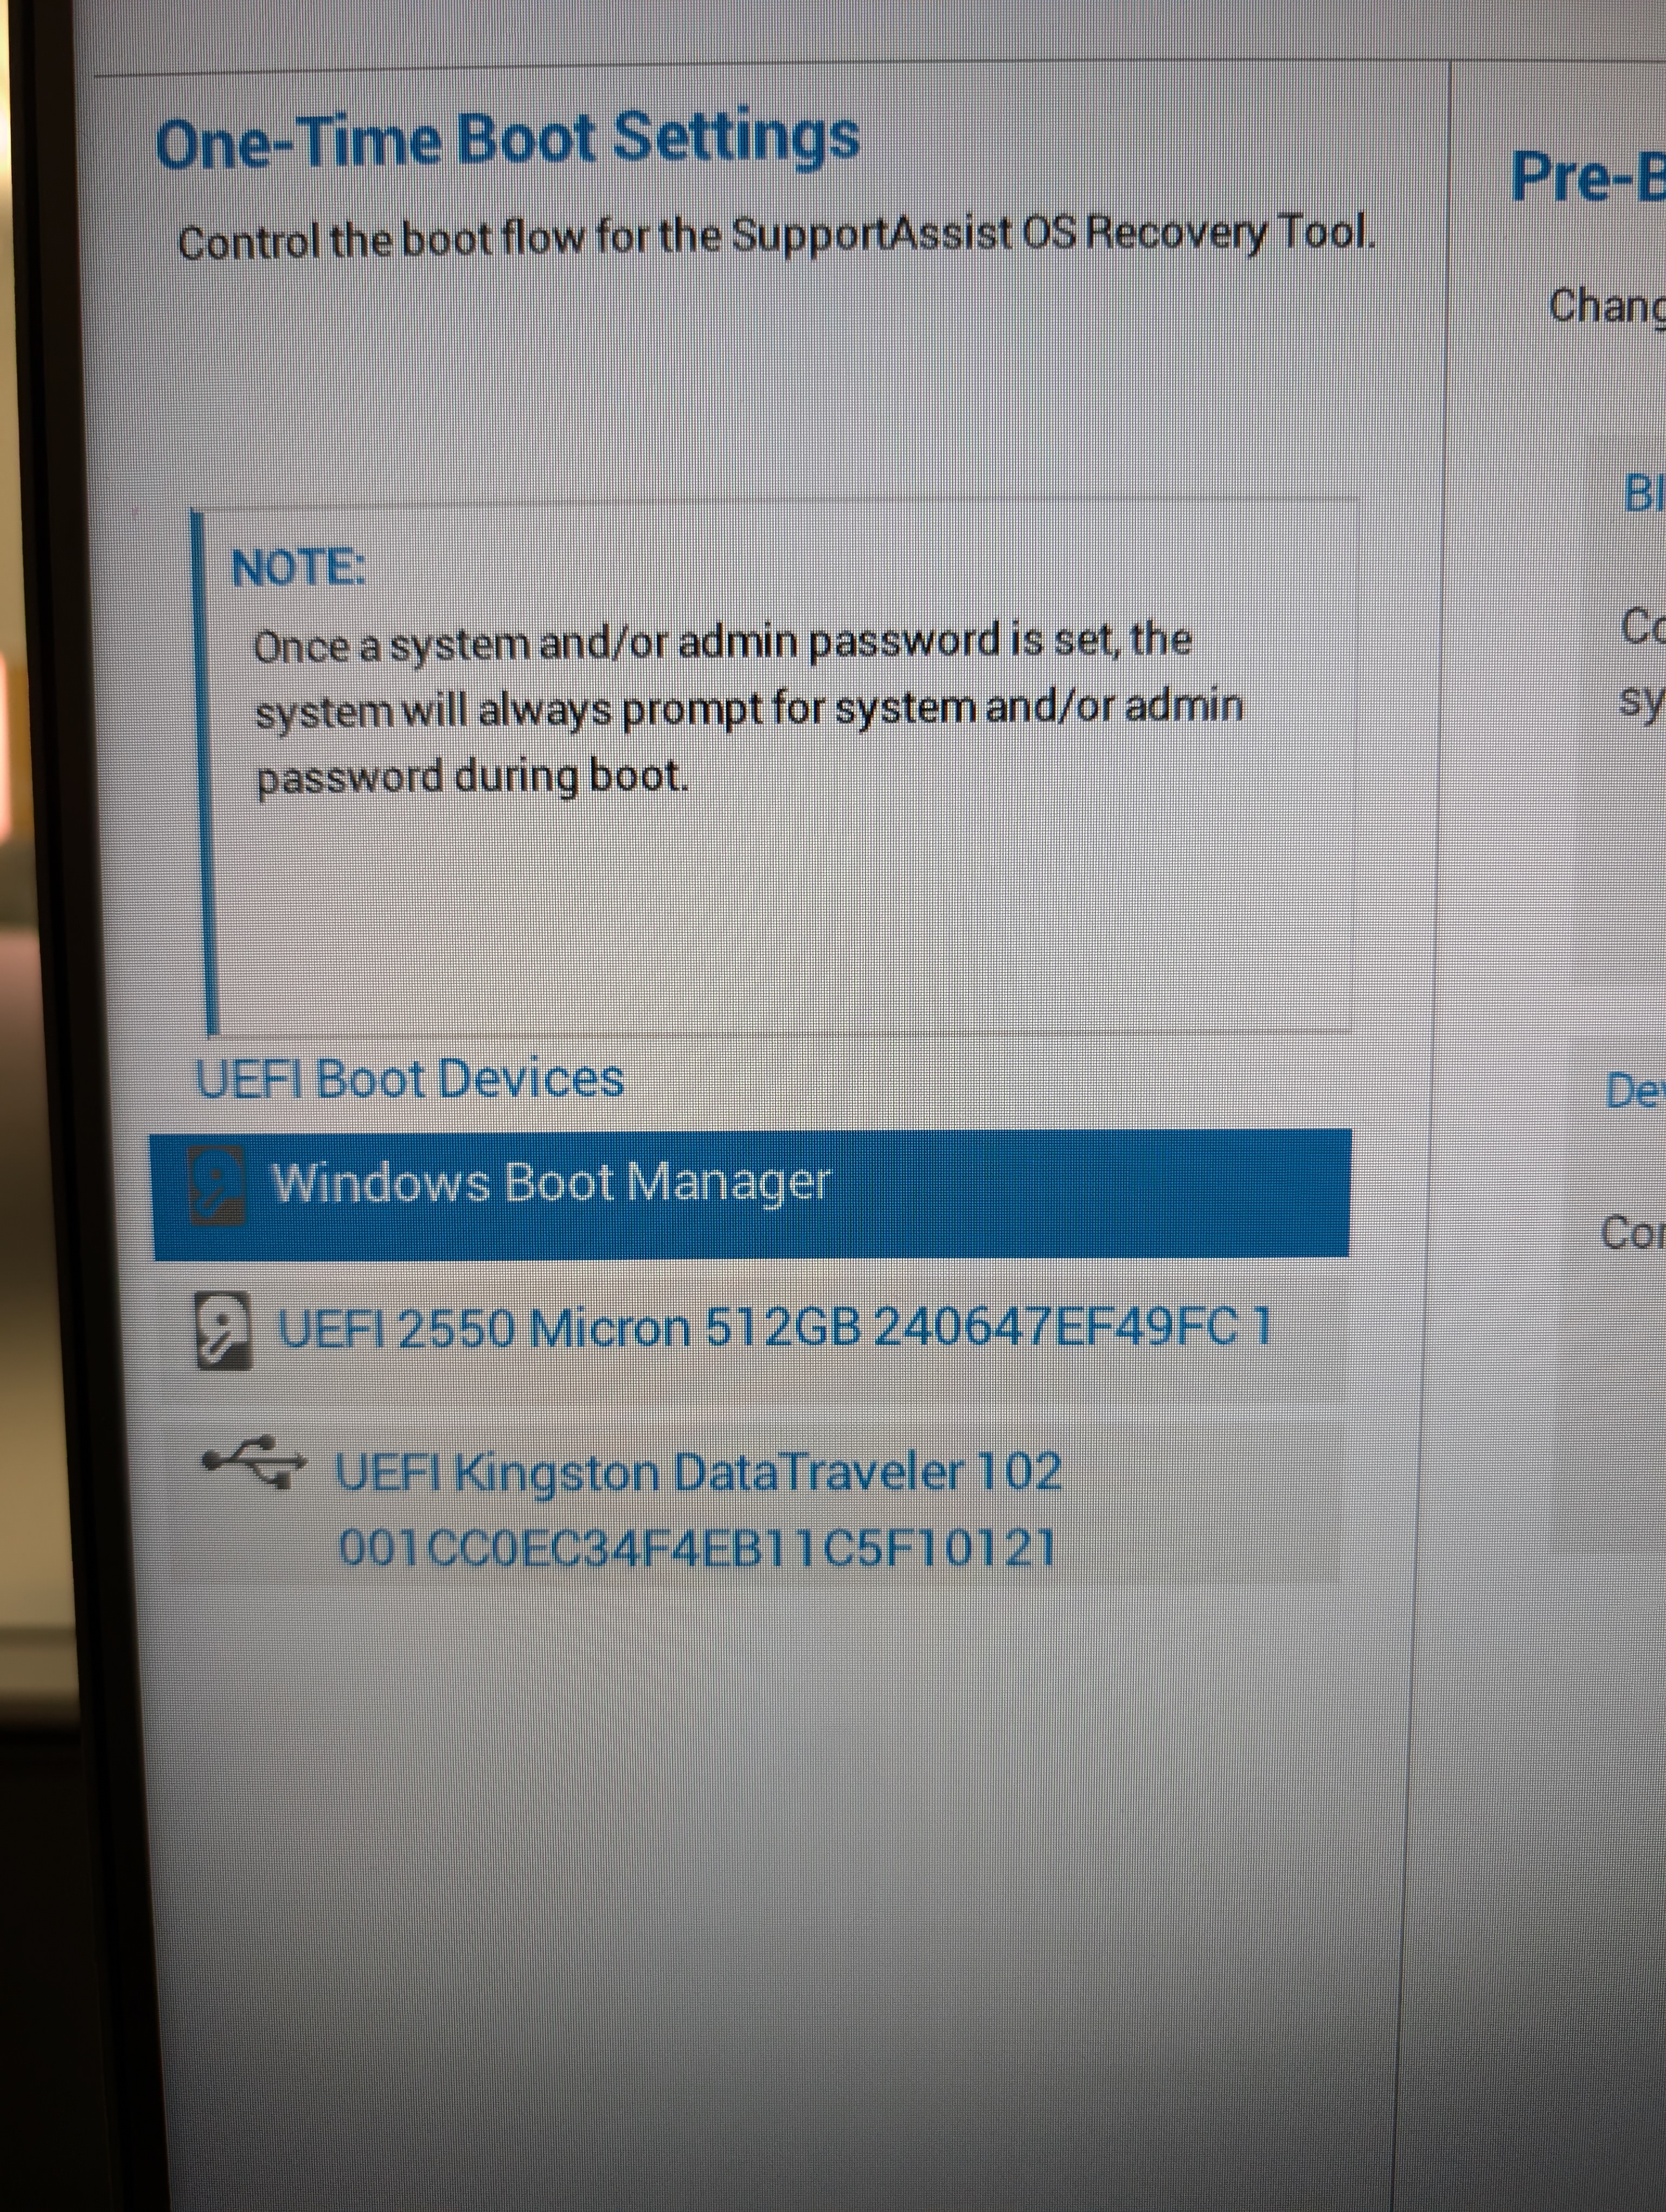
- IT IS VERY IMPORTANT THAT YOU PERFORM THESE NEXT STEPS CAREFULLY!! Notice that there are multiple boot options available to you. You should have 3 options at first. The Windows Boot Manager is built into the Seneca lab computer and is used for the built-in image that Seneca uses. DO NOT TOUCH THE WINDOWS BOOT MANAGER. The UEFI 2550Micron 512GB device is the built-in hard drive on the Seneca computers. We can tell it is the built-in hard drive because of the symbol to its left. Depending on the computer you are using, it's exact label may be different from what you see but the symbol will be the same. DO NOT TOUCH THE INTERNAL HARD DRIVE. Altering either of these may break the system and it is the student's responsibility to ensure that no damage comes to the Seneca computers. YOU HAVE BEEN WARNED!
- The other device you will see is your installation USB flash drive. The image above shows it labeled as "UEFI Kingston DataTraveler" but yours will be something different. Select your USB installation drive.
- Upon selecting your installation USB flash drive you will be asked for an admin password. Provide the password and press "OK". Note Your professor will give you the password on the first day of class.
- If you created your installation USB flash drive correctly, the Seneca Lab computer will boot to it and eventually you will see the following screen:
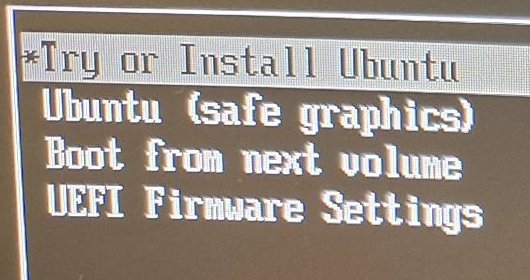
- Select Try or Install Ubuntu.
Once you have booted to the desktop, follow the steps in the Ubuntu installer.
- Under Choose your language, select English, and click Next.
- Customize any Accessibility options you wish, and click Next.
- Under Select your keyboard layout select English (US), and click Next.
- Under Connect to the internet leave Use wired connection selected, and click Next.
- Under What do you want to do with Ubuntu?, leave Install Ubuntu selected, and click Next.
- Under How would you like to install Ubuntu?, select Interactive installation, and click Next.
- Under What apps would you like to install to start with?, select Default selection, and click Next.
- Under **Install recommended proprietary software, check the boxes to:
- Install third-party software for graphics and Wi-Fi hardware
- Download and install support for additional media formats
- Click Next.
- Under How do you want to install Ubuntu? select
- Erase disk and install Ubuntu. Click on Manual installation
Creating Partitions
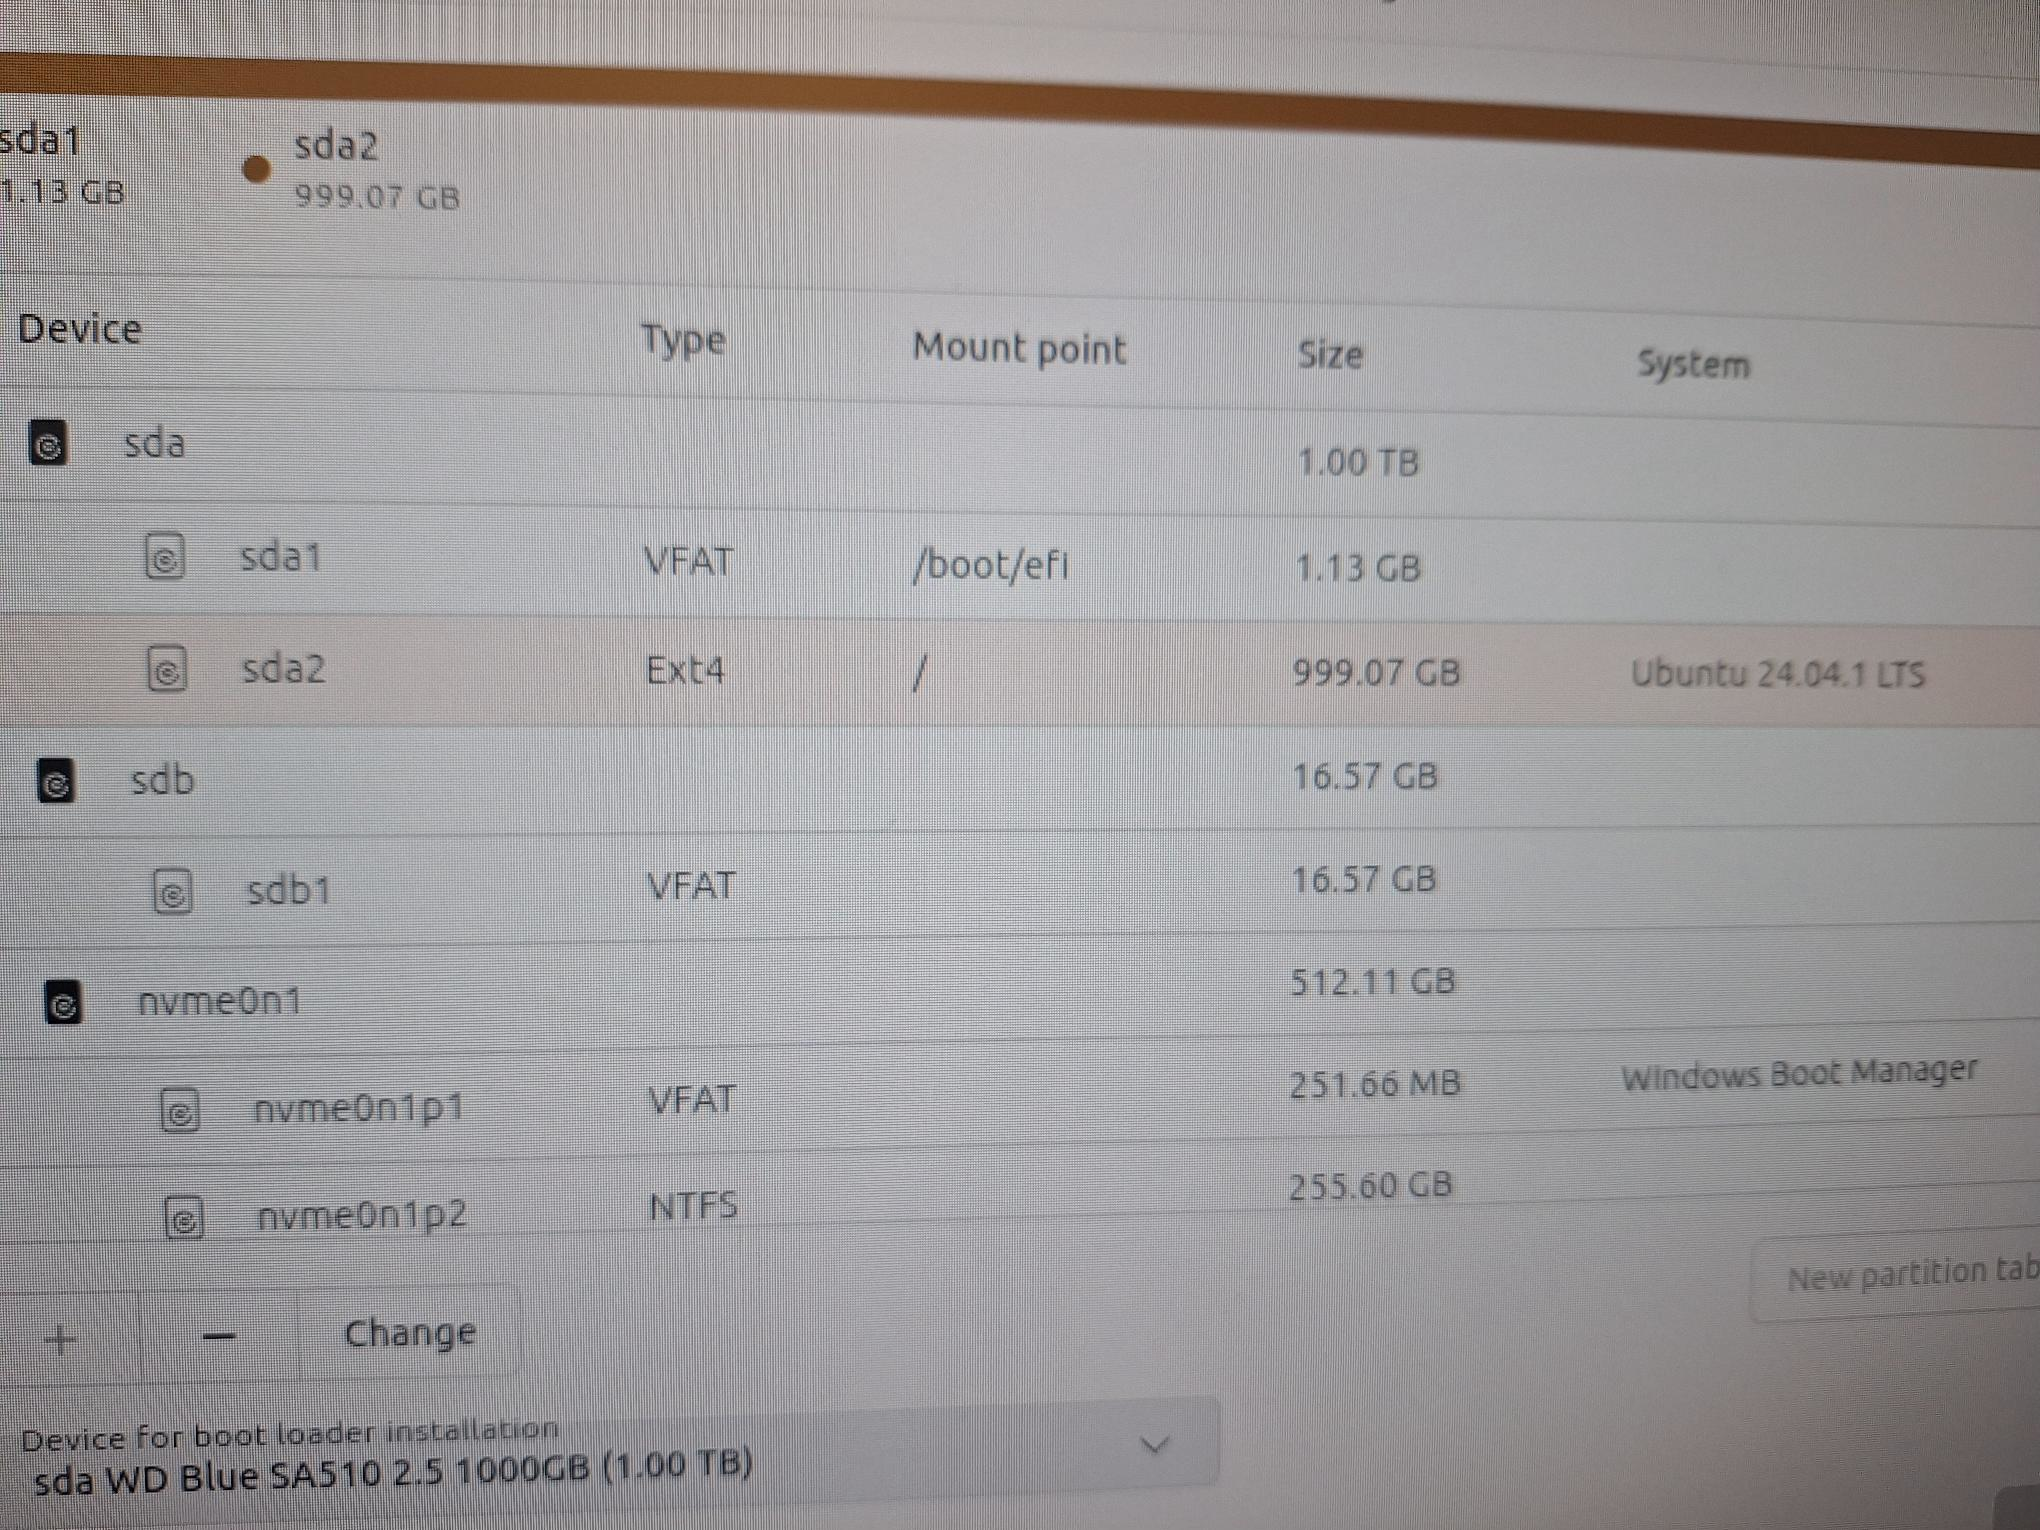
Select sda
- Select New partition table
- Create a single Ext4 volume mounted on /
- Click on Device for boot loader installation and select your ssd ie sda WD Blue SA510 2.5 1000GB (1.00 TB). Your partitions should match the following screenshot.
Creating your account
Create your account:
- Your name: enter your name
- Your computer's name: ubuhost
- Your username: Your Seneca username
- Create a secure password that you will remember
Select your timezone: Toronto
Click Install and be prepared to wait patiently for a while.
When it is done, click Restart now.
When prompted to remove the installation media, press Enter.
Login with your user.
- On the welcome screen, click Next
- Enable Ubuntu Pro: select Skip for now and click Next
- Help improve Ubuntu: select an option and click Next
- Click Finish
When it reboots, be prepared to bring up the boot menu again, just like you did in step 2. Now your boot menu should have 4 items:
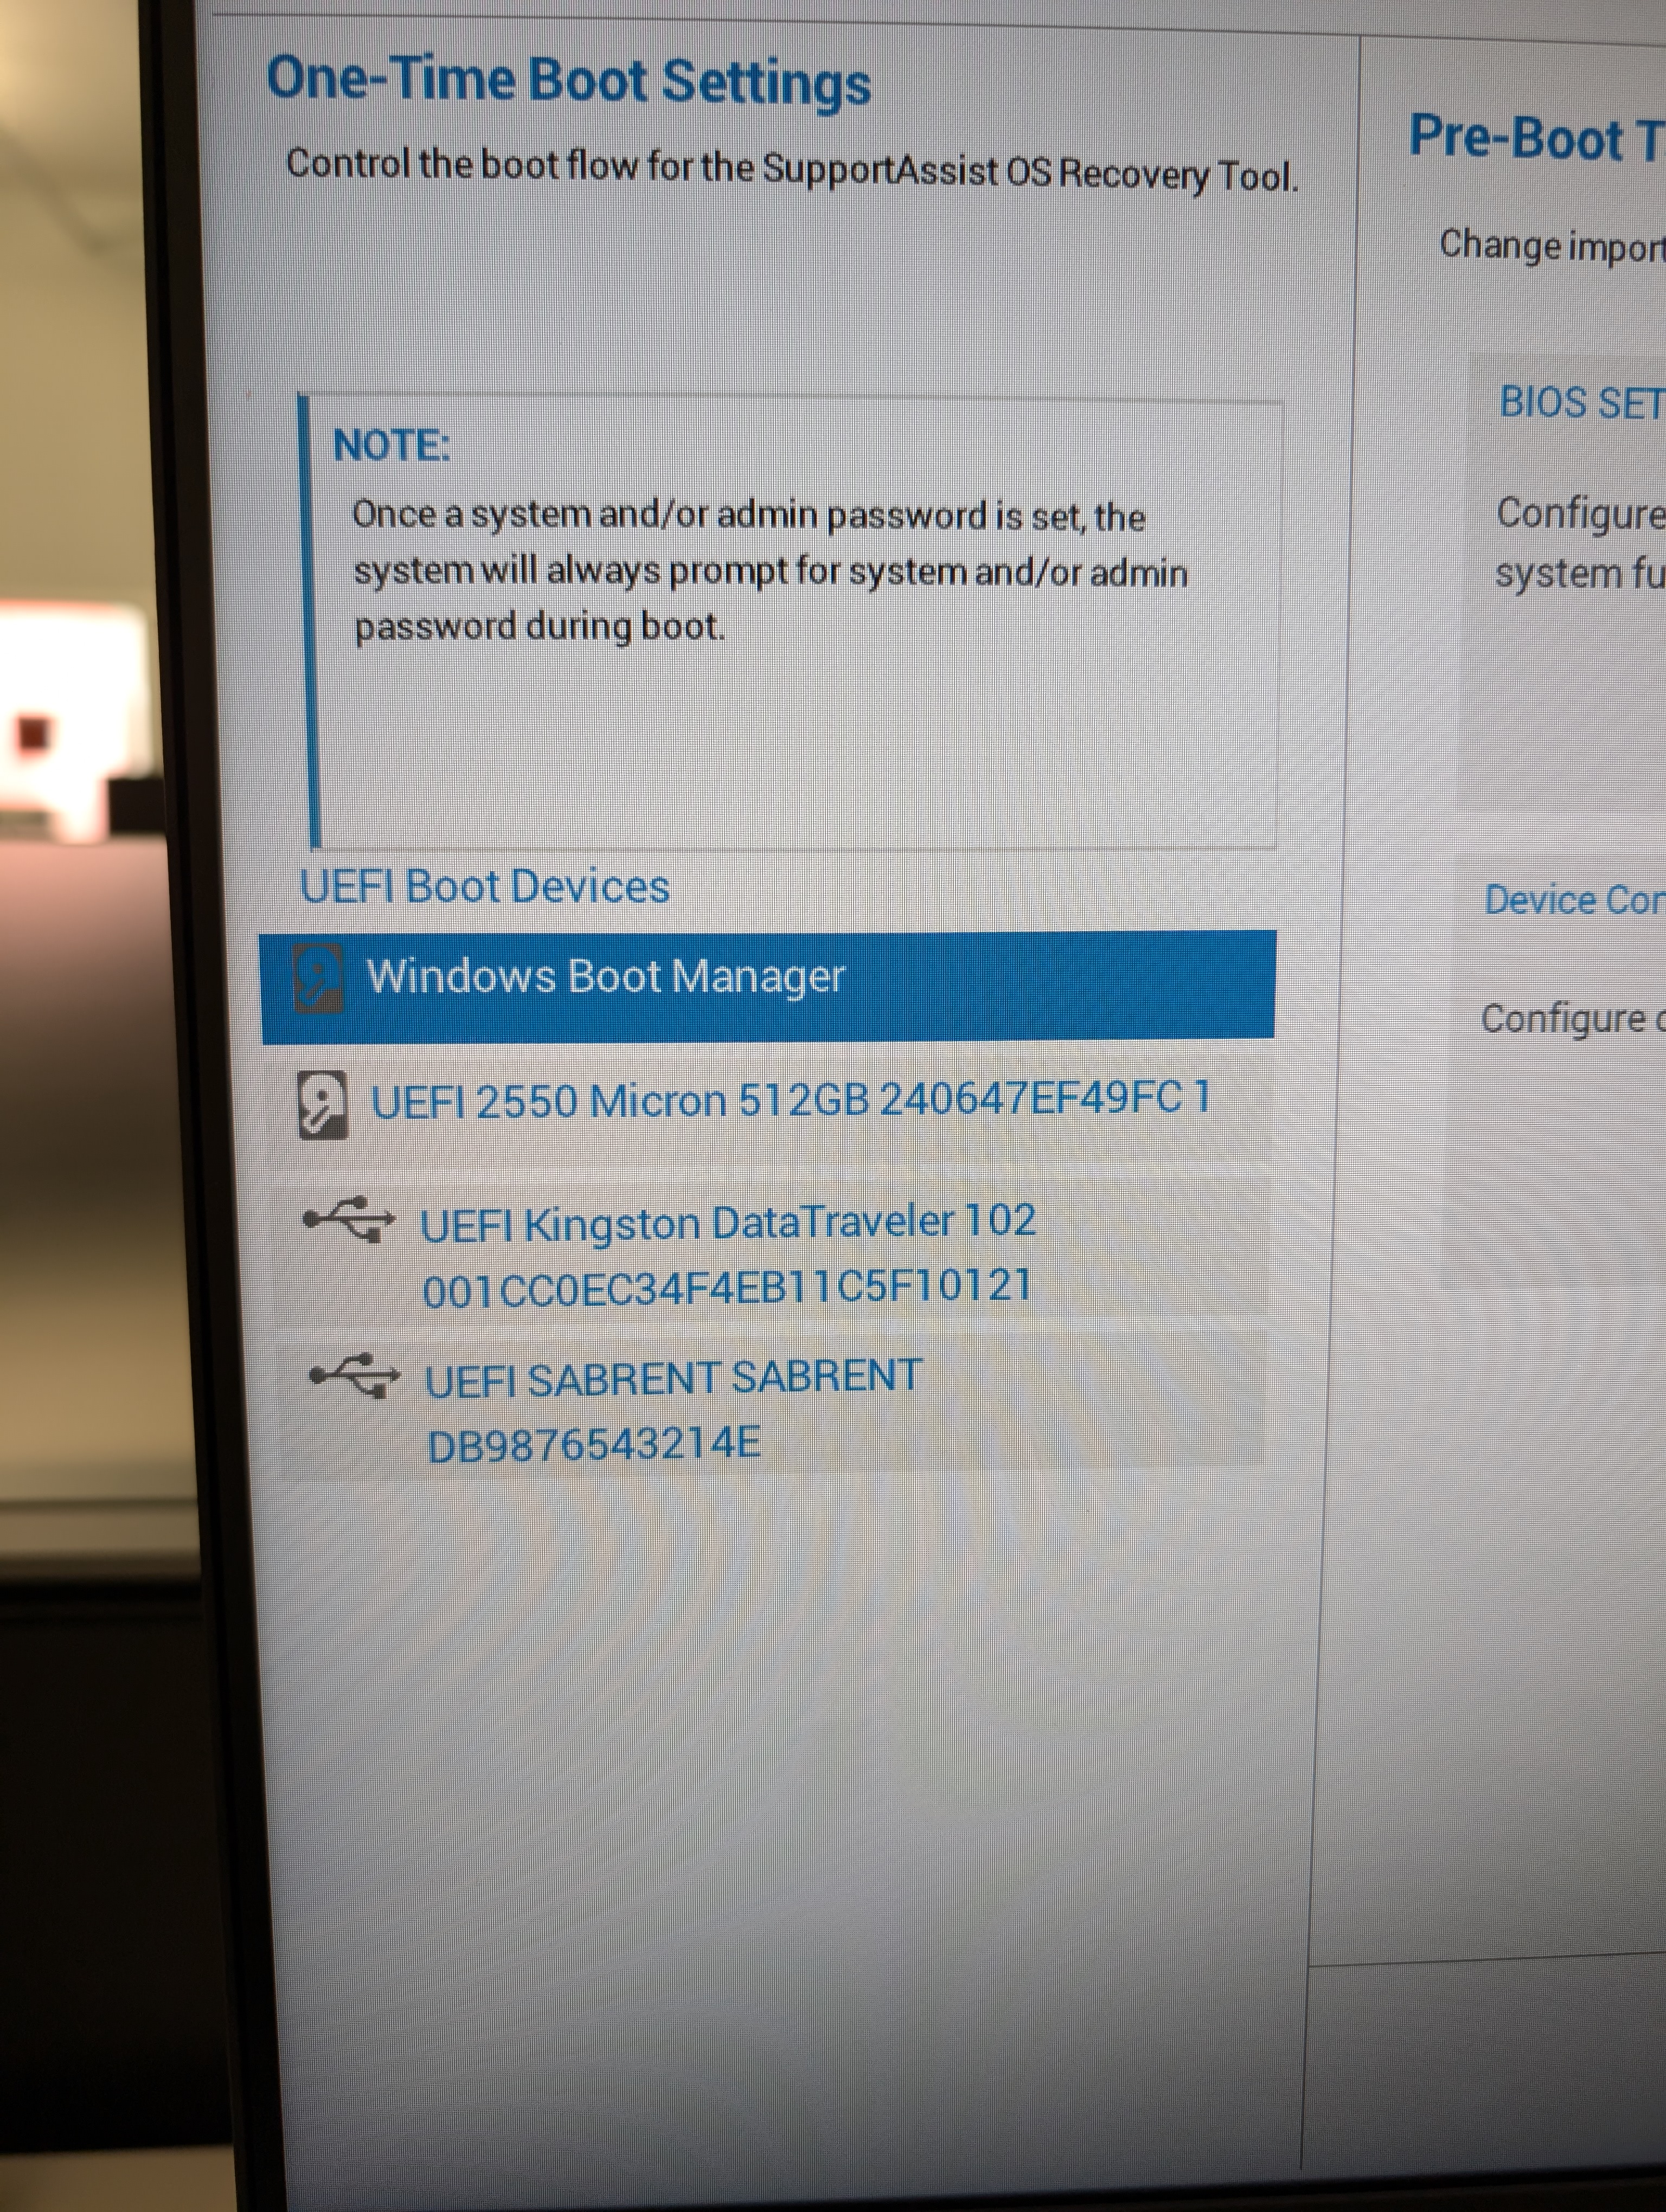
Because you installed Ubuntu to your external SSD, it now shows up as a bootable item on this boot menu.
Note: In the image above, the installation USB flash drive is labeled as "UEFI Kingston DataTraveler". The external SSD in the image above is labeled as "SABRENT". This is not the SSD itself, rather it is the label for the SATA-to-USB connector that you are using. If you are unsure of which one is your SSD, check your physical SATA-to-USB connector that connects your SSD to the Seneca lab computer. You will likely see its brand name somewhere on the connector. Look for that name in the boot list. Now you know which item is your external SSD.
Now, select your external SSD from the list of bootable drives. Put in the admin password when prompted and your new Ubuntu install will load up.
When the system boots up you will be presented with a graphical login screen. Select your username enter your password
Then you will be presented with the "Welcome" application
- "Next" for English
- "Next" keyboard layout
- Turn off Location services and then "Next"
- "Skip" connecting your online accounts
- Click "Start Using Ubuntu"
You can now remove your bootable installation USB flash drive from the computer. If you only have one USB flash drive, you can reformat your flash drive for other uses later in this course. However, it is likely that some students will need to do a re-install of their host system at some point during the semester, so if you can it would be a good idea to keep this one as a bootable installer and use another flash drive for general storage. (Which will become important in Lab 2!)
Investigation 3: Common Post-Installation Tasks
Test your Internet connection
One of the first things you do on a new system is install software and update the system. Your first step to installing software should always be to test your Internet connectivity, as without a working connection you cannot resolve anything. To do this we can use the tool ping, which is commonly used to troubleshoot network connectivity issues.
Useful addresses to ping to verify network connectivity are the following:
If that fails, you could try pinging:
8.8.8.8, or 8.8.4.4
Your default gateway
8.8.8.8 and 8.8.4.4 are two publicly available DNS servers Google provides for free use. You can use these to test external network connectivity. For example, if pinging www.google.com fails, but pinging 8.8.8.8 succeeds it is likely you have an issue with DNS resolution.
If pinging 8.8.8.8 also fails, the problem is likely on your local network. You could try pinging your default gateway to confirm whether it is reachable or not. Common issues are:
- Wrong default gateway configured
- Default gateway is down
- Unplugged or broken network cable
Since you are dealing with a virtual machine, unplugged or broken cables aren't an issue. The other two are still possible.
Ping www.google.ca. Proceed to the next step only if it is successful.
ping www.google.ca
Next, verify your IP address configuration.
ip a
Notice you have two NICs (Network Interface Cards).
- lo which is your loopback, and is assigned the IP address 127.0.0.1/8 by default
- ens?? where ?? represents two digits: ie ens33. This is the NIC connected to the virtual network, which allows communication between your VM and the Internet through your Host PC.
Now, lets look at your routing table. Your routing table tells you what networks your VM knows about, as well as the default route. The default route is where packets are sent when they don't match any other entry in your routing table.
ip route
Viewing your IP address configuration and routing table can be useful tools for troubleshooting network connectivity issues. Ping and traceroute are useful tools for verifying a particular destination is reachable. Traceroute has the added benefit of showing you where the packets are failing.
Part 1: Managing Software and Repositories with apt
We will learn how to install software packages with the apt utility. This command is useful for installing software since it automatically resolves software dependencies prior to installing the software. Upon your Ubuntu install, links to software repositories are automatically made to allow for easy software updates and installs from online repositories.
Internet Connection
In order for the apt command to work you require a connection to the Internet.
Common apt Commands
# Remember apt usually requires sudo

# Update the list of available packages in the repositories
apt update

# Upgrade all installed packages to the newest versions
apt upgrade

# Search for a given package
apt search <package>

# Show information for a package
apt show <package>

# Install a package
apt install <package>

# Uninstall a package
apt remove <package>

# List all installed packages
apt list --installed

# Show configured repositories
sudo less /etc/apt/sources.list
Unfortunately, there is no guarantee that a particular software package is contained on the default repository. In order to overcome this problem, you can add other repositories that may contain the application that you wish to install.
Perform the following steps:
- Make certain that you are in your ubuhost machine.
- Search for the package code and then show its information
sudo apt search code
- Scroll through the output. Notice there is no package named code that is displayed. That is because it is not in the ubuntu repositories. Issue the following commands to add the repository (from Microsoft) for code, which is Visual Studio Code.
sudo apt-get install wget gpg
wget -qO- https://packages.microsoft.com/keys/microsoft.asc | gpg --dearmor > packages.microsoft.gpg
sudo install -D -o root -g root -m 644 packages.microsoft.gpg /etc/apt/keyrings/packages.microsoft.gpg
echo "deb [arch=amd64,arm64,armhf signed-by=/etc/apt/keyrings/packages.microsoft.gpg] https://packages.microsoft.com/repos/code stable main" |sudo tee /etc/apt/sources.list.d/vscode.list > /dev/null
rm -f packages.microsoft.gpg
- Update the package cache and install the package
sudo apt install apt-transport-https
sudo apt update
- View the information for the package code.
sudo apt info -a code
- Read through the information provided. Who is listed as the maintainer?
- Now issue the command:
sudo apt install code
- From the menu, search for code and launch Visual Studio Code.
- Close the application.
While it is possible to install a package directly from a package file, it does present some difficulties.
- Resolving dependencies, when using
aptwith the repositories it will automatically resolve dependencies- Compatibility, if the package file is not built specifically for this particular Distribution/Architecture/Version then compatibility problems can certainly occur
- Conflicts, if you install an alternate package from an outside source as well as the same software from the repo then they can conflict with each other.
That doesn't mean we can't install software not included in the repos. We should just try to avoid unofficial .deb packages.
Part 2: Installing snap Applications
While we should mostly be using software provided by our official repos, there are certainly circumstances when software we want is not available. One alternative is using one of the "Universal Packaging" systems to find newer or 3rd party software.
Popular "Universal Package" options include
- snaps (developed and promoted by Ubuntu)
- flatpaks
- Appimages
All of these offer "containerization" or "sandboxing" as a way of resolving the issues discussed above, and also to provide additional security.
This Youtube video explains the different systems.
- Open a terminal on ubuhost.
- Issue the following command to view information about OBS Studio:
sudo snap info obs-studio
- Based on the output, what is this software and what is it used for?
- Install OBS Studio as a snap:
sudo snap install obs-studio
- From the menu, search for obs and launch OBS Studio.
- Ignore the dialogue prompts (unless you are interested in using this application).
- Close the application.
List installed snaps
sudo snap list
- Uninstall OBS Studio
sudo snap remove obs-studio
Note, OBS Studio is available through the Ubuntu repositories. You could install this with the command sudo apt install obs-studio
Updating the system & Installing software
Install the following packages with the command sudo apt install followed by the package names (separated by a space):
- chromium
- cinnamon
- tldr
sudo apt -y install chromium cinnamon tldr
Configuring the Cinnamon desktop
Logout of your graphical system. At the login screen:
- Click on your user, but do not enter your password.
- Click on the gear icon in the lower right corner.
- Select Cinnamon from the list.
- Login as your user.
- From the Menu (bottom left hand corner):
- Browse to Internet
- Right click on Chromium and select Add to panel
Changing Locked Screen-saver Power Settings
Your system automatically enables a screen-saver application which is a useful security tool to prevent unauthorized viewing of information on a terminal after a certain amount of inactivity. Turning-off the locked screen-saver for this course however is more useful.
To Disable the Locked Screen-saver, Perform the following steps:
- Click on the menu button in the bottom left corner.
- Navigate to All applications
- Select Screensaver
- Click the dropdown beside Delay before starting screensaver and select Never.
Perform a system update
The primary source of software and programs that we can install in Linux is online repositories.
These repositories are online databases of different available software organized into Packages.
The repositories and packages are maintained by the distribution (in this case Ubuntu) and they are maintained separately for each release.
We should check for updated packages frequently (at the beginning of each lab) as they often contain security updates and bug fixes.
To interact with the repositories and manage our software packages, we will use the apt command.
apt is the command line package management tool used by Ubuntu and many other distributions of Linux.
To check for and install updated packages we need to use 2 separate apt commands:
apt updatewill update the local copy of the repository databaseapt upgradewill check the database for packages that need to be updated, download them and install them along with any required dependencies.- To make changes to the software on the system requires root privileges, so we will need to add
sudoto the beginning of the command. We can also run both commands on a single command line. - Type
sudo apt update && sudo apt upgrade
Using && as a separator between the 2 commands will cause the 2nd command to execute only if the first command is successful.
Safe Shutdown and Restart, and safely removing the external SSD
You are required to correctly shutdown your Ubuntu host as you would with any operating system.
FAILURE TO DO THIS MAY DAMAGE YOUR HOST AND NOT ALLOW IT TO BOOT PROPERLY (YOU HAVE BEEN WARNED).
- Click on the power icon in the top right corner of the display and then click on the power icon again
- Click on Restart or Shutdown
What was installed?
- Type the command
man aptortldr apt - Read the man page for the apt utility and figure out a command to list only the installed packages.
- How many packages were installed? (Hint: pipe the output to
wc -l)
Customizing your desktop/shell
- Explore the Themes available under Applications. You can enable dark mode here (under settings) if you wish.
- Read and edit your
~/.bashrcfile and add an alias calledupdatethat will run the command linesudo apt update && sudo apt upgrade - Both
nanoandviare installed by default. You could/should also installvim- Type
sudo apt install vim
- Type
Investigation 4: Using Shell Commands to Generate System Information
It is very common for system administrators to keep records regarding their installed computer systems. For example, it is necessary to have a record of all the hardware information for each machine in order to help fix computer hardware problems, and to assist when purchasing additional consistent computer hardware.
Therefore, it makes sense to also have a record of the installed software and important system configurations as well. This can contain information regarding the Linux operating system, installed software, and network connectivity information.
Perform the Following Steps:
- Refer to the table below for common system information utilities and explanations for each.
- Run each of these commands, taking the time to understand what each command's output means.
- Record the output from these commands (except for the ps -ef output) in your lab logbook.
Linux/Unix System Information Utilities
| Command(s) | Purpose |
|---|---|
uname -rv, hostname, ps -ef | Basic Linux OS information such as kernel version, host-name of Linux server, and all processes that are running on the system after installation. |
ip address show, ip route show, nslookup (at prompt, enter command: server) | Obtain network connectivity confirmation including: IP ADDRESS, Netmask, routing (default gateway), and the default Domain Name Server. |
date +'%A %B %d, %Y (%I:%M %p)' | Get the current date and time according to the system. (If the date or time do not match your timezone, fix this in system settings for ubuhost!) |
Note that when you are done, you should have recorded the following information in your Lab Logbook:
- Current Date (according to ubuhost)
- Hostname (ie. ubuhost)
- Kernel version
- IPv4 address
- Subnet mask
- Broadcast address
- Default gateway address
- DNS address
Review what you just wrote in your Lab Logbook. You should be able to understand them because you just put that content there, but what would this look like if you look at it several months from now? Make sure it's clear to future-you!
Answer Investigation 4 observations (all parts and questions) in your lab log book.
Investigation 5: Using BASH Scripting to Generate System Information Reports
You learned about creating and running Bash Shell Scripts in OSL645. Shell scripts help Linux users and system administrators to automate repetitive tasks to become more efficient and to help them save time. We can take what we have learned from the commands above and put them into a bash script to generate information reports for your newly-installed Linux host machine.
Configuring SSH keys in your Ubuntu Host & GitHub
You're going to want to configure secure remote access between your GitHub repository and your Ubuntu Host (ubuhost). Fortunately, you have the perfect tool available at your fingertips: SSH key pairs.
Start your ubuhost virtual machine if it is not already running. Login, launch a terminal and issue the following command to generate a 4096 bit RSA keypair for your GitHub account's email address (replace username@email.com with your email address).
ssh-keygen -t rsa -b 4096 -C username@email.com
Accept the defaults and provide a secure passphrase (twice). Your keypair will be generated, with the public key saved as id_rsa.pub in .ssh (a hidden directory) in your home directory.
Before copying this into your GitHub account settings, you'll want to test it. Issue the following command to test it:
ssh -T git@github.com
This should fail, because you haven't added your ssh key to GitHub.
You should see the following output:

Issue the following command to view your public key.
cat .ssh/id_rsa.pub
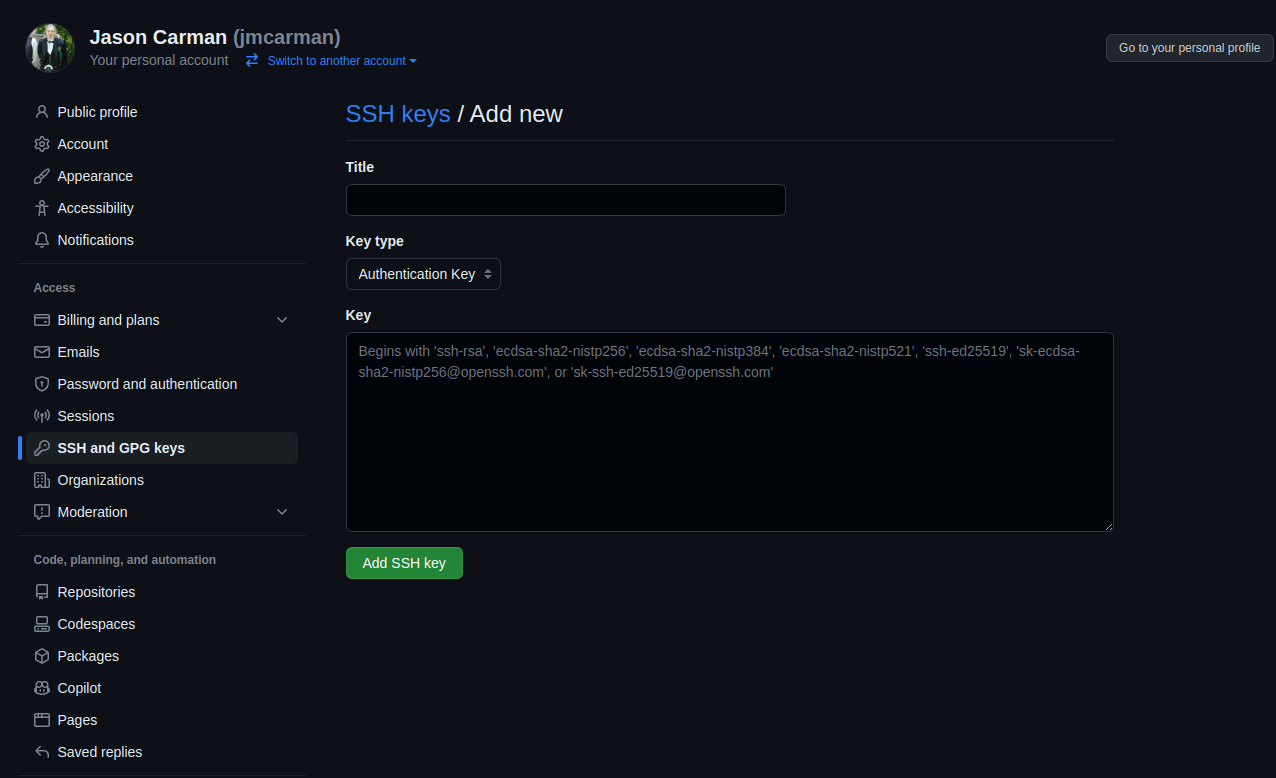
- With your mouse, select the contents of the
catcommand (beginning withssh-rsaand ending withusername@email.com) and copy it. - Access the SSH and GPG keys settings in github.com (you will be prompted to login if you haven't already).
- Click New SSH key, give it an appropriate title and paste in your public key (see following screenshot).
Try issuing the following command again. It should work now.
ssh -T git@github.com
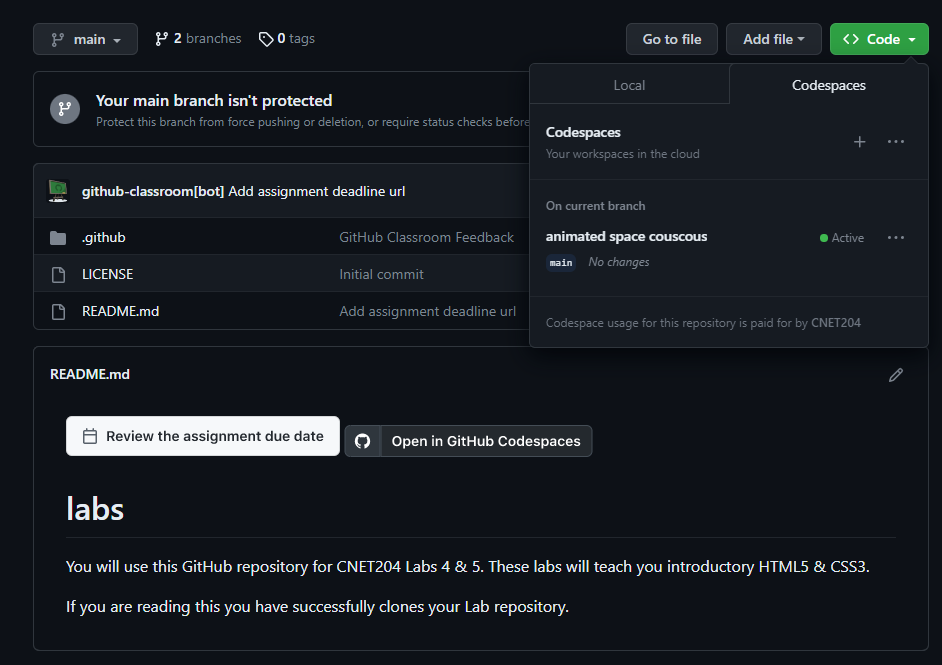
Accept the Lab 1 GitHub Classroom assignment.
Use the following link to set up your lab 1 repository. You will be using this for this investigation.
Next, follow the sections for setup on a Shared Computer by Accessing GitHub Codespaces or on your Personal Computer. While you can install Visual Studio Code (VSCode) locally, I recommend using Codespaces for this course.
Once you have set up your Lab 1 repository by following the link above (go back and do that if you missed it), you can access GitHub Codespaces from any browser on any device (PC, tablet, smart phone). Codespaces gives you access to Visual Studio Code, with direct access to your repository (without having to clone) from anywhere. It's perfect for a portable development environment. Login to GitHub (if you haven't already) and proceed.
You may have noticed in the link above you can click Open in GitHub Codespaces. Feel free to do so now. If you have already clicked past that window the next few steps will show you how to access it again (which is useful for future access attempts anyway). Click on Code and create a new codespace. Once you have created it, you can access it by clicking on the named link.
Cloning your GitHub repository in ubuhost
Issue the following command to clone your GitHub repository into your home directory.
Important: Be sure to replace
usernamein the following command with YOUR GitHub username.
git clone git@github.com:OSL745/lab-1-username
- Issue a command to confirm the repository has been cloned on your Ubuntu VM.
- Issue a command to change into your lab-1-username directory.
Confirm the contents have been written to your lab-1-username directory. You should see the following files:
- LICENSE
- README.md
- myreport.bash
Modifying the myreport.bash script
In codespaces has created, open the provided template called vs, and update the comment block to include your name and today's date.
Edit myreport.bash file to contain the following:
#!/bin/bash
# Author:
# Date:
# Purpose: Create system information report
# Usage: ./myreport.bash
#

# Create a system information report using a here document, redirection the output to /home/$USER/sysreport.txt
cat << EOF > /home/$USER/sysreport.txt
System Report
$(date +'%A %B %d, %Y (%I:%M %p)')

Hostname: $(hostname)
Kernel Version: $(uname -r)
IP Addresses:
$(ip a)

Installed Packages:
$(apt list --installed)
EOF
- Issue the chmod command to add execute permission for the user the myreport.bash file.
- Save your editing changes, stage and commit your changes to GitHub.
- What other commands and information could we document? Perhaps a list of storage devices, partitions and mount points?
On ubuhost, open a terminal and confirm you are in your home directory.
- Issue the following Linux command to change to the local clone of your GitHub repository.
cd lab-1-username
- Pull your changes into ubuhost
git pull
- Run your script and observe the output.
./myreport.bash
- Did it work? View the contents of ~/sysreport.txt
Lab 1 Sign-Off
It is extremely important that you complete Lab 1 correctly as this Ubuntu install will be the platform on which the rest of the course will be completed.
When you have completed Lab 1, ask your instructor to come and check your installation. This must be done in class. They will ask you to complete a set of tasks/commands. If everything has been completed correctly, your instructor will mark your Lab 1 as complete.
Exploration Questions
- List the major screens (steps) in the installation of Ubuntu.
- List the steps for updating software.
- How do you determine the host name of your GNU/Linux workstation?
- What command can display the NIC MAC address?
- What command is used to get a list of running processes on your newly-installed system?
- What is the process to install software using apt?
- What is the process to install software using snap?