Lab 9 - RDS
Overview
This week's lab will cover the following:
- Creating a Relational Database Service (RDS) instance
- Connecting to your RDS
In this lab, you will create a database using the Relational Database Service. You will then test connecting to it from your www instance. You will use this database in lab 10 to install and deploy Wordpress using Elastic Beanstalk.
Creating a RDS instance
Start your session in the Learner Lab by clicking on the Start Lab button. Once the red dot has turned green, click on it to enter the Learner Lab and access the AWS Console interface. You are going to create a new RDS instance.
From the Console Home navigate to Database > RDS. See the following screenshot for reference.

Click Create database (part way down the screen). Use the following options.
- Standard create
- Engine type: MariaDB
- Engine Version: MariaDB 11.4.4 (or current latest version available)
- Templates: Dev/Test
- DB instance identifier: wordpress-db
- Master username: admin
- Credentials management: Self Managed
- Auto generate a password: Checked
- DB instance class: db.t3.micro
- Allocated storage: 5 GiB
- Enable storage autoscaling: Unchecked
- Virtual private cloud (VPC): Wordpress VPC
- DB subnet group: Create new DB Subnet Group (if you're redoing your database creation, there will already be an entry here. Make sure you're using the Wordpress VPC in the setting above!)
- Public access: No
- VPC security group: Choose existing
- Existing VPC security groups:
- Remove default VPC
- Add Wordpress Database SG (look to see that it's there below the dropdown after you select it)
- Availability Zone: us-east-1a
- Monitoring > Enable Enhanced monitoring: Unchecked
- Below the Monitoring section, Additional configuration > Initial database name: wordpress (Write the database name down! You will need this later.)
- Enable automated backups: Unchecked
- Enable encryption: Unchecked
Click Create database.
This will take a few minutes to create. Once the database has finished creating, click on the View connection details button by the green success message at the top of the page. This gives you your database password.
Store the following connection information about your RDS instance in your lab logbook or a saved document. You'll need it later:
- Endpoint
- Initial database name
- Master username
- Master password
Connecting to your database from www
Login to your www instance, and install the mariadb client.
sudo apt install mariadb-client-core
From your terminal, issue the following command to connect to your database. Be sure to substitute the credentials you wrote down earlier.
mysql -u admin -h **endpoint** -p
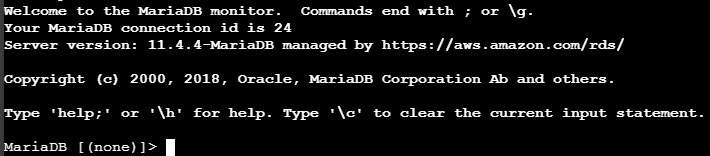
Enter your Master password when prompted. You should see the following screen indicating a successful connection.
Issue the following command to display the databases.
show databases;
Disconnect from the database.
quit;
Installing and Configuring Wordpress
Install Wordpress using apt.
sudo apt install wordpress
Create a virtual host file in /etc/apache2/sites-available/wordpress.conf with the following contents:
Alias /blog /usr/share/wordpress
<Directory /usr/share/wordpress>
    Options FollowSymLinks
    AllowOverride Limit Options FileInfo
    DirectoryIndex index.php
    Order allow,deny
    Allow from all
</Directory>
<Directory /usr/share/wordpress/wp-content>
    Options FollowSymLinks
    Order allow,deny
    Allow from all
</Directory>
Enable the new WordPress site
sudo a2ensite wordpress
- Use systemctl to restart the apache service.
Edit the file /etc/wordpress/config-www.username.mystudentproject.ca.php where username is your Seneca username. Add the following contents (changing values where appropriate).
<?php
define('DB_NAME', 'wordpress');
define('DB_USER', 'admin');
define('DB_PASSWORD', 'yourdbpassword');
define('DB_HOST', 'yourdbendpoint');
define('WP_CONTENT_DIR', '/usr/share/wordpress/wp-content');
?>
- Open a web browser and enter the following url: http://www.username.mystudentproject.ca/blog/wp-admin/install.php
- You should see a Wordpress Welcome/Setup page. Follow the prompts on screen and enter the appropriate information.
- Use the Database Name, Username and Password you configured above.
- Set the title to Your Name's Blog. For example for me it would be "Jason Carman's Blog"
- Set the username to your Seneca ID.
- Set the password to your Seneca ID. You may need to check the box to Confirm use of weak password
- Set the email to your Seneca email address.
- Click "Install Wordpress", you should see a "Success!" message.
Blog Post:
Add a blog post detailing the following:
- How did you find this lab?
- What was the most difficult part for you?
- What was the easiest part for you?
Temporarily shutting down your database:
- Navigate to Aurora and RDS > Databses.
- Select the radio button beside wordpress-db
- Click on Actions > Stop temporarily
This will shutdown your database for 7 days and pause billing. You may need to repeat this.
Note: You will need to have your database running to access your Wordpress site.
Lab 9 Sign-Off (Show Instructor)
Show your professor the following:
- A successful connection to the database from your www instance.
- Your blog post
Exploration Questions
- What is an RDS?
- How is this lab similar to Assignment 1?