Lab 4: Securing Networks
Lab Preparation
Purpose and Objectives of Lab 4
Setting up a computer network is very important, but often the Linux system administrator must also perform networking maintenance which includes trouble-shooting, repairing network connection issues and maintaining network security. System administrators need to protect or "harden" their computer networks from "penetration" from unauthorized computer users. Hardening a computer system can range from running an IDS (Intrusion Detection System) to monitoring and flagging suspicious activity to implementing security policies which could range from running firewalls to setting locked screen savers on workstations.
In this lab, you will learn how to configure the SSH service in Debian to allow users to securely access and share data between authorized personnel. In addition. Topics such as, using Public Key Authentication, setting up an SSH tunnel in order to securely run graphical applications safely among computers in the network, and disabling root login into a Linux machine. You will also learn how to configure firewall rules to control the flow of packets in and out of your computer.

Preventing unauthorized access is one of the many day-to-day operations for a Linux system administrator and/or security specialist
Main Objectives
To use the ssh and scp commands to access and copy data between Linux servers in a secure manner
Configure, and start the Secure Shell Service (ssh)
- To refuse root login from remote Linux servers or limit users that are permitted to ssh into Linux servers
Generate Public/Private keypairs to enable secure authentication to Linux servers
Use ssh to tunnel Xwindow applications
Configure the firewall to set a default policy and add exceptions to the policy chains
Minimum Required Materials
- Solid State Drive
- USB key (for backups)
- Lab Log Book
Linux Command Reference
Networking Utilities
| ssh | ssh-keygen | ssh-copy-id | scp | sftp | ss | ip | ping | arp | iptables |
|---|
Additional Utilities
Managing Services
Configuration Files
SSH Reference
Investigation 1: Installing And Maintaining An SSH Server
So far, you have learned to use the ssh utility to establish a secure connection to a remote host in order to perform Linux administration tasks. You have issued the ssh command, which is actually the client application for ssh. In order to connect to a remote server (like your VMs, Matrix, etc) it needs to run the SSH service (aka ssh).
In this section, you will learn how to configure an SSH server and restart the ssh service for an existing VM. You will also learn how to configure, restart, and use SSH in order to create secure connections between your Linux machines (host as well as VMs).
Part 1: Confirming ssh service is Running on VMs.
Perform the following steps:
- OpenSSH should have been installed by default. Let's confirm this by issuing the command:
# List installed packages filtering for ssh
dpkg -l | grep ssh
- You should see a number of packages installed including openssh-client and openssh-server
- The openssh-server package installs a service called ssh.
- Confirm that this service is running by issuing the command:
# Check status of a service
systemctl status ssh
- If the SSH service is not running, start it and configure it to start automatically on boot.
# Start the ssh service
systemctl start ssh

# Configure the ssh service to start on boot
systemctl enable ssh
- Now that you know the service is running, investigate what port number and protocol ssh uses by issuing the command:
# List active TCP and UDP ports with numeric output including "process"
# ss -p Requires sudo
sudo ss -atunp
- What protocol and port is the ssh process using? What is the state of the port?
Reissue the
sscommand without the -n option. What is the difference?You can refer to the /etc/services file in order to determine a port number for a service. Issue the following command to confirm that port 22 is associated with ssh:
# Search for ssh port number
grep ssh /etc/services
- Repeat steps 4 and 5 on ubu1 and ubu2.
Part 2: SSH Server Security Configuration
Any time that you configure your computer to allow logins from the network you are leaving yourself vulnerable to potential unauthorized access by penetration testers or even hackers. Running the ssh service is a fairly common practice but care must be taken to make things more difficult for those individuals that attempt to use brute force attacks to gain access to your system. Hackers use their knowledge of your system and can use password guessing programs help to gain access. They know which port is likely open to attack (TCP:22), and the name of the administrative account name (root).
Read this Securing SSH tutorial.
The Linux system administrator can configure the SSH server in order to make the SSH server less vulnerable to attacks. Examples include not permitting root login, and changing the default port number for the ssh service.
Perform the following steps using your ubuhost and ubu1 VM's:
- Change to your ubu1 VM.
- Read the man page for the
sshd_configfile. Search for thePermitRootLoginoption and read about the possible settings. - Edit the file /etc/ssh/sshd_config and look for the option
PermitRootLogin. - Un-comment the option and change the option value to
no.

NOTE: Now any hacking attempt also has to guess an account name as well as the password. If you need root access on the host, you ssh to the host as a regular user and then use sudo to access root privileges, just like on the local system.
- As well as disabling ssh access as root, it is possible to restrict access to just the specific users that require it.
- Read the man page for the
sshd_configfile. Search for and read about theAllowUsersandAllowGroupsoptions. - Edit the file /etc/ssh/sshd_config and add a new option of
AllowUsers yourAccountName(where "yourAccountName" is your regular user account for your deb1 VM)

- In order for these changes to take affect, you need to restart the ssh service:
# Restart ssh
systemctl restart ssh
- Try using ssh from your ubuhost to your ubu1 VM as root. Where you successful?
- Try using ssh from your debhost to your deb1 VM as your regular user account. Did it work?
Monitoring access
An important task of a System Administrator is to monitor for attempts at unauthorized remote access. All ssh connection attempts are recorded in the systemd log/journal. The journalctl command can be used to view the journal messages
# View all journal entries
sudo journalctl

# View the journal entries concerning the ssh unit
sudo journalctl -u ssh

# View the journal entries concerning the ssh unit for today
sudo journalctl -u ssh --since today

# View sudo related entries since yesterday.
sudo journalctl --since yesterday | grep sudo
Note: systemd services and targets are 2 types of systemd "units"
- Check the journal entries on ubu1. Try to find the entries showing the root user being denied access and your user being allowed access.
Answer INVESTIGATION 1 observations / questions in your lab log book.
Investigation 2: Additional Methods To Secure Your SSH Server
Generating Private and Public Keys (Public Key Infrastructure)
As a method of authentication, using account passwords as the sole authentication factor is deeply flawed. Users have terrible password habits like using the same password for multiple systems/websites, using uncomplicated passwords, writing passwords down, and not changing the password. Practices such as forced frequent password changes have not greatly improved the problem. Increasingly you are seeing multi-factor authentication systems being used to improve the reliability of authentication.
We can configure ssh public/private keys to be used as a method of authentication instead. This will allow users to generate a pair of matching public/private keys, adding the public key to their account on the remote host. The private key remains on the local host. When the user attempts to connect to the remote host, ssh will use the private key to digitally sign the request. On the remote host ssh uses the matching public key to verify the signature.
Public/Private key authentication is secure and convenient, and it does eliminate many of the problems created by user behavior with passwords.
However, key files, especially Private keys must be properly taken care of. Imagine that the private key can be used to unlock a vault that contains millions of dollars.
- If you lose the key, you can't open the vault.
- If you leave the key in an insecure location, it can be copied or stolen. Somebody could steal your money.
- If you make copies of the key you are increasing the chances of it being exposed.
- If you suspect that your key has been compromised you should change the locks on the vault. (Generate new keys)

Therefore, understanding the generation and management of public/private keys is important to the security of our system.
Storing Fingerprints
When a user connects to a host using ssh, the host sends a "fingerprint" or digital signature to the client to establish its identity. The first time a connection is established the identity must be stored for comparison during subsequent connections. The fingerprints are stored separately for each user in a file called ~/.ssh/known_hosts .

From now on when you connect to that host the client will compare the received fingerprint against the list of known hosts before connecting. If the fingerprint does not match it could indicate somebody had setup a system to impersonate the computer you wish to connect.
If you ever receive a message like the one displayed below, it means the fingerprint you received from the server does not match the fingerprint you have stored for that remote host in the file ~/.ssh/known_hosts.
You should investigate why it is happening as it could indicate a serious security issue, or it could just mean that something on the remote host has changed (i.e. the OS was reinstalled)

Perform the following steps:
- Login to your ubu1 VM as your regular user account (login via the VM viewer, NOT using ssh)
- Run the following command to check the state of any possible ssh connections. What is the state (i.e. LISTENING or ESTABLISHED)?
# Display the status of ssh ports
sudo ss -atnp | grep ssh
- While in your ubu1 VM, issue the following command to connect to your same VM via ssh:
ssh username@ubu1
- Enter yes at the prompt, and enter your password. The output should appear similar as what is shown below:
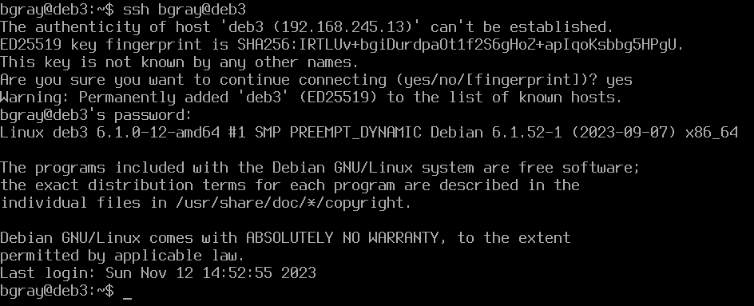
- Re-run the same ss. Is there any change to the connection status?

Note: Because we have used ssh to connect from ubu1 to ubu1 we can see the ports from both the client and server point of view.
- Log-out of your ssh connection by typing
exit. - Run that same ss command again. If you are fast enough you may see the port status is being closed.
- Wait a few minutes and then check again. Record your observations.
KeyPair Authentication
So far, you have learned to establish an ssh connection to another host using a password to authenticate your identity. But passwords are not the only or even the best way of authenticating your identity. We can also use Public/Private key encryption.
Public Key authentication is a method of establishing identity using a pair of encryption keys that are designed to work together. One key is known as your private key (which as the name suggests should remain private and protected) and the other is known as the public key (which as the name suggests can be freely distributed) The keys are designed to work together to encrypt data asymmetrically, that is to say that when we encrypt data with one of the keys it can only be decrypted with the other key from the pair.
If a message is encrypted using the Private key on the local host, and the server on the remote host can decrypt the message successfully using the matching Public key, then the server knows the message could only have come from the local host. The message itself is not secure because potentially any body with a copy of the Public key could read it. But the fact that it could only have come from the host with the Private key proves the identity of the client.
- Switch to your ubu1 VM. Login as your regular user account
- Confirm you are in your ubu1 VM by entering the command:
hostname - Consider the following commands:
# Generate a keypair
ssh-keygen

# Copy the public key to your account on the remote host
ssh-copy-id username@hostname

# Copy a specific key to your account on the remote host
ssh-copy-id -i ~/.ssh/mykey.pub username@hostname
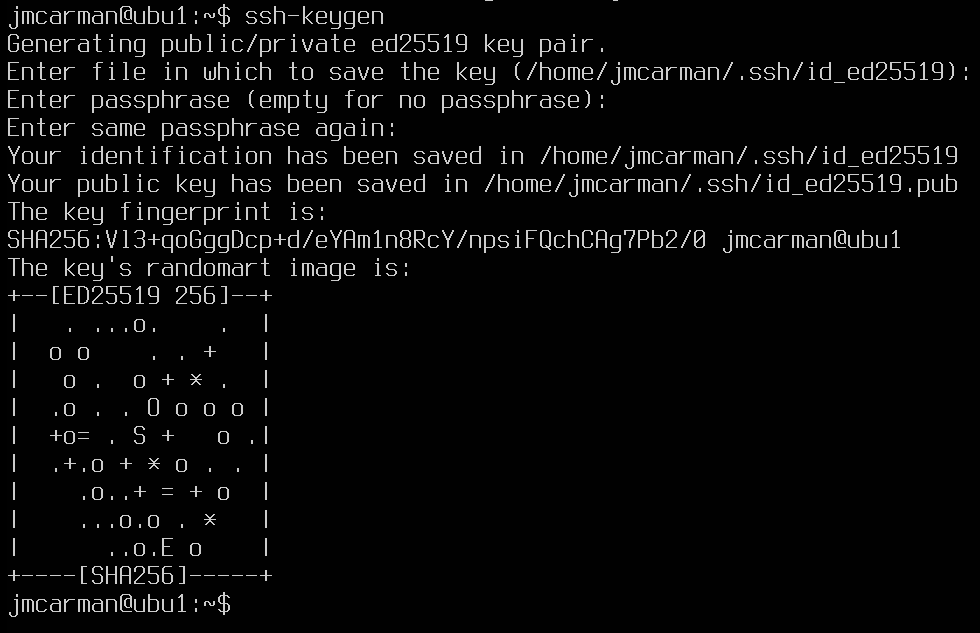
- To generate a keypair (public/private keys), issue the following command:
ssh-keygen. Notice the default type is ed25519 not rsa. ed25519 keys are smaller and more secure.
After generating the keys it prompts you for the location to save the keys. The default is ~/.ssh Your private key will be saved as id_ed25519 and your public key will be saved as id_ed25519.pub by default.
- Press ENTER to accept the default.
- You will then be prompted for a pass-phrase. The pass-phrase must be entered in order to "unlock" your private key. Pass-phrases are more secure than passwords and should be lengthy, hard to guess and easy to remember. For example one pass-phrase that meets this criteria might be "seneca students like to dance at 4:00am". Avoid famous phrases such as "to be or not to be" as they are easy to guess. It is possible to leave the pass-phrase blank but this is dangerous. It means that if a hacker was able to get into your account, they could then use your private key to access the other systems you use.
- Enter a lengthy passphrase you will remember
The output should appear similar to what is shown below:
- Now issue the command to copy your public key to your account on ubu2
# Copy public key to ubu2
ssh-copy-id username@ubu2
- When prompted enter your password

Try using ssh to now log into your ubu2 VM from your ubu1 VM. What happens? Were you required to use your pass-phrase?
Where was the Public key copied to? What file is it in?
# Display the authorized SSH keys
cat ~/.ssh/authorized_keys
This file contains the public keys that have been copied to your account
- So now you can login to ubu2 from our account on ubu1 without needing a password.
Note: While you still do need to enter our passphrase to unlock the key, if you had left the passphrase blank then that wouldn't have needed it. There are other tools available to help users manage and unlock keys.
- Apply what you have learned by generating keys on ubu2 and ubuhost. Use the appropriate ssh-copy-id commands so you can login from any of these 3 servers without a password. That means you will need to:
- Copy the key you generated on ubu1 to ubuhost
- Generate a key on ubu2 and copy it to ubuhost and ubu1
- Generate a key on ubuhost and copy it to ubu1 and ubu2
- Test that you can ssh from each server to the other two (ie from ubuhost to ubu1 and ubu2). When you are satisfied this works, move on to Part 2.
Answer INVESTIGATION 2 observations / questions in your lab log book.
Investigation 3: Managing Firewalls For Protection and Troubleshooting
Linux Firewall (nftables) Concepts
Since Linux servers can be connected to the Internet, it is very important to run a firewall to control what packets are allowed to enter and exit from the system. Also what packets might be forwarded to another computer or network. You will use the utility called nftables to set the firewall rules on a Linux server.
There have been many implementations of Linux firewalls. Some common ones you may encounter are:
- ufw: Uncomplicated Firewall. This is a frontend in Ubuntu for iptalbes and nftables.
- ipchains: The predecessor to iptables, this firewall is legacy (no longer used).
- iptables: A very popular firewall. Released in 2000, it is still pretty commonly used today.
- firewalld: Released in 2011, this was intended as a successor (replacement) for iptables. Due to significant differences in syntax compared to iptables, it wasn't adopted as widely as expected.
- nftables: Released in 2014, this is the replacement for iptables. While the syntax is different than iptables, you can issue iptables rules and they will be converted to nftables rules. More below:
The firewall software itself is in-kernel. It is called nftables.
nftables replaces the older iptables and can be configured using the nft utility. While most Linux distributions implement the iptables utility as a "wrapper" for nft, it's best to adopt the newer syntax and implementation. This wrapper allows users and organizations with considerable investment in iptables configurations and knowledge to continue to use iptables syntax to configure nftables.

nftables is a framework by the Netfilter Project that provides packet filtering, network address translation (NAT), and other packet mangling. It replaces the older iptables, ip6tables, arptables, and ebtables frameworks. nftables offers a simpler and more consistent syntax, improved performance, and better scalability. It uses a single command-line tool, nft, to manage firewall rules, which are organized into tables, chains, and rules. This structure allows for more efficient rule processing and easier management of complex firewall configurations. Additionally, nftables supports atomic rule updates, which means changes can be made without disrupting existing connections.
With nftables there are no pre-defined tables or chains. Each table is explicitly defined, and contains only the objects (chains, sets, maps, flowtables and stateful objects) that you explicitly add to it. nftables has the hierarchy of Tables > Chains > Rules; meaning tables contain chains, and those chains contain rules.
We are going to use nftables with the following 3 chains, which will function similar to iptables:
- INPUT: Packets coming into current Linux server
- OUTPUT: Packets leaving current Linux server
- FORWARD: Packets being routed between Linux servers
nftables can be configured from the command line, or from a script.
Part 1: Disabling UFW, enabling nftables
Perform the following steps on ubu1:
- Stop and Disable ufw:
sudo systemctl stop ufw
sudo systemctl disable ufw
- Start and Enable nftables
sudo systemctl start nftables
sudo systemctl enable nftables
- Confirm nftables is active and enabled
sudo systemctl status nftables
Part 2: Listing the Existing nftables Rules
Let's get some practice using the nftables command such as viewing the current firewall configuration:
Perform the following steps:
- For the remainder of this section, use your ubu1 VM.
- As working with the firewall requires elevated privileges start a sudo shell
- Issue the following command to list the existing iptables policy rules:
# List all rules for all chains
nft list ruleset
You should see many rules organized into a number of tables, with each table containing one or more chains. This is quite overwhelming but most of these rules were added when the libvirtd service was started during boot. libvirtd has to add rules that allow our VM's to communicate over a virtual network.
Notice in the inet table, you have the following 3 chains, INPUT, FORWARD, and OUTPUT. The inet table applies to both IPv4 and IPv6 packets. This is an enhancement in nftables. Previous firewalls (like iptables) had separate tables for IPv4 and IPv6 and even different commands to configure them. We are going to configure nftables using the following chains:
- INPUT is the chain of rules for incoming packets
- OUTPUT is the chain of rules for outgoing packets
- FORWARD is the chain of rules for packets that are being routed to other hosts/networks by our host.
You will notice each of the chains already exist and have no rules. They have a default policy of ACCEPT. This means that if none of the rules in the chain rejected the packet then it would be accepted. A default policy of DROP would mean that if none of the rules accepted the packet then it would be dropped.
Listing nftables Rules:
# List rules for all chains in the default table (filter)
nft list ruleset

# List all tables
nft list tables
- Clearing (Flushing) nftables Rules:
Sometimes it may be useful to completely clear the rules for all of a particular chain. Note the options that can be used to clear (or flush) the iptables rules.
# Flush the rules of all chains
nft flush ruleset

# List rules for all chains in the default table (filter)
nft list ruleset

# List all tables
nft list tables
Notice when you issue the list ruleset and list tables commands after flushing the ruleset, nothing appears.
- Restart ubu1. Once it has booted, re-issue the commands to list the ruleset and tables. What changed?
Part 3: Configuring nftables via the configuration file
The easiest way to configure nftables is via the configuration file. Changes written here will only be applied upon system reboot, or if you restart the service. You will now change the default policy of the INPUT chain to DROP. This means you will have add rules that allow specific types of packets in. The best way to configure firewalls is to create an allow list, meaning you implicitly drop everything and only allow the traffic you wish. This is exactly what we will do.
Edit the nftables configuration file (/etc/nftables.conf) to contain the following:
#!/usr/sbin/nft -f

flush ruleset

table inet filter {
        chain input {
                type filter hook input priority filter; policy drop;
        }
        chain forward {
                type filter hook forward priority filter;
        }
        chain output {
                type filter hook output priority filter;
        }
}
Save your changes and issue the following command to apply the rules.
sudo nft -f /etc/nftables.conf
Try to ping www.google.ca. What happens? Notice the input chain has a policy to drop all packets. As there are no rules to allow traffic, everything will be dropped. Edit the nftables configuration file (/etc/nftables.conf) and add the following:
#!/usr/sbin/nft -f

flush ruleset

table inet filter {
        chain input {
                type filter hook input priority filter; policy drop;
                iif lo accept comment "Accept localhost traffic"
                meta l4proto ipv6-icmp accept comment "Accept ICMPv6"
                meta l4proto icmp accept comment "Accept ICMP"
                ip protocol igmp accept comment "Accept IGMP"
                udp dport mdns ip6 daddr ff02::fb accept comment "Accept mDNS"
                udp dport mdns ip daddr 224.0.0.251 accept comment "Accept mDNS"
        }
        chain forward {
                type filter hook forward priority filter; policy drop;
        }
        chain output {
                type filter hook output priority filter;
        }
}
Save your changes and issue the following command to apply the rules.
sudo nft -f /etc/nftables.conf
Try to ping www.google.ca. What happens now? Why?
Edit the nftables configuration file (/etc/nftables.conf). Add the following rule to the input chain:
ct state related, established accept comment "Accept all traffic originating from this server"
Save your changes and issue the following command to apply the rules.
sudo nft -f /etc/nftables.conf
Try to ping www.google.ca. What happens now? Why?
Try to ssh to ubu1 from your host. This should fail, because there isn't a rule to allow ssh and the default policy for the input chain is set to drop. Edit the nftables configuration file (/etc/nftables.conf) and add the following rule to the input chain:
tcp dport { ssh } accept comment "Accept SSH traffic"
Save your changes and issue a command to apply the updated rules.
Part 4: Configuring nftables on ubu2
On ubu1, repeat the steps to:
- Stop and Disable ufw
- Start and Enable nftables
Edit the nftables configuration file (/etc/nftables.conf) to contain the following:
#!/usr/sbin/nft -f

flush ruleset

table inet filter {
        chain input {
                type filter hook input priority filter; policy drop;
                iif lo accept comment "Accept localhost traffic"
                ct state related, established accept comment "Accept all traffic originating from us"
                tcp dport { ssh } accept comment "Accept ssh traffic"
                meta l4proto ipv6-icmp accept comment "Accept ICMPv6"
                meta l4proto icmp accept comment "Accept ICMP"
                ip protocol igmp accept comment "Accept IGMP"
                udp dport mdns ip6 daddr f002::fb accept comment "Accept mDNS"
                udp dport mdns ip daddr 224.0.0.251 accept comment "Accept mDNS"
        }
        chain forward {
                type filter hook forward priority filter; policy drop;
        }
        chain output {
                type filter hook output priority filter;
        }
}
Save your changes and issue the following command to apply the rules.
sudo nft -f /etc/nftables.conf
From a terminal on your host, verify you can ping and ssh into ubu1 and ubu2. If you can't, double check your nftables rules against the lab instructions.
Reboot ubu2 and confirm your nftables rules are still present.
Answer INVESTIGATION 3 observations / questions in your lab log book.
Lab 4 Sign-Off (Show Instructor)
Follow the submission instructions that your Professor provides.
Backup ALL of your VMs!
If you have successfully completed this lab, make a new backup of all of your virtual machines onto your USB Key.
Perform the Following Steps:
- On your ubu1 and ubu2 issue the commands and show your professor the output:
- The nftables service running
- The nftables rules
Exploration Questions
- What file is used to configure ssh?
- What kind of files are stored in the "~/.ssh/" directory?
- How do you determine whether the ssh service is running on your system or not?
- What is the purpose of the ~/.ssh/known_hosts file?
- What is the purpose of the ~/.ssh/authorized_keys file?
- How do you generate SSH keys? What benefit does this provide?
- How do you stop the ssh service?
- What port is the default ssh port?
- What port is the default http port?
- What happens to incoming http traffic if the default policy for the input chain is set to drop, and there isn't a rule to allow port 80?
- What do you think would happen if you set the default policy for the output chain to drop?