Lab 2: Creating and Using Virtual Machines
Lab Preparation
Purpose / Objectives of Lab 2
In this lab, you will create 2 virtual machines using a virtualization program called KVM that will run in your ubuhost system. These VMs will be used throughout the remainder of this course to learn how to administer them (installing software, managing services, networking, etc).
While you are performing this lab, it is recommended to generally note the major differences in the different installation methods, and which method you prefer to use if you were a Linux system administrator in charge of installing many Linux distributions for an organization.
Main Objectives
Installing additional Virtualization Software on your ubuhost machine (KVM)
Create 2 separate VMs (virtual machines) using different installation methods:
- ubu1: Ubuntu Server 24.04 (CLI only)
- ubu2: Ubuntu Server 24.04 Unattended Installation deployed using a autoinstall file (CLI only)
Manipulate virtual machines by CLI (virsh)
Properly backup VM images and backup VM configuration files
Create and run Bash Shell scripts to automatically backup our installed VM's
Learn to boot your Ubuntu VM into Single User mode for rescue purposes

At the end of Lab 2, your ubuhost system will contain 2 virtual machines (ubu1, ubu2 VMs in your KVM application). You will now have the option to run one virtual machine at a time, or run all machines simultaneously to learn about networking (covered in later labs)
Minimum Required Materials
- Solid State Drive
- USB key (for backups)
- Lab Log Book
- Ubuntu Server ISO (Download this before you begin)
Linux Command Reference
Virtualization:
Installation Guides:
Miscellaneous
| gzip , gunzip | ip | grep | wc | pwd | ls | more | file | wget | chmod | vi |
|---|
Investigation 1: Setup For Virtual Machines
Install KVM Virtualisation Application
We will now install the KVM package in order to create our VMs. We will also be starting several services. We will learn more about managing firewalls in later labs.
Perform the following steps:
- Log into your ubuhost machine.
- perform a software update on your debhost by issuing the following command:
sudo apt update && sudo apt upgrade
- Install the kvm virtualisation packages, and a package required for the backup script later in the lab:
sudo apt install virt-manager progress
About KVM
There are actually several key programs installed for virtualisation using KVM:
- kvm/qemu - the hypervisor and other hardware emulation systems.
- A system service named libvirtd that manages the VMs.
- A graphical tool for managing virtual machines (virt-manager) and the virsh command-line tool.
- Now we will confirm the status of the "libvirtd" virtualisation service:
sudo systemctl status libvirtd
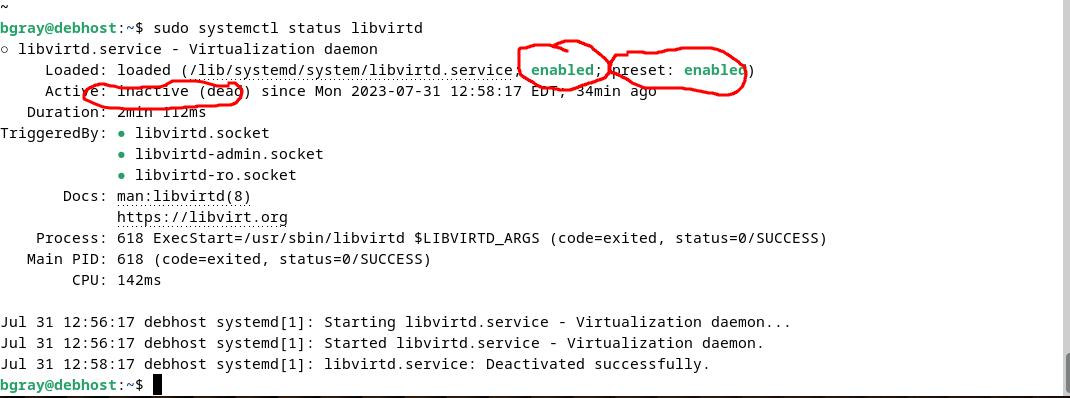
In the screenshot above you can see the first "enabled" indicates that this service will start automatically when the system starts. The "preset: enabled" indicates that "enabled" is the default when this service is first installed by apt. The "inactive (dead)" indicates that the service is not currently running.
We want the service to be "enabled" and "active":
Make note of the following commands for working with services:
# To see the status of a service (Notice sudo isn't needed with a status check!)
systemctl status <servicename>

# To enable a service
sudo systemctl enable <servicename>

# To start a service
sudo systemctl start <servicename>

# To enable and start a service at the same time
sudo systemctl enable --now <servicename>

# To disable a service
sudo systemctl disable <servicename>

# To stop a service
sudo systemctl stop <servicename>

# To restart a service
sudo systemctl restart <servicename>
Issue the correct commands to make sure that the "libvirtd" service is both "active" (started) and "enabled" (will start automatically at boot)
 The behaviour of the libvirtd service on Ubuntu Linux is for the service to stop when not in use and restart when required.
In order to manage VMs your user account needs to be added to the "libvirt" group
sudo usermod -aG libvirt <username>
Restart your ubuhost. If you fail to do this, you may experience virtualization network problems and issues loading Virtual Machine Manager.
Once you've restarted, confirm your changes took affect by running the following as your regular user (don't use sudo):
systemctl status libvirtd
id
groups
The libvirtd daemon should be running, and the id and groups commands should show that your user is part of the libvirt group.
- Start the graphical
virt-managertool by launching your Menu and searching for virt-manager. - Right click on the icon and Pin to panel and then run the application or by typing the command
virt-manager(without sudo!)
Investigation 2: Install Virtual Machines (KVM)
In order to simplify running the lab checking scripts in future labs, using the same root password for ALL machines (ubuhost and virtual machines). Also use the same username and passwords for all of your machines (ubuhost and virtual machines).
Part 1: Setting up the Virtual Network
Once we have installed our 2 VM's we will want to configure them to be able to communicate on the same network. KVM has setup a default virtual network for us to use but it is not configured to start automatically. We will also need to make sure the correct firewall and routing rules are added so that everything works. Lets start by gathering information
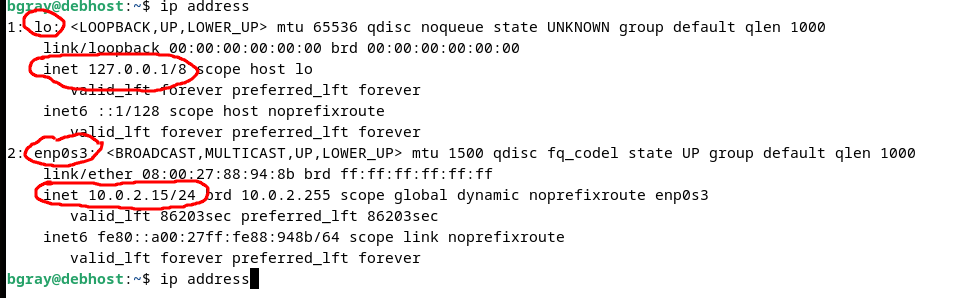
- Open a terminal window in ubuhost and run the following command to display the networks that ubuhost is connected to.
# List the networks connected and our IP address for each network interface
ip address
- Run the following command to list the current firewall/routing rules. (Note: Running iptables as a regular user without sudo will make it look like the command doesn't exist. It's there.)
# List the iptables rules
sudo iptables -L

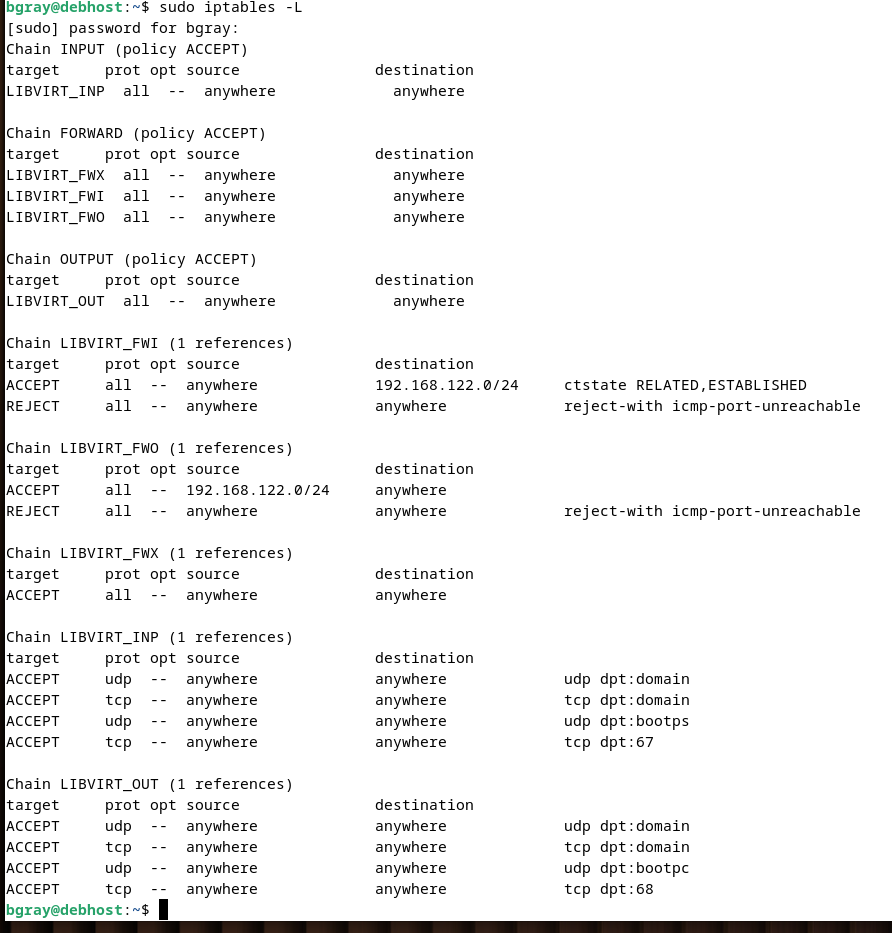 You can see that ubuhost has connected to the virtual network and iptables rules have been added to configure access to that network.
- Open virt-manager
- Select the QEMU/KVM connection and then click on Edit --> Connection Details
- Select the Virtual Networks tab
- Confirm the "Autostart: On Boot". If it is not, check it and then click Apply
Part 2 Installing ubu1
VM Details:
- VM Name (and hostname): ubu1
- Ubuntu Server 2024:
- VM Image Pathname: /var/lib/libvirt/images/deb1.qcow2
- Memory: 2048MB
- Disk space: 15GB
- CPUs: 2
Perform the following steps:
- Launch
virt-manager. - Click the Create a new VM icon located near the top left-corner of the application window.
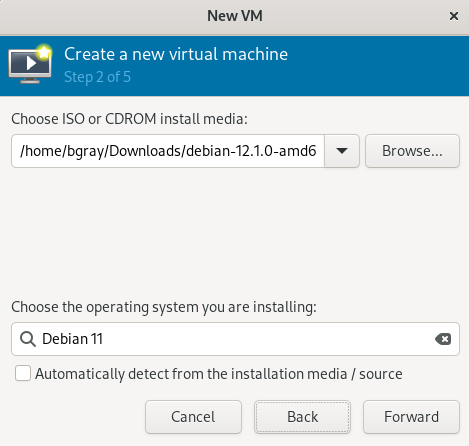
- Select the Local install media option and click Forward.
- Browse to the location of your ISO image. (probably ~/Downloads) and select the iso image
- If the Operating System is not auto detected, uncheck the "Automatically detect from the installation media" and Choose Ubuntu Server 24.04, and click Forward.
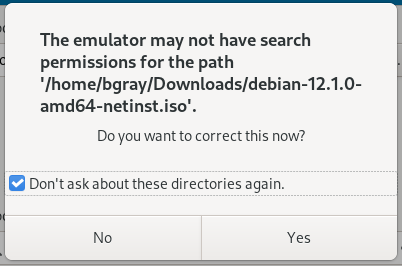
- If a "search permissions" dialog box opens, Check "Don't ask about these directories again" and click yes
- Set Memory: size to 2048 MB and CPUs to 2, then click Forward.
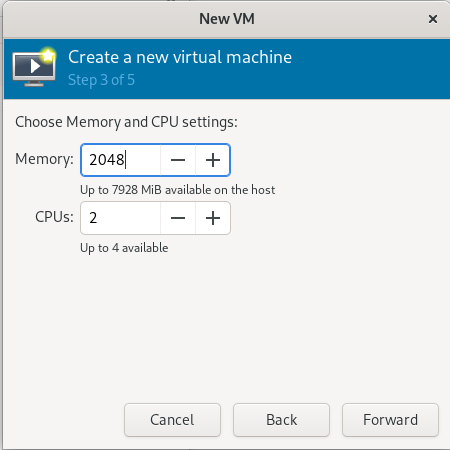
Set Hard Disk size to 15 GB and click Forward.
Enter the Name: ubu1, AND then select the option: Customize configuration before install, and click Finish.
Another dialog will appear. Click CPUs (or "processors") and on right-side under Configuration select Copy Host CPU Configuration, click Apply, and then click Begin Installation at the top left-hand side.
NOTES
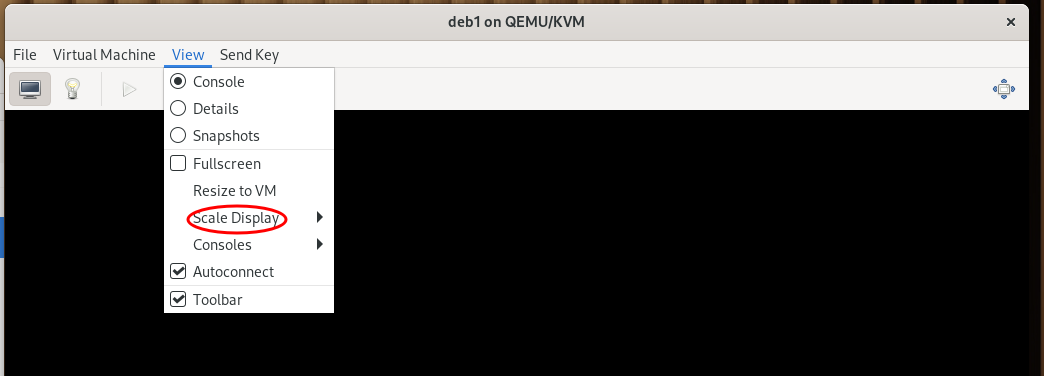
- To have the VM "capture" the keyboard and mouse input click on the viewer window
- To release the keyboard and mouse from the VM use left-ctrl+left-alt
- To make the VM easier to display, click on View --> Scale Display --> Always >
When the installer starts select Select English as the language.
If prompted to Update to the new installer, do it.
Set Keyboard Layout and Variant to English (US)
Check that Ubuntu Server is selected and select Done.
Accept the defaults for Network Configuration and select Done.
Leave proxy address blank and select Done.
For Ubuntu archive mirror configuration leave the defaults and select Done.
For Guided storage configuration select Use an entire disk and select Done.
For Storage configuration read the output and select Done.
Select Continue.
Under Profile configuration
- Enter your Full name
- Enter a Hostname of ubu1
- Enter your Username (first part of your email address)
- Enter your password twice.
- Select Done
- Skip Ubuntu Pro and select Continue
- Check the box beside Install OpenSSH server and select Done
- Under Featured server snaps leave the defaults and select Done
- When the installation is complete Reboot
You may need to go into the VM details and remove the media from the CDROM device
Post Installation Tasks
Login to your ubu1 vm.
First change the tty display font.
# Reconfigure the console font
sudo dpkg-reconfigure console-setup
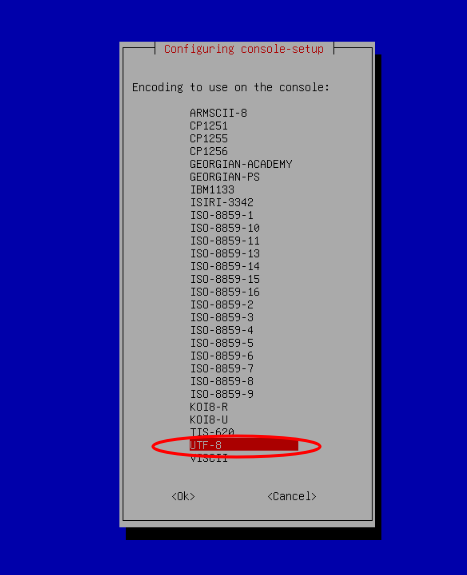
- Select UTF-8
- Select Guess optimal character set
- Select Terminus
- Select 14x28
You can experiment with different settings for Font and Font size.
- Issue the following command to obtain the IPv4 address for your deb1 VM to record in your Lab 2 logbook:
ip address show
- Issue the following command:
sudo less /var/log/installer/autoinstall-user-data
- Scroll through the file. What do you think this is?
- This file was generated when you installed ubu1.
Part 3: Cloning ubu1 as ubu2
VM Details:
- VM Name (and hostname): ubu2
- VM Image Pathname: /var/lib/libvirt/images/ubu2.qcow2
- Memory: 2048MB
- Disk space: 15GB
- CPUs: 1
Perform the following steps:
- Launch virt-manager.
- Right click on ubu1 and select clone.
- Set the Name to ubu2.
- Click Clone.
Post Installation Tasks
Repeat the steps from your ubu1 install to change your tty font.
Issue the following command to obtain the IPv4 address for your ubu2 VM to record in your Lab 2 logbook:
ip address show
- Change the hostname to ubu2 immediately:
sudo hostnamectl set-hostname --static ubu2
- Issue the hostnamectl command to confirm the changes have been applied.
sudo hostnamectl
- Logout and log back in to apply the changes to your command prompt.
Answer INVESTIGATION 2 observations / questions in your lab log book.
Investigation 3: Managing Virtual Machines (KVM)
Root Privileges
As part of this investigation you will learn how to switch over to the root account in order to run several privileged commands in sequence. It can be tempting to just use this technique all the time, and never have to worry about sudo, but do not do so. It undermines the security of your system. Use it only when you need it.
Part 1: Backing Up Virtual Machines
This allows us to recover in case something bad occurs during a Lab!
Failure to take the time to make and confirm backups can result in loss of lab work for the student!
There are three general steps to back up your Virtual Machines:
- Shutdown the VM
- Create a compressed copy of your Disk Images using the gzip command.
- Backup the VM xml configuration using the virsh shell command.
The virsh command is a command line tool/shell for managing VM's. We use it to connect to the hypervisor and then interact with our VM's
The following example virsh commands will be useful
# List all running (active) VM's
virsh list

# List all inactive VM's
virsh list --inactive

# List all VM's (active or not)
virsh list --all

# Start a VM
virsh start <vmname>

# Shutdown a VM
virsh shutdown <vmname>

# Force off a VM (if shutdown fails)
virsh destroy <vmname>

# Display the xml data that defines the VM configuration
virsh dumpxml <vmname>
To view the VM in a window without launching virt-manager
# Open VM in viewer window
virt-viewer <vmname> &
On ubuhost
- Shut down your ubu1, and ubu2 VMs. (Use the
virshcommand)
You can shutdown the VM's by issuing the following command to shutdown: sudo poweroff, or you can use thevirshcommand. Please be patient, the VMs will shut down! - Create a directory for your backups.
mkdir ~/backups
- Enter the command
virsh dumpxml ubu1
This command will output the xml data that is used to define (create) this VM If we save this output we could use that xml data to recreate the VM
- Enter the command
virsh dumpxml ubu1 > ~/backups/ubu1.xml
this will save a copy of the output.
Repeat the steps to save the xml data for
ubu2to the file~/backups/ubu2.xmlBacking up the xml data only has to be done when the VM is created, or if the configuration is modified.
We will need to use elevated privileges to backup our disk image files from the default location of
/var/lib/libvirt/images/Use the command
sudo -iand enter your password if prompted.
sudo -iwill start a new shell as the root user, you can run a number of commands and then typeexitto return to your previous shell.
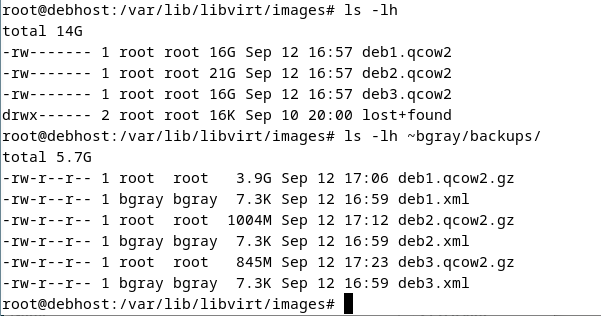
Change to the images directory:
cd /var/lib/libvirt/images/. Note that you did not need to use sudo, as you are already using elevated permissions.Type
ls -lhto see the contentsTo make a compressed copy of your ubu1.qcow2, and ubu2.qcow2 files we will use the
gzipcommand.The `gzip` command will compress the file in place and rename the file with a `.gz` extension.
However, this will make the file unusable and doesn't create a copy. We will use STDIN and STDOUT redirection to overcome this.The following commands will create a compressed backup of ubu1 and ubu2's virtual disks. These commands will take time (approximately 3-5 minutes per VM) to complete. Be patient.
Issue the commands:
gzip < ubu1.qcow2 > ~YourRegularUsername/backups/ubu1.qcow2.gz

gzip < ubu2.qcow2 > ~YourRegularUsername/backups/ubu2.qcow2.gz & progress --monitor --pid=$!
NOTE: Make certain to use the redirection signs "<" and ">" properly in the command!
It may look like the command prompt is stuck but it could take a while for gzip to compress an entire operating system.
NOTE: Do NOT press
<ctrl>cto cancel this process. If you do, your archive will become incomplete and your recovery will be corrupt.Note the difference between the backup for ubu1, and ubu2 which included the additional progress command. This is a useful utility.
- Compare the size of the compressed and original files (hint: use
ls -lh). If file is very large (like 15GB), you didn't compress it and you need to remove that file and perform the previous step until you get it right! - Once you are sure you have both VM disk images backed up, use the
exitcommand to revert back to your normal user.
Part 2: Testing the backup
Start the ubu2 VM and login.
THIS WILL DESTROY YOUR SYSTEMMake certain that you are in your
ubu2VM and not inubuhost!Type this command inside the ubu2 virtual machine:
sudo rm -rf /*(ignore error messages).Type the command
sudo poweroff, try other commands.Force the VM to poweroff and restart
When the machine restarts it will not boot since all system files have been removed!
Use the Force Off option to turn ubu2 back off.
Run
virt-managerright click on theubu2VM and select Delete make sure that Delete associated storage file is selected and Deleteubu2is now completely gone. Time to test the backup!To restore the VM configuration:
# List all VM's
virsh list --all

# Define a VM from xml data
virsh define ~/backups/ubu2.xml

# List all VM's
virsh list --all
- To restore the
ubu2disk image file:
# Start a sudo shell
sudo -i

# Change to images directory
cd /var/lib/libvirt/images

# Restore file
gunzip < ~YourRegularUserName/backups/ubu2.qcow2.gz > ubu2.qcow2

# Return to previous shell
exit
- Start the
ubu2VM and login to make sure it was successfully restored
If you shut down your host system while virtual machines are running, they will be suspended, and will resume the next time you boot your host system. Note that it is better to shut down the VMs prior to shutting down the host
- For the remainder of these labs, it is assumed that you will backup both the images and XML configuration files for all Virtual machines, when asked to backup your virtual machines. It is also highly recommended to backup these files to an external storage device (eg. USB key) in case the host machine gets "wiped" and you need to rebuild your HOST machine and then restore your Virtual Machines.
- Answer this question in your log book:
- In order to fully back up a virtual machine, what information should be saved in addition to the virtual machine image?
Answer INVESTIGATION 3 observations / questions in your lab log book.
Investigation 4: Managing VMs from the Command Line and Using Shell Scripts for VM Backup & Management
You will continue our use of Bash Shell scripting by first creating a Bash Shell script that will allow the Linux sysadmin to select their created VMs for backup. Afterwards you will download, view and run a couple of Bash Shell scripts that use the virsh command to start and stop your virtual machines.
Perform the following steps:
- Start the ubu1 virtual machine, and stop the ubu2 virtual machine.
- Switch to the ubuhost machine, and open a shell terminal.
- Enter these admin commands into your ubuhost machine and note the result:
virsh list
virsh list --all
virsh list --inactive
- Now, shut-down your ubu1 VM normally, and close the ubu1 VM window.
- Switch to your terminal and issue the command:
virsh start ubu1
- Using the appropriate command check to see if your ubu1 VM is now running.
- There are other commands that can be used (such as suspend, or shutdown). The "shutdown" command may not always work since it relies on the guest handling a particular ACPI event. Why do you think it is useful to have commands to manipulate VMs?
Virtual Machine Does not Shutdown from Command
If the Virtual machine fails to shutdown from the virsh shutdown command, then you can go to the Virtual Machine manager and halt or shutdown within the VM itself, then you can click the PowerOff button in the VM window. You'll want to avoid a forced shutdown since those are equivalent to yanking the power cord out of the wall on a physical machine!
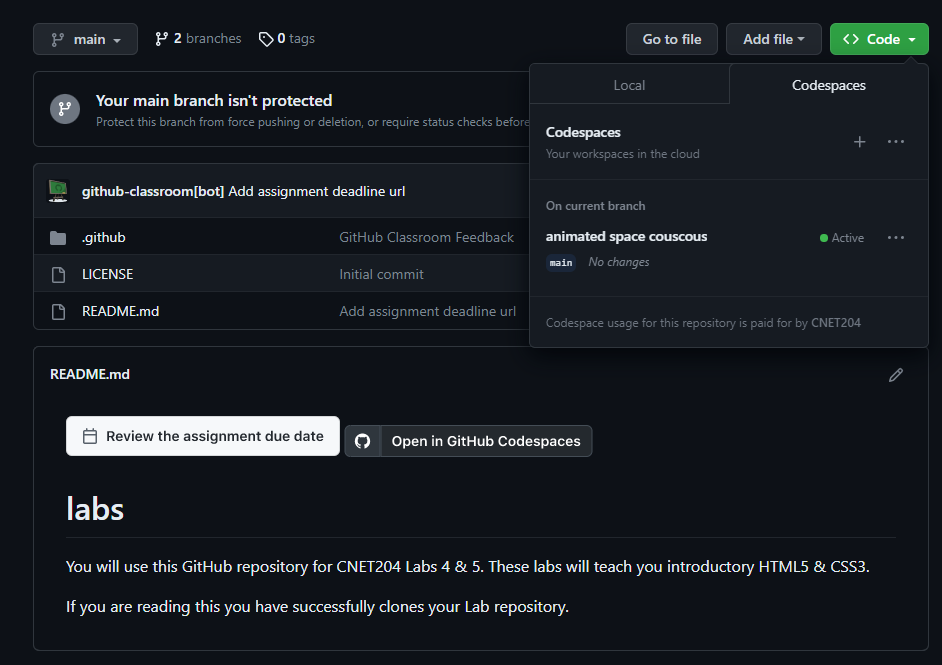
Accept the Lab 2 GitHub Classroom assignment.
Use the following link to set up your lab 2 repository. You will be using this for this investigation.
Next, follow the sections for setup on a Shared Computer by Accessing GitHub Codespaces or on your Personal Computer. While you can install Visual Studio Code (VSCode) locally, I recommend using Codespaces for this course.
Once you have set up your Lab 2 repository by following the link above (go back and do that if you missed it), you can access GitHub Codespaces from any browser on any device (PC, tablet, smart phone). Codespaces gives you access to Visual Studio Code, with direct access to your repository (without having to clone) from anywhere. It's perfect for a portable development environment. Login to GitHub (if you haven't already) and proceed.
You may have noticed in the link above you can click Open in GitHub Codespaces. Feel free to do so now. If you have already clicked past that window the next few steps will show you how to access it again (which is useful for future access attempts anyway). Click on Code and create a new codespace. Once you have created it, you can access it by clicking on the named link.
Modifying the vs script
Once your Codespace has created, open the provided template called vs, and update the comment block to include your name and today's date.
Examine the entire vs script. Note that the only sections left to complete are the function declarations. You should be able to understand the rest of the script, as the concepts were covered in OSL645.
This script will:
- Accept the following options from the command line:
- b: to backup virtual machines
- r: to restore virtual machines
- o vmname: when called with b or r will perform that action on just the virtual machine (vmname) provided
- f: used with r to indicate a fresh install of the host. This will install the virtualization software and updates.
Functions
Bash functions provide several benefits when writing and using shell scripts:
Code Reusability: Functions allow you to recall code that you need to use multiple times. This reduces redundancy and makes your scripts more maintainable.
Modularity: By breaking your script into functions, you can create modular code. Each function can perform a specific task, making your script easier to understand and debug.
Readability: Functions can make your scripts more readable by giving meaningful names to blocks of code. This helps others (and yourself) understand what each part of the script is doing.
Maintainability: When you need to update or fix a part of your script, you can do so in one place if that code is within a function. This makes maintenance easier and reduces the risk of introducing errors.
Parameterization: Functions can accept parameters, allowing you to write more flexible and general-purpose code. This makes your scripts more adaptable to different situations.
In this example, the greet function takes one parameter and prints the message Hello World!. This function can be reused with different parameters throughout the script.
#!/bin/bash

# Define a function
greet() {
  echo "Hello, $1!"
}

# Call the function with a parameter
greet "World"
Changing the value of dpath
Change the value of the dpath variable to YOUR username:
dpath="/home/username/backups"
Writing the backup function
Use the following code to write the backup function:
# A function to back up the virtual machines
function backup() {

    # Change directory to where the virtual machines are stored as files
    cd $spath

    # Use virsh dumpxml to create a backup of the xml file for the virtual machine
    virsh dumpxml $vm >$dpath/$vm.xml

    # tell the user the back up is in progress
    echo "Creating backup of $vm in $dpath"

    # Use touch to create the backup destination file if it doesn't exist, update the time and date stamp if it does
    touch $dpath/$vm.backup.gz

    # gzip images and store them in back up directory, run in the background
    gzip < $spath/$vm.qcow2 > $dpath/$vm.qcow2.gz & progress --monitor --pid=$!

    # Append the name of the virtual machine to the log message variable (logMsg)
    logMsg="$logMsg $vm,"
}
Writing the restore function
Use the following code to write the restore function:
# A function to restore the virtual machines
function restore() {

    # Change directory to where the virtual machine backups are stored
    cd $spath

    # Tell the user the restoration is in progress
    echo "Restoring $vm"

    # Use the gunzip command to unzip the backup file and restore it to /var/lib/libvirt/images
    gunzip < $dpath/$vm.qcow2.gz > $spath/$vm.qcow2 & progress --monitor --pid=$!

    # Append the name of the virtual machine to the log message variable (logMsg)
    logMsg="$logMsg $vm,"

    # Copy the xml file to the /var/lib/libvirt/images directory
    cp $spath/$vm.xml $dpath/$vm.xml

    # Use virsh define to define the virtual machine
    virsh define $vm.xml
}
In Codespaces, give your vs script execute permission.
chmod u+x vs
- Stage your changes and commit them to GitHub.
Cloning your GitHub repository in your Ubuntu VM
Issue the following command to clone your GitHub repository into your home directory.
Important: Be sure to replace
usernamein the following command with YOUR GitHub username.
git clone git@github.com:OSL745/lab-2-username
Change to your lab directory, and run your script to create a fresh backup of all your VMs. If you get any errors, double check your script (in codespaces) against the lab instructions. The only things you should have modified are the backup and restore functions.
cd lab-2-username
sudo ./vs -b
Now that you have a working backup script, you are expected to make a fresh backup of your VMs every lab. You will also want to copy these to an exteral USB flash drive. In the event your main drive fails, you will have the backup of your VMs and at worst only have to reinstall your host (Lab 1).
- You have completed lab2. Proceed to Completing The Lab, and follow the instructions for "lab sign-off".
Answer INVESTIGATION 4 observations / questions in your lab log book.
Lab 2 Sign-Off (Show Instructor)
Follow the submission instructions that your Professor provides.
Backup ALL of your VMs!
If you have successfully completed this lab, make a new backup of all of your virtual machines onto your USB Key.
Perform the Following Steps:
- On your ubuhost issue the command:
virsh list --all
- Call your professor over and show them the output.
Exploration Questions
- How do you start and stop virtual machines?
- What is the purpose of the virsh command?
- List the steps to correctly backup your VM's xml data
- List the steps to correctly backup your VM's disk images
- List the steps to correctly restore your VMs
- How can you prompt the user for data and store into a variable?
- Show a few examples of bash loops that can be used to error-check user input.
- What does the command apt update do and why is it important?
- What does the command apt upgrade do and why is it important?
- What is the purpose of booting into single-user mode?
- List the steps in order to boot into single-user mode.