Lab 6 - Amazon Web Services (AWS) Networking
Overview
This week's lab will cover the following:
- Creating a Virtual Private Cloud (VPC).
- Creating and Modifying Virtual Private Cloud (VPC) Security Groups.
- VPC components:
- Subnets
- Gateways
- NAT gateways
- Internet gateways
- Egress-only internet gateways
- Carrier gateways
- Route tables
In this lab, you will create all the networking infrastructure required to host a web application. You will be creating the server, database and configuring the application in future labs.
Virtual Private Cloud
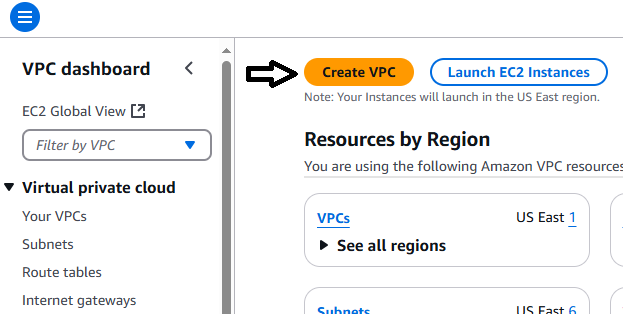
Start your session in the Learner Lab by clicking on the Start Lab button. Once the red dot has turned green, click on it to enter the Learner Lab and access the AWS Console interface. You are going to create a new Virtual Private Cloud (VPC). Resources you created last week in Lab 5 will be inaccessible in this VPC. Navigate to VPC (which you may have added to your favourites last week). On the VPC dashboard, click Create VPC. See the following screenshot for reference.
Input the following settings:
- Select VPC only
- Name tag: Wordpress VPC
- IPv4 CIDR: 10.0.0.0/16
- Leave all other settings on default
Confirm the settings match the following screenshot.

Click Create VPC at the bottom right.
Once created, click the Actions drop down in the top right corner and select Edit VPC Settings. Make sure the following boxes are Checked:
- Enable DNS resolution: Checked
- Enable DNS hostnames: Checked
Click Save
Subnets
You are going to create 4 subnets in your VPC. Two private subnets, and two public subnets. One of each type (private and public) will be in a different availability zone. This will provide redundancy, ensuring better uptime for servers and applications you create in your VPC.
- Click on Subnets (located on the left side under Virtual private cloud).
- Click Create subnet (top right corner).
- Select Wordpress VPC from the VPC ID dropdown.
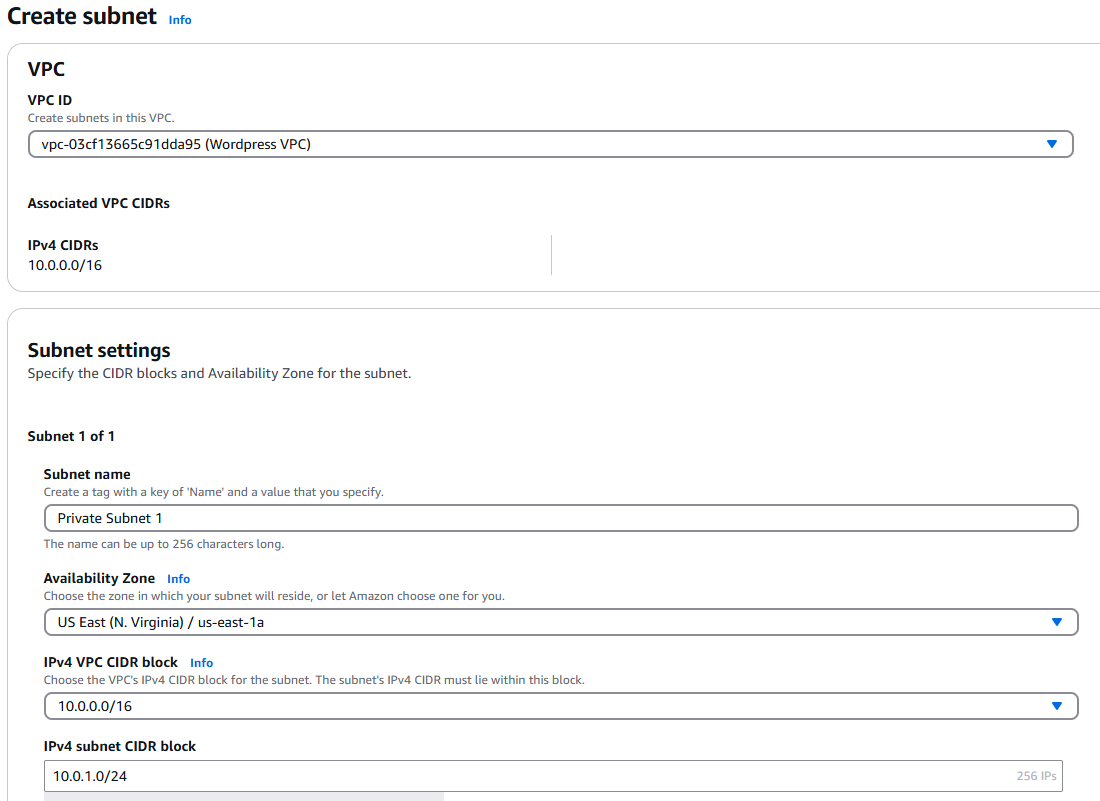
- Create a subnet with the following information:
- Subnet Name: Private Subnet 1
- Availability Zone: us-east-1a
- IPv4 VPC CIDR block: 10.0.0/16
- IPv4 subnet CIDR block: 10.0.1.0/24
- Your screen should look as follows:
- Click Add new subnet and repeat the process for the following three subnets:
Create one private IPv4 subnets in this VPC:
- Private Subnet 2 - 10.0.2.0/24 - us-east-1b
Create two public IPv4 subnets in this VPC:
- Public Subnet 1 - 10.0.11.0/24 - us-east-1a
- Public Subnet 2 - 10.0.12.0/24 - us-east-1b
Once you have confirmed your settings are correct, scroll down and click Create Subnet in the bottom right.
Check the box beside Public Subnet 1. Click on the Actions dropdown (top right) and select Edit subnet settings. See the following screenshot.
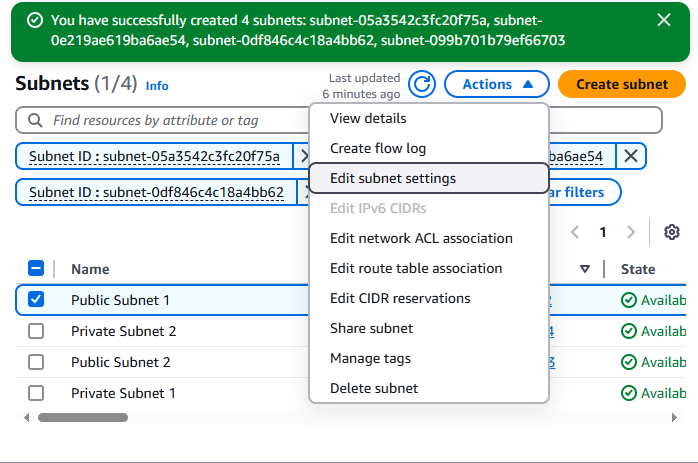
Make sure the following are Checked:
Enable auto-assign public IPv4 address: Checked
Enable resource name DNS A record on launch: Checked
Click Save.
Repeat the process for Public Subnet 2
Adding an Internet Gateway
Your VPC requires a Gateway to access outside resources. There are four types of gateways
Internet Gateway
An internet gateway is a horizontally scaled, redundant, and highly available VPC component that allows communication between your VPC and the internet. It supports IPv4 and IPv6 traffic. It does not cause availability risks or bandwidth constraints on your network traffic.
An internet gateway enables resources in your public subnets (such as EC2 instances) to connect to the internet if the resource has a public IPv4 address or an IPv6 address. Similarly, resources on the internet can initiate a connection to resources in your subnet using the public IPv4 address or IPv6 address. For example, an internet gateway enables you to connect to an EC2 instance in AWS using your local computer.
Egress-only Internet Gateway
An egress-only internet gateway is a horizontally scaled, redundant, and highly available VPC component that allows outbound communication over IPv6 from instances in your VPC to the internet, and prevents the internet from initiating an IPv6 connection with your instances.
An egress-only internet gateway is for use with IPv6 traffic only. To enable outbound-only internet communication over IPv4, use a NAT gateway instead.
Carrier Gateway
A carrier gateway is a VPC component that allows connectivity between AWS and your on-premises network using AWS Direct Connect or AWS Site-to-Site VPN. It is specifically designed for use with AWS Outposts, enabling communication between your Outposts and the internet, or between your Outposts and other AWS services. The carrier gateway supports both IPv4 and IPv6 traffic and provides a highly available and redundant connection.
A carrier gateway is used when you need to connect your Outposts to the internet or to other AWS services, ensuring that your on-premises applications can communicate seamlessly with AWS resources.
NAT Gateway
A NAT gateway is a Network Address Translation (NAT) service. You can use a NAT gateway so that instances in a private subnet can connect to services outside your VPC but external services cannot initiate a connection with those instances.
When you create a NAT gateway, you specify one of the following connectivity types:
Public – (Default) Instances in private subnets can connect to the internet through a public NAT gateway, but cannot receive unsolicited inbound connections from the internet. You create a public NAT gateway in a public subnet and must associate an elastic IP address with the NAT gateway at creation. You route traffic from the NAT gateway to the internet gateway for the VPC. Alternatively, you can use a public NAT gateway to connect to other VPCs or your on-premises network. In this case, you route traffic from the NAT gateway through a transit gateway or a virtual private gateway.
Private – Instances in private subnets can connect to other VPCs or your on-premises network through a private NAT gateway. You can route traffic from the NAT gateway through a transit gateway or a virtual private gateway. You cannot associate an elastic IP address with a private NAT gateway. You can attach an internet gateway to a VPC with a private NAT gateway, but if you route traffic from the private NAT gateway to the internet gateway, the internet gateway drops the traffic.
A NAT gateway is for use with IPv4 traffic only. To enable outbound-only internet communication over IPv6, use an egress-only internet gateway instead.
You are going to create an Internet Gateway.
- Click on Internet Gateways (located on the left side under Virtual private cloud).
- Click Create internet gateway (located in the top left corner)
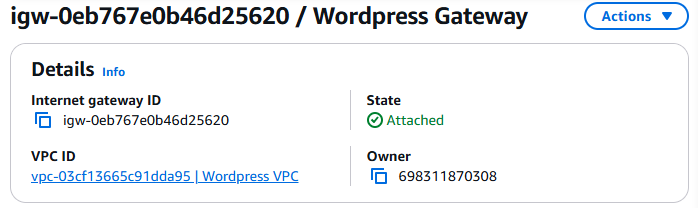
Create a new Internet Gateway with the following:
- Name: Wordpress Gateway
- Click Create internet gateway
- Once created, click on the Actions dropdown and select Attach to VPC.
- In the Available VPCs input field, select your Wordpress VPC.
- Click Attach internet gateway to attach it to your Wordpress VPC.
- Once completed, your Wordpress Gateway should display the following:
Route Tables
You are going to create Route tables in your VPC to allow traffic from within your VPC to be routed externally through the Internet Gateway you created. In the search box at the top, type VPC.
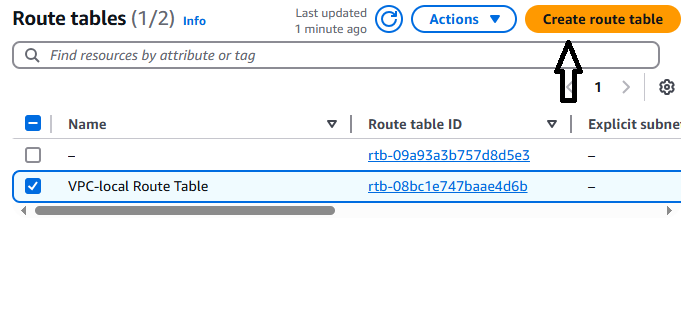
- Click on Route Tables (located on the left side under Virtual private cloud. See screenshot for clarity).
Click on your Route table ID. Find your default route table for your Wordpress VPC and add the name: VPC-local Route Table
Go back to the main Route Tables screen.
Click Create route table (top right corner).
 Create a second route table:
- Name: Wordpress Website Route Table
- VPC: Wordpress VPC
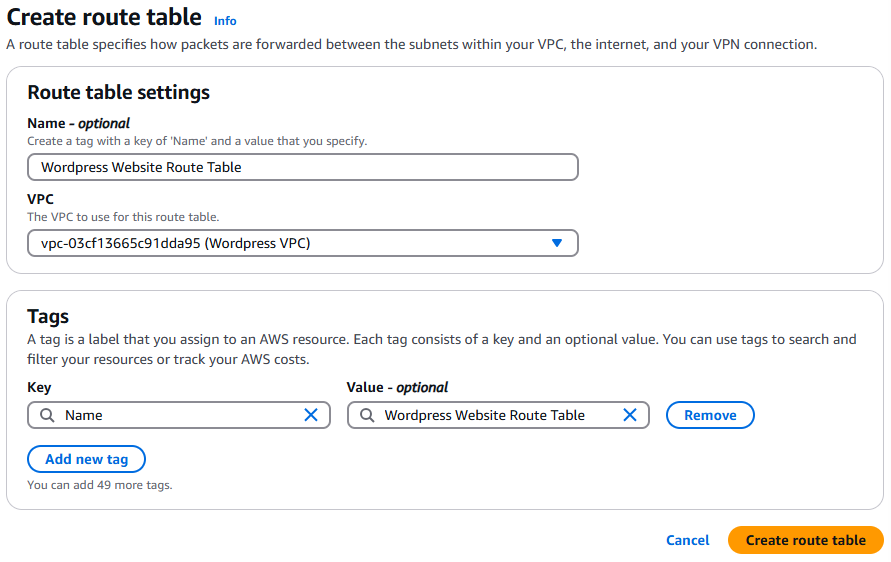
- Click Create route table (bottom right corner).
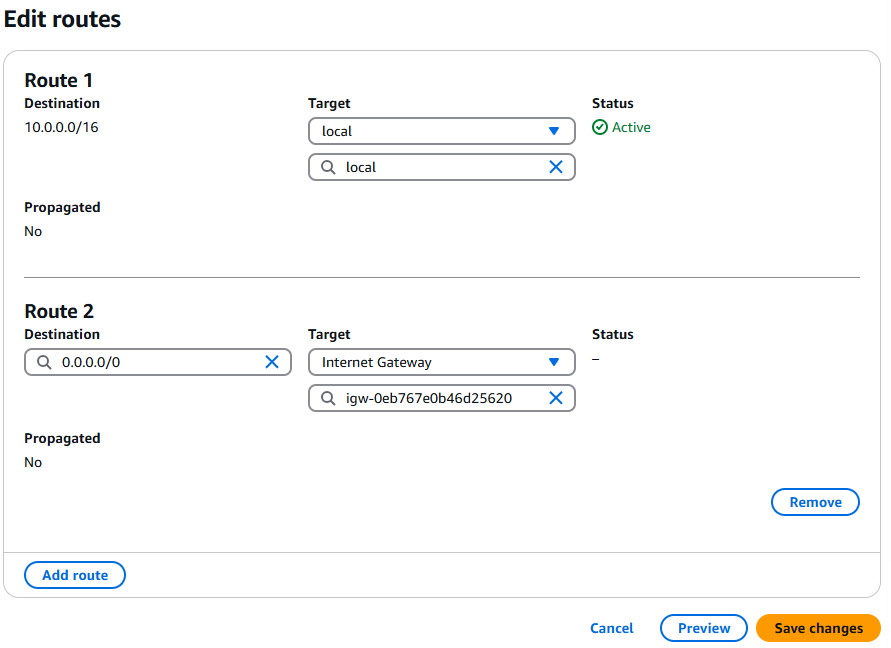
- Click Edit routes and add the following routes. The first route may already exist.
- Route Entry 1:
- Destination: 10.0.0.0/16
- Target: local
- Route Entry 2:
- Destination: 0.0.0.0/0
- Target: Internet Gateway – Wordpress Gateway
- View the following screenshot to confirm your settings are correct. If they are, click Save changes.
Security Groups
Security Group settings are located in the left side navigation under Security > Security Groups. Click on Security Groups. Note: You can access Security groups through EC2 as well (as you did in lab 5). The menu they are under is different.
Click on Create security group and create a security group with the following settings
- Security group name: Wordpress Website SG
- Description: Allows HTTP traffic inbound
- VPC: Wordpress VPC
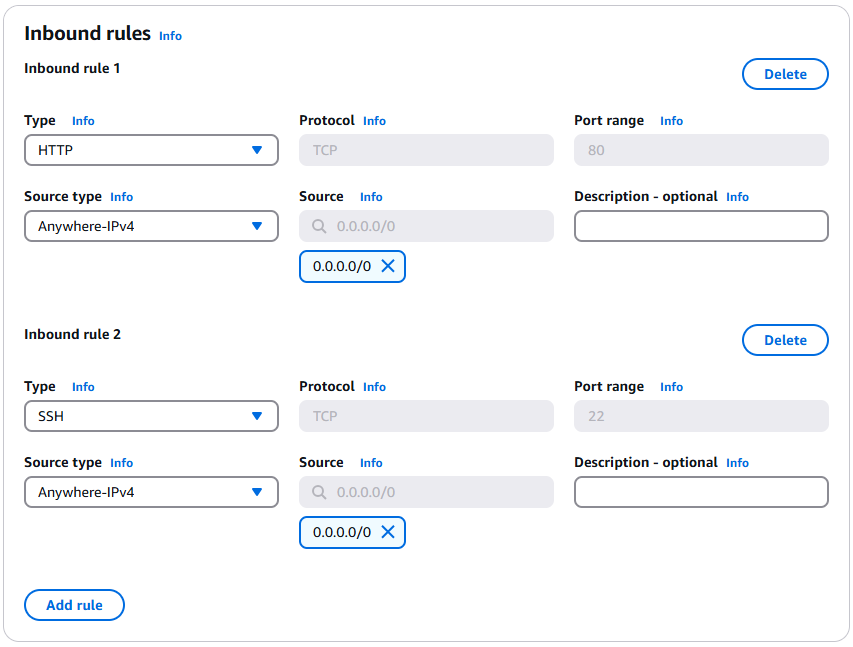
- Inbound Rules:
- Allow HTTP
- Type: HTTP
- Source: Anywhere – IPv4 (0.0.0.0/0)
- Allow SSH
- Type: SSH
- Source: Anywhere – IPv4 (0.0.0.0/0)
Warning: Do not modify the outbound rules.
Verify your inbound rules with the following screenshot.
Click Create security group (bottom right).
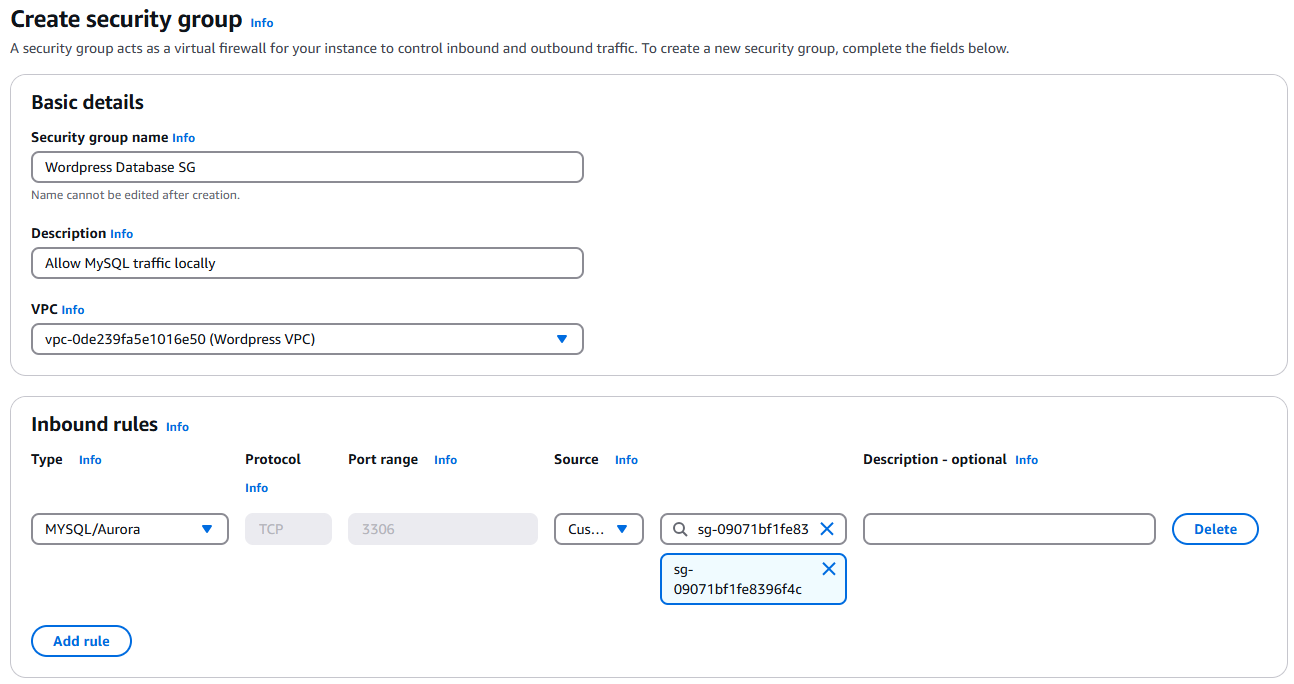
Repeat the above steps to create another security group with the following settings:
- Name: Wordpress Database SG
- Description: Allows MySQL traffic locally
- VPC: Wordpress VPC
- Inbound Rule:
- Type: MYSQL/Aurora
- Source: Custom (Select Wordpress Website SG in the search field)
Warning: Do not modify the outbound rules.
Verify your inbound rules with the following screenshot.
Editing Public Subnet route table associations
Click on Subnets under Virtual private cloud (left side).
Check the box beside Public Subnet 1 Edit both public subnets’ route table associations to: Wordpress Website Route Table
Click Actions > Edit route table association
Select Wordpress Website Route Table in the Route table ID dropdown menu. See the following screenshot.
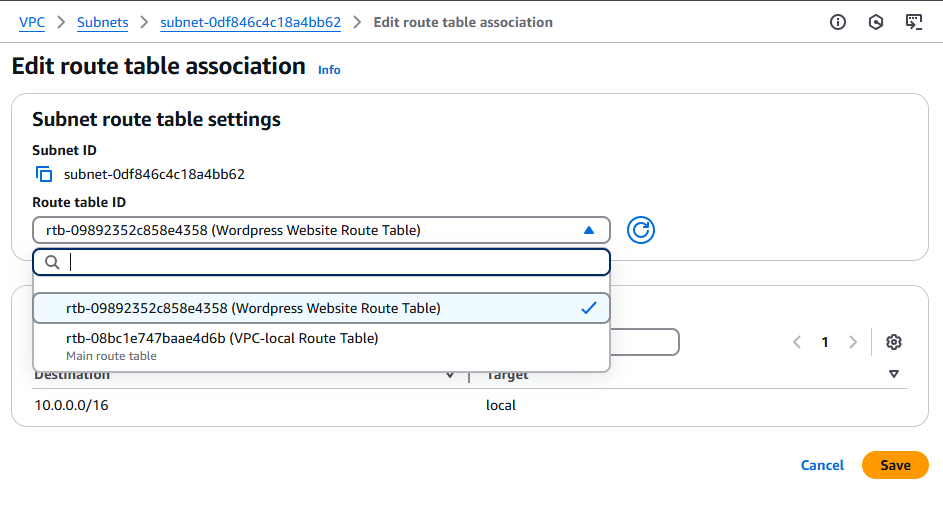
Click save.
Repeat the steps for Public Subnet 2
Creating a new instance (www)
Create a new instance in AWS (like you did in Lab 5), with the following configuration:
- Name: www
- OS: Ubuntu
- Amazon Machine Image (AMI): Make sure Ubuntu Server 24.04 is selected
- Use your existing key pair (from Lab 5). If you lost your key, then generate a new one. Don't lose this one.
- Network Settings: Click edit
- VPC: Select the Wordpress VPC you created.
- Security Group: Select the Wordpress Website Security Group you created.
- Subnet: Select Public Subnet 1
Verify your settings are correct and click Launch Instance.
Once the instance has created, confirm you can connect to it using:
- EC2 Instance Connect
- From the terminal in Codespaces. (If you had to generate a new key, you will need to update the Repository secret for your Dotfiles repo containing the key)
Lab 6 Sign-Off (Show Instructor)
Show your professor the following:
- 4 new subnets (Public Subnet 1, Public Subnet 2, Private Subnet 1 & Private Subnet 2)
- Route Table
- Internet Gateway
- Access to www from EC2 Instance Connect and Codespaces
Exploration Questions
- What is a VPC?
- What are the steps to create a VPC?
- What are subnets and route tables?
- What is an Internet Gateway?
- What comparisons can you make between this lab and the virtual network you created in Lab 3, as well as the nftables configuration from Lab 4?